Algorithm Shop (original) (raw)

2013-12-12
Starting a blog!
Following "the perfect is the enemy of the good", I'm finally going to start my messy and mathy computer blog. In case you are looking to do the same, here is an easy setup that I did for mine. I'm going to be working in Pelican and hosting the static site on Amazon AWS.
Pelican is a static site generator that is easily extensible. Blog posts are written as individual files in a variety of formats (we'll be using Markdown). Pelican will take those posts, run some magic, and then make a big static website out of them. Amazon S3 provides a cheap and reliable way to easily host large static sites with great latency. I got this site up and running while writing this article in an evening.
Create a new virtual environment
All Python projects should start with a virtual environment. I'm using conda these days to manage mine since it makes getting a scientific python stack setup so much easier. Virtual environments are self contained sets of Python packages, which prevents you from having a global system wide install. Creating the environment with Conda is simply a matter of:
conda create -n blogging python=3 anaconda
and you're off to the races. I'm using Python3, but if you would prefer not to, leave out the python=3 bit. If you leave your environment (deactivate) and want to come back to your environment, just type source activate blogging.
To install Conda, just download Anaconda here for whatever OS you have. It's easy.
Install Pelican
The easiest way to get Pelican and Markdown installed after getting conda is just
conda install pelican conda install markdown
If you prefer a source install to get all the latest fixes (though probably better to just use conda):
cd ~/src-install # Where I keep random src installed packages and libraries. git clone git@github.com:getpelican/pelican.git cd pelican python setup.py install conda install markdown # Needed
Set up Amazon S3
Set up an AWS account and then make an S3 bucket with your website's name, configured to be a website. Like so:

- Make a bucket with your website name as the bucket name.
- Note the long amazon endpoint.
- Click the option to enable website hosting.
I have two buckets: algorithmshop.com where I host everything and www.algorithmshop.com which just redirects to algorithmshop.com.
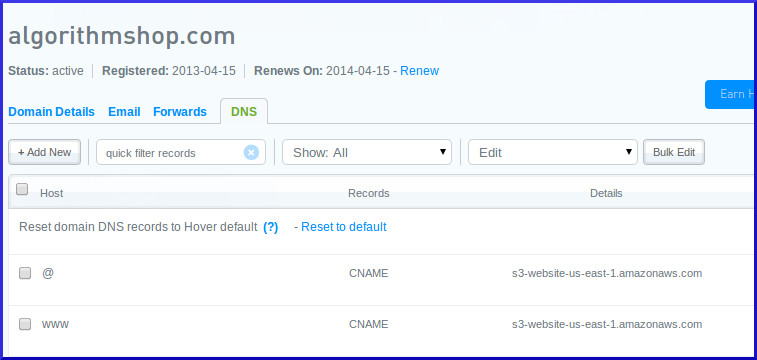
Set this up in DNS
I use Hover as my registrar and DNS provider since it's clean and easy. If you have a domain name in mind, go ahead and purchase it and then go to the DNS options. In Hover, you are going to make CNAME records for @ and for www. Note the Amazon endpoint from your bucket above and then create CNAME records with the Amazon endpoint from above, minus your domain name portion.
This same process will look more or less the same on most other companies too.
Get Google Analytics
If 12 people look at my blog (high hopes!) I want to know that and I want a pretty graph. Go to www.google.com/analytics and set up your account. Note your UA tracking code number (red arrow).
![]()
Set up a Git repo
I use Bitbucket for private personal projects due to the free private repos. They ape Github's interface, so if you are looking for something free, it's an easy option. Set up a repo at Bitbucket or Github, and then clone the repo from the link you see in the repository page.
git clone ssh://git@bitbucket.org/justinvf/algorithm-shop.git # <-- your repo here
Set up your site!
$ cd algorithm-shop # <-- whatever directory was created by git clone above $ pelican-quickstart Welcome to pelican-quickstart v3.3.1.dev.
This script will help you create a new Pelican-based website.
Please answer the following questions so this script can generate the files needed by Pelican.
Where do you want to create your new web site? [.] What will be the title of this web site? Algorithm Shop Who will be the author of this web site? justinvf What will be the default language of this web site? [en] Do you want to specify a URL prefix? e.g., http://example.com (Y/n) What is your URL prefix? (see above example; no trailing slash) http://algorithmshop.com Do you want to enable article pagination? (Y/n) How many articles per page do you want? [10] Do you want to generate a Fabfile/Makefile to automate generation and publishing? (Y/n) Do you want an auto-reload & simpleHTTP script to assist with theme and site development? (Y/n) Do you want to upload your website using FTP? (y/N) Do you want to upload your website using SSH? (y/N) Do you want to upload your website using Dropbox? (y/N) Do you want to upload your website using S3? (y/N) y What is the name of your S3 bucket? [my_s3_bucket] algorithmshop.com Do you want to upload your website using Rackspace Cloud Files? (y/N) Do you want to upload your website using GitHub Pages? (y/N)
[... It will do all sorts of stuff ...]
$ echo "output" > .gitignore # Lets not worry about putting automatically generated stuff in version control $ git add . $ git commit -a -m "Start of the blog" $ git push origin master
This will save all your config files to version control. Always commit before messing with your configs, this way you can always make your way back to a working state.
Once that works, go ahead and make a first post in your content directory.
Title: Math is Fun! Date: 2013-12-12 23:10 Category: Math Slug: GUYS-first-post Author: Justin Vincent Summary: A beginning post about math
So there is this little thing I've been working on.
Viola: 1 * 3 * 0 = 2 * (1 * 3) * 0
Run the devserver locally
and then visit your server running on localhost.
This is looking pretty good with almost no work, but the math is totally ugly. We are doing a math blog and the math is ugly. Pity!

Set up MathJax
MathJax is a JavaScript library that makes math Latex beautiful. We are just going to hack this for now by making some updates to a built in theme, called "notmyidea". This is the theme being used already by default. Taking this route and running with it, we first are going to copy the theme to our blogs root directory.
pelican-themes -l -v /home/justinvf/anaconda/envs/blogging/lib/python3.3/site-packages/pelican-3.3-py3.3.egg/pelican/themes/simple /home/justinvf/anaconda/envs/blogging/lib/python3.3/site-packages/pelican-3.3-py3.3.egg/pelican/themes/notmyidea mkdir themes cp -R /home/justinvf/anaconda/envs/blogging/lib/python3.3/site-packages/pelican-3.3-py3.3.egg/pelican/themes/notmyidea themes/
And now we will edit the file themes/notmyidea/templates/base.html. Lifting an idea from here, we simply add the following to the base.html file right before the closing </head> tag:
    <!-- Using MathJax, with the delimiters $ -->
    <!-- Conflict with pygments for the .mo and .mi -->
    <script type="text/x-mathjax-config">
      MathJax.Hub.Config({
      "HTML-CSS": {
      styles: {
      ".MathJax .mo, .MathJax .mi": {color: "black ! important"}}
      },
      tex2jax: {inlineMath: [['$','$'], ['\\\\(','\\\\)']],processEscapes: true}
      });
    </script>

    <script type="text/javascript" src="http://cdn.mathjax.org/mathjax/latest/MathJax.js?config=TeX-AMS_HTML"></script>
Viola! Now we can type in LaTeX\LaTeXLaTeX like so:
Title: Math is Fun! Date: 2013-12-12 23:10 Category: Math Slug: GUYS-first-post Author: Justin Vincent Summary: A beginning post about math
So there is this little thing I've been working on: I=2πiexp(πi4)−1+i(174−534214)=2π2−12(174−534214)I = 2 \pi i \frac{\exp(\tfrac{\pi i}{4})}{-1+i} \left(\frac{17}{4} - 5^{\frac{3}{4}} 2^{\frac{1}{4}} \right) = 2 \pi 2^{-\frac{1}{2}} \left(\frac{17}{4} - 5^{\frac{3}{4}} 2^{\frac{1}{4}} \right)I=2πi−1+iexp(4πi)(417−543241)=2π2−21(417−543241)
And also this little ditty
\begin{eqnarray} y &=& a x^4 + 4 \\ &=& (\alpha^2+2\gamma)^2 -4x^2 \\ &\le& \sum_{i=0}^{200} i^i \end{eqnarray}
And out pops something that looks decent:

Push to Amazon
We are looking pretty good! Let's ship this and become the next Terry Tao.
The makefile expects the program s3cmd to be installed for the upload. Install it and configure it:
$ sudo apt-get install s3cmd $ s3cmd --configure
This will prompt you for some keys and stuff you can get from your AWS security page.
Open up publishconf.py in your root directory and add your Google Analytics info, as well as Disqus if you will be using that. Now just go ahead and run
Next Steps
Well, you can now make posts in the content folder and have good looking math come out! You will probably want to tweak your Pelican install now that you have a rough working setup. Head over to the Pelican docs and take it from there. If you have some troubles in the install, note them below in the comments so that we can make this easy for everyone. Otherwise, I look forward to reading your first post!