Glow effect text using filters and layer effects. (original) (raw)
Making  from scrap.
Note:
This is a photoshop cs tutorial, and I don’t know if it’s translatable.
If you have earlier photoshop versions, most or even all of the shortcuts (in the brackets) will work.
Open your 100x100 canvas and fill it with black (g) then add your text (t). Make sure your text isn’t too large. (I used the font "neuropol" and got it from dafont dot com.)
There are at least two ways to align your text in the center of your canvas:
1. Menu view – new guide, then type in 50 px once for vertical alignment and once again for horizontal alignment. Then align your text manually.
2. select your whole canvas (ctrl + a), then: layer – align to selection – vertical sections and again for horizontal sections.
That done, we duplicate our text layer and our background layer once (ctrl +j), then make one text layer invisible by pressing this little button [ ]. Then we merge the three remaining layers: layers – merge visible (ctrl + shift +e).
Now we will need our filters.
The first one is the polar coordinate filter: filter – polar coordinate – polar to rectangular.
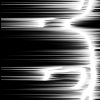
Next, we’ll need the wind-filter, but for this to work properly, we’ll have to flip our canvas by 90° clockwise: image – rotate canvas – 90° CW
That done, we apply the wind filter: filter – stylize – wind.
We will do this thrice; once from the right, once from the left, and once more from the right.
[ ] image example
Now it looks a mess, but we’ll fix that by bringing it back to it’s original state: image – rotate canvas – 90° CCW, and then filter – polar coordinate – rectangular to polar.
[ ] image example
It still looks a mess. The rays look jagged, but we’ll fix that with a radial blur: filter – blur – radial blur. Set it the method to zoom at best quality, and 100 amount.
[ ] image example
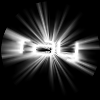
Now we make the top text layer visible again. (If your text layer wasn’t at the top before, make sure it is now.) Select your text by double-clicking on the big “T” in your layer window and then click on one of the foreground-background-squares. Choose black from the window that has opened, and then press enter or ok.
Now duplicate your text layer (ctrl + j) and switch to the layer effects [ ] and check the “outer glow” box.
Here I’ll let you play around with the settings till you find a result to your liking. In the end, mine looked something like this:
[ ]
]
(To not be all too mean, two of my settings were outer glow color = white, and blending mode = screen)
Now select your bottom layer and then image – adjust – hue/saturation (ctrl + u). Check the “color” box, and increase the saturation to your liking, and move the color-bar around, till you find a color you like.
Save image, and you’re done.
[]
For the next icon, I used the leftover text layer and toyed around with the inner shadow and inner glow, selecting colors from the background.
[ ]
]
This icon doesn’t look like much, of course, but maybe you might find some of the things you’ve learned here useful when designing different things that are maybe also bigger than just the 100x100 icon.
Hope this was useful to a few of you, and fun as well.