snaking text #2, tweening, grids, tweening (original) (raw)
 divacita was curious as to how I made
So I’ll show you how it’s done.
I’ve seen a tutorial very similar to this one before myself, but I can’t find it anymore. And besides: It can hardly do any harm to have two similar tuts around, ne?
Off we go, then.
Tutorial aspects today:
[x] snaking text take 2
[x] tweaking grids
[x] tweening
[x] keyboard shortcuts
Difficulty: simple
Software: Photoshop CS3 and earlier. Translatable.
Note:
Shortcuts are in the brackets
Open a new canvas (ctrl + n) with a transparent background. For the other settings, I’d say you choose whatever you’re used to or comfortable with.
Pick a font and a text color. For this, I suggest something semi-wavy like ‘Saginaw,’ ‘Pristina’ or ‘Marka.’ (You can get those brushes by doing a google search with ‘font’ ‘NAME’). Download from wherever you choose to.
Then you’ll need a brush of some sort. Something scribbled would work best here.
I chose a heart-brush by cooliojulio.
If you don’t want to download the whole pack, you could make a brush out of this here, which is in her brush set’s image pack:
[ ]
]
If you don’t know how to make a brush out of an image, please go here. Thank you!
Duplicate your background once (ctrl + j), and then use the brush (b) on it. Move (v) it around on the canvas till it’s positioned as you like it.
Note
If your brush layer doesn’t ‘pop’, you might like to duplicate it two or three times and then merge those layers together.
To do that, you click on each of the layers in your layer palette by holding down the (shift) key to mark them. Then hover over one of the layers and right-click with your mouse. Click on ‘merge layers’ (ctrl + e)
Give your brush-layer a name [e.g. brush], then duplicate it several times. If your canvas and brush-size are relatively small [e.g. 100x100; ~55pt] you might like to duplicate about 15 times or so.
Then, on a new layer (ctrl + shift + n) type in your font, then rasterize it for manipulation: layer -> rasterize -> type.
Move (v) your text to where you want it to be as well.
If your layer isn’t named yet, then do so now. [This is only important because you’ll be erasing most of what’s there in each layer, and if your layers aren’t named, they can be easily confused. I’m sure that many of you know that confusing layers in PS can cause a lot of unnecessary work, and that’s something nobody will want.]
Duplicate (ctrl + j) this layer several times as well. It would be best to have (about) as many font-layers as brush-layers.
While holding down the shift button and your left mouse-button, go over all the visibility icons [ ], except for two. These two, will be your background layer and the ‘original’ font or brush layer. You can choose for yourself where you would like to start. It makes no difference at all.
If you haven’t filled your background with a color already, then do so now. You can either fill it with the foreground color by using the bucket tool (g), or by hitting (alt + backspace). Hitting (shift + backspace) will fill your layer with the background color.
For your next step, it would greatly help to a) zoom in (z or alt + z, depending on your settings) to about 500% if you’re using a small canvas [100x100] and b) use a grid. You can activate your grid by going to view -> show -> grid.
We’ll want a grid that gives us 10x10 boxes. To tweak your grid, you’ll have to go to edit -> preferences -> guides, grids, slices and count, and type in 10 where it says “grid line every:” and type in a smaller value (like 2) where it says “subdivisions:”
[view settings here]
You can hide and reveal your grid by hitting (ctrl + h) on your keyboard.
Before you go on to the next step, I would like to point out that it would be of great help to have two ‘whole’ layers in reserve at all times. Chose one of each of your various layers, and mark them as reserve somehow, either mentally or other (e.g. by renaming them: X and Y).
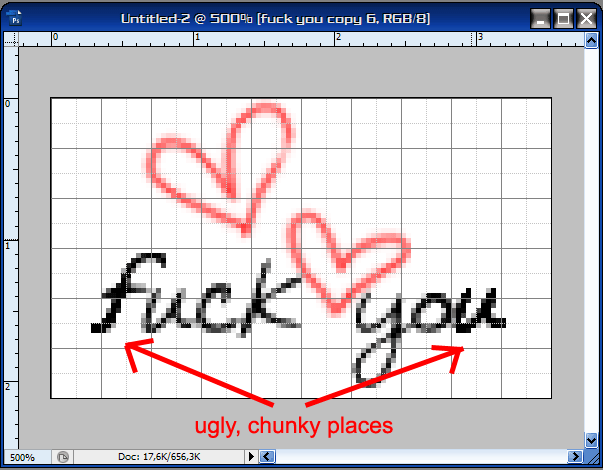
Now you can start erasing (e) parts of your layers one by one. For this type of erasing, I highly recommend brushes with hard edges rather than soft ones. Soft-edges brushes will give you a chunky result in this case.
Before: [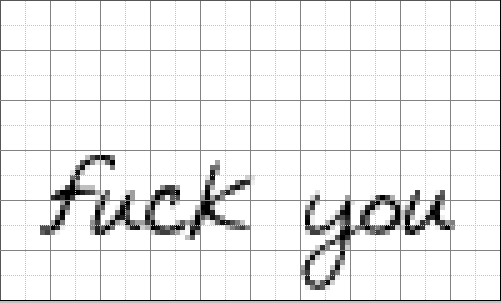 ]
]
After: [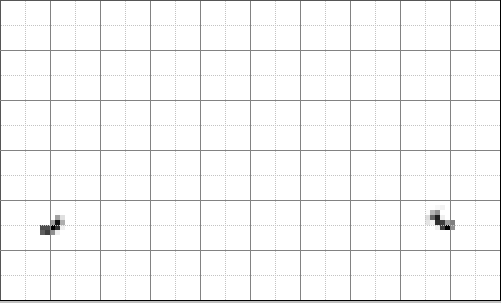 ]
]
Once you have erased the parts you wanted gone on your first layer, make your second layer visible.
Erase every part of this layer, except for that segment adjacent to the one in the layer before. Every part, please. If you don’t you’ll end up with something like this in once you have repeated this step with all of your other layers:
[ ]
]
It would help a lot to have only two layers visible when erasing.
Once you’re done, make all your layers visible again by holding down the (shift) key and running your mouse over the visibility icons.
If you have some blank spaces in your text or brush, you can now correct those by making your reserve layers visible again. Erase every part of that layer except those parts that are ‘blank’ in the overall icon.
If more than one part is ‘blank’ it would be best if you’d duplicate your reserve layer as man times as required before erasing.
[What I mean with ‘blank’ places.]
Once that’s ready, you can switch over to your animation window. If you’re using CS3, go to window -> animation.
If you have an older version of Photoshop, you can open your image in Image Ready by hitting (ctrl + shift + m). The animation window can be found at window -> animation as well.
If this key combination is wrong, please tell me so. I’m doing that from memory.
Before you do that, though, it would be a good thing to save (ctrl + s) your layers as a .psd file. That way, no information will be lost, should Photoshop or IR freeze up on you. Other than that, you’ll be able to edit the layers as they were, rather than having to work on merged layers (the way you do when you open an animated .gif file in IR).
Photoshop CS3 users will have to save their file as a .psd from the start, since they cannot open a .gif file for manipulation/editing in CS3.
Now you can make your layers visible one by one in the animation window.
In your first frame, only the background layer should be visible.
Hit the duplication button [ ] to duplicate your frame. In this new frame, make the first layer from your layers palette visible. In this case, those would be your first text-layer and your first brush-layer.
Duplicate that frame, and make your two second layers visible, and so on.
Once you’re done, you can hit the tween button [ ]. A new window will open. [Example] Type in a value of your choice in the “frames to add” box. The option “tween with” is likely set to “previous frame” now. Change that to “first frame” and hit enter.
For more detailed information on tweening, you can visit this tutorial. Thank you!
Now you can tweak your ‘time line’ to your liking.
I chose 2,5 seconds for the first, 0,05 second from the second all the way through to the second to last (before the tweening), 1 second for the one before tweening, and 0 seconds for all the tweened layers.
You can either set the time for your frames one by one, or you can select multiple frames by clicking on one, and clicking on another while holding down the (shift) key. All the frames in between those two will then be selected. Set the time for one of these frames, and all the others will have the same setting after that.
You can unselect single frames by holding down the (control) key and clicking on the one you’d like deselected.
Once you’re ready, save your image (ctrl + shift + alt + s) as a .gif, and you’re done.
Depending on how many frames and colors your animation has, you might have to optimize your file size so you can upload it to Livejournal as an icon.
If you don’t know how to do that, then please click here. (Image Ready users)
If you’re a CS3-user, you’ll have to do things slightly differently. You’ll have to choose the ‘optimize to file size’ option from the “save for web devices” window.
Ok. That was all for now.
I hope you were able to learn something new today!
Till next time, if you like.