Make Your Own Wooden Toy Cars (original) (raw)
Feature Mon May 18 2009
Every once in a while I look at that big bin of scrap wood in the shop and think I should do something with them. Obviously, most are odd shaped pieces and relatively small, but it would be a waste to just through them away, so why not make some toy cars?
Kids like toys, kids like cars. Toys can be expensive, so making some toys is a no-brainer. Making toy cars isn't really hard: a piece of wood is cut into a car-like shape, and some wheels are put on to make the toy functional. Not hard at all. What I'm going to do is show how easy this can be and show some different interpretations of the idea of moving toys.
What You'll Need
Scrap wood or equivalent new wood. Any kind of wood can be used to make a toy car. Softer woods like pine and fir are preferred because dense woods such as oak are hard to hand cut. Most of my scrap wood is either 3/4" birch plywood or 1" x 4" pine. All of the cars I made are more of a silhouette shape, because I used thin woods.
Quarter-inch dowel rods, wheels and non-toxic wood glue. These can be found at any local craft-type store. The size of wheel can be determined by the size of car you are building. A large car with tiny wheels might look a bit odd, but that's up to you. Making your own wheels isn't out of the question. I once made a few sets of wheels with a 2" circle saw bit.
A drill or drill press with a 9/32" bit and a small woodboring bit about 3/4" or a forstner bit. The 9/32" bit is for the axle holes while the woodboring or forstner bits are for making things like windows on the car -- this, of course, is an option and not factory equipment.
A way to cut wood. Band saws and scroll saws are ideal for cutting, but you can use jig saw or a coping saw. I used a band saw for most of the cuts on my cars and a coping saw for the axles.
How to Do It
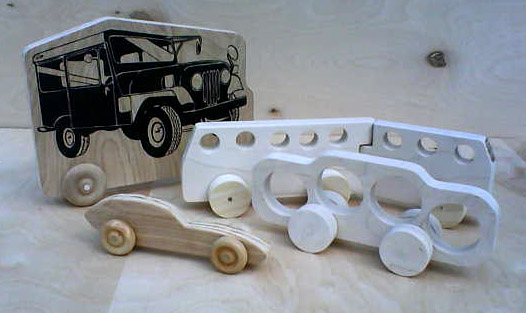
First off, you need to decide what kind of vehicle you want to make. Sometimes the shape can be determined by the dimensions of your scrap wood: if the wood already has a race car shape, build a race car. The two vehicles made from a piece of 1" x 4" emulated a sedan and a CTA articulated bus. As for the other cars, the sports car was made from a small piece of plywood and the jeep from a larger one.
If your wood is relatively unremarkable with no real angles or cuts, you can cut your wood to any desired shape you feel comfortable with. To do this I suggest drawing the desired shape out first and transferring it to the wood. Simple shapes are best: the more elaborate, the more cuts you need to make. Toy cars don't necessarily need to be strictly car shaped either, so you can do whatever shape you feel comfortable cutting. For example, you could make a duck with wheels or any sort of other object.
It's time for cutting. Always use appropriate safety guidelines when using power tools as well as hand tools. Cut your wood to shape by following your hand-drawn lines. Depending on the tool you use to make the cuts, this could be really easy or hard. Once you have the desired shape, decide on the placement of your wheels, which should be about 1/2" from the bottom. Mark where you want the axles to be, then use the 9/32" bit to make the holes with your drill or drill press. Use a slightly larger bit than the dowel rod to leave some turning room for the axle. Make sure the holes are somewhat even with each other or you alignment might be off. If your design calls for windows, cut or drill them now.
One of the most fun parts of building a toy car is the sanding -- getting all the edges smooth and free of splinters and edges. It's best to have as few harsh angles as possible. After sanding all the edges down, you can paint the car. Painting isn't mandatory but adds to the life of the toy. One reason to keep the toy natural would be for your child to paint it or to use crayons to color the toy. Varnish, sand and repeat.
Now you can test fit the wheels and axles. Most store bought wheels can be bought with many different size holes, but for our sake let's say we are using 2" wheels with a 1/4" hole. Using a coping saw, cut the dowel rod to a length just longer than two wheels and the width of the toy. The wheels should have a bit of play from the body. With the cut axle, dab one end with some wood glue and fit in the hole in the wheel. Only glue one side of the axle. Repeat with the second axle and so on, letting the glue set over night. When dry, put the axle through the hole in the body and glue the second wheel on. Let it dry. Now you have a finished your wood toy car.
If you're looking for something more, the variation I used on the jeep can be useful. I used an image of an existing jeep and painted it on a piece of plywood. Afterwards, I cut out the shape. While the shape doesn't look like a jeep, the image conveys it. This idea can be done with unlimited options, such as an octopus or owls or an octo-owl.
