Python | grid() method in Tkinter (original) (raw)
Last Updated : 21 Aug, 2024
The **Grid geometry manager puts the widgets in a 2-dimensional table. The master widget is split into a number of rows and columns, and each “cell” in the resulting table can hold a widget. The **grid manager is the most flexible of the geometry managers in Tkinter. If you don’t want to learn how and when to use all three managers, you should at least make sure to learn this one. Consider the following example – 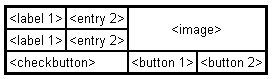
Creating this layout using the **pack manager is possible, but it takes a number of extra frame widgets, and a lot of work to make things look good. If you use the grid manager instead, you only need one call per widget to get everything laid out properly. Using the **grid manager is easy. Just create the widgets, and use the **grid method to tell the manager in which row and column to place them. You don’t have to specify the size of the grid beforehand; the manager automatically determines that from the widgets in it.
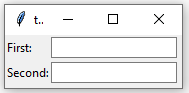
**Code #1:
Python `
import tkinter module
from tkinter import * from tkinter.ttk import *
creating main tkinter window/toplevel
master = Tk()
this will create a label widget
l1 = Label(master, text = "First:") l2 = Label(master, text = "Second:")
grid method to arrange labels in respective
rows and columns as specified
l1.grid(row = 0, column = 0, sticky = W, pady = 2) l2.grid(row = 1, column = 0, sticky = W, pady = 2)
entry widgets, used to take entry from user
e1 = Entry(master) e2 = Entry(master)
this will arrange entry widgets
e1.grid(row = 0, column = 1, pady = 2) e2.grid(row = 1, column = 1, pady = 2)
infinite loop which can be terminated by keyboard
or mouse interrupt
mainloop()
`
**Output:
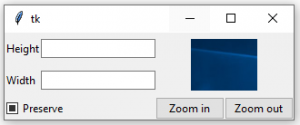
**Code #2: Creating the layout which is shown above.
Python `
import tkinter module
from tkinter import * from tkinter.ttk import *
creating main tkinter window/toplevel
master = Tk()
this will create a label widget
l1 = Label(master, text = "Height") l2 = Label(master, text = "Width")
grid method to arrange labels in respective
rows and columns as specified
l1.grid(row = 0, column = 0, sticky = W, pady = 2) l2.grid(row = 1, column = 0, sticky = W, pady = 2)
entry widgets, used to take entry from user
e1 = Entry(master) e2 = Entry(master)
this will arrange entry widgets
e1.grid(row = 0, column = 1, pady = 2) e2.grid(row = 1, column = 1, pady = 2)
checkbutton widget
c1 = Checkbutton(master, text = "Preserve") c1.grid(row = 2, column = 0, sticky = W, columnspan = 2)
adding image (remember image should be PNG and not JPG)
img = PhotoImage(file = r"C:\Users\Admin\Pictures\capture1.png") img1 = img.subsample(2, 2)
setting image with the help of label
Label(master, image = img1).grid(row = 0, column = 2, columnspan = 2, rowspan = 2, padx = 5, pady = 5)
button widget
b1 = Button(master, text = "Zoom in") b2 = Button(master, text = "Zoom out")
arranging button widgets
b1.grid(row = 2, column = 2, sticky = E) b2.grid(row = 2, column = 3, sticky = E)
infinite loop which can be terminated
by keyboard or mouse interrupt
mainloop()
`
**Output:
**Warning: Never mix **grid() and **pack() in the same master window.