JDBC - How to connect Eclipse to Oracle Database - Step by Step Guide Example (original) (raw)
Though I prefer Toad or Oracle SQL Developer tool to connect Oracle database, sometimes it's useful to directly connect Eclipse to Oracle using JDBC using its Data Source Explorer view. This means you can view data, run SQL queries to the Oracle database right from your Eclipse window. This will save a lot of time wasted during switching between Toad and Eclipse or Oracle SQL Developer and Eclipse. Eclipse also allows you to view the Execution plan in both text and Graphical mode, which you can use to troubleshoot the performance of your SQL queries.
In this article, I'll tell you the steps to connect Eclipse to the Oracle database. Since Eclipse uses Java to connect to the Oracle database, it asks for JDBC driver information. Since connecting using a thin Oracle JDBC driver is much easier, as you just need to drop a JAR file in the classpath, we will be using JDBC thin driver to connect Oracle from Eclipse.
Depending upon your Oracle version e.g. Oracle 10g or Oracle 11g you need to download Oracle JDBC thin driver like ojdbc14.jar file. Just download this JAR file and configure it on Eclipse IDE. Enter the username, password, and sid and you are ready to execute the SQL query to the Oracle database from Eclipse.
In order to connect to the Oracle database instance, you need two things:
Eclipse IDE for Java EE developers, because that contains the database development plugin which doesn't come along with Eclipse IDE for Java developers. You can download the latest version of Eclipse IDE for Java EE developers here.
Oracle JDBC JAR, since Eclipse uses JDBC to connect to the Oracle database it needs JDBC driver JAR for Oracle. You can use any type of JDBC driver, but I prefer Oracle JDBC thin driver like ojdbc14.jar file to connect to Oracle 11g instance. If you don't have one, you can download it from here.
Once you have these two things, we are ready to connect to any local or remote Oracle database instance from Eclipse IDE. I am using Eclipse Java EE IDE for Web Developers, Version: Kepler Service Release 2.
Steps to connect Oracle database from Eclipse
The steps are exactly similar to what I have shown you before while connecting to Microsoft SQL Server from Eclipse IDE, here, the only difference is, this time, we are choosing Oracle from the list of databases and installing Oracle JDBC driver instead of SQL Server JDBC driver.
Here are the exact steps to connect the Oracle instance from Eclipse:
- Open Eclipse IDE and Select Database Perspective (Windows >> Open Perspective >> Other >> Database Development).
- Create Connection Profile, Chose Oracle
- Choose JDBC Driver and specify its location
- Specify connection detail e.g. host, port, username, and password
- Test Connection
Tips like this save a lot of time and improve productivity and that's why I have always said that a good understanding of Eclipse IDE is a must to become an expert Java J2EE developer and developers should spend some time learning their tools e.g. Eclipse.
If you are primarily a Java EE developer then you can also take a look at Ram Kulkarni's Java EE Development with Eclipse book, which will help you to write code, debug, test, and troubleshoot Java EE 7 applications right from the Eclipse IDE.

Now, let's see each step in little bit of detail with a screenshot if you are ready to connect to the Oracle database from Eclipse, follow it along:
Step 1: Open Eclipse IDE and Select Database Perspective
In order to open the Database Development perspective go to Windows >> Open Perspective >> Other >> Database Development, as shown below:

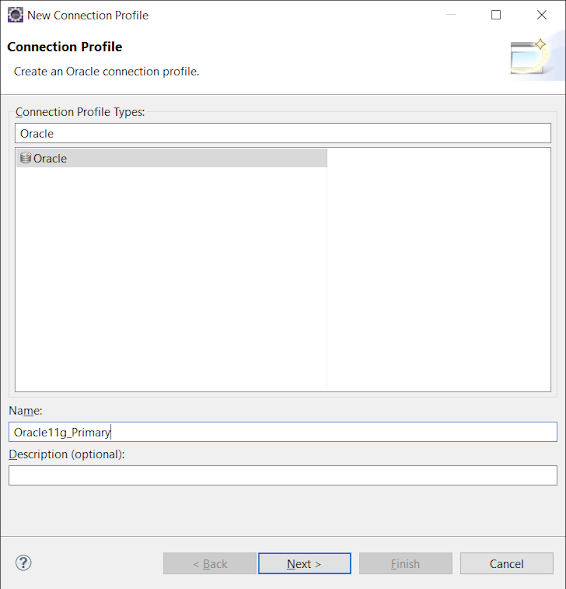
Step 2: Create Connection Profile
For creating a new connection profile, select the "Database Connection" at the top left in the Database Development view, right-click and select "New Connection". This will open the New Connection Profile window as shown below. Now type Oracle and give your connection profile a meaningful name e.g. combination of application, host, and instance.
Step 3: Choose JDBC Driver and specify its location
Once you have selected the database, it's time to select the JDBC driver. To configure JDBC driver, just click the setting icon on the previous screen as shown below:

After that, the following screen will open which will list down all JDBC drivers for supported Oracle versions e.g. Oracle 10g, Oracle 11g, and JDBC thin driver or other drivers. I have chosen the Oracle Thin Driver to connect Oracle 11g as seen below:

Once you select a particular driver, you can see the error message appear at the top saying "Unable to locate JAR/ZIP in the file system as specified by the driver definition: ojdbc14.jar", this means you need to locate the path of this JAR in your local file system, as shown below. If you don't specify the correct JAR, you will get "java.lang.classnotfoundexception oracle.jdbc.driver.oracledriver" error.

Once you are done, click Ok and then it will take you to the previous screen. Click next there.
Step 4: Specify Database Connection details
Now, it's time to specify the database connection details e.g. host, port, sid, username, and password required to connect to an Oracle database instance.

Step 5: Test Connection
Once you are done with putting connect detail, just click the "Test Connection" button, if everything is good then you will see a ping succeed message, if not then you will see a "ping failed" message.
That's all about how to connect Eclipse to Oracle database using Java and JDBC. This is an immensely helpful tip if your application is using Oracle database at the backend and you frequently need to select, update or delete data.