AC Voltage Measurement using Arduino - Difference Amplifier Technique (original) (raw)
In this article, we will see how to measure ac voltage using Arduino. This same project can also be used for AC voltage peak detection that is an AC voltage detector circuit using Arduino Uno. Firstly, we will see a difference amplifier method to design a voltage sensor using an operational amplifier. In the end, we will see an Arduino example sketch to measure AC voltage and display RMS value on 16×2 LCD.
Arduino AC Voltmeter
This Arduino project will be a simple Arduino based AC voltmeter that can measure 220 volts very easily and without any need for an external sensor. By using a operational amplifier as a different amplifier, we will step down 220V AC into voltage level which ADC of Arduino can measure.
We will also post articles on how to measure AC current, AC power, power factor using Arduino.
We have already written articles on all these topics using a pic microcontroller. But at the request of users, I will be also writing these articles using Arduino.
Check the following articles which are based on pic microcontrollers.
- Ac voltage measurement using pic microcontroller
- Ac current measurement using pic microcontroller
- three phase voltage measurement using pic microcontroller
- three phase power measurement using pic microcontroller
- power factor measurement using pic microcontroller
- power factor controller using pic microcontroller
So now let’s see how to measure ac voltage using Arduino and how to design ac voltage sensor using Arduino and I recommend you to check Arduino tutorials and Arduino projects first if you are a beginner in Arduino programming.
Required Components
Followings are the main components required for the design of ac voltage detector with Arduino:
- Arduino Uno R3: It is the main component of this project. It measures analog voltage with the help of built-in analog channels and converter the analog measured voltage into a digital value and then we convert this measure digital value back into a voltage by multiplying it with the resolution factor of Arduino ADC.
- 16 x 2 LCD: Liquid crystal display is used to display measured voltage value. If you don’t know how to interface LCD with Arduino, I suggest you check this tutorial on lcd interfacing with Arduino.
- Difference amplifier: In this alternating voltage measurement method, difference amplifier is used to step down voltage from 220-volt ac to less than 3.3-volt ac. I will explain it in more detail in the next section of this article.
AC Voltage Sensor with Op-Amp
To measure ac voltage with the help of Arduino, first of all, you need to design an alternating current voltage measurement sensor. For example, if you want to measure the voltage of magnitude 220 volt AC. you need to step down this voltage first. Because Arduino has built-in ADC channels and the maximum voltage that the Arduino analog channel can measure is 5 volts. Therefore, we can not measure voltage greater than 5 volts with the help of Arduino analog to digital converter directly. you should also know how to measure an analog voltage with the help of Arduino or how to use the analog channels of Arduino. if you don’t know, check this article on how to measure analog voltage with Arduino.
Step Down AC Voltage
It will give you an idea on how to use analog channel of Arduino. Because it is a first step towards designing ac voltage sensor with Arduino and ac voltage detector meter with Arduino. As I have explained earlier, in this project I have used difference amplifier to step down voltage from 220 volt AC to less than 3.3 volt AC. Because built in ADC of Arduino can not measure voltage more than 5 volt. So we need to find a way to step down voltage. There are many other methods to step down voltage like potential transformer or step down transformer which is a expensive method for low cost applications. Voltage divider method, it is a least expensive method for this purpose. But it has disadvantage of less voltage range and more power consumption. So we can not use it critical power applications.
So I have come up with another method using operational amplifier. I have use operational amplifier for a step down purpose. Operational amplifier is used a difference amplifier. By adjusting the gain of operational amplifier, we step down the voltage to less than 3.3 volt. I have explained all the theory and working of difference amplifier for to step down ac voltage in separate article on ac voltage measurement using pic microcontroller. I recommend you to check it, if you want to get more understanding about this method.
Step Down Voltage Circuit using Op-Amp
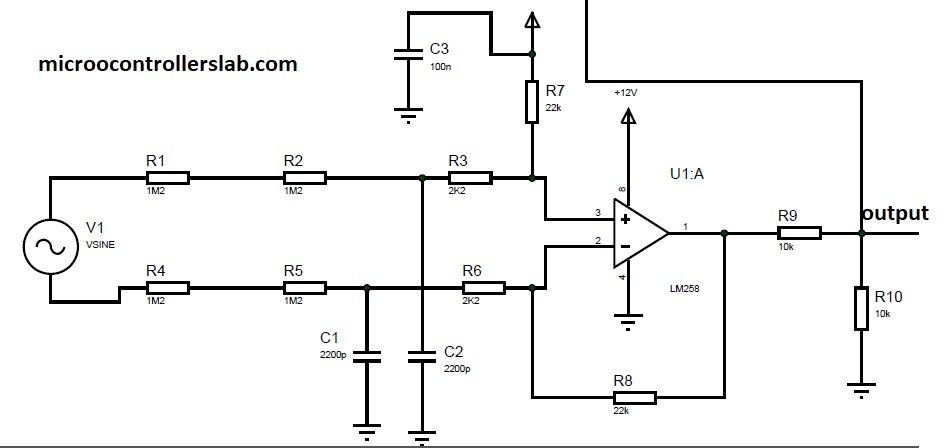
In this circuit, LM358 op-amp is used as a difference amplifier. Circuit diagram of difference amplifier is given below:
Input to difference amplifier is 220 volt ac and output of difference amplifier is less than 3.3 volt. I have also added 5 volt dc to ac to convert negative cycle into positive cycle. Because Arduino can not measure negative voltage directly. Again refer to the article on ac voltage measurement using pic microcontroller for more understanding and why I added 5 volt dc level to the circuit. Output of this circuit is fed to analog channel of Arduino which measures this voltage and after performing some calculations displays measured voltage value on LCD.
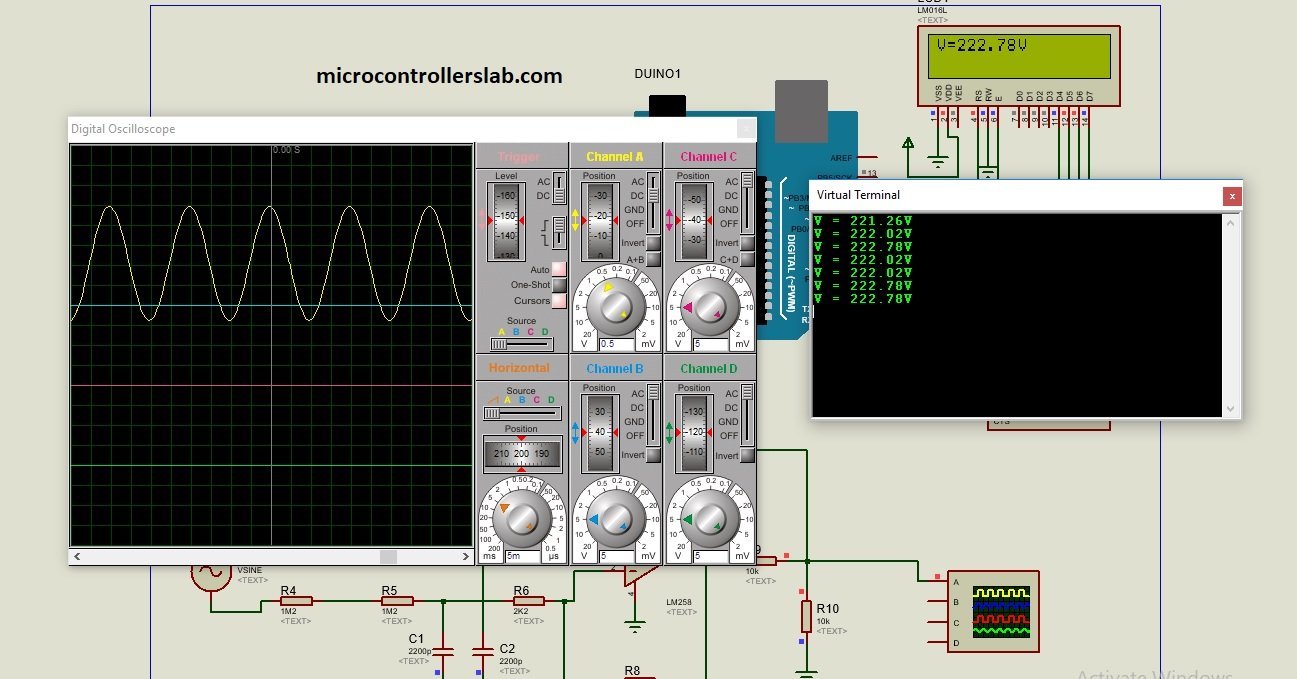
Video simulation in Proteus
Circuit diagram of AC voltage measurement using Arduino
Circuit diagram of ac voltage measurement using Arduino is given below. In this circuit, we used a 16×2 LCD to display voltage value. If you don’t know how to interface an LCD with Arduin, you should read this article:
Arduino Code
#include <LiquidCrystal.h>  // initialize the library with the numbers of the interface pins
LiquidCrystal lcd(12, 11, 5, 4, 3, 2);
const int sensorIn = A3;
double Voltage = 0;
double VRMS = 0;
int i;

void setup(){
 Serial.begin(9600);
 lcd.begin(16,2); // set up the LCD’s number of columns and rows:
}

void loop(){

  VRMS = voltage_READ();
  lcd.setCursor(0,0);
  lcd.print("V=");
  lcd.print(VRMS);
  lcd.print("V");
  Serial.print("V = ");
  Serial.print(VRMS);
  Serial.println("V");
  delay(1000);
}


 float voltage_READ(void)
 {
 float max;
 int i;
 unsigned int temp=0;
 float maxpoint = 0;
 for(i=0;i<500;i++)
      {
         if(temp =analogRead(sensorIn),temp>maxpoint)
         {
            maxpoint = temp;
         }
      }

maxpoint = maxpoint *(10.0/1023.0);
maxpoint = (maxpoint -5.0);
maxpoint = maxpoint *110.1909091;
 max=maxpoint *.707106781;
 return max;
 }
How Code works?
First include the library of liquid crystal display and define the pin number of Arduino that we connect with 16×2 LCD.
#include <LiquidCrystal.h>
LiquidCrystal lcd(12, 11, 5, 4, 3, 2);
We will use analog channel zero of Arduino (A0). This line defines the name of channel zero as a “sensorIn” pin. By doing this, we will use this symbolic name throughout the code instead of using ADC channel number.
const int sensorIn = A0;We define three global variables to store voltage value, adc digital value and to use with loops executions.
double Voltage = 0; // store ADC value
double VRMS = 0; //store RMS value of voltage
int i; // to keep count of loop value
Inside the setup function, we declare start the LCD library for 16×2 size using lcd.begin() function.
lcd.begin(16,2); // set up the LCD’s number of columns and rowsBefore taking a look inside the loop() function, first lets see the working of voltage_READ() routine.
Voltage Read Function
This is the main code of the Arduino AC voltmeter project. This function measures the peak voltage of the AC waveform and converts the peak voltage into a root mean square (RMS) voltage value.
Inside the AC voltage measurement function, first, we take 500 samples of AC voltage waveform using a for ‘loop’ and analog channel A0 of Arduino. Firstly, we initialize the “maxpoint” float type variable to zero and its value keeps updating with a new value of the ADC sample if the ADC sample value is greater than the currently hold value of “maxpoint”.
for(i=0;i<500;i++)
      {
         if(temp =analogRead(sensorIn),temp>maxpoint)
         {
            maxpoint = temp;
         }
      }
After that, this line converts the digital measured value of ADC into voltage.
maxpoint = maxpoint *(10.0/1023.0);Finally, we get original measured value of voltage by multiplying voltage value with the gain of operational amplifier.
maxpoint = (maxpoint -5.0);
 // subtract DC gain from the signal
maxpoint = maxpoint *110.1909091;
 // multiply with inverse of gain
max=maxpoint *.707106781; // peak to rms conversion- ac current measurement using acs712 hall effect current sensor and Arduino
- Acs712 current sensor interfacing with Arduino for ac and dc current measurement
- power factor meter using Arduino : How to measure power factor
| Arduino Components | Amazon Links |
|---|---|
| Arduino Starter Kit | Buy Now |
| Arduino Development Kit | Buy Now |
| Arduino Smart Robot Car Kit V4 | Buy Now |
| Arduino Sensors Kit | Buy Now |


