Genital Beading - BME Encyclopedia (original) (raw)
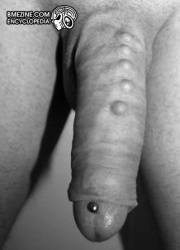
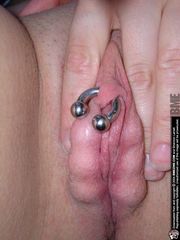
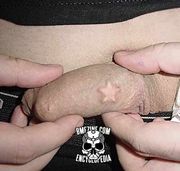
Genital beading is a body modification which involves the of beads under the skin of the shaft of the penis. These are done primarily for the purpose of physical stimulation (for both the wearer and their partner), as well as everywhere for aesthetic reasons.Genital beading is more commonly done by men, but, recently, a handful of women have adapted this mod as well.
It is important to note that not all sexual partners enjoy the feeling of genital beads. If your partner doesn't like studded dildos and condoms, you may want to consider not getting this modification. Also, the legality of this procedure varies from region to region, but in general, similar laws apply to small-scale beading as apply to genital piercing.
Contents
- Photos
- Placement
- Materials
- Procedure
- Healing and Aftercare
- Alternative Names
- See Also
- Related Risks
- External Links
Photos
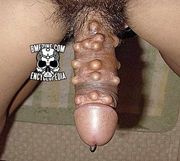
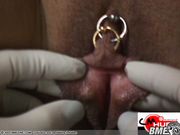
Male Genital Beading (Please note that these photos above show fairly large beads. Far more subtle ones are available to those who are seeking something less extreme.)
Male Genital Beading By Jonathan Martinez (Please note that these photos above show fairly large beads. Far more subtle ones are available to those who are seeking something less extreme.)
Placement
For men, shaft skin and the foreskin can fairly easily heal genital implants, but they are not possible in the same context in the glans (head) of the penis, nor are they possible deeper under the skin (see deep genital implants for more on that procedure).
Materials
Usually spherical 1/4" stainless steel, titanium, silicone, niobium or PTFE beads are used, but there are numerous other options both in terms of size and shape. It is important that the material be biocompatible to minimize risks.
Procedure
Genital beads are usually placed by using one of two methods:
Piercing Technique
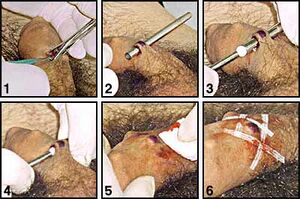
Beads can be placed using a technique very similar to a frenum piercing, except that the jewelry is left entirely inside the wound, rather than with the ends protruding. When the entrance and exit holes heal, the bead is thus trapped inside. The piercing is made with either a scalpel or a large gauge piercing needle. A taper follows, enlarging the hole to accept the bead, which is pushed by a second rod. The taper and the pusher rod (often combined into a beading tool) place the bead, and are then removed. The incisions are usually closed with either a standard suture or a butterfly bandage. Genital Ribs are typically placed using this method as well.
- Pros: Simple and fast procedure, no more painful, invasive, or complex than a genital piercing. Suitable for normal piercing studios and home practitioners.
- Cons: Two incisions required per bead (entrance and exit of needle), and limited in terms of maximum bead size.
- Making the incision. In this case, a scalpel is being used, but a larger gauge needle (8ga and up) is also an option.
- Inserting the first (leading) taper.
- Holding the bead between the taper and the pusher rod.
- Placing the bead.
- The bead is in place. The purple discoloration is just surgical marker, indicating that the bead is in the right location.
- The incisions have been closed with surgical tape.
Implant Technique
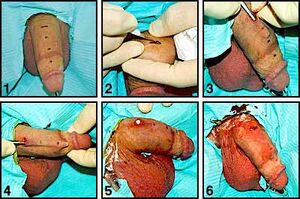
Genital beads can also be placed in a similar method to a standard 3D art-style. A single incision is made a short distance from the first bead. A spatula is inserted into this incision and used to create a "pocket" or "tunnel" under the skin. Beads are pushed into this pocket which is then sutured or bandaged closed. Tape or other pressure may be applied to help keep the beads from shifting along the channel. This is the most common method for female genital beading.
- Pros: Allows for almost anything in terms of size and shape to be implanted. Only a single incision is required, even if an entire row of beads is implanted, resulting in no scarring other than the one incision, which can be hidden at the base of the penis.
- Cons: Invasive and requires medical knowledge in addition to standard piercing techniques, as well as being more painful.
- Incision point (top) and the proposed locations for a three-bead ladder have been indicated with surgical marker.
- Making the incision. This is the only incision that has to be made for all three beads.
- Using a dermal elevator/separator to create the channel for the beads.
- Finishing the pocket for the implants.
- Inserting the first implant. Some artists do this by hand, while others use tools.
- The incision has been sutured closed, and the procedure is complete. After this, tape may be added to help minimize migration for the first couple days.
Healing and Aftercare
Once in place, the implants are, essentially, permanent, although they can be surgically removed. Assuming the bead is of a high-quality material and was placed with proper attention to anatomy and sterility concerns, healing beading should be relatively uneventful and trouble-free. Other than regular washing, no aftercare should be required (if sutures were used, they can be taken out at home about a week later using cuticle scissors and tweezers). In the rare case that beadings become infected, a doctor will probably prescribe antibiotics. Because there is no real way for these modifications to drain, in the case of infection, you may be required to have the implants removed. In very rare cases (usually due to poor placement, but not always), rejection can happen, where the implant first blisters or bruises and then rejects up through the skin like a splinter and falls out. Migration, where the beads shift around under the skin and change their layout, is quite common. It can be minimized by giving the beads time to heal (as the skin layers reattach, they should bind the beads in place), but even that can't guarantee it, so do be prepared for beads not to look 'perfect.
Alternative Names
- Pearling is a type of genital beading using real pearls instead of metal or plastic beads —although some people refer to all forms of genital implantation as pearling.
- Yakuza Beads is a reference to a supposed Yakuza ritual of placing one pearl under the skin of the penis for every year spent behind bars.
- Speed Bumps
See Also
External Links
- BME/Extreme Gallery
