Metrics in Drafting - Pen Sizes and Line Types (original) (raw)


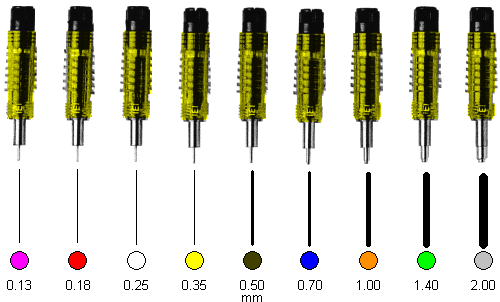
The ISO defines a set of standard metric line widths for drafting.

Like the ISO A and B series sheet sizes, the pen sizes increase by a factor of  2. This allows additions and corrections to be made on the enlargements or reductions of drawings.
Each width is assigned a color code. The color code corresponds to that for the matching lettering stencil.
Line widths and color codes are standardized across all manufacturers.
Line Types
| Letter | Type of Line | Line Thickness (mm) | Application | ||
|---|---|---|---|---|---|
| A0 | A1 | A2A3A4 | |||
| A | Continuous - thick |
0.7 | 0.5 | 0.35 | Visible outlines |
| B | Continuous - thin |
0.35 | 0.25 | 0.18 | Fictitious outlinesImaginary intersection of surfacesDimension lines, projection lines, intersection lines and leadersHatchingOutlines of revolved sectionsAdjacent parts and toolingFold and tangent bend linesShort centerlines |
| C | Continuous - thin, freehand or ruled with zig-zag |
0.35 | 0.25 | 0.18 | Indication of repeated detailBreak lines (other than on an axis) |
| D | Dashed - medium |
0.50 | 0.35 | 0.25 | Hidden outlines |
| E | Chain - thin |
0.35 | 0.25 | 0.18 | CenterlinesPitch linesAlternative position of moving partPath lines for indicating movementFeatures in front of a cutting planeDeveloped viewsMaterial to be removed |
| F | Chain - thick at ends and at change of direction, thin elsewhere |
0.70.35 | 0.50.25 | 0.350.18 | Cutting planes |
| G | Chain - thick |
0.7 | 0.5 | 0.35 | Indication of surfaces to meet special requirements |
