An Application Example That Consumes Messages from a Remote Server (original) (raw)
2. Using the Tutorial Examples
3. Getting Started with Web Applications
4. JavaServer Faces Technology
7. Using JavaServer Faces Technology in Web Pages
8. Using Converters, Listeners, and Validators
9. Developing with JavaServer Faces Technology
10. JavaServer Faces Technology: Advanced Concepts
11. Using Ajax with JavaServer Faces Technology
12. Composite Components: Advanced Topics and Example
13. Creating Custom UI Components and Other Custom Objects
14. Configuring JavaServer Faces Applications
16. Uploading Files with Java Servlet Technology
17. Internationalizing and Localizing Web Applications
18. Introduction to Web Services
19. Building Web Services with JAX-WS
20. Building RESTful Web Services with JAX-RS
21. JAX-RS: Advanced Topics and Example
23. Getting Started with Enterprise Beans
24. Running the Enterprise Bean Examples
25. A Message-Driven Bean Example
26. Using the Embedded Enterprise Bean Container
27. Using Asynchronous Method Invocation in Session Beans
Part V Contexts and Dependency Injection for the Java EE Platform
28. Introduction to Contexts and Dependency Injection for the Java EE Platform
29. Running the Basic Contexts and Dependency Injection Examples
30. Contexts and Dependency Injection for the Java EE Platform: Advanced Topics
31. Running the Advanced Contexts and Dependency Injection Examples
32. Introduction to the Java Persistence API
33. Running the Persistence Examples
34. The Java Persistence Query Language
35. Using the Criteria API to Create Queries
36. Creating and Using String-Based Criteria Queries
37. Controlling Concurrent Access to Entity Data with Locking
38. Using a Second-Level Cache with Java Persistence API Applications
39. Introduction to Security in the Java EE Platform
40. Getting Started Securing Web Applications
41. Getting Started Securing Enterprise Applications
42. Java EE Security: Advanced Topics
Part VIII Java EE Supporting Technologies
43. Introduction to Java EE Supporting Technologies
45. Resources and Resource Adapters
46. The Resource Adapter Example
47. Java Message Service Concepts
48. Java Message Service Examples
Writing Simple JMS Applications
A Simple Example of Synchronous Message Receives
Writing the Clients for the Synchronous Receive Example
JMS Administered Objects for the Synchronous Receive Example
Running the Clients for the Synchronous Receive Example
A Simple Example of Asynchronous Message Consumption
Writing the Clients for the Asynchronous Receive Example
To Build and Package the AsynchConsumer Client Using NetBeans IDE
To Deploy and Run the Clients for the Asynchronous Receive Example Using NetBeans IDE
To Build and Package the AsynchConsumer Client Using Ant
A Simple Example of Browsing Messages in a Queue
Writing the Client for the QueueBrowser Example
To Run the MessageBrowser Client Using NetBeans IDE
To Run the MessageBrowser Client Using Ant and the appclient Command
Running JMS Clients on Multiple Systems
To Create Administered Objects for Multiple Systems
Changing the Default Host Name
To Run the Clients Using NetBeans IDE
To Run the Clients Using Ant and the appclient Command
Undeploying and Cleaning the Simple JMS Examples
Writing Robust JMS Applications
A Message Acknowledgment Example
To Run ackequivexample Using NetBeans IDE
To Run ackequivexample Using Ant
A Durable Subscription Example
To Run durablesubscriberexample Using NetBeans IDE
To Run durablesubscriberexample Using Ant
To Run transactedexample Using NetBeans IDE
To Run transactedexample Using Ant and the appclient Command
An Application That Uses the JMS API with a Session Bean
Writing the Application Components for the clientsessionmdb Example
Coding the Application Client: MyAppClient.java
Coding the Publisher Session Bean
Coding the Message-Driven Bean: MessageBean.java
Creating Resources for the clientsessionmdb Example
Running the clientsessionmdb Example
To Run the clientsessionmdb Example Using NetBeans IDE
To Run the clientsessionmdb Example Using Ant
An Application That Uses the JMS API with an Entity
Overview of the clientmdbentity Example Application
Writing the Application Components for the clientmdbentity Example
Coding the Application Client: HumanResourceClient.java
Coding the Message-Driven Beans for the clientmdbentity Example
Coding the Entity Class for the clientmdbentity Example
Creating Resources for the clientmdbentity Example
Running the clientmdbentity Example
To Run the clientmdbentity Example Using NetBeans IDE
To Run the clientmdbentity Example Using Ant
An Application Example That Deploys a Message-Driven Bean on Two Servers
Overview of the sendremote Example Modules
Writing the Module Components for the sendremote Example
Coding the Application Client: MultiAppServerClient.java
Coding the Message-Driven Bean: ReplyMsgBean.java
Creating Resources for the sendremote Example
To Enable Deployment on the Remote System
To Use Two Application Servers for the sendremote Example
Running the sendremote Example
To Run the sendremote Example Using NetBeans IDE
To Run the sendremote Example Using Ant
To Disable Deployment on the Remote System
49. Bean Validation: Advanced Topics
50. Using Java EE Interceptors
51. Duke's Bookstore Case Study Example
52. Duke's Tutoring Case Study Example
53. Duke's Forest Case Study Example
This section and the following section explain how to write, compile, package, deploy, and run a pair of Java EE modules that run on two Java EE servers and that use the JMS API to interchange messages with each other. It is a common practice to deploy different components of an enterprise application on different systems within a company, and these examples illustrate on a small scale how to do this for an application that uses the JMS API.
The two examples work in slightly different ways. In the first example, the deployment information for a message-driven bean specifies the remote server from which it will consume messages. In the next example, described in An Application Example That Deploys a Message-Driven Bean on Two Servers, the same message-driven bean is deployed on two different servers, so it is the client module that specifies the servers (one local, one remote) to which it is sendingmessages.
This first example divides the example in Chapter 25, A Message-Driven Bean Example into two modules: one containing the application client, and the other containing the message-driven bean.
You will find the source files for this section in the tut-install/examples/jms/consumeremote/directory. Path names in this section are relative to this directory.
Overview of the consumeremote Example Modules
This example is very similar to the one in Chapter 25, A Message-Driven Bean Example, except for the fact that it is packaged as two separate modules:
- One module contains the application client, which runs on the remote system and sends three messages to a queue.
- The other module contains the message-driven bean, which is deployed on the local server and consumes the messages from the queue on the remote server.
The basic steps of the modules are as follows:
- The administrator starts two Java EE servers, one on each system.
- On the local server, the administrator deploys the message-driven bean module, which specifies the remote server where the client is deployed.
- On the remote server, the administrator places the client JAR file.
- The client module sends three messages to a queue.
- The message-driven bean consumes the messages.
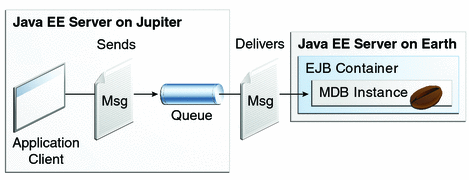
Figure 48-5 illustrates the structure of this application. You can see that it is almost identical to Figure 25-1 except that there are two Java EE servers. The queue used is the one on the remote server; the queue must also exist on the local server for resource injection to succeed.
Figure 48-5 A Java EE Application That Consumes Messages from a Remote Server
Writing the Module Components for the consumeremote Example
Writing the components of the modules involves
- Coding the application client
- Coding the message-driven bean
The application client, jupiterclient/src/java/SimpleClient.java, is almost identical to the one in The simplemessage Application Client.
Similarly, the message-driven bean, earthmdb/src/java/MessageBean.java, is almost identical to the one inThe Message-Driven Bean Class. The only significant difference is that the activation config properties include one property that specifies the name of the remote system. You need to edit the source file to specify the name of your system.
Creating Resources for the consumeremote Example
The application client can use any connection factory that exists on the remote server; in this example, it uses jms/ConnectionFactory. Both components use the queue namedjms/Queue, which you created for A Simple Example of Synchronous Message Receives. The message-driven bean does not need a previously created connection factory; the resource adapter creates one for it.
Any missing resources will be created when you deploy the example.
Using Two Application Servers for the consumeremote Example
As in Running JMS Clients on Multiple Systems, the two servers are referred to as earth and jupiter.
The GlassFish Server must be running on both systems.
Before you can run the example, you must change the default name of the JMS host on jupiter, as described in To Change the Default Host Name Using the Administration Console. If you have already performed this task, you do not have to repeat it.
Which system you use to package and deploy the modules and which system you use to run the client depend on your network configuration (specifically, which file system you can access remotely). These instructions assume you can access the file system of jupiter from earth but cannot access the file system ofearth from jupiter. (You can use the same systems for jupiter and earththat you used in Running JMS Clients on Multiple Systems.)
You can package both modules on earth and deploy the message-driven bean there. The only action you perform on jupiter is running the client module.
Running the consumeremote Example
You can use either NetBeans IDE or Ant to build, package, deploy, and run the consumeremote example.
To Run the consumeremote Example Using NetBeans IDE
To edit the message-driven bean source file and then package, deploy, and run the modules using NetBeans IDE, follow these steps.
- From the File menu, choose Open Project.
- In the Open Project dialog, navigate to:
tut-install/examples/jms/consumeremote/ - Select the earthmdb folder.
- Select the Open as Main Project check box.
- Click Open Project.
- Edit the MessageBean.java file as follows:
- In the Projects tab, expand the earthmdb, Source Packages, and mdb nodes, then double-click MessageBean.java.
- Find the following line within the @MessageDriven annotation:
@ActivationConfigProperty(propertyName = "addressList",
propertyValue = "remotesystem"), - Replace remotesystem with the name of your remote system.
- Right-click the earthmdb project and select Build.
This command creates a JAR file that contains the bean class file. - From the File menu, choose Open Project.
- Select the jupiterclient folder.
- Select the Open as Main Project check box.
- Click Open Project.
- In the Projects tab, right-click the jupiterclient project and select Build.
This command creates a JAR file that contains the client class file and a manifest file. - Right-click the earthmdb project and select Deploy.
- To copy the jupiterclient module to the remote system, follow these steps:
- Change to the directory jupiterclient/dist:
cd tut-install/examples/jms/consumeremote/jupiterclient/dist - Type a command like the following:
cp jupiterclient.jar F:/
That is, copy the client JAR file to a location on the remote file system. You can use the file system graphical user interface on your system instead of the command line. - To run the application client, follow these steps:
- If you did not previously create the queue and connection factory on the remote system (jupiter), go to the tut-install/examples/jms/consumeremote/jupiterclient/ directory on the remote system and type the following command:
ant add-resources - Go to the directory on the remote system (jupiter) where you copied the client JAR file.
- To deploy the client module and retrieve the client stubs, use the following command:
asadmin deploy --retrieve . jupiterclient.jar
This command deploys the client JAR file and retrieves the client stubs in a file named jupiterclientClient.jar - To run the client, use the following command:
appclient -client jupiterclientClient.jar
On jupiter, the output of the appclient command looks like this (preceded by application client container output):
Sending message: This is message 1 from jupiterclient
Sending message: This is message 2 from jupiterclient
Sending message: This is message 3 from jupiterclient
On earth, the output in the server log looks something like this (preceded by logging information):
MESSAGE BEAN: Message received: This is message 1 from jupiterclient
MESSAGE BEAN: Message received: This is message 2 from jupiterclient
MESSAGE BEAN: Message received: This is message 3 from jupiterclient - To undeploy the client after you finish running it, use the following command:
asadmin undeploy jupiterclient
To Run the consumeremote Example Using Ant
To edit the message-driven bean source file and then package, deploy, and run the modules using Ant, follow these steps.
- Open the following file in an editor:
tut-install/examples/jms/consumeremote/earthmdb/src/java/mdb/MessageBean.java - Find the following line within the @MessageDriven annotation:
@ActivationConfigProperty(propertyName = "addressList",
propertyValue = "remotesystem"), - Replace remotesystem with the name of your remote system, then save and close the file.
- Go to the following directory:
tut-install/examples/jms/consumeremote/earthmdb/ - Type the following command:
ant
This command creates a JAR file that contains the bean class file. - Type the following command:
ant deploy - Go to the jupiterclient directory:
cd ../jupiterclient - Type the following command:
ant
This command creates a JAR file that contains the client class file and a manifest file. - To copy the jupiterclient module to the remote system, follow these steps:
- Change to the directory jupiterclient/dist:
cd ../jupiterclient/dist - Type a command like the following:
cp jupiterclient.jar F:/
That is, copy the client JAR file to a location on the remote file system.
- Change to the directory jupiterclient/dist:
- To run the application client, follow these steps:
- If you did not previously create the queue and connection factory on the remote system (jupiter), go to the tut-install/examples/jms/consumeremote/jupiterclient/ directory on the remote system and type the following command:
ant add-resources - Go to the directory on the remote system (jupiter) where you copied the client JAR file.
- To deploy the client module and retrieve the client stubs, use the following command:
asadmin deploy --retrieve . jupiterclient.jar
This command deploys the client JAR file and retrieves the client stubs in a file named jupiterclientClient.jar - To run the client, use the following command:
appclient -client jupiterclientClient.jar
On jupiter, the output of the appclient command looks like this (preceded by application client container output):
Sending message: This is message 1 from jupiterclient
Sending message: This is message 2 from jupiterclient
Sending message: This is message 3 from jupiterclient
On earth, the output in the server log looks something like this (preceded by logging information):
MESSAGE BEAN: Message received: This is message 1 from jupiterclient
MESSAGE BEAN: Message received: This is message 2 from jupiterclient
MESSAGE BEAN: Message received: This is message 3 from jupiterclient - To undeploy the client after you finish running it, use the following command:
asadmin undeploy jupiterclient


Copyright © 2013, Oracle and/or its affiliates. All rights reserved. Legal Notices