The FOA Reference For Fiber Optics-Installing Fiber Optic Cable - "Figure 8" Cable (original) (raw)
How To "Figure 8" Cable for Intermediate Pulls in OSP Installations
On very long OSP runs (farther than approximately 2.5 miles or 4 kilometers), it may be necessary to
use an automated fiber puller at intermediate point(s) for a continuous pull or pull from the middle out to both ends (midspan pull.)
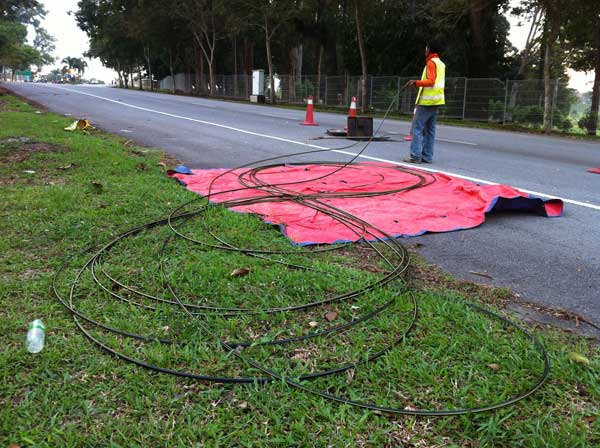
When laying loops of fiber on a surface during a pull, use “figure-8” loops to prevent twisting the cable.
The figure 8 puts a half twist in on one side of the 8 and takes it out on the other, preventing twists.
Use this procedure for pulling from one end:
1. Pull the cable out of the conduit or innerduct and lay on the ground in a large "figure 8" pattern. The size of the "8" will be determined by the size and stiffness of the cable, but 6-12 feet (2-4 m) is a common size. The end of the cable will be against the ground - you might want a tarp or plastic sheet to keep the cable clean. Pull slowly and carefully lay the cable in the figure 8 pattern to keep it from becoming kinked.
2. Using several installers, pick up the cable and flip it over so the end to be pulled to the next location is on top.
3. Attach the end to the pull rope with appropriate swivel pulling eyes and continue the pull.For a "midspan pull," use these directions:
This procedure eliminates having to flip the cable in the Figure 8 on the ground over.
1. Place the cable reel a mid point on the long span (ensuring the maximum pulling length in either direction would not be exceeded).
2. Pull the one end of cable through the conduit to one end of the span.
3. Roll the cable off the reel and Figure 8 the remaining cable on the ground. The end on the cable will be on the top of the figure 8.
4. Pull the second end of the cable through the conduit to the other end of the span.
A tech using "Figure 8" technique on a midspan pull in Kuala Lumpur, Malaysia.
