Auth0 Vue SDK Quickstarts: Login (original) (raw)
This quickstart demonstrates how to add user login to a Vue.JS application using Auth0.We recommend that you log in to follow this quickstart with examples configured for your account.
I want to explore a sample app
2 minutes
Get a sample configured with your account settings or check it out on Github.
System requirements: Vue 3+
Visit the Vue.js Authentication By Example guide for a deep dive into implementing user authentication in Vue. This guide provides additional details on how to create a sign-up button and add route guards to a Vue application.
Configure Auth0
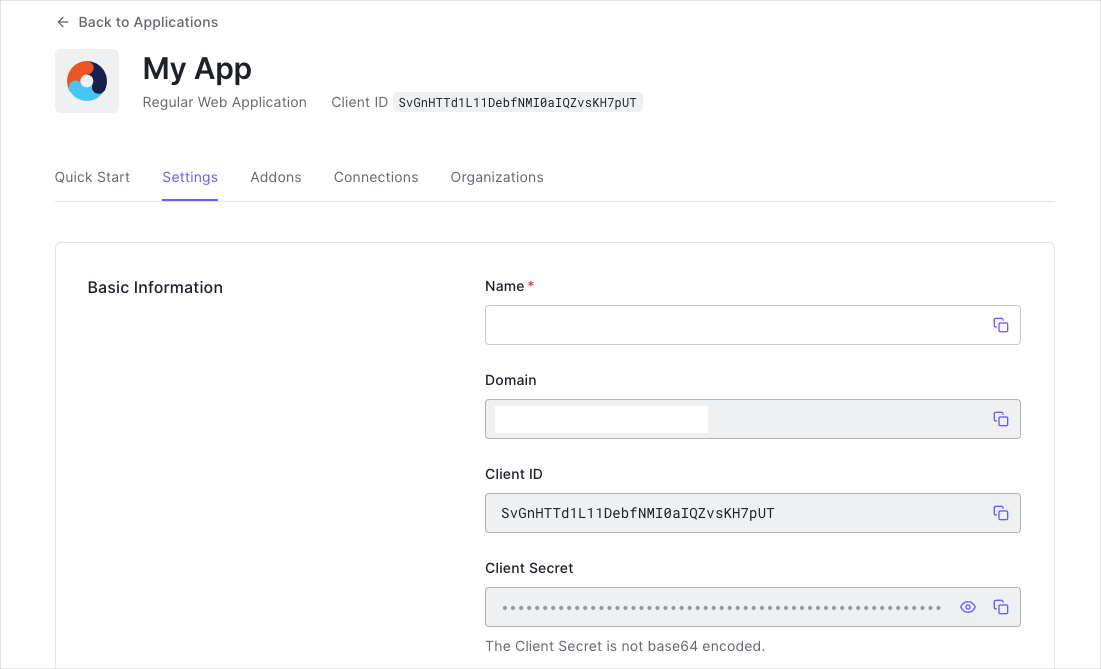
Get Your Application Keys
When you signed up for Auth0, a new application was created for you, or you could have created a new one. You will need some details about that application to communicate with Auth0. You can get these details from the Application Settings section in the Auth0 dashboard.
When using the Default App with a Native or Single Page Application, ensure to update the Token Endpoint Authentication Method to None and set the Application Type to either SPA or Native.
You need the following information:
- Domain
- Client ID
If you download the sample from the top of this page, these details are filled out for you.
Configure Callback URLs
A callback URL is a URL in your application where Auth0 redirects the user after they have authenticated. The callback URL for your app must be added to the Allowed Callback URLs field in your Application Settings. If this field is not set, users will be unable to log in to the application and will get an error.
If you are following along with the sample project you downloaded from the top of this page, you should set the Allowed Callback URL to http://localhost:3000.
Configure Logout URLs
A logout URL is a URL in your application that Auth0 can return to after the user has been logged out of the authorization server. This is specified in the returnTo query parameter. The logout URL for your app must be added to the Allowed Logout URLs field in your Application Settings. If this field is not set, users will be unable to log out from the application and will get an error.
If you are following along with the sample project you downloaded from the top of this page, the logout URL you need to add to the Allowed Logout URLs field is http://localhost:3000.
Configure Allowed Web Origins
You need to add the URL for your app to the Allowed Web Origins field in your Application Settings. If you don't register your application URL here, the application will be unable to silently refresh the authentication tokens and your users will be logged out the next time they visit the application, or refresh the page.
If you are following along with the sample project you downloaded from the top of this page, you should set the Allowed Web Origins to http://localhost:3000.
Install the SDK
Install the Auth0 Vue SDK using npm:
npm install @auth0/auth0-vueRegister the plugin
To use the SDK in your Vue application, register the plugin with your Vue application by passing the return value of createAuth0 to app.use().
import { createAuth0 } from '@auth0/auth0-vue';

const app = createApp(App);

app.use(
  createAuth0({
    domain: "{yourDomain}",
    clientId: "{yourClientId}",
    authorizationParams: {
      redirect_uri: window.location.origin
    }
  })
);

app.mount('#app');
The plugin will register the SDK using both provide and app.config.globalProperties, allowing the SDK to be used with both the Composition API and Options API.
Add Login to Your Application
To add login to your application, use the loginWithRedirect function that is exposed on the return value of useAuth0, which you can access in your component's setup function.
<template>
  <div>
    <button @click="login">Log in</button>
  </div>
</template>
<script>
  import { useAuth0 } from '@auth0/auth0-vue';

  export default {
    setup() {
      const { loginWithRedirect } = useAuth0();

      return {
        login: () => {
          loginWithRedirect();
        }
      };
    }
  };
</script>
The loginWithRedirect function will redirect the user to Auth0, and redirect them back to the redirect_uri (provided when calling createAuth0()) after entering their credentials.
Using the Options API
If you are using the Options API, you can use the same loginWithRedirect method from the global $auth0 property through the this accessor.
<template>
  <div>
    <button @click="login">Log in</button>
  </div>
</template>

<script>
  export default {
    methods: {
      login() {
        this.$auth0.loginWithRedirect();
      }
    }
  };
</script>
Add Logout to Your Application
Use the logout function that is exposed on the return value of useAuth0, which you can access in your component's setup function, to log the user out of your application.
<template>
  <div>
    <button @click="logout">Log out</button>
  </div>
</template>
<script>
  import { useAuth0 } from '@auth0/auth0-vue';

  export default {
    setup() {
      const { logout } = useAuth0();

      return {
        logout: () => {
          logout({ logoutParams: { returnTo: window.location.origin } });
        }
      };
    }
  };
</script>
The logout() function will redirect the user to Auth0 to ensure their session is ended with Auth0 as well. Once the user is logged out successfully, they will be redirected back to the specified returnTo parameter.
To log the user out of your application but not from Auth0, use logout({ localOnly: true }).
Using the Options API
If you're using the Options API, you can use the same logout method from the global $auth0 property through the this accessor.
<template>
  <div>
    <button @click="logout">Log out</button>
  </div>
</template>

<script>
  export default {
    methods: {
      logout() {
        this.$auth0.logout({ logoutParams: { returnTo: window.location.origin } });
      }
    }
  };
</script>
Show User Profile Information
Once the user authenticates, the SDK extracts the user's profile information and stores it in memory. It can be accessed by using the reactive user property exposed by the return value of useAuth0, which you can access in your component's setup function.
<template>
  <div>
    <h2>User Profile</h2>
    <button @click="login">Log in</button>
    <pre v-if="isAuthenticated">
        <code>{{ user }}</code>
      </pre>
  </div>
</template>
<script>
  import { useAuth0 } from '@auth0/auth0-vue';

  export default {
    setup() {
      const { loginWithRedirect, user, isAuthenticated } = useAuth0();

      return {
        login: () => {
          loginWithRedirect();
        },
        user,
        isAuthenticated
      };
    }
  };
</script>
Ensure the user is authenticated by implementing login in your application before accessing the user's profile.
Using the Options API
If you're using the Options API, you can use the same reactive user property from the global $auth0 property through the this accessor.
<template>
  <div>
    <h2>User Profile</h2>
    <button @click="login">Log in</button>
    <pre>
      <code>{{ user }}</code>
    </pre>
  </div>
</template>

<script>
  export default {
    data: function () {
      return {
        user: this.$auth0.user
      };
    },
    methods: {
      login() {
        this.$auth0.loginWithRedirect();
      }
    }
  };
</script>