RHEL8環境へのRedmine v5.0.5の手動インストール手順 (2) - Redmine環境の構築 (original) (raw)
このドキュメントでは、RHEL8環境に手動でRedmineをインストールする手順を記載します。
構築手順を1つの記事で全部書くと非常に長文になってしまいますので、以下の内容で記事を分割して記載しています。
2回目の今回は、Redmine本体のインストールです。
■記事一覧
- 前提ソフトウェアのインストール(Apache、MariaDB、Ruby)
- Redmine環境の構築 (※今回はここを書きます)
- Subversion連携
- Git連携
- 旧バージョンからのデータ移行
- 前提
- 1. Redmineのインストール
- 2. Passengerのインストール
- 3. Redmineに必要な追加モジュールのインストール
- 4. Redmineの設定
- 5. Redmineへのログイン
- 6.追加設定
- 後書き
前提
環境
全体のソフトウェア環境構成は以下となります。
- Redhat Enterprise Linux 8.6
- Ruby環境
- rbenv v1.2.0-74
- Ruby v3.1.4p223
- Rails v6.1.7.6
- Apache HTTP Server v2.4.37
- MariaDB v10.3.35
- Redmine v5.0.5
- Subversion v1.10.2
- Git v2.31.1
- LDAP
- Windows Server 2019 Active Directory
コマンド記載時のプロンプトルール
コマンド実行の記載でのプロンプトは以下のルールで記載をしています。
- $ : 一般ユーザー
- # : rootユーザー
参考にしたサイト
今回のインストールに当たり、全体的な手順で参考にしたサイトは以下となります。
1-1. ファイルアクセス権限の検討
Redmineをインストールする前に、Linuxファイルシステム上のディレクトリ・ファイルの所有ユーザー・グループを検討する必要があります。
検討すべき事は以下です。
| No. | 検討事項 | 今回の設定 | (参考)bitnamiでの設定 |
|---|---|---|---|
| 1 | Apache HTTP Serverの実行ユーザー・グループ | apache:apache | daemon:daemon |
| 2 | Redmineディレクトリの所有ユーザー・グループ | redmine:apache | root:root |
No.1の「Apache HTTP Serverの実行ユーザー・グループ」は、Bitnamiでは「daemon:daemon」となっていました。
ただ、前回dnfでApache HTTP Serverをインストールした際に、専用のユーザー・グループ「apache:apache」が作成され、実行ユーザーとしてデフォルトで設定されていますので、今回はそれをそのまま採用することにしました。
No.2の「Redmineディレクトリの所有ユーザー・グループ」は、Bitnamiでは「root:root」となっていました。
個人的には何となくrootユーザーをアプリケーションの所有者にすることに抵抗がありましたので、redmineというユーザーを作成しました。
しかしながら、RedmineはApache HTTP Server上で動作しますので、実行ユーザー・グループは「apache:apache」になります。 そうすると、apacheユーザー又はapacheグループがRedmineのインストールフォルダ配下に読み書きができる必要があります。 具体的にはRedmineのチケットに添付するファイルの格納先のディレクトリです。
そのため、今回は「redmine」ユーザーが所属するメイングループを「apache」グループとしました。
1-2. redmineユーザーの作成
前述の内容に従い、以下コマンドで「redmine」ユーザーを作成します。
$ sudo useradd -d /home/redmine -m -s /bin/bash -G apache redmine
2024/04/02追記
redmineユーザーに、sudo実行権限を付与して下さい。 そうしないと、後の「3-4. Redmineに必要なRubyパッケージをbundleインストール」がうまく動作しませんでした。
1-3. Redmineのインストール
以下のコマンドをrootユーザーで実行し、Redmineをダウンロード・インストール・権限付与を行います。
cd /opt (←インストールディレクトリへ移動)
wget https://www.redmine.org/releases/redmine-5.0.5.tar.gz (←ダウンロード)
tar zxf ./redmine-5.0.5.tar.gz (←ファイル解凍・・・Redmineインストール)
chown -R redmine:apache ./redmine-5.0.5 (← 所有ユーザー・グループの設定)
chmod -R g+w ./redmine-5.0.5 (←apacheグループに書き込み権限を付与)
1-4. RedmineのDB設定
Redmineに、前回「前提ソフトウェアのインストール」でMariaDBに作成したRedmine用のDBへの接続設定を行います。
- 修正ファイル
- /opt/redmine-5.0.5/config/database.yml
redmineユーザーで以下を実行します。
$ cd /opt/redmine-5.0.5/config $ cp -p database.yml.example database.yml $ vi database.yml
: production: adapter: mysql2 database: redmine ( ←DB名をredmineと設定) host: localhost username: redmine ( ←ユーザー名をredmineと設定) password: "パスワード" (←redmineユーザーのパスワードを設定)
encoding: utf8mb4 socket: /var/lib/mysql/mysql.sock (←通信をソケットで行うための設定) :
2. Passengerのインストール
Redmine等のRuby on RailsアプリケーションをApache上で動作させるためには、Rubyの「Passenger」というモジュールが必要とのことです。
Bitnamiでサクッとインストールしていたときには表に出てこない物なので、今回初めて知りました。 この章ではこのPassengerをインストールしていきます。
2-1. 参考にしたページ
以下に参考にしたページを記載します。
- Apache上でRuby on Railsアプリケーションを動かす/Passenger(mod_rails for Apache)の利用 — Redmine.JP
- RedmineをCentOS8上で構築する手順 » 環境改善の備忘録
2-2. 前提モジュールのインストール
以下4つのモジュールを dnfでインストールします。
- openssl-devel
- httpd-devel
- libcurl-devel
- gcc-c++
$ sudo dnf install openssl-devel httpd-devel libcurl-devel gcc-c++
2-3. Passengerのインストール
rootユーザーで、Rubyのgemコマンドを用いて、Passengerをインストールします。 rbenvでRubyの複数バージョンを使用している可能性もあるので、以下ではgemをフルパスで指定しています。
/opt/rbenv/versions/3.1.4/bin/gem install passenger
2-4. Apache用のPassengerモジュールをインストール
2024/04/02追記
ここで、以下のエラーが発生する事があります。c++: error: /usr/lib/rpm/redhat/redhat-hardened-cc1: No such file or directory
もし上記エラーが発生した場合は、以下コマンドで「redhat-rpm-config」をインストールすると解決します。sudo dnf install redhat-rpm-config
/opt/rbenv/versions/3.1.4/bin/passenger-install-apache2-module
Welcome to the Phusion Passenger Apache 2 module installer, v6.0.18.
This installer will guide you through the entire installation process. It shouldn't take more than 3 minutes in total.
Here's what you can expect from the installation process:
- The Apache 2 module will be installed for you.
- You'll learn how to configure Apache.
- You'll learn how to deploy a Ruby on Rails application.
Don't worry if anything goes wrong. This installer will advise you on how to solve any problems.
Press Enter to continue, or Ctrl-C to abort. (← Enterを押す)
Which languages are you interested in?
Use to select. If the menu doesn't display correctly, press '!'
? ? Ruby (← Rubyを選択してEnterを押す) ? Python ? Node.js ? Meteor
Checking for required software...
- Checking for C compiler... Found: yes Location: /usr/bin/cc : : linking shared-object passenger_native_support.so
Almost there!
Please edit your Apache configuration file, and add these lines:
LoadModule passenger_module /opt/rbenv/versions/3.1.4/lib/ruby/gems/3.1.0/gems/passenger-6.0.18/buildout/apache2/mod_passenger.so PassengerRoot /opt/rbenv/versions/3.1.4/lib/ruby/gems/3.1.0/gems/passenger-6.0.18 PassengerDefaultRuby /opt/rbenv/versions/3.1.4/bin/ruby
After you restart Apache, you are ready to deploy any number of web applications on Apache, with a minimum amount of configuration!
Press ENTER when you are done editing.
上記が表示され、Apache HTTP Serverに設定を追加するように促されます。
2-5. Apache用の設定ファイルを作成
別のターミナルを起動して、前手順で指示された情報をApacheに設定をします。
ここではPassenger専用の設定ファイルを作成して、httpd.confに読み込ませる事とします。
- 作成ファイル
- /etc/httpd/conf.extra/httpd-passenger.conf
mkdir /etc/httpd/conf.extra
vi /etc/httpd/conf.extra/httpd-passenger.conf
指示された情報のほかに以下も追記しています。
- Passengerが使うRuby
- Passengerの実行ユーザー・グループ
- Remineのコンテキストルートを「/redmine」にする設定
- Apache HTTP Server起動時に、Passengerモジュールを読み込む設定(これにより初回アクセス時のレスポンスが早くなる)
LoadModule passenger_module /opt/rbenv/versions/3.1.4/lib/ruby/gems/3.1.0/gems/passenger-6.0.18/buildout/apache2/mod_passenger.so PassengerRoot /opt/rbenv/versions/3.1.4/lib/ruby/gems/3.1.0/gems/passenger-6.0.18 PassengerDefaultRuby /opt/rbenv/versions/3.1.4/bin/ruby
PassengerRuby /opt/rbenv/versions/3.1.4/bin/ruby PassengerUser apache PassengerGroup apache
コンテキストルートを/redmineにする設定
Alias /redmine /opt/redmine-5.0.5/public <Location /redmine> PassengerBaseURI /redmine PassengerAppRoot /opt/redmine-5.0.5 <Directory "/opt/redmine-5.0.5/public"> AllowOverride All Require all granted Options -MultiViews PassengerEnabled on
Apache HTTP Server起動時に、Passengerモジュールを読み込む設定
PassengerPreStart http://127.0.0.1:80/redmine
この設定ファイルを読み込む為の設定をApache HTTP Serverの設定ファイルに記載します。
- 編集ファイル
- /etc/httpd/conf/httpd.conf
末尾に以下を追記
Include conf.extra/*.conf
以下のコマンドを実行し、Apache設定ファイルの書式に誤りが無いかを確認します。
apachectl configtest
AH00558: httpd: Could not reliably determine the server's fully qualified domain name, using fe80::4ce:deff:fe0a:e487. Set the 'ServerName' directive globally to suppress this message Syntax OK ( ←OKが表示されるのを確認する。)
Apache設定ファイルの書式に問題が無いことが確認できたら、以下コマンドを実行して、Apache HTTP Serverを再起動します。
systemctl restart httpd
2-6. (2-4. Apache用のPassengerモジュールをインストール)の続き
「Press ENTER when you are done editing.」で止まっていたので、Enterをクリックして、 「/opt/rbenv/versions/3.1.4/bin/passenger-install-apache2-module」を終了させます。
: Press ENTER when you are done editing. (← Enterを押す)
Validating installation...
Checking whether this Passenger install is in PATH... ?
Please add /opt/rbenv/version/3.1.4/lib/ruby/gem/3.1.0/gems/passenger-6.0.18/bin to PATH. Otherwise you will get "command not found" errors upon running any Passenger commands.
Learn more at about PATH at:
Checking whether there are no other Passenger installations... (!)
You are currently validating against Phusion Passenger(R) 6.0.18, located in:
/opt/rbenv/versions/3.1.4/lib/ruby/gems/3.1.0/gems/passenger-6.0.18/bin/passenger
Besides this Passenger installation, the following other Passenger installations have also been detected:
/opt/rbenv/shims/passenger
Please uninstall these other Passenger installations to avoid confusion or conflicts.
Checking whether Apache is installed... ?
Checking whether the Passenger module is correctly configured in Apache... ?
Detected 0 error(s), 2 warning(s). Press ENTER to continue. (← Enterを押す)
Deploying a web application
To learn how to deploy a web app on Passenger, please follow the deployment guide:
https://www.phusionpassenger.com/library/deploy/apache/deploy/
Enjoy Phusion Passenger, a product of PhusionR (www.phusion.nl) :-) https://www.phusionpassenger.com
PassengerR is a registered trademark of Phusion Holding B.V.
以下2つの警告が表示されますが、私の環境では特に対応しなくても問題なく動作しています。
- PassengerのbinディレクトリをPATHに追加する。
- Passengerのコマンドが2つ存在する。
3. Redmineに必要な追加モジュールのインストール
3-1. mariadbに関するモジュール
3-1-1. RHELのモジュール
dnf install mariadb-devel
3-1-2. Rubyのモジュール
/opt/rbenv/versions/3.1.4/bin/gem install mysql2
3-2. ImageMagickのインストール
ガントチャートのPING形式でのエクスポートや、サムネイル表示などを行うために使用するImageMagickをインストールします。
3-2-1. EPELインストール
RHEL8では、ImageMagickは通常のdnfリポジトリには存在せず、EPEL内にあります。 そのため、まずEPELリポジトリを利用できるようにします。
dnf install https://dl.fedoraproject.org/pub/epel/epel-release-latest-8.noarch.rpm
3-2-2. ImageMagickのインストール
dnf install ImageMagick ImageMagick-devel
3-3. Redmineで使う日本語フォントの設定
IPAフォントをインストールして、Redmineに設定します。
3-3-1. ipaフォントのインストール
dnf install https://pkgs.dyn.su/el8/base/x86_64/ipa-pgothic-fonts-003.03-14.el8.noarch.rpm
3-3-2. フォントファイルのRedmine設定
Redmineの設定ファイルにipaフォントを設定します。
- 修正ファイル
- /opt/redmine-5.0.5/config/configuration.yml
redmineユーザーで以下を実行します。
$ cd /opt/redmine-5.0.5/config $ cp -p configuration.yml.example configuration.yml $ vi configuration.yml
: default: : : minimagick_font_path: /usr/share/fonts/ipa-pgothic/ipagp.ttf :
3-4. Redmineに必要なRubyパッケージをbundleインストール
redmineユーザーで以下を実行します。
$ cd /opt/redmine-5.0.5 $ bundle config set --local without 'development test' $ bundle install
2024/04/02追記
redmineユーザーにsudo実行権限が付与されていないと、ここでパスワード入力が求められてしまいます。
4. Redmineの設定
4-1. メールサーバー設定
Redmineでメールを送付する際のメールサーバーの設定をします。
- 修正ファイル
- /opt/redmine-5.0.5/config/configuration.yml
4-2. セッション改ざん防止用秘密鍵の作成
redmineユーザーで以下を実行します。
$ cd /opt/redmine-5.0.5 $ bundle exec rake generate_secret_token
4-3. Redmine用のデータベーステーブルを作成
以下をrootユーザーで実行し、MariaDBを起動します。
systemctl start mariadb
以下をredmineユーザーで実行し、MariaDBにRedmine用のテーブルを作成します。
$ cd /opt/redmine-5.0.5 $ RAILS_ENV=production bundle exec rake db:migrate
4-4. Redmine用データベーステーブルに初期データを登録
以下をredmineユーザーで実行します。
$ RAILS_ENV=production bundle exec rake redmine:load_default_data Select language: ar, az, bg, bs, ca, cs, da, de, el, en, en-GB, es, es-PA, et, eu, fa, fi, fr, gl, he, hr, hu, id, it, ja, ko, lt, lv, mk, mn, nl, no, pl, pt, pt-BR, ro, ru, sk, sl, sq, sr, sr-YU, sv, th, tr, uk, vi, zh, zh-TW [en] ja (←言語を日本語(ja)を設定しています。
Default configuration data loaded.
5. Redmineへのログイン
ここまでの手順でRedmineの環境構築が完了しました。 以下のURLにアクセスし、Redmineのログイン画面を表示します。
- http://ホスト名/redmine
- ユーザーID:admin
- パスワード : admin
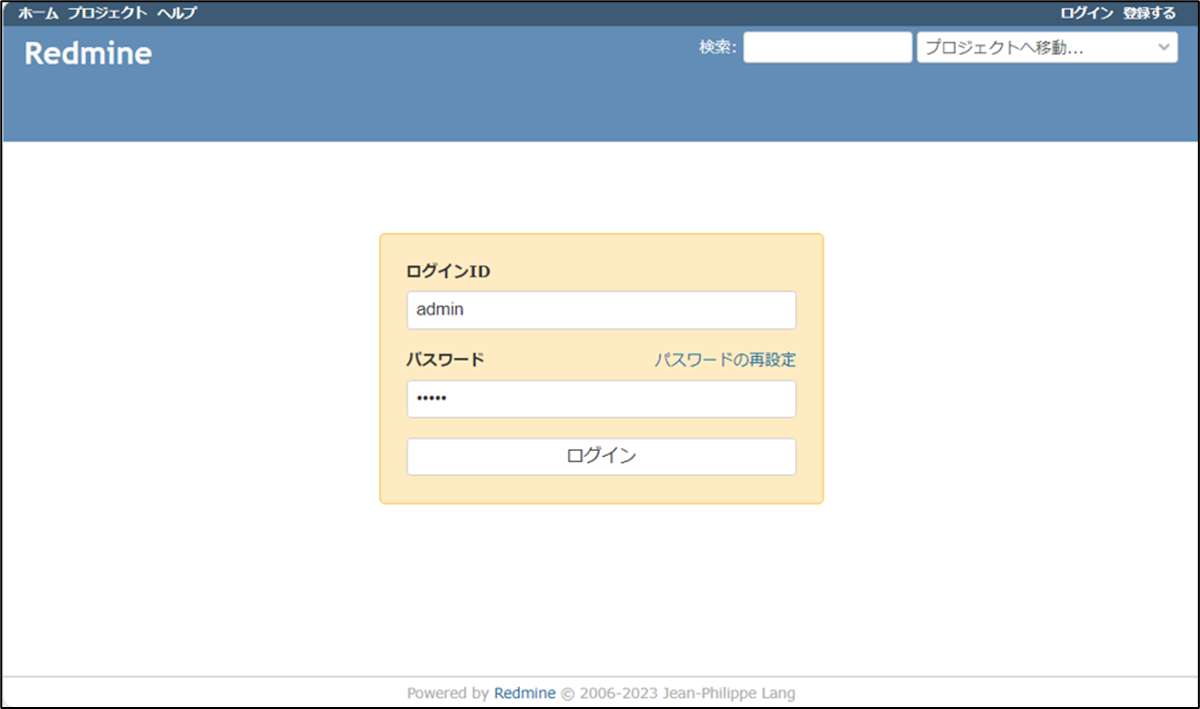
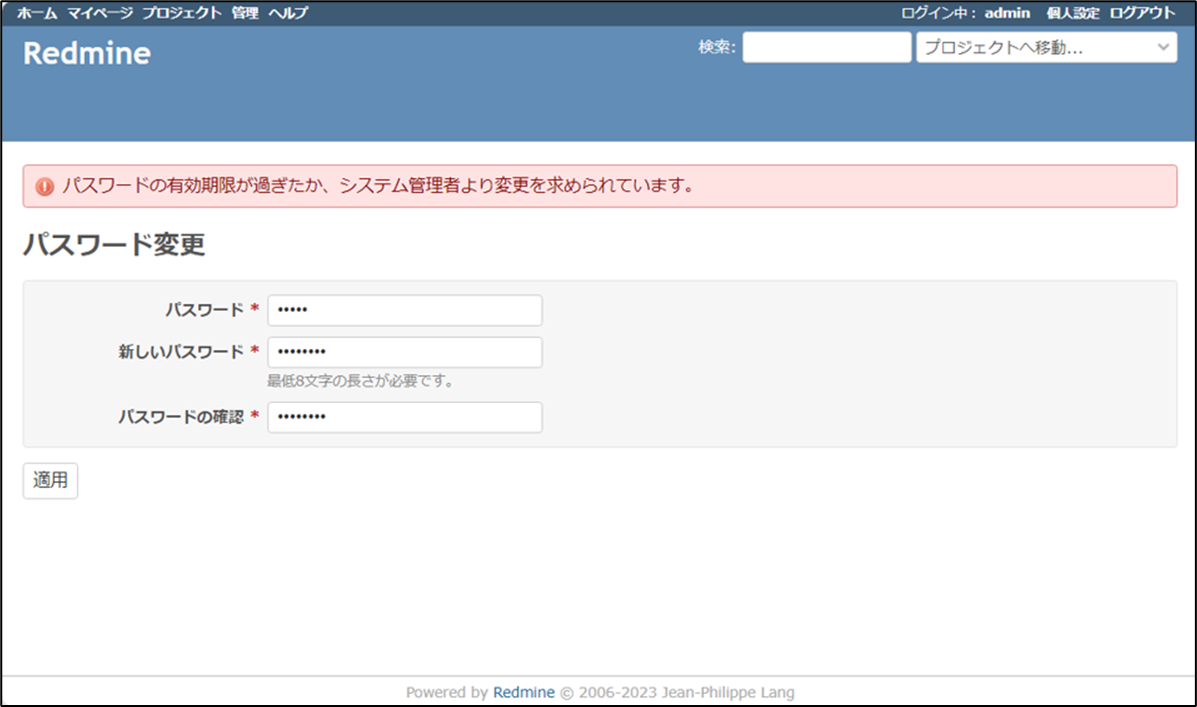
するとパスワード変更を求められますので、新しいパスワードを入力して「適用」ボタンをクリックします。
6.追加設定
6-1. ImageMagickのPDFサポートオプションのエラー対応
インストール直後、Redmineメニューの[管理]-[情報]を表示したところ、以下がエラーになっていました。
- ImageMagickのPDFサポートが利用可能(オプション)

ここではこのエラーの解消を実施します。
rootユーザーで以下を実行してGhostscriptをインストールします。
dnf install ghostscript
これによりエラーが解消しました。

6-2. PDFファイルのサムネイルが表示されない場合の対処方法
チケット詳細画面で、PDFファイルを添付してもサムネイルが表示されない場合の対応方法を上記を参考に実施しました。 以下のファイルに設定を追記します。
- 編集ファイル
- /etc/ImageMagick-6/policy.xml
: (←左記行を追記) : : :
6-3. LDAP認証の設定
RedmineをActiveDirectoryのユーザーで利用できるようにLDAP認証の設定をします。

| No. | 設定項目 | 設定値 | 備考 |
|---|---|---|---|
| 1 | 名称 | ActiveDirectory | 任意の名前を設定 |
| 2 | ホスト | ActiveDirectoryのドメイン名 | RHELのDNS設定がActiveDirectoryになっている場合。そうでは無いときはIPアドレスの指定でもOK。 |
| 3 | ポート | 389,LDAP | |
| 4 | アカウント | 任意のユーザーID | ActiveDirectoryに存在するLDAP認証用のユーザーID |
| 5 | パスワード | ||
| 6 | ベースDN | 任意値 | Redmineにログインするユーザーが所属するベースのDNを設定 |
| 7 | LDAPフィルタ | userAccountControl!=514 | ActiveDirectoryにて無効になっているユーザーを除外 |
| 8 | ログインIDの属性 | sAMAccountName | ActiveDirectoryのユーザーIDの属性名 |
| 9 | 名の属性 | sn | ActiveDirectoryの名の属性名 |
| 10 | 姓の属性 | givenName | ActiveDirectoryの姓の属性名 |
| 11 | メールアドレスの属性 | ActiveDirectoryのメールアドレスの属性名 |
後書き
以上で素のRedmineのインストールは完了となります。
今回はここまでにします。
最後まで読んで頂きありがとうございました。
どなたかの参考になりましたら幸いです。