Feline Diabetes- treatment and prevention in cats (original) (raw)
Lisa A. Pierson, DVM
Introduction
Warning: Before reading even the first sentence of this webpage, you must commit to reading past the STOP sign below.
The first section of this paper discusses the detrimental impact of dietary carbohydrates on the blood glucose balance and insulin response of cats as a species – with pre-diabetic and diabetic patients being especially susceptible to the negative effects of high carbohydrate diets.
However, if your cat is receiving insulin and you switch to a low carb diet –without lowering the insulin dosage – you will be putting your cat at significant risk for a hypoglycemic crisis. This is discussed under the STOP sign section below.
I receive many emails each week asking for food recommendations for diabetic cats. Answers:
NO DRY FOOD but see Tips for Transitioning Dry Food Addicts to Canned Food if you are dealing with a dry food addict. All cats can be transitioned to an appropriate diet (no dry food) if the owner is patient enough.
See Cat Food Composition chart and stay below 10% carbohydrate calories (the third column). There are many suitable low carbohydrate choices available depending on your cat’s preference and your budget. Many cats do well on Friskies Classic Pates and Fancy Feast.
Stay away from food with gravy – they are high in carbohydrates. The same is true for most food with sauces. Higher protein/lower fat is also the goal. However, you will note that most commercial foods are low in protein and high in fat. Why? Because protein is expensive and fat is cheap This is one of many reasons why I make my own cat food.
See Commercial Foods when you are ready to learn more about evaluating pet foods. Cats are obligate carnivores and are designed to eat other animals (meat, organs, etc.) – not grains and vegetables which only serve to enhance the profit margin of pet food companies and load the food up with carbohydrates.
and 2) are very important. 3) can wait until you are not so overwhelmed.
The two most important initial goals when faced with a diabetic patient are:
Get them on a low carb diet ASAP but pay close attention to the STOP sign section below.
Learn how to home test.
Note that I do not recommend any ‘prescription’ diets – including the ones sold for diabetes. They are expensive, low in quality, contain species-inappropriate ingredients, and are not necessarily low in carbohydrates.
There is absolutely no reason to spend your hard-earned money on veterinarian-prescribed diets.
Dry food addicts: I do not support the feeding of any dry food to any cat for many reasons (water depletion, high in carbohydrates, high in plant-based proteins, bacterial and fungal mycotoxin contamination, cooked-to-death which destroys nutrients, very calorically dense, etc.), but while you are working on the_Tips for Transitioning Dry Food Addicts to Canned Food_, please substitute your cat’s high carb dry food with either EVO or Young Again.
Understand that neither of these dry diets are healthy options for your cat long-term. See Urinary Tract Health. Read the content in the grey box at the top but also scroll down to Opie’s pictures for a sad look at the tremendous suffering caused by feeding water-depleted diets to cats. Urethral obstructions and cystitis are extremely common problems seen in cats fed dry food. Urethral obstructions are painful, life-threatening (ruptured bladder) and very expensive to treat. Cystitis is also extremely painful and often causes the cat to stop using the litter box.
Please do not say “but my cat drinks plenty of water so dry food is just fine for him/her!” Many studies have shown that when all water sources are considered (food and water bowl) cats on canned food consume double the amount of water when compared to a dry food-fed cat. This is in spite of the fact that cats on canned food rarely drink water from a bowl. Cats on dry food do not make up their water deficit at the water bowl – no matter how much wishful thinking humans engage in to justify the feeding of this type of diet.
It can be fairly argued that water is one of the most important ‘nutrients’ for all living beings. Dehydration is a very serious issue and your diabetic cat is in a precarious situation as it is. We don’t need to compound their disease state by compromising their hydration status.
In addition to the fact that all dry foods are water-depleted, they are extremely calorically dense and adipose tissue (fat) causes insulin resistance => diabetes. EVO and Young Again are even more calorie-dense than other dry foods because they are high in fat. Therefore, careful portion control is very important.
I am a firm believer that all cats will eventually eat canned food if the human implements a healthy dose of patience and perseverance as discussed in my Tips for Transitioning paper linked above. It can be harder or easier with a diabetic cat. The difficult part is due to the fact that they must eat when receiving insulin so it is harder to use hunger as an incentive.
However, many diabetic cats have a ravenous appetite which can aid in the transition to canned food.
I see people ‘throw in the towel’ and give up far too soon on these stubborn, dry food-addicted cats. Some cats will take several weeks to several months to make the switch. Be patient and don’t give up!
~~~~~~~~~~~~~~~~~~~~~~~~~~~~~~~~~~~~~~~~~~~~~~~~~~~~~~~~
Carbohydrates
Diabetes is one of the most common feline endocrine diseases and, while we do not know all of the causes of this complex disease, we do know that many diabetic cats cease needing insulin or have their insulin needs significantly decrease once their dietary carbohydrate level is lowered to a more species-appropriate level than that found in many commercial foods – especially dry kibble.
Feeding a high carbohydrate diet to a diabetic cat is analogous to pouring gasoline on a fire and wondering why you can’t put the fire out. While some cats are more sensitive to the detrimental effects of carbohydrates than others, the bottom line is that cats are obligate carnivores and are not designed by nature to consume a high carbohydrate diet or one that is water-depleted (dry kibble).
If you have not read my articles entitled Feeding Your Cat: Know the Basics of Feline Nutrition and Urinary Tract Health I urge you to do so.
Although all dry foods are too high in carbohydrates (except as noted above) and too low in water (causing many cats to suffer tremendously from extremely painful and life-threatening urethral obstructions and cystitis), please be aware that some canned foods (especially ones with gravy/sauce) also contain far too many carbohydrates making them very poor choices for cats.
All canned foods made by Hill’s are too high in carbohydrates. This includes all of their ‘prescription’ diets including m/d and w/d.
As a side note, here is an excerpt from a paper that I am working on entitled Veterinarian Prescribed Diets/Over-the-Counter Options:
‘Prescription dietʼ is an industry-coined term trademarked by Hill’s and holds no legal meaning.
In other words, these diets contain no ingredient that actually requires a prescription. The term ‘prescription diet’ is simply a clever marketing tool between Hillʼs and veterinarians. The sale of these diets is restricted (by Hillʼs, not by law) to veterinarians only. In return, Hillʼs enjoys a boost in perception of quality brought about by this professionʼs endorsement of their products. However, this perception of quality is undeserved and this incestuous relationship jeopardizes the integrity of the veterinary profession.
There is nothing magical about the veterinarian-prescribed diabetes-management diets. In fact, several of them such as Hill’s m/d and w/d (dry and canned), Purina DM dry, and Royal Canin DS (dry) are far too high in carbohydrates making them very inappropriate choices for all cats but especially diabetic patients. Purina DM canned is sufficiently low in carbohydrates (~7%) but it is expensive and it is predominantly liver which should not make up the bulk of a cat’s diet. There is absolutely no reason to spend money on this product.
Obesity
In addition to the dietary carbohydrate level, we also need to address the issue of ‘portion control‘ (managing caloric intake) of any food that we choose to feed to our cats because obesity is a very important factor to consider when discussing both the causes and treatments of diabetes.Adipocytes (fat cells) secrete a substance that makes the cells of the body resistant to insulin (Type 2 diabetes).
Portion control has recently become even more important because as pet food manufacturers move toward making more low carbohydrate foods, this process is selecting for high fat diets. Keep in mind that we get our calories from 3 nutrient classes: proteins, fats, and carbohydrates. The percentage of calories that come from these 3 nutrients must add up to 100%. Therefore, if we lower the percentage of carbohydrates in the food to < 10%, that means that 90-95% of the total calories must come from fat and protein. Given the fact that fat is cheap and protein is expensive, you can see that profit margin drives pet food manufacturers to produce high fat/low protein foods when they make low carb products.
Fat contains 9 calories per gram whereas proteins and carbohydrates are only 4 calories per gram. Therefore, fatty foods are very calorically dense making portion control important to consider.
If your cat is overweight, please see Feline Obesity but you need to understand that it is beyond the scope of a webpage to explain how to implement a safe weight loss program at the same time that you are dealing with an unregulated or newly diagnosed diabetic cat. This can be a tricky situation since an unregulated diabetic cat is starving internally – at the cellular level – and restricting calories, in some cases, can be very dangerous. I am available for phone consultations if the reader wishes to discuss this situation in more detail. (My email address is provided at the bottom of this page.)
On the flip side, weight loss exhibited by any cat is often the first sign of illness – including diabetes – so I make it a point to weigh my cats at least every 2-3 months – more frequently when they reach ~10 years of age.
I strongly urge all cat caregivers to purchase a scale such as the American Red Cross Baby Scale or the Salter Baby and Toddler scale – especially if you are trying to implement a safe weight loss program. (I prefer the Red Cross one because it has a wide base allowing the cat to walk onto it without tipping it.) Make sure that you verify that the scale is reasonably accurate by weighing items that you know the weight of.
Lack of exercise (activity level) has also recently become an issue that is gaining more attention as it relates to both the cause and management of feline diabetes.
Even though we need to be careful to not necessarily assume that what is ‘right’ for a human is also ‘right’ for a cat, the need to consider carbohydrates, obesity, and activity level should come as no surprise since these factors are are also significant issues in human diabetes.
~~~~~~~~~~~~~~~~~~~~~~~~~~~~~~~~~~~~~~~~~~~~~~~~~~~~~~~~~

Very Critical Points
If you do not read any further on this webpage, please understand the following principles. Your cat’s life literally depends on your understanding of these issues.
Many cats that are in a diabetic state no longer need any insulin when they are finally fed an appropriate low-carbohydrate diet.
Others will always need some insulin but the amount necessary to maintain proper blood glucose levels is nearly always significantly reduced once the patient is on a low carbohydrate diet.
Please re-read the previous two paragraphs carefully.
If you change your diabetic cat’s diet to one with lower carbohydrates, he will, in all probability, IMMEDIATELY (not days or weeks later) require a reduction in his insulin dosage. He may also immediately go into ‘remission’ and not need any insulin at all.
If this warning is ignored, you may very well end up with a cat in a hypoglycemic crisis (dangerously low blood sugar) which can result in death, or brain damage.
If you take only one point away from this page, it needs to be the understanding that if you stop pouring carbs into your cat by switching to a low-carb canned food diet (or even a dry food diet with lower carbs than you have been feeding), you MUST be aware of the probable immediate and significant impact on your cat’s insulin needs.
If I could shout this from the rooftops, I would.
Frequently, I hear of reports of cats that ended up near-death – or actually did die – from insulin overdoses because lay caregivers and veterinarians did not understand this basic concept.
I often hear my colleagues support the change to a low carbohydrate diet but then recommend “re-testing in a week or two” while the caregiver continues to administer the same amount of insulin. This very common lack of recognition of the immediate effects of low carb diets on the blood glucose level of the diabetic patient often results in a dangerous hypoglycemic state.
Or – the caregiver reads this article and decides to change the diet on their own and does not understand the need to lower the insulin dosage.
When someone understands half of the concept (changing to a low-carb diet), but does not understand the other half of the concept (the highly probable need to lower the insulin dosage) disaster often strikes.
Remember the statement that I made above? The one about pouring gasoline onto a fire? If you stop pouring gas on a fire, there is going to be an immediate reaction of that fire when its fuel is taken away. That fire is not going to take weeks or a month to respond.
In this analogy it would not be a big issue if you kept ‘drowning’ that dying fire with water but in this instance water = insulin and a hypoglycemic crisis can ensue if more insulin is given than is needed by the body.
Of course, carbohydrates are not the only fuel for a diabetic ‘fire’ but they play a very significant part in contributing to high blood sugar levels in a diabetic cat. If you minimize this issue – and do not lower the insulin accordingly – you really will be ‘playing with fire’ with regard to the safety of your cat.
So you say – “OK!! I get it! I understand that my cat may very well need a lower dose of insulin – or may not need insulin at all – once I stop pouring gasoline (carbs) onto his diabetic fire, but how do I know what dosage of insulin to give? How do I know what impact the new diet is going to have on his insulin needs? How do I keep my cat safe?”
This is where in-home blood glucose monitoring comes into play.
Trying to manage a diabetic cat without home testing is a bit like driving a car with a paper bag over your head.
A human who cares about his own safety would never inject himself with insulin without testing his blood sugar beforehand. The goal is to treat our diabetic cats the same way.
The best way to arrive at the optimal dosage of insulin and the optimal dosing frequency is by home testing. Note that I said “optimal.” Many diabetic cats have survived with a set amount of insulin being administered twice daily with the dosage determined by periodic glucose curves performed at a veterinary clinic if their owners will not, or cannot, home test. However, this is not the safest and most physiologically sound way to manage a diabetic patient so I urge all diabetic cat caregivers to strongly consider home testing.
Every case is different and definitive recommendations with respect to how far to lower the insulin dosage (when you start the diet change) cannot be given without knowing the specifics of each case. There are many crucial factors to be considered:
- carbohydrate content of the original diet
- carbohydrate content of the new diet
- how fast the change to a low carb diet is made
- how carb ‘sensitive’ the cat’s body is
- how quickly the cat’s body responds to the decrease in carbs
- how the cat, in general, reacts to insulin
- has the cat ever been positive for ketones in his urine
- current dosage of insulin
- current blood glucose levels of the patient
- etc.
Here are some quotes from recent studies regarding feline diabetes and how a proper diet impacts the insulin needs of cats:
- The Carnivore Connection to Nutrition in Cats, Dr. Debra Zoran:
“High-protein, low-carbohydrate diets and low-fiber diets are highly beneficial in the management of cats with diabetes, resulting in a reduction of > 50% in the amount of insulin required in 8 of 9 cats in one study. In another study, complete cessation of insulin administration was reported for one-third of the cats.”
- Update on Feline Diabetes Mellitus, Dr. Claudia Reusch (WSAVA 2006):
“In previous years, when we did not limit the type of food our remission rate was 15%-25%. We were able to increase the remission rate to 50-70% by using a low-carbohydrate high-protein diet.” (Remission refers to no further need for insulin.)
- Antech Diagnostic News, December 2003:
“In one study, 68% of cats with diabetes mellitus fed a carbohydrate-restricted canned diet lost the need for exogeneous insulin.”
I urge you to keep the lines of communication open between you and your veterinarian while learning to home test and implementing the diet change. That said, it is unfortunate that many veterinarians are not well-versed in the management of feline diabetes and all too often do not fully understand the strong connection between diet and blood sugar levels.
It is also very frustrating to note that many veterinarians either are not aware that home testing is possible (despite the subject being discussed in many veterinary journals and at many continuing education meetings) or just simply do not support this life-saving tool.
Additional help and support can be found on the Feline Diabetes Message Board and I urge all diabetic cat caregivers to join this forum as a support system to be used in conjunction with your veterinarian.
Keep in mind that with all internet forums, the experience and knowledge base of the participants will vary.
If posting to forums is not within your comfort zone and you would like additional help, I am available for consultations. Please understand that I cannot offer advice via email. Feline diabetes can be a very complicated disease to optimally manage and it would not be ethical or time-efficient to attempt to address individual case management of this disease via email.
If you have read Feeding Your Cat: Know the Basics of Feline Nutrition along with the first part of this webpage and are convinced that you need to start feeding your cat(s) correctly (low-carb – canned or homemade – food) and want to skip the rest of this paper, please head right to the changing the diet safely and the home testing sections below.
~~~~~~~~~~~~~~~~~~~~~~~~~~~~~~~~~~~~~~~~~~~~~~~~~~~~~~~~~
If you want to know more about the physiology of diabetes and why a low carbohydrate diet is so important for this species, please click on the first four links below.
Carbohydrates, obesity and diabetes
Optimal nutrition for all cats
Switching the Diabetic Cat to a Low Carbohydrate Diet – SAFELY!
In-home blood glucose monitoring
Urine collection for ketone and glucose testing
The Basics of Diabetes
All cells in the body use glucose (“blood sugar”) as their source of energy. However, in order for glucose to provide nourishment to the cell, the glucose must get inside the cell. Insulin, which is produced by the pancreas, is the substance that tells the ‘front door’ of the cell to open in order to let the glucose inside. If this system is disrupted for any reason, the glucose cannot enter the cell and subsequently, the level of glucose increases in the blood stream (hyperglycemia) and the cells go ‘hungry’.
There are two types of diabetes. Type 1 and Type 2. Type 2 is the more common form in both humans and cats.
Type 1 occurs when the beta cells of the pancreas are not able to produce enough insulin.
Type 2 is characterized by two problems. The first, as in Type 1, is a diminished ability of the pancreas to secrete insulin. The second issue is one ofinsulin resistance. In other words, the receptors on the cell wall that would normally open the door to the cell to let the glucose in when insulin ‘knocks’, stop ‘listening’ to the insulin. The cells ‘resist’ the signal that the circulating insulin is sending and the glucose is not transferred to the inside of the cell, resulting in an elevated blood glucose (hyperglycemia) and cellular ‘starvation’. The elevated blood glucose, in turn, sends a signal to the pancreas telling it to secrete more insulin. The elevated insulin may somewhat override the insulin resistance resulting in more glucose entering the cells, but eventually the pancreas can become exhausted or ‘burned out’.
Glucose toxicity results from chronic hyperglycemia. Glucose toxicity wreaks havoc on the entire body – especially the pancreas and its insulin-producing cells. A vicious cycle then ensues as the insulin-producing cells are damaged resulting in less insulin being produced.
Here is a picture of the pancreas. It is the long, flat, pink organ in the center. The dark red organ below it is the spleen. The white tissue is all fat. This is also called “omental fat” and some of you may have heard or read about this type of fat in humans. It is the fat that is carried around the abdomen and is associated with significant health problems.

The Cat’s Unique Metabolism
In my article, Feeding Your Cat: Know the Basics of Feline Nutrition, I explain what it means to be an obligate carnivore. For a more technically detailed presentation of this subject matter, please see Dr. Debra Zoran’s wonderful article entitled The Carnivore Connection to Nutrition in Cats.
Cats are obligate carnivores and, as such, are uniquely adapted to consume a diet that is high in protein, contains a moderate amount of fat, and includes a very small amount (2-3 percent) of carbohydrates. Since nature designed them to ingest very few carbohydrates, cats lack many of the important enzymes that are necessary to process this type of food efficiently.
With the above information in mind, consider the fact that the carbohydrate level of most dry foods is between 35-50 percent with some of the lower quality dry foods being even higher.
Robbie has been designed by nature to eat meat, not grains.
The three main ‘take-home’ words from my Feeding Your Cat article are“proteins” (animal versus plant), “water”, and “carbohydrates.” For this article, the most important of the three subjects is carbohydrates.
Carbohydrates, Obesity and Diabetes
Most people are aware that diabetes is more common in overweight humans than it is in people closer to an optimal weight. The same is true for cats. Fat (adipose) cells produce a substance that causes the cells of the body to become resistant to insulin. This increase in insulin resistance is the hallmark of Type 2 diabetes. As mentioned above, this is the most common form in the cat.
Cats are designed to utilize proteins and fats for their energy – not carbohydrates. They are lacking the necessary enzymes to efficiently utilize carbohydrates to meet their energy needs. When the carbohydrate level of an obligate carnivore’s diet is higher than it should be – remember that a bird or a mouse is only 2-3 percent carbs and that most dry foods contain between 35-50 percent carbs – the excess carbohydrates are stored as fat. The increased fat cells, in turn, promote Type 2 diabetes via an increase in insulin resistance.
That said, if calories in exceed calories out – no matter whether the calories come from protein, fat, or carbohydrates – the cat will gain weight. This is why portion control is important no matter what diet you are feeding.
Mindy (left) is nice and lean and full of energy. Molly (right) was rescued from a home where only dry food was free-fed and she had become terribly obese. She could barely walk and could not even clean herself. She has gone from 20.5 pounds to 13 pounds simply by eating a low-carbohydrate canned food and having all dry food removed from her diet. She now runs, jumps and plays like a normal cat! For more on her story see Obesity – Molly’s story.
Not all carbohydrates are created equal, but it is safe to say that obligate carnivores – especially diabetic ones – do not benefit from carbs at a level above what would be in their natural diet regardless of the type. But that said, carbohydrates are characterized by their Glycemic Index (GI) and their Glycemic Load (GL) which are measurements that reflect how high and how rapidly a specific carb causes a rise in blood glucose when ingested and the overall impact that particular carb has on the diabetic state. The higher the GI/GL of a carbohydrate, the worse the result will be for a diabetic patient although GI/GL of various ingredients has not been studied in cats like it has been in humans.
The Glycemic Index and Glycemic Load values of different food sources are very important to consider for people trying to manage their own diabetes. However, I do not like to concentrate on these values for cats because then it sounds like there may be “good” carbs versus “bad” carbs for cats. The bottom line is that humans are designed to utilize carbs whereas cats are not. What we can say is that some carbs, such as the grain flours, are worse (higher GI/GL) than other carbs, but ideally, we should strive to keep the carb level of the feline diet at a level which would be found in nature.
More in-depth information can be found here:
Hypercarnivory and the brain: protein requirements of cats reconsidered

Buck still needs to lose a bit more weight on his low-carb diet.
Unfortunately, pet food labels are extremely lacking in useable information. All that is required to be listed is the ‘guaranteed analysis’ which are only minimums and maximums which are, by definition, inaccurate. Also, it is not required to list the carbohydrate content.
It is sometimes stated that you can subtract all of the percentages on the label from 100 percent in order to give you an approximate percentage of the carbohydrates contained in any product. In other words, subtracting the protein, fat, water, fiber, and ash/mineral content from 100 percent will leave you with the percentage of carbohydrates contained in the diet in the diet on a ‘wet matter’ or ‘as fed’ basis. However, because the guaranteed analysis values are only listed as minimums and maximums with no ‘floor’ or ‘ceiling,’ you can see where this type of calculation can lead to a very erroneous conclusion with respect to the carbohydrate content. Also, you need to convert this number to dry matter basis or ‘calories from’. If you use ‘as fed’ values, they will be misleadingly low.
More on this subject can be found on my Commercial Foods page.
Also see Cat Food Composition chart.
Optimal Nutrition for All Cats
I long for the day when veterinarians start thinking outside of the Big Four ‘box’ and stop being so ‘married’ to Hill’s, Purina, Iams, and Royal Canin since there are higher quality – and less expensive – diets available over-the-counter (non-prescription).
We have all heard the phrase ‘locking the barn door after the horse is gone’. This applies to how we feed our cats with respect to the diseases that they commonly develop secondarily to being fed a low quality, species-inappropriate diet. For instance, when looking at feline diabetes, notice that the rationale behind the diabetic prescription diets is to provide a decreased carbohydrate level in the food to ‘treat’ a diabetic cat.
However, why not recommend a decreased level of carbohydrates for _all_obligate carnivores to possibly prevent diabetes? Why are we always addressing treatment rather than prevention? Why aren’t more veterinarians making common sense-based recommendations for their healthy patients in order to prevent diseases such as diabetes, IBD, urinary tract disorders, etc., that are, in many cases, strongly linked to a high carbohydrate/grain-laden/water-depleted diet?
The subject of fiber is also widely discussed with respect to feline nutrition and diabetes. It was once thought that a high fiber diet would be beneficial for blood glucose control in the diabetic cat but this recommendation has since fallen out of favor. Please see The Carnivore Connection to Nutrition in Cats for more details. A cat’s natural diet is very low in fiber.Cows and horses are designed to eat a high fiber diet – not cats – yet many veterinarians still recommend diets like Hill’s w/d (a high fiber/high carbohydrate diet).
Let’s take a look at some of the ingredients and the carbohydrate content in several diets that are often prescribed by veterinarians for diabetic cats. I have underlined the sub-optimal and species-inappropriate ingredients. For a more in-depth look at reasons why these ingredients do not constitute optimal nutrition, please see Feeding Your Cat.
In summarizing the points in that article, please take note of the fact that the Hill’s Prescription products listed contain no muscle meat. By-products or organ meats are used instead. (Please see my discussion regarding by-products which can be highly nutritious sources of protein but can also include low quality ingredients and diseased organs.)
In addition, note the high carbohydrate levels in all of the listed products except for the Purina canned DM. Also notice the common usage of high glycemic index grain flours and the use of hyperallergenic ingredients (corn, wheat, soy, and yeast).
Powdered cellulose is fiber source obtained from plants/trees.
The carbohydrates listed are on a dry matter basis.
Hill’s Prescription dry m/d: (18% carbohydrates)
Chicken By-Product Meal, Corn Gluten Meal, Pork Fat, Brewers Rice, Wheat Gluten, Powdered Cellulose, Pork Protein Isolate, etc.
Hill’s Prescription canned m/d: (16% carbohydrates)
Pork by-products, pork liver, water, corn starch, powdered cellulose, soy protein isolate, chicken fat, etc.
Hill’s Prescription dry w/d: (37% carbohydrates)
Brewers Rice, Chicken By-Product Meal, Corn Gluten Meal, Powdered Cellulose, Chicken Liver Flavor, Soybean Oil, etc.
Old version: Chicken by-product meal, corn gluten meal, brewers rice, rice flour, powdered cellulose, chicken liver flavor *, soybean oil…..preserved with BHT, BHA and ethoxyquin
Notice that they finally removed the BHT, BHA, and ethoxyquin but they made the diet even more unhealthy than it was previously by making it predominantly brewers rice instead of an animal-based protein source (chicken by-product meal).
Hill’s Prescription canned w/d with* chicken: (26% carbohydrates)
Water, Pork Liver, Pork By-Products, Chicken, Powdered Cellulose, Corn Starch, Oat Fiber…..Chicken Liver Flavor, etc.
*Please be aware that the word “with” means that a product is required to contain only 3% of the ingredient – in this case, chicken. The word “flavor” means that the product is not required to have any of the ingredient present.
Now let’s look at two Purina products:
Purina dry DM: (18% carbohydrates)
Poultry by-product meal, soy protein isolate, corn gluten meal, soy flour, animal fat preserved with mixed-tocopherols (source of Vitamin E), corn starch, animal liver flavor, etc.
Purina canned DM: (3% carbohydrates)
Liver, poultry by-products, meat by-products, water sufficient for processing, chicken, salmon, oat fiber, salmon meal, artificial and natural flavors, etc.
Purina canned DM Savory Selects: ( 10% carbohydrates)
Water sufficient for processing, chicken, liver, wheat gluten, meat by-products, corn starch-modified, soy flour, artificial and natural flavors, etc.
If I had to choose between the Hill’s and Purina choices, I would pick the Purina canned (regular) DM. But fortunately, we do have other choices. One of the biggest mistakes I see veterinarians make is choosing a diet based on addressing a single disease entity. This is very narrow-sighted.
The Purina canned DM favorably addresses the overall carbohydrate level but it also contains corn, wheat, and soy and it contains predominantly liver versus a muscle meat. These ingredients are certainly not what a cat would choose to eat in the wild. Note that there is a negative relationship between soy and thyroid health. Given how common hyperthyroidism is in cats, I will not feed soy to any cat in my care.
I choose to feed a cat for overall health, not just to address one disease state such as diabetes – especially when there are products available that are even lower in carbohydrates and contain far superior ingredients for carnivores than the products listed above – and are less expensive. When I look at the Hill’s and Purina ingredients, these are not products that I would choose to feed to my patients or my own cats.
Switching the Diabetic Cat to a Low Carbohydrate Diet
Caution: This must be done very carefully if the patient is already on insulin. See above if you have not already read the Critical Points section.
If your cat is not on insulin because he was just diagnosed with diabetes, then you can change the diet more rapidly – either immediately (‘cold turkey’) or within 2-3 days. More on this issue below.
Unless the patient’s clinical signs warrant immediate insulin administration, I try a diet change – with no insulin – for 3-5 days to see what impact the new diet will have on the blood glucose. In most cases, I do not agree with waiting much longer than a week to start insulin. This is because you will have the best chance of getting your cat into remission (cease needing insulin) if both diet and insulin are used very early on. The longer your cat’s body is under the effects of glucose toxicity, the more his body will be damaged and the less chance of remission he will have.
When I have a new diabetic patient present to me, the two most important tasks are:
getting the patient onto a low carbohydrate diet – preferably canned and not dry
teaching the client how to home test
If your cat is already on insulin, the safest way to implement a diet change is to incorporate home testing into your management protocol.
You also need to discuss any diet change with your veterinarian but be aware that many vets underestimate the degree to which the insulin dosage needs to be lowered when a low-carb diet is implemented. This puts the patient at significant risk for life-threatening hypoglycemia.
For example, let’s consider a cat that is currently eating Hill’s Prescription dry w/d with 37% of its calories coming from carbs and he is suddenly switched to a canned food with less than 10% carbs. If the insulin is not lowered accordingly, an overdose of insulin will occur. Please do not underestimate the favorable impact that a low-carb diet has on decreasing the blood glucose level of a cat. As stated at the beginning of this page, many cats no longer need any insulin once on a low carb diet. Others have a drastic decrease in the amount of insulin needed to maintain an optimal blood glucose level.
The goal is to get your cat off of dry food and on to a 100 percent canned food diet but if your cat is on insulin, this must be done carefully – especially if the cat refuses to eat canned food.
Giving a full dose of insulin to a cat that is not eating can result in life-threatening hypoglycemia.
Many of the tips that I offer in the Transitioning Dry Food Addicts to Canned Food section of my Feeding Your Cat article can be used for diabetic cats but be cautious as you implement them if you are also injecting insulin.
A non-diabetic cat can very safely handle the ‘tough love’ 12-18 hours period of time without food that is often necessary to get them to change their diet but this does not apply to a diabetic patient. Therefore switching a stubborn diabetic cat can be more difficult. It is not impossible but the process does have some complicating factors.
With a stubborn cat that is a dry food addict, approach the diet transition slowly and with a high dose of patience. For cats that like canned food but are still eating a 100% dry food diet, the transition can proceed much more rapidly as long as the blood glucose is being monitored **at home** and the insulin is being adequately adjusted downward. I cannot stress this last point strongly enough.
When defining “rapidly,” I have, as noted above, switched many cats from dry to canned ‘cold turkey’ without any digestive problems (vomiting or diarrhea) – especially those cats that are already eating some canned food in addition to their dry food. However, you can also error on the side of caution and go slower than I would – taking ~1 week to make the switch.
With regard to the issue of diarrhea and a diet change – I don’t mind a bit of loose stools (tooth paste +/- with a bit of pancake batter consistency) and tend to keep on with the canned food diet. These loose stools often firm up within a few weeks on the new diet.
Some cats will vomit when changed to canned food. The transition must be slowed down for these patients because it is very important for them to have food ‘on board’ in order for the insulin to have something to work with.
There are many cases of success stories on the Feline Diabetes Message Board that discuss cats ceasing to need insulin once all dry food (or high carb canned food) was removed from their diet.
In-Home Blood Glucose Monitoring
Few humans with diabetes would dream of trying to mange their disease without the use of a glucometer (“meter”) to test their blood glucose level prior to injecting insulin. Injecting insulin blindly – into a human or a cat – puts the patient at significant risk for developing life-threatening hypoglycemia (low blood sugar).
This includes feline patients that have their doses determined with glucose curves done at a veterinary hospital. This is because your cat’s insulin needs can change for a variety of reasons (infection, stress, anorexia, etc.) and also because the curve generated at the vet clinic is influenced by stress hyperglycemia which is a false increase in blood glucose due to the cat’s internal reaction to this stress. This can then result in a higher dosage of insulin being prescribed than will be needed by the patient when they are at home.
Believe me, I understand that the issue of home testing can be quite intimidating at first. Most people become very stressed when first learning of their cat’s diabetes diagnosis and can’t even imagine injecting their cat with insulin, let alone getting a blood sample from their ear!
Awhile back I decided to pretend that I was a new diabetic cat owner. I went to test 7 cats in my home (my own and foster cats). Needless to say, it was frustrating – and not as easy as I was expecting it to be – but I finally got them all tested.
Several cats took 5-7 pokes (in different sessions) to get enough blood for a reading.
Only 1 out of the 7 ‘guinea pigs’ gave up enough blood the first time to get a reading.
I, on the other hand, was bleeding like a stuck pig. The lancet was going through the cat’s ear and right into my finger. I was bleeding. The cat was not. I started practicing what I preach and got a cotton ball to protect my finger while I kept working to find the ‘sweet spot’ in the cats’ ears so that I could get a blood sample from them.
The moral of the story? Be patient. Be kind to yourself. Give it time and it will come. Maybe not the first day and maybe not even the first week but most people (and cats) get the hang of home testing.
Oh…and cat ears tend to bleed a bit easier after they are poked a few times. Do not worry about this! It is a good thing and your cat’s ears will be fine!
A very valuable resource and a great group of supportive people can be found at the Feline Diabetes Message Board. On a daily basis, board members talk newbies through the trials of learning how to home test. It is always fun to see these scared, apprehensive new people master home testing and then go on to help others after they get the hang of it.
If you or your veterinarian need some convincing that home blood glucose monitoring is critical to the optimal management of feline diabetes, there are many veterinary journal and PubMed articles discussing the value and validity of blood glucose monitoring of cats.
Two veterinary journal articles can be found here and here that verify the reasonable accuracy of these meters for use in diabetic pets.
Sadly, many of my colleagues either do not introduce their clients to this life-saving tool or, worse yet, dissuade their clients from the practice of home monitoring. This lack of pro-active management has resulted in the death of many cats and the less-than-optimal management of countless others.
That said, there are rare cats that will not allow home testing. I say “rare” because if the cat allows insulin injections, they will almost always allow you to test them – eventually – so don’t give up too quickly and do not assume that your cat will not allow you to home test.
Meters, test strips, lancets, lancet pens:
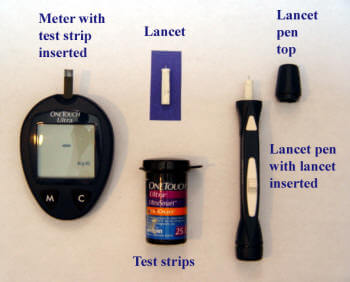
The meters that are used by humans can also be used to successfully monitor a diabetic cat.
You do not need a meter designed especially for pets such as the AlphaTrak which costs ~$100 and uses very expensive test strips (over $1 per strip). The cost of the meter is not as much of a factor as the ongoing cost for the test strips.
There are many meter models to choose from. You can often get the meters for free (or around $10) when you purchase 50 – 100 strips since the manufacturers want to get you locked into buying their strips. (Think about cheap printer prices – they are cheap because the companies want to get you locked into buying their expensive ink cartridges.)
Ebay is also a good place to buy strips but watch the expiration dates.
There are two important factors to consider when buying a meter:
cost of strips (range 0.35–0.35 – 0.35–1.20 each)
amount of blood needed (range = 0.3 – 1.0 microliters)
I have had good luck managing patients with the Walmart Relion Micro or the newer Relion Confirm. Both of these meters use only 0.3 uL. The Confirm has few more features than the Micro but they are overkill for what you really need. Either meter will work just fine. These meters and their strips are inexpensive when compared to other strips and the meters have been shown to be reasonably accurate.
Other favorites include the Ascencia Contour and the Accucheck Aviva.
The TrueTrack has not been getting very good reviews on the Feline Diabetes Message Board lately so you may want to to stay away from that meter.
Also, the Freestyle Lite has had several reports of testing far too low so I would not purchase that model.
I suggest that you take your cat and your new meter to your vet for comparison with their blood analyzer or the meter they use in-house (as long as it has been shown to be accurate by comparison with table top analyzer). Make it a point to take your glucometer with you every time you take your cat to your vet so that you can run comparisons.
Use the same drop of blood from the cat’s ear for comparison with your vet’s glucometer. They are not going to be exactly the same but they will hopefully be within 15 – 20% of each other or better.
It is important to get a meter that uses ‘wicking’ test strips which all of the meters mentioned above use. These strips automatically draw the blood into the testing area as soon as the edge of the strip contacts the edge of the blood drop. This is in contrast to the type of meters that use strips requiring that the blood be dropped directly onto the test strip.
Lancets (the ‘pokers’) range in size from a large 25 gauge to a very small 33 gauge. However, most companies do not state the gauge size on their lancet boxes so it can be confusing when trying to figure out which lancets to buy. Generally speaking, when you see lancets labeled “ultra-fine” or “ultra thin”, that denotes a very fine lancet size (31,32,33 gauge). Exception to the word “ultra” is the LifeScan One Touch UltraSoft lancets. They are 28 gauge and many people have good luck with those.
Keep in mind that the lancet has nothing to do with the meter. You do not have to use the same brand of meter and lancet.
The larger the number, the smaller the lancet point. The smaller the lancet point, the harder it is to get enough blood but the more comfortable it will be for your cat so you can see that it is a trade-off.
However, contrary to what you may think, most cats don’t even feel the lancet stick. I think they ‘feel’ the nervousness of the human even more! What bothers them the most is the restraint and sometimes the noise of the lancet pen.
This noise of the pen is why some people do not like using it and, instead, just use the lancets freehand.
Most people like to use a lancet in the 28-29 gauge range especially when first starting out since it can be frustrating enough to get blood without having to deal with an ultra-fine lancet.
Some people like to use an even larger lancet (25 – 27 gauge). They are happier with the blood flow and their cats don’t seem to mind the larger size. Other people have had great luck with the lancets that are much finer – more in the 31-33 gauge range. It all depends on how good of a ‘bleeder’ your cat is.
You will have to experiment to see what size of lancet works best for you and your cat but you will probably be able to use a smaller lancet after a few weeks as your cat’s ears ‘learn’ to bleed.
One example of the lancets that I have used is the Life Scan One Touch FinePoint Lancets (purple ones) which, according to the chart above, is a 25 gauge lancet. (No gauge number is listed on the box but I assume that the chart is accurate.)
I have also used the Life Scan One Touch UltraSoft Lancets (white ones shown in picture above) which are 28 gauge.
The FinePoint lancets will provide a large enough drop of blood more consistently than the UltraSoft lancets. Again, you can start with a larger lancet but then move to a smaller lancet once your cat’s ears start to bleed easier and you start to get the hang of where to test on the ear. Many people start to use smaller lancets within 2-3 weeks (or sooner) of learning how to home test. Or…they need to use the smaller ones right from the beginning because their cat does not favor being poked with the larger ones.
Most meters come with 10 lancets but they vary in size depending on the company.
Each meter kit should also come with a lancet device (lancet pen) that you can adjust to give a deeper or more shallow penetration of the lancet. The pen that I have has 7 settings (7 is the deepest penetration) and I find that the 5 works well.
As mentioned above, some people prefer to ‘freehand’ the lancet. In other words, they do not use the pen but, instead, they just hold the lancet in their hand and poke their cat’s ear that way. The nice part about doing it freehand is that you can see exactly where you are poking relative to the blood vessel. When using the pen, you can’t tell exactly where the lancet tip is going to end up.
Testing your cat:
Be sure to test yourself first so that you become familiar with the use of the glucometer – especially the way the strips ‘sip’ up the blood drop.
The most common mistake that I see people make is that they do not hold the ear gently but firmly against the tip of the lancet pen. Instead, they let the ear fall away from the pen. If this happens, the lancet will not penetrate the ear.
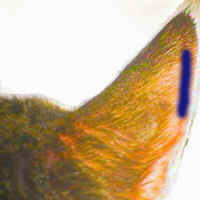
Vein location – notice the vein (red line) running along the perimeter of the ear:

Aim for the shaded area shown here:
Here is a pictorial webpage that demonstrates the testing procedure. It is outdated (2001) with respect to meter brand and the comment on blood drop size. (Thankfully, the newer meters do not require a 1.5 uL drop.)
You will find that there are several different opinions and techniques recommended for the testing procedure and, with time, you will figure out which ones work best for you and your cat.
For instance, the pictorial page linked above shows the person approaching the cat head-on (in order to test the inside of the ear, versus the outside) which I find makes many cats nervous. They tend to want to back away from the person and so I would much rather stay behind them as described and shown below.
However, as the author of this page points out, there is minimal hair on the inside of the cat’s ear which may be an important consideration when testing a long-haired cat. Long hair can interfere with the blood drop formation. Vaseline may help with the formation of the blood drop on these cats.
This page also discusses the use of warming devices for the ear which I have never tried. Maybe if I had warmed the ear on my test subjects discussed above, I would have had better luck getting blood the first or second time.
Be aware that if you do not have anything against the ear other than your own finger, you may stick yourself especially if using a lancet pen versus freehand. As shown in the third movie below, a small cotton ball or tissue can be used to protect your finger.
Here is a very good movie that demonstrates the testing procedure. This movie shows the operator using the lancet free-hand.
Another movie is located here. This movie shows the veterinarian using a 25 gauge needle instead of a lancet. I do not recommend this method. A 25 gauge needle is overkill and will cause more trauma and pain for your cat than is necessary – especially since the newer meters do not require a large blood drop. The blood drop shown in this movie is about 20 times more than you need.
Some people like to use a warm sock filled with rice to increase the blood flow to the ear but I find it cumbersome and annoying to have to use one more item when testing a cat. Do what works best for you.
After you have poked the ear with the lancet, you may need to ‘milk’ the blood up to the punctured area for just a couple of seconds.
These movies show the patients being star pupils with minimal restraint. However, in reality, not all cats are this good about testing. Most of them, however, do improve with time.
It is very important to be patient and move slowly and calmly. Also, the best time to try this procedure for the first time is when your cat is sleepy. Keep in mind that there is a learning curve for both of you and the less nervous you are, the better off both of you will be. Rest assured that the procedure will most likely get easier as you polish your skills so please do not get discouraged early on in the learning process.
When first starting to test a new patient, I click the pen several times around the cat’s ear to make sure he gets used to the noise. Depending on the cat, I may or may not poke him in that first session.
When first testing very skittish cats, I simply lightly restrain them and click the pen a few times – without poking them – and then feed them a treat and let them go.
You do not have to get a test on the first try or even on the first day. Most people are not successful on the first day. Give it time and try again later that day or the next day.
Offering the cat his favorite treat in conjunction with the testing may help keep him calm and persuade him to view this procedure in a more positive light.
Baby steps and positive reinforcement (treats) are very important when approaching any type of training. First impressions are lasting ones so there needs to be a balance between being gentle but firm with your cat.
Although certainly not necessary, it may be easier on your nerves if the first test is done under supervision at your veterinarian’s office. You can also check in with the Feline Diabetes Message Board to see if there are any members living near you who can help you learn how to home test. There are many wonderful members of this board who are spread all over the world and who are willing to help a newbie learn how to home test.
Everyone has their preference when it comes to methods used to handle their cat and every cat also has their own idea of what level of restraint they will tolerate. The least amount of restraint that can be used to get the job done is obviously going to make this less stressful for both of you. If you can test them, unrestrained, while they are just hanging out on their favorite chair, that is optimal.
Please note that in the following pictures the test strip should already be in the meter but I did not have any at the time these pictures were taken.
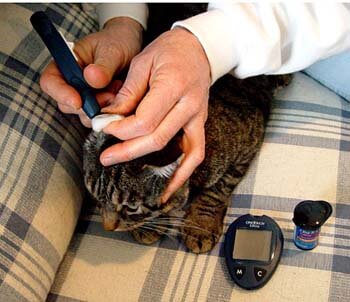
Testing Calvin’s right ear with minimal restraint

Testing Calvin’s left ear with no restraint bracing of his head
The method that works best for me when testing a fidgety cat, is to kneel on the floor with the cat between my knees. We are both facing the same direction and there is very little firm restraint involved. I just try to prevent the cat from going forward. I am right handed so it is easiest for me to test the right ear but it is best for the cat to alternate between ears to keep one from getting sore.
I use gentle pressure with my left hand on the left side of the cat’s head to, hopefully, keep him from shaking his head while the blood drop is forming. I hold the right ear with my left thumb and index finger and my right hand handles the lancet pen. It is easiest for me to test the outside edge of the right ear but alternating between the inside and outside margins of each ear is optimal. (Again, please note that the test strip should already be in the meter at this point.)

Testing Calvin’s right ear with gentle restraint.

Testing Calvin’s left ear while restraint. bracing his head.
The blood vessel runs along the margin of the ear. Aim for the upper outer (or inner – toward the other ear) edge of the ear anywhere from half to three-quarters of the distance up the ear from the base toward the tip. (See pictures above where I marked the ear with a pen.)
A tricky issue to contend with is the cat’s instinct to shake his head during those few critical seconds when you are waiting for the blood drop to form.
After the lancet is used, I lay it down but continue to gently hold onto the ear and keep a few fingers of my left hand on the left side of his head to prevent him from shaking off the forming drop of blood. Of course, if he is allowed to do so, the drop of blood will go flying and you will have to start over again.
If a drop has not formed quickly, you can try to ‘pump’ the blood into the puncture area with your right hand. This involves a gentle squeeze and release, squeeze and release just below the puncture site. Another technique involves gently ‘milking’ the blood up the vein from the base of the ear. This whole process takes about 5 seconds or less.
With most meters, you have about 2 minutes to fill the test strip with blood once the strip is inserted into the meter so don’t insert it too soon. Insert the strip after the cat is in place and ready to be tested. Two minutes is generally plenty of time but if the meter ‘times out’ simply remove the test strip and re-insert it.
Once you have a large enough blood drop, touch the tip of the strip to the edge of the blood drop so that the strip will sip the blood into its chamber. Do not try to ‘scoop’ or ‘scrape’ the blood off the ear and onto the test strip. It must be drawn up by the test strip via capillary (‘sipping’) action.

The most common problem that I encountered when first starting to test cats with the glucometer was not getting the test strip confirmation window filled. When this happens, the meter will give you an error message. You will then have to get a new strip and start again. If the blood drop was too small and all of the blood has been drawn up by the test strip – but it is not enough – do not try to get more blood from the puncture site and reapply the test strip to the ear. That will not work. As soon as blood enters the strip, the meter starts counting down and adding more blood at this point is futile.
Try to make a habit of watching the test strip window as you are touching the strip to the drop of blood. If your blood drop is large enough, this will ensure complete filling before taking the strip away and will result in a successful sampling. With a bit of practice, you will also learn not to ‘jump the gun’ and apply the test strip before you have a large enough blood drop to fill the confirmation window. If the drop looks too small, be patient and try to gently ‘pump’ or ‘milk’ the blood into the puncture area as discussed above.
After the test strip is filled, lay the meter down and gently hold off the puncture site with the cotton ball that you were using to protect your finger. Necessary holding times will vary but usually 10 seconds or less will be sufficient.
Please be forewarned that you may want to cry and throw the meter when first attempting to test your cat’s blood glucose! There is definitely a learning curve associated with this procedure – for both you and your cat – and the frustration level can be very high initially. Take a deep breath, stay calm, keep a sense of humor, (drink a glass of wine…eat some chocolate……) and accept the fact that it may take you many tries at different times over the span of a few days to start consistently getting samples. The calmer you are, the better off your cat will be.
Do not get discouraged if the first few times do not go well. If success has not been met after 2-3 sticks (or if the cat is very nervous, after only 1 stick) feed him the treat you have standing by and let him go. You can try again in a few hours. You do not need to master this on the first try!
As already mentioned, a group of very caring and knowledgeable people can be found on the Feline Diabetes Message Board. They can often talk you down off of the ‘ledge of frustration’ that comes along with learning how to home-test. Many of the members have a great deal of very practical experience in dealing with feline diabetes.
Managing a cat with diabetes can be very overwhelming, to say the least, and communicating with others who are faced with the same issues can be very helpful. As with any online group, be sure to do your own homework.
Collecting Urine for Ketone and Glucose Measurements
Diabetic ketoacidosis (DKA) is a very serious and life threatening condition which can result from unregulated diabetes.
DKA can result from:
- not enough food
- not enough insulin
- high level of insulin resistance secondary to infection, inflammation, obesity, etc.
When sugar cannot get inside of the cells for any of the reasons above, the body ends up starving at the cellular level so it starts to burn fat for fuel. When this happens, ketones are released into the blood stream and then end up in the urine.
Therefore, it is important to be able to test diabetic cats for urine ketones – daily, if possible – whenever there is a threat of DKA.
With regard to using urine sugar (glucose) levels to manage a diabetic cat, I must stress that this is very far from optimal. Urine glucose testing is a very crude way to manage a diabetic cat but if home testing as described above is not possible, then urine glucose testing is better than no monitoring at all.
See this video for more information:
Conclusion
While writing this webpage, I decided to see what information is available on the internet with respect to feline diabetes. I was quite disturbed to see so many authors of the various websites, and posters in chat groups, still continuing to recommend a high complex carbohydrate/high fiber diet. A very critical point is being missed: Cats are obligate carnivores and a high carbohydrate diet is detrimental to their health, in general, and will make diabetic regulation much more difficult and diabetic remission (no longer needing insulin) almost impossible.
Also, high fiber diets run counter to a cat’s natural diet and research has shown that high fiber diets do not favorably impact a diabetic cat like that observed in a diabetic dog or human.
Fortunately, there has been a great deal of focus on feline diabetes in the past couple of years so when you are searching the internet, be sure to pay attention to the date on the webpage for the most recent information.
The “Catkins” diet (high protein, moderate fat, low carbohydrate) is in and the illogical high carbohydrate/high fiber diets are, thankfully, out.
Updated June 2014
Partially updated November 2016
Lisa A. Pierson, DVM