PyTorch on Google Cloud: How to deploy PyTorch models on Vertex AI (original) (raw)
Rajesh Thallam
Solutions Architect, Generative AI Solutions
Vaibhav Singh
Group Product Manager
This article is the next step in the series of PyTorch on Google Cloud using Vertex AI. In the preceding article, we fine-tuned a Hugging Face Transformers model for a sentiment classification task using PyTorch on Vertex Training service. In this post, we show how to deploy a PyTorch model on the Vertex Prediction service for serving predictions from trained model artifacts.
Now let’s walk through the deployment of a Pytorch model using TorchServe as a custom container by deploying the model artifacts to a Vertex Endpoint. You can find the accompanying code for this blog post on the GitHub repository and the Jupyter Notebook.
Deploying a PyTorch Model on Vertex Prediction Service
Vertex Prediction service is Google Cloud's managed model serving platform. As a managed service, the platform handles infrastructure setup, maintenance, and management. Vertex Prediction supports both CPU and GPU inferencing and offers a selection of n1-standard machine shapes in Compute Engine, letting you customize the scale unit to fit your requirements. Vertex Prediction service is the most effective way to deploy your models to serve predictions for the following reasons:
- Simple: Vertex Prediction service simplifies model service with pre-built containers for prediction that requires you to only specify where you store your model artifacts.
- Flexible: With custom containers, Vertex Prediction offers flexibility by lowering the abstraction level so that you can choose whichever ML framework, model server, preprocessing, and post-processing that you need.
- Assistive: Built-in tooling to track performance of models and explain or understand predictions.
TorchServe is the recommended framework to deploy PyTorch models in production. TorchServe’s CLI makes it easy to deploy a PyTorch model locally or can be packaged as a container that can be scaled out by the Vertex Prediction service. The custom container capability of Vertex Prediction provides a flexible way to define the environment where the TorchServe model server is run.
In this blog post, we deploy a container running a TorchServe model server on the Vertex Prediction service to serve predictions from a fine-tuned transformer model from Hugging Face for the sentiment classification task. You can then send input requests with text to a Vertex Endpoint to classify sentiment as positive or negative.
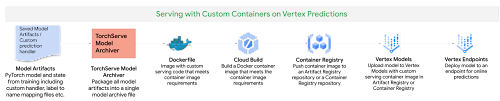
Figure 1. Serving with custom containers on Vertex Prediction service
Following are the steps to deploy a PyTorch model on Vertex Prediction:
- Download the trained model artifacts.
- Package the trained model artifacts including default or custom handlers by creating an archive file using the Torch Model Archiver tool.
- Build a custom container (Docker) compatible with the Vertex Prediction service to serve the model using TorchServe.
- Upload the model with the custom container image as a Vertex Model resource.
- Create a Vertex Endpoint and deploy the model resource to the endpoint to serve predictions.
1. Download the trained model artifacts
Model artifacts are created by the training application code that are required to serve predictions. TorchServe expects model artifacts to be in either a saved model binary (.bin) format or a traced model (.pth or .pt) format. In the previous post, we trained a Hugging Face Transformer model on the Vertex Training service and saved the model as a model binary (.bin) by calling the .save_model() method and then saved the model artifacts to a Cloud Storage bucket.
Based on the training job name, you can get the location of model artifacts from Vertex Training using the Cloud Console or gcloud ai custom-jobs describe command and then download the artifacts from the Cloud Storage bucket.
2. Create a custom model handler to handle prediction requests
TorchServe uses a base handler module to pre-process the input before being fed to the model or post-process the model output before sending the prediction response. TorchServe provides default handlers for common use cases such as image classification, object detection, segmentation and text classification. For the sentiment analysis task, we will create a custom handler because the input text needs to be tokenized using the same tokenizer used at the training time to avoid the training-serving skew.
The custom handler presented here does the following:
- Pre-process the input text before sending it to the model for inference using the same Hugging Face Transformers Tokenizer class used during training
- Invoke the model for inference
- Post-process output from the model before sending back a response
3. Create custom container image with TorchServe to serve predictions
When deploying a PyTorch model on the Vertex Prediction service, you must use a custom container image that runs a HTTP server, such as TorchServe in this case. The custom container image must meet the requirements to be compatible with the Vertex Prediction service. We create a Dockerfile with TorchServe as the base image that meets custom container image requirements and performs the following steps:
- Install dependencies required for the custom handler to process the model inference requests. For e.g.
transformerspackage in the use case. - Copy trained model artifacts to
/home/model-server/directory of the container image. We assume model artifacts are available when the image is built. In the notebook, we download the trained model artifacts from the Cloud Storage bucket saved as part of hyperparameter tuning trials. - Add the custom handler script to
/home/model-server/directory of the container image. - Create
/home/model-server/config.propertiesto define the serving configuration such as health check and prediction listener ports - Run the Torch Model Archiver tool to create a model archive file from the files copied into the image
/home/model-server/. The model archive is saved in the/home/model-server/model-store/with name same as<model-name>.mar - Launch Torchserve HTTP server to enable serving of the model referencing the configuration properties and the model archive file
Let’s understand the functionality of TorchServe and Torch Model Archiver tools in these steps.
Torch Model Archiver
Torchserve provides a model archive utility to package a PyTorch model for deployment and the resulting model archive file is used by torchserve at serving time. Following is the torch-model-archiver command added in Dockerfile to generate a model archive file for the text classification model:
- Model Binary
(--serialized-file parameter): Model binary is the serialized Pytorch model that can either be the saved model binary (.bin) file or a traced model (.pth) file generated using TorchScript - Torch Just In Time (JIT) compiler. In this example we will use the saved model binary generated in the previous post by fine-tuning a pre-trained Hugging Face Transformer model.- NOTE: JIT compiler trace may have some device-dependent operations in the output. So it is often a good practice to generate the trace in the same environment where the model will be deployed.
- Model Handler
(--handlerparameter): Model handler can be TorchServe's default handlers or path to a python file to handle custom TorchServe inference logic that can pre-process model inputs or post-process model outputs. We defined a custom handler script in the previous section of this post. - Extra files (
--extra-filesparameter): Extra files allow you to package additional files referenced by the model handler. For example, a few of the files referred in the command are:index_to_name.json: In the custom handler defined earlier, the post-processing step uses an index-to-name JSON file to map prediction target indexes to human-readable labelsconfig.json: Required for AutoModelForSequenceClassification.from_pretrained method to load the modelvocab.txt: vocab files used by the tokenizer
TorchServe
TorchServe wraps PyTorch models into a set of REST APIs served by a HTTP web server. Adding the torchserve command to the CMD or ENTRYPOINT of the custom container launches this server. In this article we will only explore prediction and health check APIs. The Explainable AI API for PyTorch models on Vertex endpoints is currently supported only for tabular data.
**TorchServe** **Config** (--ts-config parameter): TorchServe config allows you to customize the inference address and management ports. We also configure service_envelop field to json to indicate the expected input format for TorchServe. Refer to TorchServe documentation to configure other parameters. We create a config.properties file and pass it as TorchServe config.
- Model Store (--
model-storeparameter): Model store location from where local or default models can be loaded - Model Archive (--
modelsparameter): Models to be loaded by TorchServe using[model_name=]model_locationformat. Model location is the model archive file in the model store.
4. Build and push the custom container image
- Run the following command to build the container image based on the
Dockerfileand tag it with a name compatible with your Container Registry repository:
Before pushing the image to the Container Registry, you can test the docker image locally by sending input requests to a local TorchServe deployment running inside docker.
To run the container image as a container locally, run the following command:
To send the container's server a health check, run the following command:
This request uses a test sentence. If successful, the server returns the prediction in the following format:
- After the response is verified, it confirms that the custom handler, model packaging and torchserve config are working as expected. You can stop the TorchServe local server by stopping the container.
Now push the custom container image to the Container Registry, which will be deployed to the Vertex Endpoint in the next step.
NOTE: You can also build and push the custom container image to the Artifact Registry repository instead of the Container Registry repository.
5. Deploying the serving container to Vertex Endpoint
We have packaged the model and built the serving container image. The next step is to deploy it to a Vertex Endpoint. A model must be deployed to an endpoint before it can be used to serve online predictions. Deploying a model associates physical resources with the model so it can serve online predictions with low latency. We use Vertex SDK for Python to upload the model and deploy it to an endpoint. Following steps are applicable to any model trained either on Vertex Training service or elsewhere such as on-prem.
Upload model
We upload the model artifacts to Vertex AI and create a Model resource for the deployment. In this example the artifact is the serving container image URI. Notice that the predict and health routes (mandatory routes) and container port(s) are also specified at this step.
After the model is uploaded, you can view the model in the Models page on the Google Cloud Console under the Vertex AI section.

Figure 2. Models page on Google Cloud console under the Vertex AI section
Create endpoint
Create a service endpoint to deploy one or more models. An endpoint provides a service URL where the prediction requests are sent. You can skip this step if you are deploying the model to an existing endpoint.
After the endpoint is created, you can view the endpoint in the Endpoints page on the Google Cloud Console under the Vertex AI section.
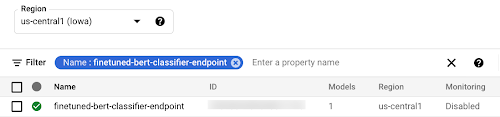
Figure 3. Endpoints page on Google Cloud console under the Vertex AI section
Deploy the model to endpoint
The final step is deploying the model to an endpoint. The deploy method provides the interface to specify the endpoint where the model is deployed and compute parameters including machine type, scaling minimum and maximum replica counts, and traffic split.
After deploying the model to the endpoint, you can manage and monitor the deployed models from the Endpoints page on the Google Cloud Console under the Vertex AI section.
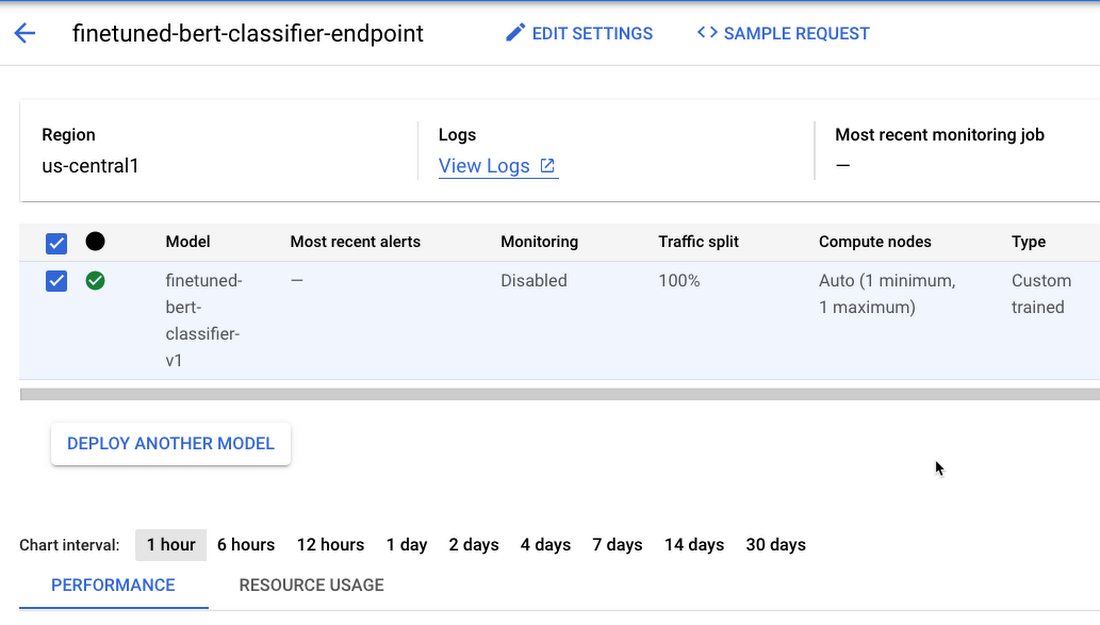
Figure 4. Manage and monitor models deployed on Endpoint from Google Cloud console under the Vertex AI section
Test the deployment
Now that the model is deployed, we can use the endpoint.predict() method to send base64 encoded text to the prediction request and get the predicted sentiment in response.
Posted in