Duplicate a disk with clones (original) (raw)
Discover
Get started
Plan and prepare
- Networking overview for VMs
- Images and operating systems
- Access control
* Access control overview
* Manage access to Compute Engine resources
* Manage resources by using custom constraints
* IAM roles and permissions
* Service accounts - Name resources
Create instances
Migrate VMs
Connect to VMs
Connect to a VM
Manage access to VMs
Manage storage
Configure disks
Make disks highly available
Back up and restore
Manage VMs
Basic operations and lifecycle
Host maintenance events
Securing VMs
Manage operating systems
Manage OS images
Manage licenses
Deploy workloads
Applications
Databases
- MySQL
* MySQL on Compute Engine
* Install MySQL on Compute Engine
* Configure MySQL on Compute Engine
* Set up client access with a private IP address
* Cloning a MySQL database on Compute Engine
* Architectures for high availability of MySQL clusters on Compute Engine
* Deploying a highly available MySQL 5.6 cluster with DRBD on Compute Engine - SQL Server
* Best practices for SQL Server VMs
* Create
* Create a high-performance SQL Server VM
* Add a SQL Server license to an existing Linux server
* Add a SQL Server license to an existing Windows server
* Configure SQL Server on Google Cloud Platform using Cloud Volumes Service
* Configure
* Set up AlwaysOn availability groups using an internal load balancer
* Set up AlwaysOn availability groups using a distributed network name
* Set up a failover cluster VM that uses S2D
* Set up a failover cluster VM with multi-writer disks
* Set up a SQL Server cluster on Linux with Always On availability groups and Pacemaker
* Cloning a Microsoft SQL Server database on Compute Engine
* Load test SQL Server using HammerDB
* Disaster recovery for Microsoft SQL Server
* Disaster recovery for Microsoft SQL server on Persistent disk
* Disaster recovery for Microsoft SQL server on Hyperdisk
* Deploying Microsoft SQL Server for multi-regional disaster recovery
* Migrate a SQL Server database from Windows to Linux
- MySQL
Containers
Microsoft Windows
- Windows workloads
- Best practices for Windows Server VMs
- Setting up Active Directory
- Best practices for running Active Directory on Google Cloud
- Deploy Microsoft SharePoint Server on Compute Engine
- Deploying Microsoft Exchange Server 2016 on Compute Engine
- Windows Server
* Perform an in-place upgrade of Windows Server
* Perform an automated in-place upgrade of Windows Server
* Run Windows Server failover clustering
Monitor
Monitor logs
Scale
Load balancing
Optimize
Network performance
- Network bandwidth
- Use Google Virtual NIC
- Use IDPF network interface
- Configure a VM with higher bandwidth
- Reduce latency by using compact placement policies
- Optimize TCP network performance
- Benchmark higher bandwidth VMs
- Optimize app latency with load balancing
- Use DPDK to improve network performance
Troubleshoot
Duplicate a disk with clones
This document provides information about how disk clones work and how to create a disk clone. Disk cloning lets you make instantly usable duplicates of existing disks. Create a disk clone in scenarios where you want to create an identical copy of an existing disk that you can instantly attach to a VM, such as the following:
- Creating staging environments by duplicating production data to debug without disturbing production
- Creating copies for database backup verification
- Moving non-boot disk data to a new project
- Duplicating disks while scaling out your VMs
To protect against disaster recovery, back up your disk withstandard snapshots instead of using disk clones. To capture disk contents at regular intervals without creating new disks, use instant snapshots because they're more storage-efficient than clones. For additional disk protection options, see Data protection options.
Before you begin
- If you haven't already, then set up authentication.Authentication is the process by which your identity is verified for access to Google Cloud services and APIs. To run code or samples from a local development environment, you can authenticate to Compute Engine by selecting one of the following options:
Select the tab for how you plan to use the samples on this page:
Console
When you use the Google Cloud console to access Google Cloud services and APIs, you don't need to set up authentication.
gcloud
- After installing the Google Cloud CLI,initialize it by running the following command:
gcloud init
If you're using an external identity provider (IdP), you must first sign in to the gcloud CLI with your federated identity. - Set a default region and zone.
Terraform
To use the Terraform samples on this page in a local development environment, install and initialize the gcloud CLI, and then set up Application Default Credentials with your user credentials.
- Install the Google Cloud CLI.
- If you're using an external identity provider (IdP), you must first sign in to the gcloud CLI with your federated identity.
- To initialize the gcloud CLI, run the following command:
gcloud init - If you're using a local shell, then create local authentication credentials for your user account:
gcloud auth application-default login
You don't need to do this if you're using Cloud Shell.
If an authentication error is returned, and you are using an external identity provider (IdP), confirm that you have signed in to the gcloud CLI with your federated identity.
For more information, see Set up authentication for a local development environment.
Go
To use the Go samples on this page in a local development environment, install and initialize the gcloud CLI, and then set up Application Default Credentials with your user credentials.
- Install the Google Cloud CLI.
- If you're using an external identity provider (IdP), you must first sign in to the gcloud CLI with your federated identity.
- To initialize the gcloud CLI, run the following command:
gcloud init - If you're using a local shell, then create local authentication credentials for your user account:
gcloud auth application-default login
You don't need to do this if you're using Cloud Shell.
If an authentication error is returned, and you are using an external identity provider (IdP), confirm that you have signed in to the gcloud CLI with your federated identity.
For more information, see Set up authentication for a local development environment.
Java
To use the Java samples on this page in a local development environment, install and initialize the gcloud CLI, and then set up Application Default Credentials with your user credentials.
- Install the Google Cloud CLI.
- If you're using an external identity provider (IdP), you must first sign in to the gcloud CLI with your federated identity.
- To initialize the gcloud CLI, run the following command:
gcloud init - If you're using a local shell, then create local authentication credentials for your user account:
gcloud auth application-default login
You don't need to do this if you're using Cloud Shell.
If an authentication error is returned, and you are using an external identity provider (IdP), confirm that you have signed in to the gcloud CLI with your federated identity.
For more information, see Set up authentication for a local development environment.
Python
To use the Python samples on this page in a local development environment, install and initialize the gcloud CLI, and then set up Application Default Credentials with your user credentials.
- Install the Google Cloud CLI.
- If you're using an external identity provider (IdP), you must first sign in to the gcloud CLI with your federated identity.
- To initialize the gcloud CLI, run the following command:
gcloud init - If you're using a local shell, then create local authentication credentials for your user account:
gcloud auth application-default login
You don't need to do this if you're using Cloud Shell.
If an authentication error is returned, and you are using an external identity provider (IdP), confirm that you have signed in to the gcloud CLI with your federated identity.
For more information, see Set up authentication for a local development environment.
REST
To use the REST API samples on this page in a local development environment, you use the credentials you provide to the gcloud CLI.
After installing the Google Cloud CLI,initialize it by running the following command:
gcloud init
If you're using an external identity provider (IdP), you must first sign in to the gcloud CLI with your federated identity.
For more information, seeAuthenticate for using REST in the Google Cloud authentication documentation.
How disk cloning works
When you clone a disk, you create a new disk that contains all the data on the source disk. You can create a disk clone even if the existing disk is attached to a VM instance.
The disk type of the clone must be the same as that of the source disk. However, you can modify properties on the clone, such as the disk size. You can also delete the source disk without any risk of deleting the clone.
Supported disk types
You can create disk clones only for the following disk types:
- Persistent Disk: All types of Persistent Disk
- Google Cloud Hyperdisk:
- Hyperdisk Balanced
- Hyperdisk Balanced High Availability
- Hyperdisk Extreme
- Hyperdisk Throughput
Restrictions
Depending on the type of disk, disk clones have the following restrictions:
General restrictions
The following restrictions apply to clones of all disk types:
- The disk type of the clone must be the same as that of the source disk.
- You can't create a zonal disk clone of an existing zonal disk in a different zone.
- The size of the clone must be at least the size of the source disk. If you create a clone using the Google Cloud console, then you can't specify a disk size and the clone will be the same size as the source disk.
- If you use a customer-supplied encryption keyor a customer-managed encryption keyto encrypt the source disk, you must use the same key to encrypt the clone. For more information, see Creating a clone of an encrypted source disk.
- You can't delete the source disk while its clone is being created.
- The compute instance that the source disk is attached to won't be able to power on while the clone is being created.
- If the source disk was marked to be deleted along with the VM that it is attached to, then you can't delete the VM while the clone is being created.
- You can create at most one clone of a given source disk or its clones every 30 seconds.
- You can have at most 1000 simultaneous disk clones of a given source disk or its clones. Exceeding this limit returns an internalError. However, if you create a disk clone and delete it later, then the deleted disk clone is not included in this limit.
- After a disk is cloned, any subsequent clones of that disk or of its clones are counted against the limit of 1000 simultaneous disk clones for the original source disk and are counted against the limit of creating at most one clone every 30 seconds.
- If you create a regional disk by cloning a zonal disk, then you can clone at most 1 TiB of capacity every 15 minutes, with a burst request limit of 257 TiB.
Restrictions for Persistent Disk clones
Disk clones for Persistent Disk have the following restrictions:
- You can't create a zonal disk clone from a regional disk.
- To create a regional disk clone from a zonal source disk, one of thereplica zonesof the regional disk clone must match the zone of the source disk.
- After creation, a regional disk clone is usable within 3 minutes, on average. However, the disk might take tens of minutes to become fully replicated and reach a state where therecovery point objective (RPO)is near zero.
- If you created a zonal disk from an image, then you can't use that zonal disk to create a regional disk clone.
Restrictions for Google Cloud Hyperdisk clones
- You can't create a Hyperdisk Balanced High Availability disk by cloning a zonal disk. To create a Hyperdisk Balanced High Availability disk from an existing zonal disk, complete the steps inChange a zonal disk to a regional Hyperdisk Balanced High Availability disk.
- You can't clone Hyperdisk ML volumes.
Error messages
If you exceed the cloning frequency limits, the request fails with the following error:
RATE LIMIT: ERROR: (gcloud.compute.disks.create) Could not fetch resource:
- Operation rate exceeded for resource RESOURCE. Too frequent operations from the source resource.
Create disk clones
This section explains how you can duplicate an existing disk and create a disk clone.
For detailed steps, depending on the type of disk clone creation, see one of the following sections in this document:
- Create a zonal disk clone
- Create a regional disk clone from a zonal disk
- Create a clone of an encrypted source disk
Permissions required for this task
To perform this task, you must have the followingpermissions:
compute.disks.createon the projectcompute.disks.useReadOnlyon the source disk
Create a zonal disk clone
You can create zonal disk clones of an existing disk in the same zone as the source disk by using the Google Cloud console, the Google Cloud CLI, or REST.
Console
- In the Google Cloud console, go to the Disks page.
Go to Disks - In the list of disks, navigate to the disk that you want to clone.
- In the Actions column, click the menu button and select Clone disk.
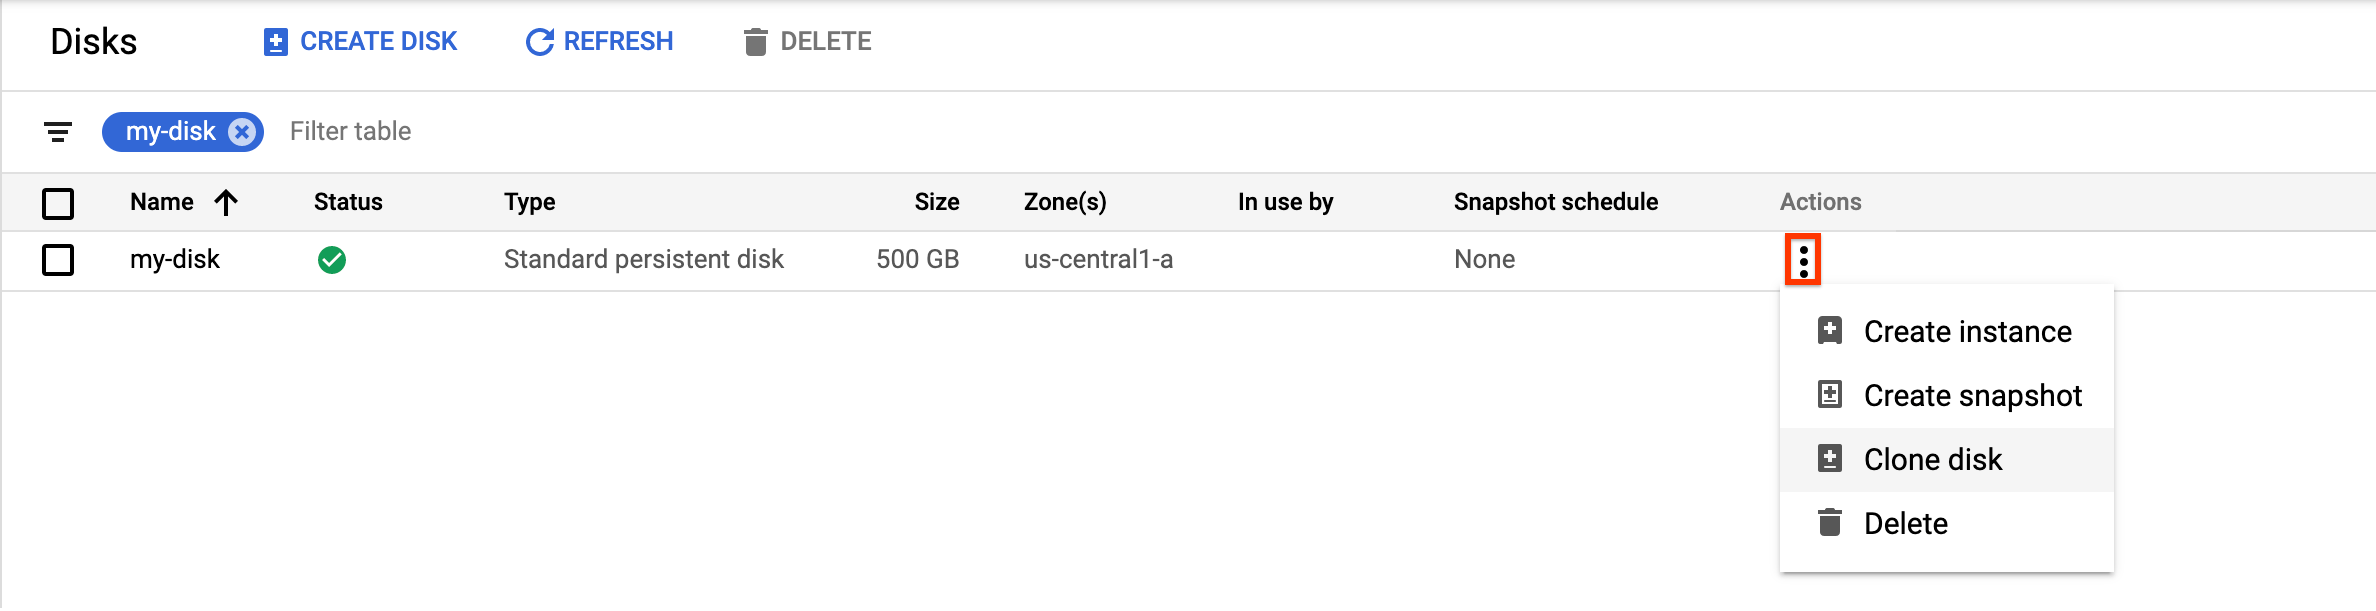
In the Clone disk panel that appears, do the following:- In the Name field, specify a name for the cloned disk.
- For Location, verify that Single zone is selected.
- Under Properties, review other details for the cloned disk.
- To finish creating the cloned disk, click Create.
gcloud
To clone a zonal source disk and create a new zonal disk, run thedisks create commandand specify the --source-disk flag:
gcloud compute disks create TARGET_DISK_NAME
--description="cloned disk"
--source-disk=projects/PROJECT_ID/zones/ZONE/disks/SOURCE_DISK_NAME
Replace the following:
TARGET_DISK_NAME: the name for the new disk.PROJECT_ID: theproject IDwhere you want to clone the disk.ZONE: the zone of the source and new disk.SOURCE_DISK_NAME: the name of the source disk.
Terraform
To create a disk clone, use the google_compute_disk resource.
To learn how to apply or remove a Terraform configuration, seeBasic Terraform commands.
Go
Go
Before trying this sample, follow the Go setup instructions in theCompute Engine quickstart using client libraries. For more information, see theCompute Engine Go API reference documentation.
To authenticate to Compute Engine, set up Application Default Credentials. For more information, seeSet up authentication for a local development environment.
Java
Java
Before trying this sample, follow the Java setup instructions in theCompute Engine quickstart using client libraries. For more information, see theCompute Engine Java API reference documentation.
To authenticate to Compute Engine, set up Application Default Credentials. For more information, seeSet up authentication for a local development environment.
Python
Python
Before trying this sample, follow the Python setup instructions in theCompute Engine quickstart using client libraries. For more information, see theCompute Engine Python API reference documentation.
To authenticate to Compute Engine, set up Application Default Credentials. For more information, seeSet up authentication for a local development environment.
REST
To clone a zonal source disk and create a new zonal disk, make a POSTrequest to thecompute.disks.insert method. In the request body, specify the name and sourceDisk parameters. The disk clone inherits all omitted properties from the source disk.
POST https://compute.googleapis.com/compute/v1/projects/PROJECT_ID/zones/ZONE/disks
{ "name": "TARGET_DISK_NAME" "sourceDisk": "projects/PROJECT_ID/zones/ZONE/disks/SOURCE_DISK_NAME" }
Replace the following:
PROJECT_ID: theproject IDwhere you want to clone the disk.ZONE: the zone of the source and new disk.TARGET_DISK_NAME: the name for the new disk.SOURCE_DISK_NAME: the name of the source disk
Create a regional disk clone from a zonal disk
You can create a new regional Persistent Disk disk by cloning an existing zonal Persistent Disk volume. To migrate a zonal disk to a regional disk, Google recommends this option instead of creating a snapshot of the zonal disk and restoring the snapshot to a new regional disk.
Console
- In the Google Cloud console, go to the Disks page.
Go to Disks - In the list of disks, navigate to the zonal Persistent Disk volume that you want to clone.
- In the Actions column, click the menu button and select Clone disk.
In the Clone disk panel that appears, do the following:- In the Name field, specify a name for the cloned disk.
- For Location, select Regional and then select the secondary replica zone for the new regional cloned disk.
- Under Properties, review other details for the cloned disk.
- To finish creating the cloned disk, click Create.
gcloud
To create a regional disk clone from a zonal disk, run thegcloud compute disks create commandand specify the --region and --replica-zones parameters.
gcloud compute disks create TARGET_DISK_NAME
--description="zonal to regional cloned disk"
--region=CLONED_REGION
--source-disk=SOURCE_DISK_NAME
--source-disk-zone=SOURCE_DISK_ZONE
--replica-zones=SOURCE_DISK_ZONE,REPLICA_ZONE_2
--project=PROJECT_ID
Replace the following:
TARGET_DISK_NAME: the name for the new regional disk clone.CLONED_REGION: the region of the source and cloned disks.SOURCE_DISK_NAME: the name of the zonal disk to clone.SOURCE_DISK_ZONE: the zone for the source disk. This will also be the first replica zone for the regional disk clone.REPLICA_ZONE_2: the second replica zone for the new regional disk clone.PROJECT_ID: theproject IDwhere you want to clone the disk.
Terraform
To create a regional disk clone from a zonal disk, you can optionally create a snapshot of the zonal disk and then clone the snapshot. To do this, use the following resources:
To learn how to apply or remove a Terraform configuration, seeBasic Terraform commands.
Go
Go
Before trying this sample, follow the Go setup instructions in theCompute Engine quickstart using client libraries. For more information, see theCompute Engine Go API reference documentation.
To authenticate to Compute Engine, set up Application Default Credentials. For more information, seeSet up authentication for a local development environment.
Java
Java
Before trying this sample, follow the Java setup instructions in theCompute Engine quickstart using client libraries. For more information, see theCompute Engine Java API reference documentation.
To authenticate to Compute Engine, set up Application Default Credentials. For more information, seeSet up authentication for a local development environment.
Python
Python
Before trying this sample, follow the Python setup instructions in theCompute Engine quickstart using client libraries. For more information, see theCompute Engine Python API reference documentation.
To authenticate to Compute Engine, set up Application Default Credentials. For more information, seeSet up authentication for a local development environment.
REST
To create a regional disk clone from a zonal disk, make a POST request to the compute.disks.insert methodand specify the sourceDisk and replicaZone parameters.
POST https://compute.googleapis.com/compute/v1/projects/PROJECT_ID/regions/CLONED_REGION/disks
{ "name": "TARGET_DISK_NAME" "sourceDisk": "projects/PROJECT_ID/zones/SOURCE_DISK_ZONE/disks/SOURCE_DISK_NAME" "replicaZone": "SOURCE_DISK_ZONE,REPLICA_ZONE_2" }
Replace the following:
PROJECT_ID: theproject IDwhere you want to clone the disk.TARGET_DISK_NAME: the name for the new regional disk clone.CLONED_REGION: the region of the source and cloned disks.SOURCE_DISK_NAME: the name of the zonal disk to clone.SOURCE_DISK_ZONE: the zone for the source disk. This will also be the first replica zone for the regional disk clone.REPLICA_ZONE_2: the second replica zone for the new regional disk clone.
Create a disk clone of an encrypted source disk
You can use acustomer-supplied encryption key (CSEK)or a customer-managed encryption keyto encrypt your disks.
Create disk clones for CSEK-encrypted disks
If you use a CSEK to encrypt your source disk, you must also use the same key to encrypt the clone.
Console
- In the Google Cloud console, go to the Disks page.
Go to Disks - In the list of zonal persistent disks, find the disk that you want to clone.
- In the Actions column, click the menu button and select Clone disk.
In the Clone disk panel that appears, do the following:- In the Name field, specify a name for the cloned disk.
- In the Decryption and encryption field, provide the source disk encryption key.
- Under Properties, review other details for the cloned disk.
- To finish creating the cloned disk, click Create.
gcloud
To create a disk clone for a CSEK-encrypted source disk, run thegcloud compute disks create commandand provide the source disk encryption key using the --csek-key-fileflag. If you are using an RSA-wrapped key, use thegcloud beta compute disks create command.
gcloud compute disks create TARGET_DISK_NAME
--description="cloned disk"
--source-disk=projects/PROJECT_ID/zones/ZONE/disks/SOURCE_DISK_NAME
--csek-key-file example-key-file.json
Replace the following:
TARGET_DISK_NAME: the name for the new disk.PROJECT_ID: theproject IDwhere you want to clone the disk.ZONE: the zone of the source and new disk.SOURCE_DISK_NAME: the name of the source disk
Go
Go
Before trying this sample, follow the Go setup instructions in theCompute Engine quickstart using client libraries. For more information, see theCompute Engine Go API reference documentation.
To authenticate to Compute Engine, set up Application Default Credentials. For more information, seeSet up authentication for a local development environment.
Java
Java
Before trying this sample, follow the Java setup instructions in theCompute Engine quickstart using client libraries. For more information, see theCompute Engine Java API reference documentation.
To authenticate to Compute Engine, set up Application Default Credentials. For more information, seeSet up authentication for a local development environment.
Python
Python
Before trying this sample, follow the Python setup instructions in theCompute Engine quickstart using client libraries. For more information, see theCompute Engine Python API reference documentation.
To authenticate to Compute Engine, set up Application Default Credentials. For more information, seeSet up authentication for a local development environment.
REST
To create a disk clone for a CSEK-encrypted source disk, make a POST request to the compute.disks.insert methodand provide the source disk encryption key using the diskEncryptionKeyproperty. If you are using an RSA-wrapped key, usethe beta version of the method.
POST https://compute.googleapis.com/compute/v1/projects/PROJECT_ID/zones/ZONE/disks
{ "name": "TARGET_DISK_NAME" "sourceDisk": "projects/PROJECT_ID/zones/ZONE/disks/SOURCE_DISK_NAME" "diskEncryptionKey": { "rsaEncryptedKey": "ieCx/NcW06PcT7Ep1X6LUTc/hLvUDYyzSZPPVCVPTVEohpeHASqC8uw5TzyO9U+Fka9JFHz0mBibXUInrC/jEk014kCK/NPjYgEMOyssZ4ZINPKxlUh2zn1bV+MCaTICrdmuSBTWlUUiFoDD6PYznLwh8ZNdaheCeZ8ewEXgFQ8V+sDroLaN3Xs3MDTXQEMMoNUXMCZEIpg9Vtp9x2oeQ5lAbtt7bYAAHf5l+gJWw3sUfs0/Glw5fpdjT8Uggrr+RMZezGrltJEF293rvTIjWOEB3z5OHyHwQkvdrPDFcTqsLfh+8Hr8g+mf+7zVPEC8nEbqpdl3GPv3A7AwpFp7MA==" }, }
Replace the following:
PROJECT_ID: theproject IDwhere you want to clone the disk.ZONE: the zone of the source and new disk.TARGET_DISK_NAME: the name for the new disk.SOURCE_DISK_NAME: the name of the source disk
Create disk clones for CMEK-encrypted disks
If you use a CMEK to encrypt your source disk, you must also use the same key to encrypt the clone.
Console
Compute Engine automatically encrypts the clone using the source disk encryption key.
gcloud
To create a disk clone for a CMEK-encrypted source disk, run thegcloud compute disks create commandand provide the source disk encryption key using the --kms-key flag. If you are using an RSA-wrapped key, use thegcloud beta compute disks create command.
gcloud compute disks create TARGET_DISK_NAME
--description="cloned disk"
--source-disk=projects/PROJECT_ID/zones/ZONE/disks/SOURCE_DISK_NAME
--kms-key projects/KMS_PROJECT_ID/locations/REGION/keyRings/KEY_RING/cryptoKeys/KEY
Replace the following:
TARGET_DISK_NAME: the name for the new disk.PROJECT_ID: theproject IDwhere you want to clone the disk.ZONE: the zone of the source and new disk.SOURCE_DISK_NAME: the name of the source disk.KMS_PROJECT_ID: the project ID for the encryption key.REGION: the region of the encryption key.KEY_RING: thekey ring of the encryption key.KEY: the name of the encryption key.
Go
Go
Before trying this sample, follow the Go setup instructions in theCompute Engine quickstart using client libraries. For more information, see theCompute Engine Go API reference documentation.
To authenticate to Compute Engine, set up Application Default Credentials. For more information, seeSet up authentication for a local development environment.
Java
Java
Before trying this sample, follow the Java setup instructions in theCompute Engine quickstart using client libraries. For more information, see theCompute Engine Java API reference documentation.
To authenticate to Compute Engine, set up Application Default Credentials. For more information, seeSet up authentication for a local development environment.
Python
Python
Before trying this sample, follow the Python setup instructions in theCompute Engine quickstart using client libraries. For more information, see theCompute Engine Python API reference documentation.
To authenticate to Compute Engine, set up Application Default Credentials. For more information, seeSet up authentication for a local development environment.
REST
To create a disk clone for a CMEK-encrypted source disk, make a POST request to the compute.disks.insert methodand provide the source disk encryption key using the kmsKeyName property. If you are using an RSA-wrapped key, usethe beta version of the method.
POST https://compute.googleapis.com/compute/v1/projects/PROJECT_ID/zones/ZONE/disks
{ "name": "TARGET_DISK_NAME" "sourceDisk": "projects/PROJECT_ID/zones/ZONE/disks/SOURCE_DISK_NAME" "diskEncryptionKey": { "kmsKeyName": "projects/KMS_PROJECT_ID/locations/REGION/keyRings/KEY_RING/cryptoKeys/KEY" }, }
Replace the following:
PROJECT_ID: theproject IDwhere you want to clone the disk.ZONE: the zone of the source and new disk.TARGET_DISK_NAME: the name for the new disk.SOURCE_DISK_NAME: the name of the source disk.KMS_PROJECT_ID: the project ID for the encryption key.REGION: the region of the encryption key.KEY_RING: thekey ring of the encryption key.KEY: the name of the encryption key.
What's next
- Learn how to regularlybackup your disks using standard snapshotsto prevent unintended data loss.
- Learn how tobackup your disks in place using instant snapshots.
- Learn about using regional persistent disksfor synchronous replication between two zones.
- Learn about Asynchronous Replication.
Except as otherwise noted, the content of this page is licensed under the Creative Commons Attribution 4.0 License, and code samples are licensed under the Apache 2.0 License. For details, see the Google Developers Site Policies. Java is a registered trademark of Oracle and/or its affiliates.
Last updated 2025-06-30 UTC.