Deploying container images to Cloud Run (original) (raw)
This page describes how to deploy container images to a new Cloud Run service or to a new revision of an existing Cloud Run service.
For an example walkthrough of deploying a new service, seeDeploy a sample container quickstart.
Before you start
If you are under a domain restriction organization policy restricting unauthenticated invocations for your project, you will need to access your deployed service as described under Testing private services.
Required roles
To get the permissions that you need to deploy Cloud Run services, ask your administrator to grant you the following IAM roles:
- Cloud Run Developer (
roles/run.developer) on the Cloud Run service - Service Account User (
roles/iam.serviceAccountUser) on the service identity
For a list of IAM roles and permissions that are associated with Cloud Run, seeCloud Run IAM rolesand Cloud Run IAM permissions. If your Cloud Run service interfaces with Google Cloud APIs, such as Cloud Client Libraries, see theservice identity configuration guide. For more information about granting roles, seedeployment permissionsand manage access.
Supported container registries and images
You can directly use container images stored in Artifact Registry, or Docker Hub. Google recommends the use of Artifact Registry.
You can use container images from other public or private registries (like JFrog Artifactory, Nexus, or GitHub Container Registry), by setting up anArtifact Registry remote repository.
You should only consider Docker Hubfor deploying popular container images such as Docker Official Images or Docker Sponsored OSS images. For higher availability, Google recommends deploying these Docker Hub images via an Artifact Registry remote repository.
Deploying a new service
You can specify a container image with a tag (for example, us-docker.pkg.dev/my-project/container/my-image:latest) or with an exact digest (for example, us-docker.pkg.dev/my-project/container/my-image@sha256:41f34ab970ee...).
Deploying to a service for the first time creates its first revision. Note that revisions are immutable. If you deploy from a container image tag, it will be resolved to a digest and the revision will always serve this particular digest.
Click the tab for instructions using the tool of your choice.
Console
To deploy a container image:
- In the Google Cloud console, go to the Cloud Run page:
Go to Cloud Run - Click Deploy container and select Service to display the_Create service_ form.
- In the form, select the deployment option:
- If you want to manually deploy a container, selectDeploy one revision from an existing container image and specify the container image.
- If you want to automate for continuous deployment, selectContinuously deploy new revisions from a source repository and follow the instructions for continuous deployments.
- Enter the needed service name. Service names must be 49 characters or less and must be unique per region and project. A service name cannot be changed later and is publicly visible.
- Select the region where you want your service located. The region selector indicates price tier, availability of domain mappingsand highlights regions with the lowest carbon impact.
- Set CPU allocation and pricing as needed.
- Under Autoscaling, specifyminimum andmaximum instances.
- Set the Ingress settings in the form as needed.
- Under Authentication, configure the following:
- If you are creating a public API or website, selectAllow unauthenticated invocations. Selecting this assigns the IAM Invoker role to the special identifier
allUser. You canuse IAM to edit this settinglater after you create the service. - If you want a secure service protected by authentication, selectRequire authentication.
- If you are creating a public API or website, selectAllow unauthenticated invocations. Selecting this assigns the IAM Invoker role to the special identifier
- In the form, select the deployment option:
- Click Container(s), volumes, networking, security to set other optional settings in the appropriate tabs:
- When you are finished configuring your service, click Create to deploy the image to Cloud Run and wait for the deployment to finish.
- Click the displayed URL link to open the unique and stable endpoint of your deployed service.
gcloud
- In the Google Cloud console, activate Cloud Shell.
Activate Cloud Shell
At the bottom of the Google Cloud console, aCloud Shell session starts and displays a command-line prompt. Cloud Shell is a shell environment with the Google Cloud CLI already installed and with values already set for your current project. It can take a few seconds for the session to initialize. - To deploy a container image:
- Run the following command:
gcloud run deploy SERVICE --image IMAGE_URL- Replace SERVICE with the name of the service you want to deploy to. Service names must be 49 characters or less and must be unique per region and project. If the service does not exist yet, this command creates the service during the deployment. You can omit this parameter entirely, but you will be prompted for the service name if you omit it.
- Replace IMAGE_URL with a reference to the container image, for example,
us-docker.pkg.dev/cloudrun/container/hello:latest. If you use Artifact Registry, the repository REPO_NAME must already be created. The URL has the shapeLOCATION-docker.pkg.dev/PROJECT_ID/REPO_NAME/PATH:TAG. Note that if you don't supply the--imageflag, the deploy command will attempt to deploy from source code.
If you are creating a public API or website, allow unauthenticated invocations of your service using the--allow-unauthenticatedflag. Thisassigns the Cloud Run Invoker IAM roletoallUsers. You can also specify--no-allow-unauthenticatedto disallow unauthenticated invocations. If you omit either of these flags, you are prompted to confirm when thedeploycommand runs.
- Wait for the deployment to finish. Upon successful completion, a success message is displayed along with the URL of the deployed service.
Note that to deploy to a different location from the one you set using therun/regiongcloudproperties, use:
gcloud run deploy SERVICE --region REGION
- Run the following command:
YAML
You can store your service specification in a YAML file and then deploy it using the gcloud CLI.
- Create a new
service.yamlfile with the following content:
apiVersion: serving.knative.dev/v1
kind: Service
metadata:
name: SERVICE
spec:
template:
spec:
containers:- image: IMAGE
Replace
- SERVICE with the name of your Cloud Run service. Service names must be 49 characters or less and must be unique per region and project.
- IMAGE with the URL of your container image.
You can also specify more configuration such as environment variables or memory limits.
- image: IMAGE
- Deploy the new service using the following command:
gcloud run services replace service.yaml - Optionally, make your service publicif you want to allow unauthenticated access to the service.
Cloud Code
To deploy with Cloud Code, read the IntelliJ and Visual Studio Code guides.
Terraform
If you use Terraform, define your service in a Terraform configuration, using thegoogle_cloud_run_v2_serviceresource from the Google Cloud Platform Provider.
- Create a new
main.tffile with this content:
provider "google" {
  project = "PROJECT-ID"
}
resource "google_cloud_run_v2_service" "default" {
  name     = "SERVICE"
  location = "REGION"
  client   = "terraform"
  template {
    containers {
      image = "IMAGE"
    }
  }
}
resource "google_cloud_run_v2_service_iam_member" "noauth" {
  location = google_cloud_run_v2_service.default.location
  name     = google_cloud_run_v2_service.default.name
  role     = "roles/run.invoker"
  member   = "allUsers"
}
Replace
- PROJECT-ID with the Google Cloud project ID
- REGION with the Google Cloud region
- SERVICE with the name of your Cloud Run service. Service names must be 49 characters or less and must be unique per region and project.
- IMAGE_URL with a reference to the container image, for example,
us-docker.pkg.dev/cloudrun/container/hello:latest. If you use Artifact Registry, the repository REPO_NAME must already be created. The URL has the shapeLOCATION-docker.pkg.dev/PROJECT_ID/REPO_NAME/PATH:TAG
This configuration allows public access (the equivalent of--allow-unauthenticated). To make the service private, remove thegoogle_cloud_run_v2_service_iam_memberstanza.
- Initialize Terraform:
terraform init - Apply the Terraform configuration:
terraform apply
Confirm you want to apply the actions described by enteringyes.
Client libraries
To deploy a new service from code:
REST API
To deploy a new service, send a POST HTTP request to the Cloud Run Admin API service endpoint.
For example, using curl:
curl -H "Content-Type: application/json"
-H "Authorization: Bearer ACCESS_TOKEN"
-X POST
-d '{template: {containers: [{image: "IMAGE_URL"}]}}'
https://run.googleapis.com/v2/projects/PROJECT_ID/locations/REGION/services?serviceId=SERVICE
Replace:
- ACCESS_TOKEN with a valid access token for an account that has the IAM permissions to deploy services. For example, if you are logged into gcloud, you can retrieve an access token using
gcloud auth print-access-token. From within a Cloud Run container instance, you can retrieve an access token using the container instance metadata server. - IMAGE_URL with a reference to the container image, for example,
us-docker.pkg.dev/cloudrun/container/hello:latest. If you use Artifact Registry, the repository REPO_NAME must already be created. The URL has the shapeLOCATION-docker.pkg.dev/PROJECT_ID/REPO_NAME/PATH:TAG. - SERVICE with the name of the service you want to deploy to. Service names must be 49 characters or less and must be unique per region and project.
- REGION with the Google Cloud region of the service.
- PROJECT-ID with the Google Cloud project ID.
Cloud Run locations
Cloud Run is regional, which means the infrastructure that runs your Cloud Run services is located in a specific region and is managed by Google to be redundantly available acrossall the zones within that region.
Meeting your latency, availability, or durability requirements are primary factors for selecting the region where your Cloud Run services are run. You can generally select the region nearest to your users but you should consider the location of the other Google Cloud products that are used by your Cloud Run service. Using Google Cloud products together across multiple locations can affect your service's latency as well as cost.
Cloud Run is available in the following regions:
Subject to Tier 1 pricing
Subject to Tier 2 pricing
If you already created a Cloud Run service, you can view the region in the Cloud Run dashboard in theGoogle Cloud console.
When deploying, the Cloud Run service agentneeds to be able to access the deployed container, which is the case by default.
Each service has a unique and permanent URL that does not change over time as you deploy new revisions to it.
Deploying a new revision of an existing service
You can deploy a new revision using the Google Cloud console, the gcloudcommand line, or a YAML configuration file.
Note that changing any configuration settings results in the creation of a new revision, even if there is no change to the container image. Each revision created is immutable.
Click the tab for instructions using the tool of your choice.
Console
To deploy a new revision of an existing service:
- In the Google Cloud console, go to the Cloud Run page:
Go to Cloud Run - Locate the service you want to update in the services list, and click to open the details of that service.
- Click Edit and deploy new revision to display the revision deployment form.
- If needed, supply the URL to the new container image you want to deploy.
- Configure the container as needed.
- Set CPU allocation and pricing as needed.
- Under Capacity, specify memory limits. and CPU limits.
- Specify request timeout andconcurrency as needed.
- Specify execution environmentas needed.
- Under Autoscaling, specifyminimum andmaximum instances.
- Use the other tabs as needed to optionally configure:
- To send all traffic to the new revision, select Serve this revision immediately. To gradually roll out a new revision, clear that checkbox. This results in a deployment where no traffic is sent to the new revision. Follow the instructions forgradual rolloutsafter you deploy.
- Click Deploy and wait for the deployment to finish.
gcloud
- In the Google Cloud console, activate Cloud Shell.
Activate Cloud Shell
At the bottom of the Google Cloud console, aCloud Shell session starts and displays a command-line prompt. Cloud Shell is a shell environment with the Google Cloud CLI already installed and with values already set for your current project. It can take a few seconds for the session to initialize. - To deploy a container image:
- Run the command:
gcloud run deploy SERVICE --image IMAGE_URL- Replace SERVICE with the name of the service you are deploying to. You can omit this parameter entirely, but you will be prompted for the service name if you omit it.
- Replace IMAGE_URL with a reference to the container image, for example,
us-docker.pkg.dev/cloudrun/container/hello:latest. If you use Artifact Registry, the repository REPO_NAME must already be created. The URL has the shapeLOCATION-docker.pkg.dev/PROJECT_ID/REPO_NAME/PATH:TAG.
The revision suffix is assigned automatically for new revisions. If you want to supply your own revision suffix, use the gcloud CLI parameter --revision-suffix.
- Wait for the deployment to finish. Upon successful completion, a success message is displayed along with the URL of the deployed service.
- Run the command:
YAML
If you need to download or view the configuration of an existing service, use the following command to save results to a YAML file:
gcloud run services describe SERVICE --format export > service.yaml
From a service configuration YAML file, modify any spec.template child attributes as needed to update revision settings, then deploy the new revision:
gcloud run services replace service.yaml
Cloud Code
To deploy a new revision of an existing service with Cloud Code, read the IntelliJ and Visual Studio Code guides.
Terraform
Make sure you have setup Terraform as described in the Deploying a new service example.
- Make a change to the configuration file.
- Apply the Terraform configuration:
terraform apply
Confirm you want to apply the actions described by enteringyes.
Client libraries
To deploy a new revision from code:
REST API
To deploy a new revision, send a PATCH HTTP request to the Cloud Run Admin API service endpoint.
For example, using curl:
curl -H "Content-Type: application/json"
-H "Authorization: Bearer ACCESS_TOKEN"
-X PATCH
-d '{template: {containers: [{image: "IMAGE_URL"}]}}'
https://run.googleapis.com/v2/projects/PROJECT_ID/locations/REGION/services/SERVICE
Replace:
- ACCESS_TOKEN with a valid access token for an account that has the IAM permissions to deploy revisions. For example, if you are logged into gcloud, you can retrieve an access token using
gcloud auth print-access-token. From within a Cloud Run container instance, you can retrieve an access token using the container instance metadata server. - IMAGE_URL with a reference to the container image, for example,
us-docker.pkg.dev/cloudrun/container/hello:latest. If you use Artifact Registry, the repository REPO_NAME must already be created. The URL has the shapeLOCATION-docker.pkg.dev/PROJECT_ID/REPO_NAME/PATH:TAG. - SERVICE with the name of the service you are deploying to.
- REGION with the Google Cloud region of the service.
- PROJECT-ID with the Google Cloud project ID.
Cloud Run locations
Cloud Run is regional, which means the infrastructure that runs your Cloud Run services is located in a specific region and is managed by Google to be redundantly available acrossall the zones within that region.
Meeting your latency, availability, or durability requirements are primary factors for selecting the region where your Cloud Run services are run. You can generally select the region nearest to your users but you should consider the location of the other Google Cloud products that are used by your Cloud Run service. Using Google Cloud products together across multiple locations can affect your service's latency as well as cost.
Cloud Run is available in the following regions:
Subject to Tier 1 pricing
Subject to Tier 2 pricing
If you already created a Cloud Run service, you can view the region in the Cloud Run dashboard in theGoogle Cloud console.
Deploying images from other Google Cloud projects
You can deploy container images from other Google Cloud projects if you set the correct IAM permissions:
- In the Google Cloud console, open the project for your Cloud Run service.
Go to the IAM page - Select Include Google-provided role grants.
- Copy the email of the Cloud Run service agent. It has the suffix @serverless-robot-prod.iam.gserviceaccount.com
- Open the project that owns the container registry you want to use.
Go to the IAM page - Click Add to add a new principal.
- In the New principals field, paste in the email of the service account that you copied earlier.
- In the Select a role drop-down menu, if you are using Container Registry, select the role Storage -> Storage Object Viewer. If you are using Artifact Registry, select the role Artifact Registry -> Artifact Registry Reader.
- Deploy the container image to the project that contains your Cloud Run service.
Deploying images from other registries
To deploy public or private container images that are not stored in Artifact Registry or Docker Hub, set upan Artifact Registry remote repository.
Artifact Registry remote repositories allow you to:
- Deploy any public container image, for example, GitHub Container Registry (
ghcr.io). - Deploy container images from private repositories that require authentication, for example, JFrog Artifactory or Nexus.
Alternatively, if using an Artifact Registry remote repository is not an option, you can temporarily pull and push container images to Artifact Registryusing docker push in order to deploy them to Cloud Run. The container image is imported by Cloud Run when deployed, so after the deployment, you candelete the image from Artifact Registry.
Deploying multiple containers to a service (sidecars)
In a Cloud Run deployment with sidecars, there is one ingress container that handles all incoming HTTPS requests at the container PORT you specify, and there are one or more sidecar containers. The sidecars cannot listen for the incoming HTTP requests at the ingress container port, but they can communicate with each other and with the ingress container using a localhost port. The localhost port used varies depending on the containers you are using.
In the following diagram, the ingress container is communicating with the sidecar using localhost:5000.
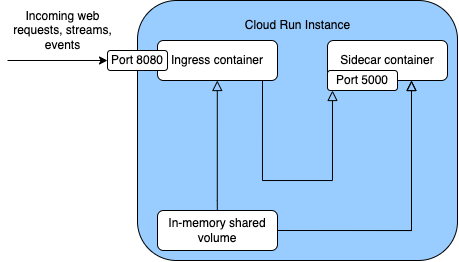
You can deploy up to 10 containers per instance including the ingress container. All containers within an instance share the same network namespace and can also share files using an in-memory shared volume, as shown in the diagram.
You can deploy multiple containers in either the first or second generation execution environment.
By default, sidecars are only allocated CPU when the instance is processing at least one request. If you need your sidecar to be able to use CPU outside of request processing (for example, for metrics collection), configure your service to have CPU always allocated. For more information see CPU allocation (services).
You can require that all deployments use a specific sidecar by creatingcustom organization policies.
Use cases
Use cases for sidecars in a Cloud Run service include:
- Application monitoring, logging and tracing
- Using Nginx, Envoy or Apache2 as a proxy in front of your application container
- Adding authentication and authorization filters (for example, Open Policy Agent)
- Running outbound connection proxies such as the Alloy DB Auth proxy
Deploying a service with sidecar containers
You can deploy multiple sidecars to a Cloud Run service using the Google Cloud console, the Google Cloud CLI, YAML, or Terraform.
Click the tab for instructions using the tool of your choice.
Console
- In the Google Cloud console, go to the Cloud Run page:
Go to Cloud Run- To deploy to an existing service, locate it in the services list, and click to open, then click EDIT & DEPLOY NEW REVISION to display the revision deployment form.
- Click Deploy container and select Service to display the_Create service_ form.
- For a new service,
- Supply the service name and the URL to the ingress container image you want to deploy.
- Click Container(s), volumes, networking, security
- In the Edit container card, configure the ingress container as needed.
- Click Add container and configure a sidecar container you want to add alongside the ingress container. If the sidecar depends on another container in the service, indicate this in the Container start-up order drop-down menu. Repeat this step for each sidecar container you are deploying.
- To send all traffic to the new revision, select Serve this revision immediately. For a gradual rollout, clear that checkbox. This results in a deployment where no traffic is sent to the new revision. Follow the instructions forgradual rolloutsafter you deploy.
- Click Create for a new service or Deploy for an existing service, then wait for the deployment to finish.
gcloud
The container parameters in Google Cloud CLI are in Preview.
- In the Google Cloud console, activate Cloud Shell.
Activate Cloud Shell
At the bottom of the Google Cloud console, aCloud Shell session starts and displays a command-line prompt. Cloud Shell is a shell environment with the Google Cloud CLI already installed and with values already set for your current project. It can take a few seconds for the session to initialize. - To deploy multiple containers to a service, run the following command:
gcloud run deploy SERVICE \
--container INGRESS_CONTAINER_NAME \
--image='INGRESS_IMAGE' \
--port='CONTAINER_PORT' \
--container SIDECAR_CONTAINER_NAME \
--image='SIDECAR_IMAGE'
Replace:- SERVICE with the name of the service you are deploying to. You can omit this parameter entirely, but you will be prompted for the service name if you omit it.
- INGRESS_CONTAINER_NAME with a name for the container receiving requests, for example
app. - INGRESS_IMAGE with a reference to the container image that should receive requests, for example,
us-docker.pkg.dev/cloudrun/container/hello:latest. - CONTAINER_PORT with the port where the ingress container listens for incoming requests. Unlike a single-container service, for a service containing sidecars, there is no default port for the ingress container. You must explicitly configure the container port for the ingress container and only one container can have the port exposed.
- SIDECAR_CONTAINER_NAME with a name for the sidecar container, for example
sidecar. - SIDECAR_IMAGE with a reference to the sidecar container image
If you want to configure each container in the deploy command, supply each container's configuration after thecontainerparameters, for example:
gcloud run deploy SERVICE \
--container CONTAINER_1_NAME \
--image='INGRESS_IMAGE' \
--set-env-vars=KEY=VALUE \
--port='CONTAINER_PORT' \
--container SIDECAR_CONTAINER_NAME \
--image='SIDECAR_IMAGE' \
--set-env-vars=KEY_N=VALUE_N
- Wait for the deployment to finish. Upon successful completion, a success message is displayed along with the URL of the deployed service.
YAML
These instructions show a basic YAML file for your Cloud Run service with sidecars. Create a file named service.yaml and add the following to it:
apiVersion: serving.knative.dev/v1 kind: Service metadata: annotations: name: SERVICE spec: template: spec: containers: - image: INGRESS_IMAGE ports: - containerPort: CONTAINER_PORT - image: SIDECAR_IMAGE
Replace
- SERVICE with the name of your Cloud Run service. Service names must be 49 characters or less.
- CONTAINER_PORT with the port where the ingress container listens for incoming requests. Unlike a single-container service, for a service containing sidecars, there is no default port for the ingress container. You must explicitly configure the container port for the ingress container and only one container can have the port exposed.
- INGRESS_IMAGE with a reference to the container image that should receive requests, for example,
us-docker.pkg.dev/cloudrun/container/hello:latest. - SIDECAR_IMAGE with a reference to the sidecar container image. You can specify multiple sidecars by adding more elements to the
containersarray in the YAML.
After you update the YAML to include the ingress and sidecar containers, deploy to Cloud Run using the command:
gcloud run services replace service.yaml
Terraform
To learn how to apply or remove a Terraform configuration, seeBasic Terraform commands.
Add the following to a google_cloud_run_v2_service resource in your Terraform configuration.
resource "google_cloud_run_v2_service" "default" {
  name     = "SERVICE"
  location = "REGION"
  ingress = "INGRESS_TRAFFIC_ALL"
  template {
    containers {
      name = "INGRESS_CONTAINER_NAME"
      ports {
        container_port = CONTAINER_PORT
      }
      image = "INGRESS_IMAGE"
      depends_on = ["SIDECAR_CONTAINER_NAME"]
    }
    containers {
      name = "SIDECAR_CONTAINER_NAME"
      image = "SIDECAR_IMAGE"
      }
    }
  }
The CONTAINER_PORT represents the port where the ingress container listens for incoming requests. Unlike a single-container service, for a service containing sidecars, there is no default port for the ingress container. You must explicitly configure the container port for the ingress container and only one container can have the port exposed.
Notable features available to deployments with sidecars
You can specify the container start up orderwithin a deployment with multiple containers, if you have dependencies that require some containers to start up before other containers in the deployment.
If you have containers that depend on other containers, you must use healthchecks in your deployment. If you use healthchecks, Cloud Run follows the container startup order and inspects the health of each container, making sure each passes successfully before Cloud Run starts up the next container in the order. If you don't use healthchecks, healthy containers will start up even if the containers they depend on are not running.
Multiple containers within a single instance can access a sharedin-memory volume, which is accessible to each container using mount points that you create.
What's next
After you deploy a new service, you can do the following:
- Gradual rollouts, rollback revisions, traffic migration
- View service logs
- Monitor service performances
- Set memory limits
- Set environment variables
- Change service concurrency
- Manage the service
- Manage service revisions
- Cloud Run OpenTelemetry sidecar example
- Deploy only trusted images with Binary Authorization (Preview)
You can automate the builds and deployments of your Cloud Run services using Cloud Build Triggers:
You can also use Cloud Deploy to set up a continuous-delivery pipeline to deploy Cloud Run services to multiple environments: