Espresso tarifleri (original) (raw)
Bu dokümanda, yaygın olarak kullanılan çeşitli Espresso testlerinin nasıl oluşturulacağı açıklanmaktadır.
Başka bir görünümün yanındaki görünümü eşleştirme
Bir düzen, kendi başına benzersiz olmayan belirli görünümleri içerebilir. Örneğin, Örneğin, kişiler tablosundaki tekrar eden bir arama düğmesi aynıR.id, aynı metni içerir ve diğer çağrıyla aynı özelliklere sahiptir düğmeleriyle görünmesini sağlayabilirsiniz.
Örneğin, bu etkinlikte, "7" metnini içeren görünüm birden çok yerde tekrar ediyor satır:
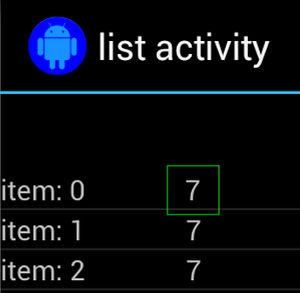
Benzersiz olmayan görünüm, çoğu zaman bulunan benzersiz bir etiketle eşleştirilir. (ör. arama düğmesinin yanındaki kişinin adı) tıklayın. Böyle durumlarda seçiminizi daraltmak için hasSibling() eşleştiriciyi kullanabilirsiniz:
Kotlin
onView(allOf(withText("7"), hasSibling(withText("item: 0")))) .perform(click())
Java
onView(allOf(withText("7"), hasSibling(withText("item: 0")))) .perform(click());
İşlem çubuğunun içindeki bir görünümü eşleştirme
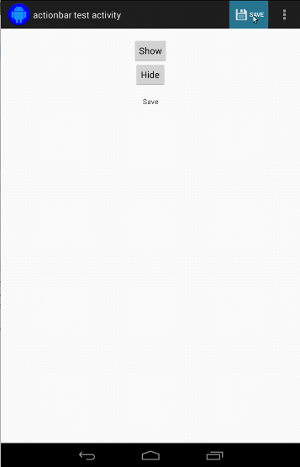
ActionBarTestActivity üzerinde iki farklı işlem çubuğu vardır: normal işlem çubuğu ve seçenekler menüsünden oluşturulan bağlamsal bir işlem çubuğu. Her ikisi işlem çubuklarında her zaman görünen bir öğe ve yalnızca görünür. Bir öğe tıklandığında, metin görünümü Tıklanan öğenin içeriği.
Gösterildiği gibi her iki işlem çubuğunda da görünür simgeleri eşleştirmek kolaydır. aşağıdaki kod snippet'inde:
Kotlin
fun testClickActionBarItem() { // We make sure the contextual action bar is hidden. onView(withId(R.id.hide_contextual_action_bar)) .perform(click())
// Click on the icon - we can find it by the r.Id.
onView(withId(R.id.action_save))
    .perform(click())

// Verify that we have really clicked on the icon
// by checking the TextView content.
onView(withId(R.id.text_action_bar_result))
    .check(matches(withText("Save")))
}
Java
public void testClickActionBarItem() { // We make sure the contextual action bar is hidden. onView(withId(R.id.hide_contextual_action_bar)) .perform(click());
// Click on the icon - we can find it by the r.Id.
onView(withId(R.id.action_save))
    .perform(click());

// Verify that we have really clicked on the icon
// by checking the TextView content.
onView(withId(R.id.text_action_bar_result))
    .check(matches(withText("Save")));
}
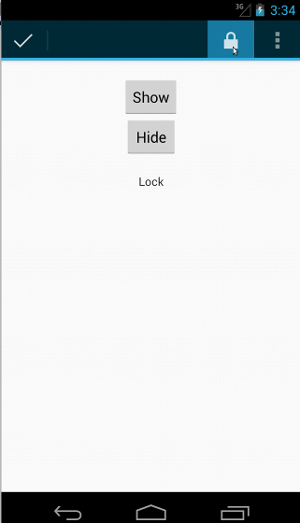
Kod, içeriğe dayalı işlem çubuğu için aynı görünür:
Kotlin
fun testClickActionModeItem() { // Make sure we show the contextual action bar. onView(withId(R.id.show_contextual_action_bar)) .perform(click())
// Click on the icon.
onView((withId(R.id.action_lock)))
    .perform(click())

// Verify that we have really clicked on the icon
// by checking the TextView content.
onView(withId(R.id.text_action_bar_result))
    .check(matches(withText("Lock")))
}
Java
public void testClickActionModeItem() { // Make sure we show the contextual action bar. onView(withId(R.id.show_contextual_action_bar)) .perform(click());
// Click on the icon.
onView((withId(R.id.action_lock)))
    .perform(click());

// Verify that we have really clicked on the icon
// by checking the TextView content.
onView(withId(R.id.text_action_bar_result))
    .check(matches(withText("Lock")));
}
Taşma menüsündeki öğeleri tıklamak, normal işlem için biraz daha karmaşıktır çubuğunu, tüm cihazlarda bulunan donanım taşma menüsü düğmesini seçenekler menüsünde taşan öğeler vardır ve bazı cihazlarda menü düğmesi gibi görünür. Neyse ki Espresso bu konuda bizim için çok değerli.
Normal işlem çubuğu için:
Kotlin
fun testActionBarOverflow() { // Make sure we hide the contextual action bar. onView(withId(R.id.hide_contextual_action_bar)) .perform(click())
// Open the options menu OR open the overflow menu, depending on whether
// the device has a hardware or software overflow menu button.
openActionBarOverflowOrOptionsMenu(
        ApplicationProvider.getApplicationContext<Context>())

// Click the item.
onView(withText("World"))
    .perform(click())

// Verify that we have really clicked on the icon by checking
// the TextView content.
onView(withId(R.id.text_action_bar_result))
    .check(matches(withText("World")))
}
Java
public void testActionBarOverflow() { // Make sure we hide the contextual action bar. onView(withId(R.id.hide_contextual_action_bar)) .perform(click());
// Open the options menu OR open the overflow menu, depending on whether
// the device has a hardware or software overflow menu button.
openActionBarOverflowOrOptionsMenu(
        ApplicationProvider.getApplicationContext());

// Click the item.
onView(withText("World"))
    .perform(click());

// Verify that we have really clicked on the icon by checking
// the TextView content.
onView(withId(R.id.text_action_bar_result))
    .check(matches(withText("World")));
}

Donanım taşma menü düğmesi bulunan cihazlarda bu şekilde görünür:

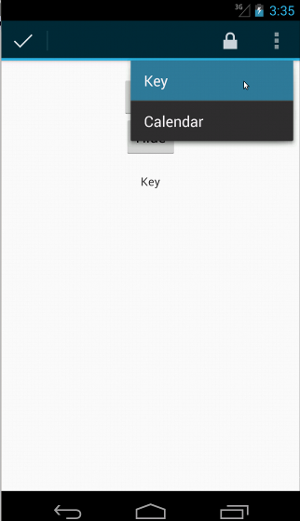
Bağlamsal işlem çubuğu için bunu tekrar yapmak çok kolaydır:
Kotlin
fun testActionModeOverflow() { // Show the contextual action bar. onView(withId(R.id.show_contextual_action_bar)) .perform(click())
// Open the overflow menu from contextual action mode.
openContextualActionModeOverflowMenu()

// Click on the item.
onView(withText("Key"))
    .perform(click())

// Verify that we have really clicked on the icon by
// checking the TextView content.
onView(withId(R.id.text_action_bar_result))
    .check(matches(withText("Key")))
}
}
Java
public void testActionModeOverflow() { // Show the contextual action bar. onView(withId(R.id.show_contextual_action_bar)) .perform(click());
// Open the overflow menu from contextual action mode.
openContextualActionModeOverflowMenu();

// Click on the item.
onView(withText("Key"))
    .perform(click());

// Verify that we have really clicked on the icon by
// checking the TextView content.
onView(withId(R.id.text_action_bar_result))
    .check(matches(withText("Key")));
}
}
Bu örneklere ilişkin kodun tamamını görmek için GitHub'da ActionBarTest.java örneği.
Bir görünümün görüntülenmediğini iddia etme
Bir dizi işlem gerçekleştirdikten sonra kesinlikle durumunu kontrol edin. Bu bazen olumsuz bir durum olabilir; örneğin olmadığını gösterir. Herhangi bir hamcrest görünümünü çevirebileceğinizi unutmayın. eşleştiriciyi ViewAssertions.matches() kullanarak bir ViewAssertion olarak ayarlayın.
Aşağıdaki örnekte, isDisplayed() eşleştiriciyi alıp bunu standart not() eşleştirici:
Kotlin
import androidx.test.espresso.Espresso.onView import androidx.test.espresso.assertion.ViewAssertions.matches import androidx.test.espresso.matcher.ViewMatchers.isDisplayed import androidx.test.espresso.matcher.ViewMatchers.withId import org.hamcrest.Matchers.not
onView(withId(R.id.bottom_left)) .check(matches(not(isDisplayed())))
Java
import static androidx.test.espresso.Espresso.onView; import static androidx.test.espresso.assertion.ViewAssertions.matches; import static androidx.test.espresso.matcher.ViewMatchers.isDisplayed; import static androidx.test.espresso.matcher.ViewMatchers.withId; import static org.hamcrest.Matchers.not;
onView(withId(R.id.bottom_left)) .check(matches(not(isDisplayed())));
Yukarıdaki yaklaşım, görünüm hâlâ hiyerarşinin bir parçasıysa işe yarar. Eğer değil, bir NoMatchingViewException alırsınız ve kullanmak içinViewAssertions.doesNotExist().
Bir görünümün mevcut olmadığını iddia edin
Görünüm, görünüm hiyerarşisinden kaldırılırsa (bu durum, başka bir etkinliğe geçişe neden olduysa,ViewAssertions.doesNotExist():
Kotlin
import androidx.test.espresso.Espresso.onView import androidx.test.espresso.assertion.ViewAssertions.doesNotExist import androidx.test.espresso.matcher.ViewMatchers.withId
onView(withId(R.id.bottom_left)) .check(doesNotExist())
Java
import static androidx.test.espresso.Espresso.onView; import static androidx.test.espresso.assertion.ViewAssertions.doesNotExist; import static androidx.test.espresso.matcher.ViewMatchers.withId;
onView(withId(R.id.bottom_left)) .check(doesNotExist());
Bir veri öğesinin bağdaştırıcıda olmadığını iddia etme
Belirli bir veri öğesinin AdapterView sınırları içinde olmadığını kanıtlamak için aşağıdakileri yapmanız gerekir bazı değişiklikler yapıyoruz. İlgilendiğimiz AdapterView ürününü bulmamız gerekiyor elindeki verileri sorgulamaya gelir. onData() kullanmamız gerekmiyor. Bunun yerine, AdapterView öğesini bulmak için onView() operatörünü, ardından başka bir tane kullanırız. görünüm içindeki veriler üzerinde çalışmak için "eşleştirici"yi kullanın.
Öncelikle eşleştirici:
Kotlin
private fun withAdaptedData(dataMatcher: Matcher): Matcher { return object : TypeSafeMatcher() {
    override fun describeTo(description: Description) {
        description.appendText("with class name: ")
        dataMatcher.describeTo(description)
    }

    public override fun matchesSafely(view: View) : Boolean {
        if (view !is AdapterView<*>) {
            return false
        }

        val adapter = view.adapter
        for (i in 0 until adapter.count) {
            if (dataMatcher.matches(adapter.getItem(i))) {
                return true
            }
        }

        return false
    }
}
}
Java
private static Matcher withAdaptedData(final Matcher dataMatcher) { return new TypeSafeMatcher() {
    @Override
    public void describeTo(Description description) {
        description.appendText("with class name: ");
        dataMatcher.describeTo(description);
    }

    @Override
    public boolean matchesSafely(View view) {
        if (!(view instanceof AdapterView)) {
            return false;
        }

        @SuppressWarnings("rawtypes")
        Adapter adapter = ((AdapterView) view).getAdapter();
        for (int i = 0; i < adapter.getCount(); i++) {
            if (dataMatcher.matches(adapter.getItem(i))) {
                return true;
            }
        }

        return false;
    }
};
}
O zaman AdapterView öğesini bulmak için yalnızca onView() gerekir:
Kotlin
fun testDataItemNotInAdapter() { onView(withId(R.id.list)) .check(matches(not(withAdaptedData(withItemContent("item: 168"))))) } }
Java
@SuppressWarnings("unchecked") public void testDataItemNotInAdapter() { onView(withId(R.id.list)) .check(matches(not(withAdaptedData(withItemContent("item: 168"))))); } }
Ayrıca, "item: 168" değerine eşit olan bir öğe, başarısız olacak bir onayımız var. bağdaştırıcı görünümünde kimlik listesiyle birlikte bulunur.
Örneklemin tamamı için tablodaki testDataItemNotInAdapter() yöntemine bakın.AdapterViewTest.javagidin.
Özel hata işleyici kullan
Espresso'daki varsayılan FailureHandler değerini özel bir öğeyle değiştirerek ek veya farklı hata işleme (örneğin, ekran görüntüsü alma veya hata ayıklama bilgileri ile birlikte ekleyin.
CustomFailureHandlerTest örneği, özel bir değerin nasıl uygulanacağını gösterir hata işleyici:
Kotlin
private class CustomFailureHandler(targetContext: Context) : FailureHandler { private val delegate: FailureHandler
init {
    delegate = DefaultFailureHandler(targetContext)
}

override fun handle(error: Throwable, viewMatcher: Matcher<View>) {
    try {
        delegate.handle(error, viewMatcher)
    } catch (e: NoMatchingViewException) {
        throw MySpecialException(e)
    }

}
}
Java
private static class CustomFailureHandler implements FailureHandler { private final FailureHandler delegate;
public CustomFailureHandler(Context targetContext) {
    delegate = new DefaultFailureHandler(targetContext);
}

@Override
public void handle(Throwable error, Matcher<View> viewMatcher) {
    try {
        delegate.handle(error, viewMatcher);
    } catch (NoMatchingViewException e) {
        throw new MySpecialException(e);
    }
}
}
Bu hata işleyici,MySpecialException NoMatchingViewException ve diğer tüm başarısızlıklardaDefaultFailureHandler. CustomFailureHandler, kayıt için kullanılabilir: Testin setUp() yönteminde espresso:
Kotlin
@Throws(Exception::class) override fun setUp() { super.setUp() getActivity() setFailureHandler(CustomFailureHandler( ApplicationProvider.getApplicationContext())) }
Java
@Override public void setUp() throws Exception { super.setUp(); getActivity(); setFailureHandler(new CustomFailureHandler( ApplicationProvider.getApplicationContext())); }
Daha fazla bilgi içinFailureHandlerarayüz ve Espresso.setFailureHandler())
Varsayılan olmayan pencereleri hedefle
Android birden çok pencereyi destekler. Normalde bu, kullanıcılar açısından şeffaf bir süreçtir ve uygulama geliştiricisi tarafından, ancak bazı durumlarda birden fazla pencerenin görünür olması ana uygulama penceresinin üzerine gelindiğinde otomatik tamamlama arama widget'ı. Espresso, işleri basitleştirmek için varsayılan olarak buluşsal bir hangi Window ile etkileşime girmek istediğinizi tahmin edin. Bu buluşsal yöntem, her zaman yeterince iyidir. ancak nadiren de olsa her bir kullanıcının hangi bir etkileşimin hedeflenmesidir. Bunu yapmak için kendi kök pencerenizi sağlayabilirsiniz eşleştirici veya Root eşleştirici:
Kotlin
onView(withText("South China Sea"))
.inRoot(withDecorView(not(is(getActivity().getWindow().getDecorView()))))
.perform(click())
Java
onView(withText("South China Sea")) .inRoot(withDecorView(not(is(getActivity().getWindow().getDecorView())))) .perform(click());
Proje yönetimindeViewMatchersönceden sağlanmış bir diziRootMatchers. Elbette, istediğiniz zaman kendi Matcher nesnenizi uygulayabilirsiniz.
Çoklu pencere testi için MultipleWindowTest'e örnekbulabilirsiniz.
ListViews için üstbilgi ve altbilgiler, addHeaderView() veaddFooterView() yöntem. Espresso.onData() uygulamasının hangi veri nesnesini bilmesini sağlamak için eşleşmesini sağlamak için ikinci parametre olarak önceden ayarlanmış bir veri nesnesi değeriniaddHeaderView() ve addFooterView() arasında. Örnek:
Kotlin
const val FOOTER = "FOOTER" ... val footerView = layoutInflater.inflate(R.layout.list_item, listView, false) footerView.findViewById(R.id.item_content).text = "count:" footerView.findViewById(R.id.item_size).text = data.size.toString listView.addFooterView(footerView, FOOTER, true)
Java
public static final String FOOTER = "FOOTER"; ... View footerView = layoutInflater.inflate(R.layout.list_item, listView, false); footerView.findViewById(R.id.item_content).setText("count:"); footerView.findViewById(R.id.item_size).setText(String.valueOf(data.size())); listView.addFooterView(footerView, FOOTER, true);
Ardından, altbilgi için bir eşleştirici yazabilirsiniz:
Kotlin
import org.hamcrest.Matchers.allOf
import org.hamcrest.Matchers.instanceOf
import org.hamcrest.Matchers.is
fun isFooter(): Matcher {
return allOf(is(instanceOf(String::class.java)),
is(LongListActivity.FOOTER))
}
Java
import static org.hamcrest.Matchers.allOf; import static org.hamcrest.Matchers.instanceOf; import static org.hamcrest.Matchers.is;
@SuppressWarnings("unchecked") public static Matcher isFooter() { return allOf(is(instanceOf(String.class)), is(LongListActivity.FOOTER)); }
Görünümü bir testte yüklemek çok basittir:
Kotlin
import androidx.test.espresso.Espresso.onData import androidx.test.espresso.action.ViewActions.click import androidx.test.espresso.sample.LongListMatchers.isFooter
fun testClickFooter() { onData(isFooter()) .perform(click())
// ...}
Java
import static androidx.test.espresso.Espresso.onData; import static androidx.test.espresso.action.ViewActions.click; import static androidx.test.espresso.sample.LongListMatchers.isFooter;
public void testClickFooter() { onData(isFooter()) .perform(click());
// ...}
Şu sayfadaki kod örneğine göz atın: testClickFooter() yönteminde bulunan:AdapterViewTest.javabulabilirsiniz.