সোর্স ফাইলগুলিতে পরিবর্তনগুলি সংরক্ষণ করতে ওয়ার্কস্পেস সেট আপ করুন৷ (original) (raw)


একটি ওয়ার্কস্পেস সেট আপ করে আপনার কম্পিউটারের সোর্স ফাইলগুলিতে আপনি DevTools-এ করা পরিবর্তনগুলি সংরক্ষণ করুন৷ আপনি একটি কনফিগারেশন ফাইল পরিবেশন করে একটি ওয়ার্কস্পেস ফোল্ডার স্বয়ংক্রিয়ভাবে DevTools এর সাথে সংযুক্ত করতে পারেন, অথবা আপনি উৎস প্যানেলে ম্যানুয়ালি একটি ওয়ার্কস্পেস অবস্থান যোগ করতে পারেন।
ওভারভিউ
একটি ওয়ার্কস্পেস ফোল্ডারে একটি স্বয়ংক্রিয় (বা ম্যানুয়াল) সংযোগ আপনাকে আপনার কম্পিউটারে একই ফাইলের স্থানীয় অনুলিপিতে DevTools-এ করা পরিবর্তন সংরক্ষণ করতে দেয়। উদাহরণস্বরূপ, ধরুন:
- আপনার ডেস্কটপে আপনার সাইটের জন্য সোর্স কোড আছে।
- আপনি সোর্স কোড ডিরেক্টরি থেকে একটি স্থানীয় ওয়েব সার্ভার চালাচ্ছেন, যাতে সাইটটি
localhost: PORTএবং এটি মেটাডেটা সহ একটি সাধারণ JSON ফাইলও পরিবেশন করে (পরে বর্ণনা করা হয়েছে)। - আপনি
localhost: PORTখোলা আছে এবং আপনি সাইটের CSS পরিবর্তন করতে DevTools ব্যবহার করছেন।
একটি ওয়ার্কস্পেস ফোল্ডার সংযুক্ত থাকলে, সোর্স প্যানেলে আপনি CSS, HTML এবং JavaScript ফাইলগুলিতে যে পরিবর্তনগুলি করেন তা আপনার কম্পিউটারের সোর্স কোডে সংরক্ষিত হয়৷ যাইহোক, DevTools আপনি এলিমেন্টস প্যানেলে করা DOM-এ পরিবর্তনগুলি সংরক্ষণ করে না।
তাছাড়া, DevTools সাধারণত সোর্স ম্যাপের সাহায্যে অপ্টিমাইজ করা কোডটিকে আপনার আসল সোর্স কোডে ম্যাপ করতে সক্ষম।
একটি সংযোগের জন্য মেটাডেটা তৈরি করুন
DevTools-কে আপনার ওয়ার্কস্পেস ফোল্ডার স্বয়ংক্রিয়ভাবে আবিষ্কার করতে দিতে, একটি র্যান্ডম সংস্করণ 4 UUID তৈরি করুন এবং এটিকে নিম্নলিখিত JSON ফাইলে রাখুন:
{
  "workspace": {
    "uuid": "UUID",
    "root": "path/to/project/root/folder"
  }
}
তারপর JSON ফাইলটিকে path/to/project/root/folder /.well-known/appspecific/com.chrome.devtools.json এ রাখুন।
অবশেষে, আপনার স্থানীয় HTTP সার্ভার চালান এবং JSON ফাইলটিও পরিবেশন করা নিশ্চিত করুন।
বিকল্পভাবে, আপনি এই ধাপটি এড়িয়ে যেতে পারেন এবং ম্যানুয়ালি একটি ফোল্ডার সংযোগ সেট আপ করতে পারেন ৷
একটি ওয়ার্কস্পেস ফোল্ডার সংযুক্ত করুন
একটি ফোল্ডার সংযোগ করতে:
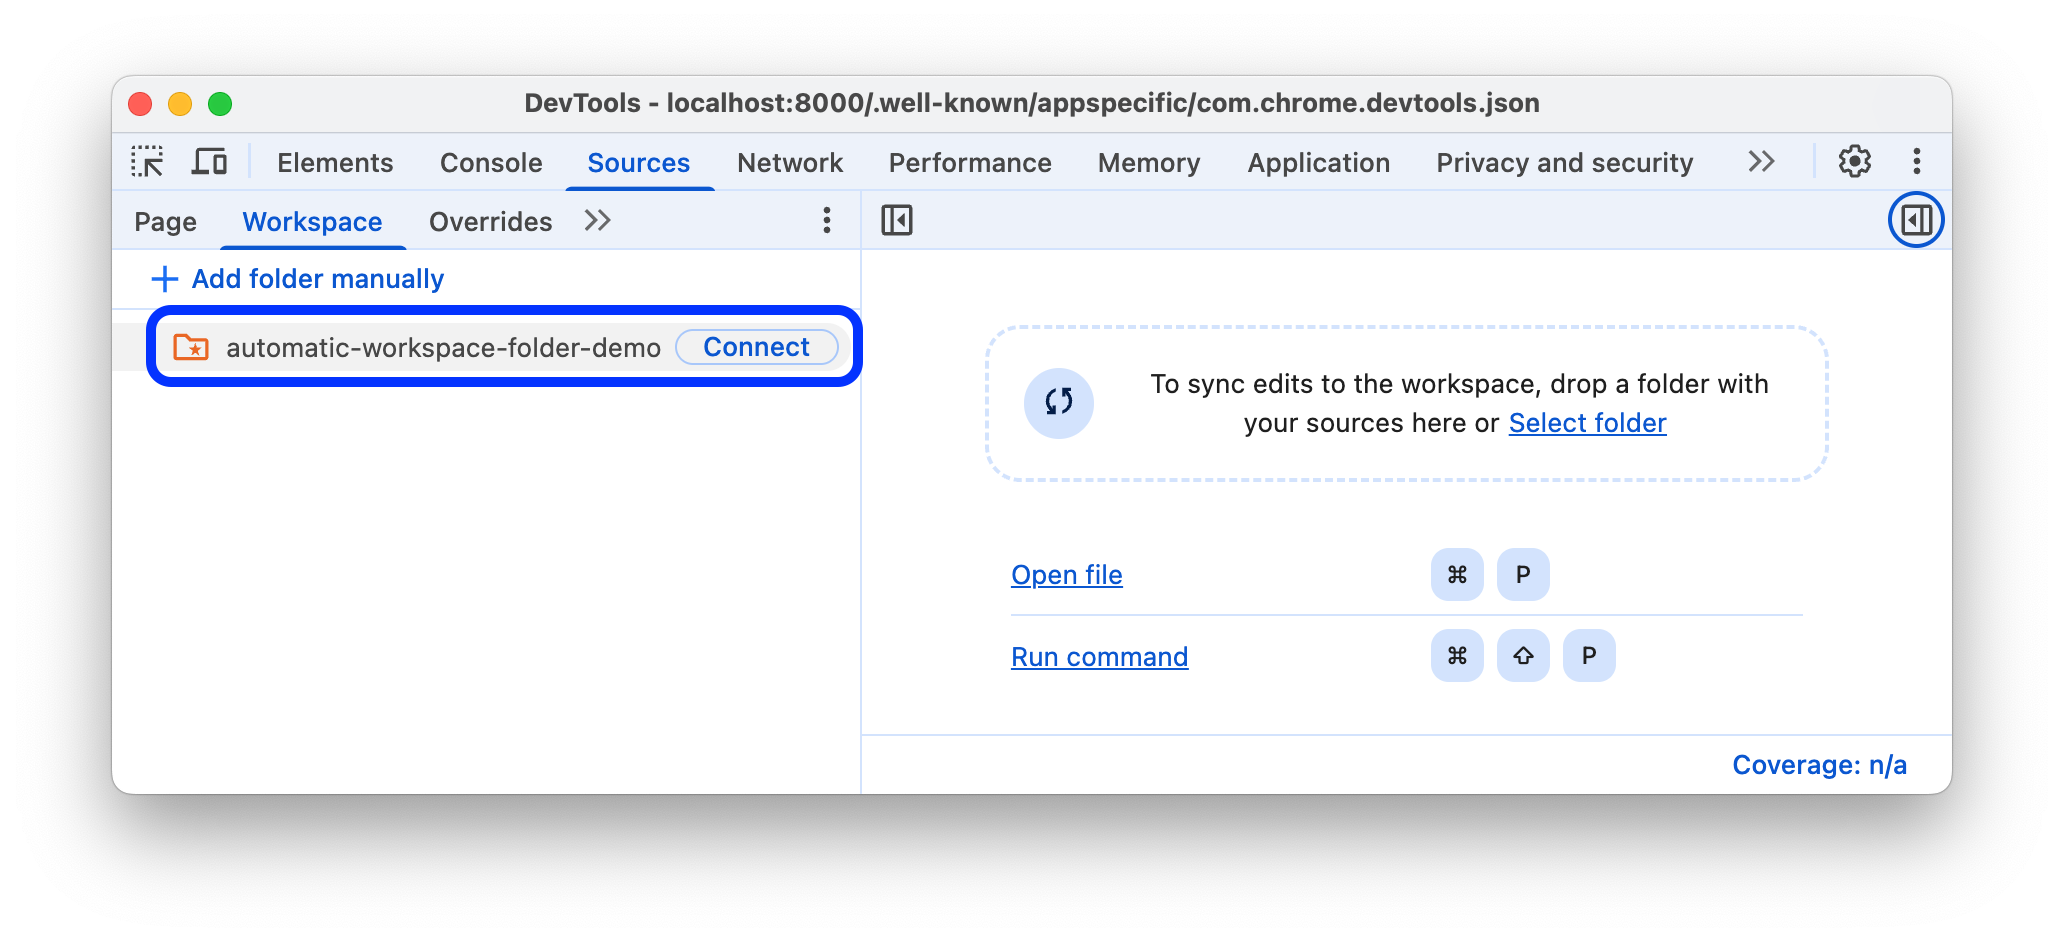
- Chrome-এ, আপনার স্থানীয়ভাবে হোস্ট করা পৃষ্ঠায় নেভিগেট করুন (এই উদাহরণে,
localhost:8000এ) এবং DevTools খুলুন । - Sources > Workspace- এ, আপনার ফোল্ডারের পাশে Connect-এ ক্লিক করুন।
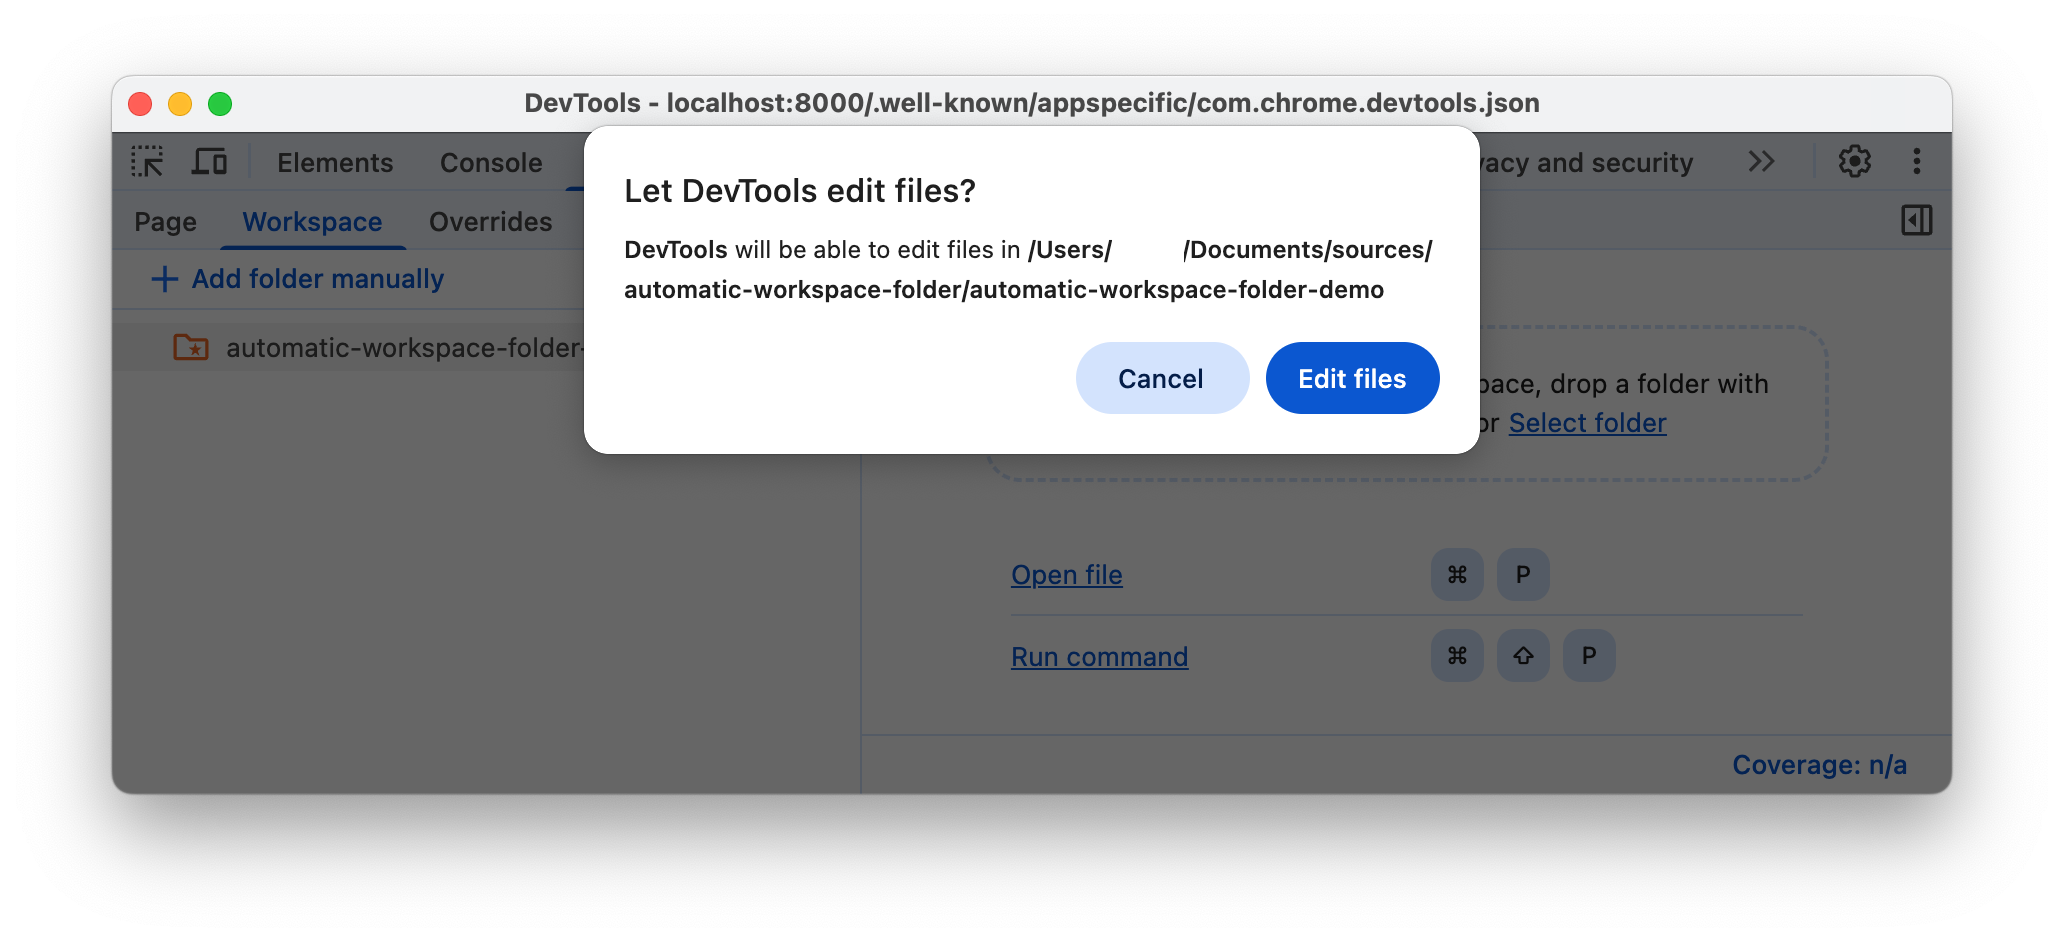
- অনুরোধ করা হলে, আপনার ফোল্ডারে DevTools অ্যাক্সেসের অনুমতি দিতে ফাইল সম্পাদনা করুন এ ক্লিক করুন।
- একবার সংযুক্ত হয়ে গেলে, আপনি ওয়ার্কস্পেস ট্যাবে ফোল্ডারটি খুলতে পারেন।

ওয়ার্কস্পেস ট্যাব আপনাকে HTML, CSS এবং JavaScript ফাইলের পাশে একটি সবুজ বিন্দু দেখায়। এই সবুজ বিন্দুগুলির অর্থ হল DevTools পৃষ্ঠার নেটওয়ার্ক সংস্থান এবং ফোল্ডারের ফাইলগুলির মধ্যে একটি ম্যাপিং স্থাপন করেছে৷
উৎস ফোল্ডারে একটি পরিবর্তন সংরক্ষণ করুন
আপনি সংযুক্ত ওয়ার্কস্পেস ফোল্ডারে যেকোনো CSS, HTML এবং JavaScript ফাইলের পরিবর্তনগুলি সংরক্ষণ করতে পারেন।
CSS এ পরিবর্তনগুলি সংরক্ষণ করুন
CSS এ পরিবর্তনগুলি সংরক্ষণ করতে:
- আপনার সংযুক্ত ওয়ার্কস্পেস ফোল্ডার থেকে সোর্স > ওয়ার্কস্পেস এ একটি CSS ফাইল খুলুন।
- আপনার CSS এ পরিবর্তন করুন।
- পরিবর্তনটি সংরক্ষণ করুন, উদাহরণস্বরূপ, Ctrl / Cmd + S টিপে এবং আপনার উত্স ফাইলে প্রয়োগকৃত পরিবর্তনটি দেখুন। উত্স প্যানেল আপনাকে ফাইলের নামের পাশে একটি সবুজ বিন্দু দেখায়।
কর্মপ্রবাহ শিখতে, ভিডিওটি দেখুন:
HTML এ পরিবর্তনগুলি সংরক্ষণ করুন
HTML-এ পরিবর্তনগুলি সংরক্ষণ করতে:
- আপনার সংযুক্ত ওয়ার্কস্পেস ফোল্ডার থেকে সোর্স > ওয়ার্কস্পেস- এ একটি HTML ফাইল খুলুন।
- আপনার HTML এ পরিবর্তন করুন।
- পরিবর্তনটি সংরক্ষণ করুন, উদাহরণস্বরূপ, Ctrl / Cmd + S টিপে এবং আপনার উত্স ফাইলে প্রয়োগকৃত পরিবর্তনটি দেখুন। উত্স প্যানেল আপনাকে ফাইলের নামের পাশে একটি সবুজ বিন্দু দেখায়।
- পরিবর্তন কার্যকর হতে দেখতে পৃষ্ঠাটি পুনরায় লোড করুন৷
কর্মপ্রবাহ শিখতে, ভিডিওটি দেখুন:
কেন আপনি উপাদান প্যানেল থেকে HTML পরিবর্তন করতে পারবেন না?
- এলিমেন্টস প্যানেলে আপনি যে নোডের গাছটি দেখতে পাচ্ছেন সেটি পৃষ্ঠার DOM প্রতিনিধিত্ব করে।
- একটি পৃষ্ঠা প্রদর্শন করতে, একটি ব্রাউজার নেটওয়ার্কে HTML নিয়ে আসে, HTML পার্স করে এবং তারপর এটিকে DOM নোডের একটি ট্রিতে রূপান্তর করে।
- যদি পৃষ্ঠাটিতে কোনো জাভাস্ক্রিপ্ট থাকে, তাহলে সেই জাভাস্ক্রিপ্ট DOM নোড যোগ, মুছে বা পরিবর্তন করতে পারে। CSS content প্রপার্টির সাথেও DOM পরিবর্তন করতে পারে।
- ব্রাউজার ব্যবহারকারীদের কাছে কোন বিষয়বস্তু উপস্থাপন করা উচিত তা নির্ধারণ করতে ব্রাউজারটি অবশেষে DOM ব্যবহার করে।
- অতএব, ব্যবহারকারীরা যে পৃষ্ঠাটি দেখেন তার চূড়ান্ত অবস্থা ব্রাউজারটি আনা HTML থেকে খুব আলাদা হতে পারে।
- এটি এলিমেন্টস প্যানেলে করা পরিবর্তন কোথায় সেভ করা উচিত তা সমাধান করা DevTools-এর পক্ষে কঠিন করে তোলে, কারণ DOM HTML, JavaScript এবং CSS দ্বারা প্রভাবিত হয়।
সংক্ষেপে, ডম ট্রি !== HTML।
জাভাস্ক্রিপ্টে পরিবর্তনগুলি সংরক্ষণ করুন
জাভাস্ক্রিপ্টে পরিবর্তনগুলি সংরক্ষণ করতে:
- আপনার সংযুক্ত ওয়ার্কস্পেস ফোল্ডার থেকে সোর্স > ওয়ার্কস্পেস এ একটি জাভাস্ক্রিপ্ট ফাইল খুলুন।
- আপনার জাভাস্ক্রিপ্ট একটি পরিবর্তন করুন.
- পরিবর্তনটি সংরক্ষণ করুন, উদাহরণস্বরূপ, Ctrl / Cmd + S টিপে এবং আপনার উত্স ফাইলে প্রয়োগকৃত পরিবর্তনটি দেখুন। উত্স প্যানেল আপনাকে ফাইলের নামের পাশে একটি সবুজ বিন্দু দেখায়।
- যদি আপনার স্থানীয় HTTP সার্ভার লাইভ সোর্স ফাইলের পরিবর্তনের কথা শোনে এবং পৃষ্ঠাটি স্বয়ংক্রিয়ভাবে পুনরায় লোড করে, তাহলে আপনি DevTools-এ সেভ করার পরে প্রয়োগ করা পরিবর্তনগুলি দেখতে পাবেন। অন্যথায়, আপনার স্থানীয় সার্ভার পুনরায় স্থাপন করুন।
কর্মপ্রবাহ শিখতে, ভিডিওটি দেখুন:
একটি ওয়ার্কস্পেস ফোল্ডার সংযোগ সরান
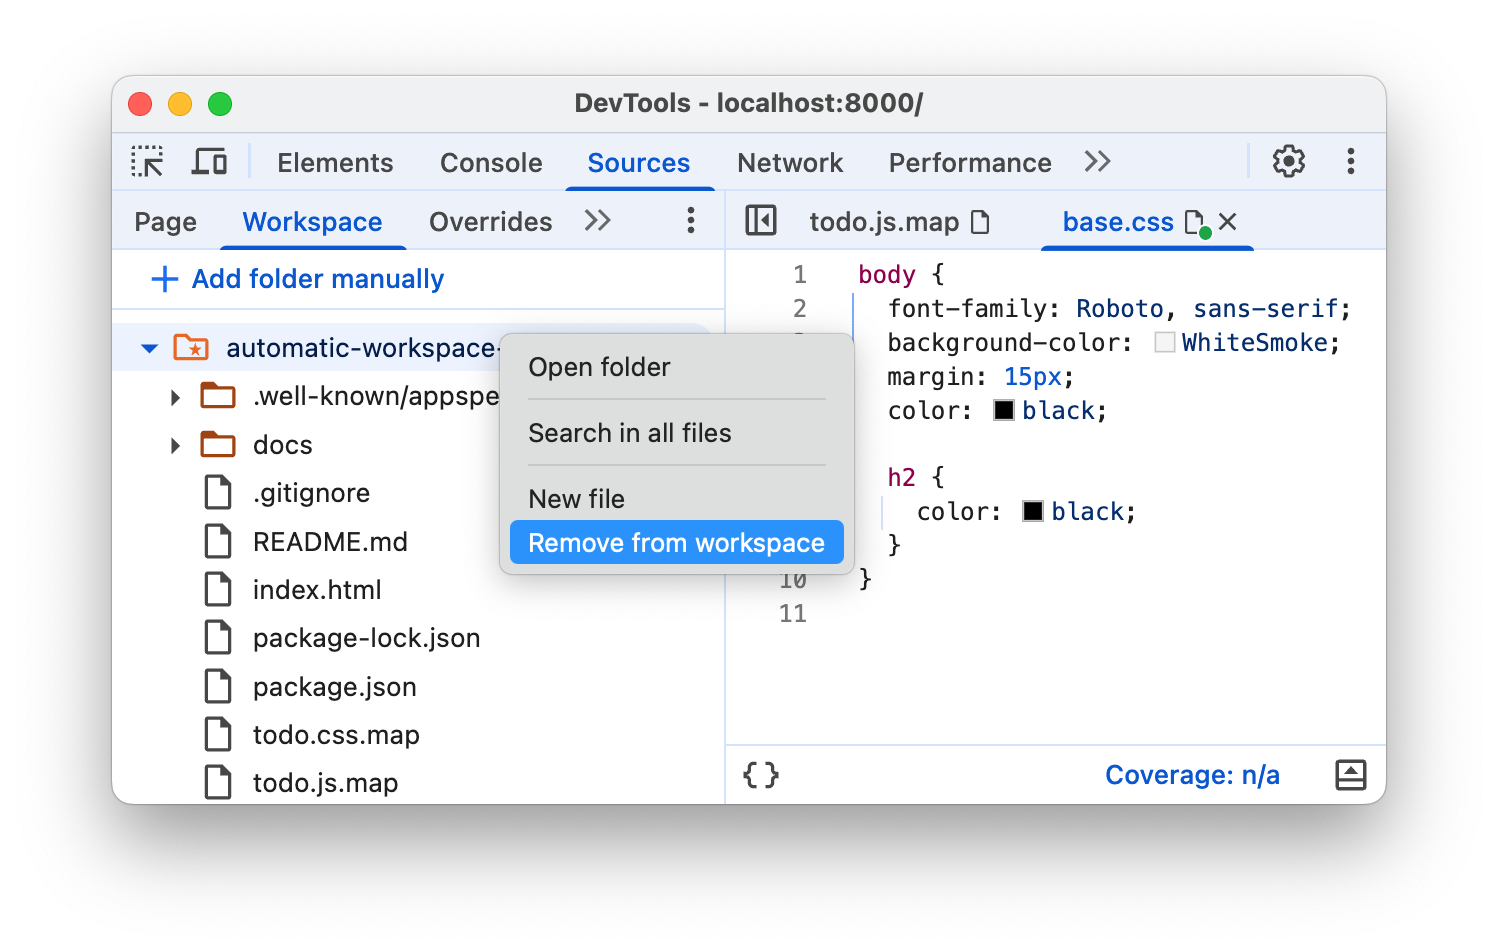
একটি ওয়ার্কস্পেস ফোল্ডার সংযোগ সরাতে, উত্স > কর্মক্ষেত্রে , ফোল্ডারটিতে ডান-ক্লিক করুন, ড্রপ-ডাউন মেনু থেকে ওয়ার্কস্পেস থেকে সরান নির্বাচন করুন এবং সরান ক্লিক করুন।
ম্যানুয়ালি একটি ওয়ার্কস্পেস ফোল্ডার সংযোগ করুন
- আপনার স্থানীয়ভাবে হোস্ট করা পৃষ্ঠায় DevTools খুলুন ।
- উত্স > কর্মক্ষেত্রে , ম্যানুয়ালি ফোল্ডার যোগ করুন ক্লিক করুন। তারপরে আপনার সোর্স ফাইল সহ একটি ফোল্ডার নির্বাচন করুন।
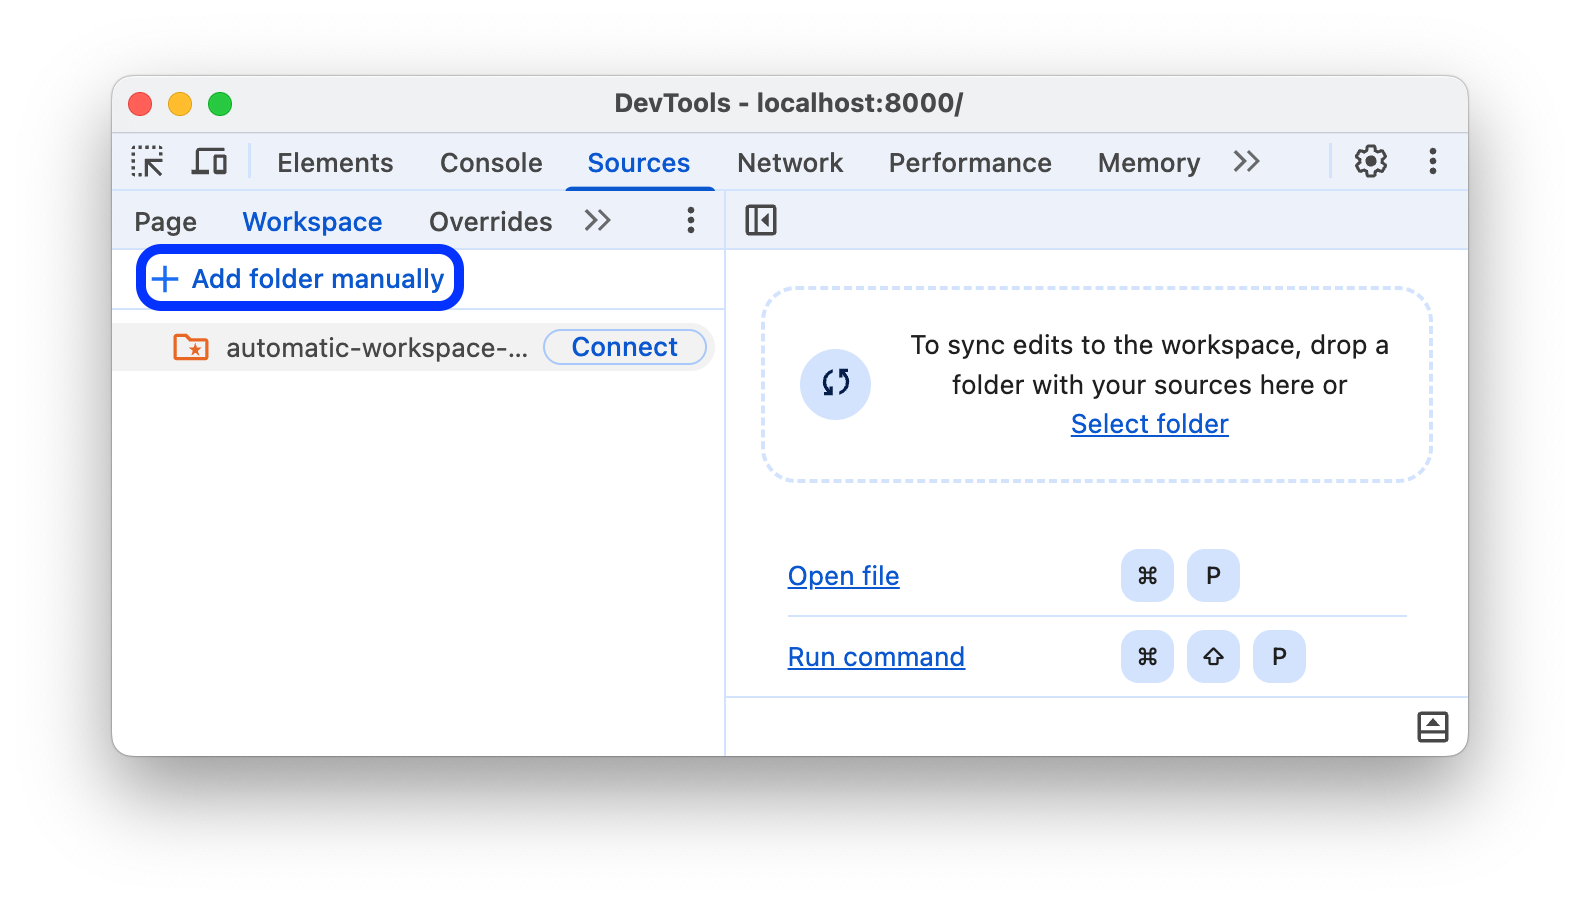
- তারপর Connect a workspace ফোল্ডারে ধাপ 3 এবং 4 অনুসরণ করুন।
সীমাবদ্ধতা
আপনি যদি একটি আধুনিক ফ্রেমওয়ার্ক ব্যবহার করেন, তাহলে এটি সম্ভবত আপনার সোর্স কোডটিকে এমন একটি ফর্ম্যাট থেকে রূপান্তরিত করে যা আপনার পক্ষে যত তাড়াতাড়ি সম্ভব চালানোর জন্য অপ্টিমাইজ করা ফর্ম্যাটে বজায় রাখা সহজ৷ একটি ওয়ার্কস্পেস ফোল্ডার সংযোগ সাধারণত সোর্স ম্যাপের সাহায্যে অপ্টিমাইজ করা কোডটিকে আপনার আসল সোর্স কোডে ম্যাপ করতে সক্ষম হয়।
DevTools সম্প্রদায় বিভিন্ন ফ্রেমওয়ার্ক এবং টুল জুড়ে সোর্স ম্যাপ দ্বারা প্রদত্ত ক্ষমতাগুলিকে সমর্থন করার জন্য কাজ করে৷ আপনার পছন্দের ফ্রেমওয়ার্কের সাথে একটি ওয়ার্কস্পেস ব্যবহার করার সময় আপনি যদি সমস্যায় পড়েন, বা আপনি কিছু কাস্টম কনফিগারেশনের পরে এটি কাজ করতে পান, তাহলে মেলিং তালিকায় একটি থ্রেড শুরু করুন বা বাকি DevTools সম্প্রদায়ের সাথে আপনার জ্ঞান ভাগ করার জন্য স্ট্যাক ওভারফ্লোতে একটি প্রশ্ন জিজ্ঞাসা করুন ।
পরবর্তী পদক্ষেপ
আপনি অধীনে পরিচালনা করতে পারেন সব ইতিমধ্যে সেট আপ ফোল্ডার  সেটিংস > ওয়ার্কস্পেস ।
এর পরে, সিএসএস পরিবর্তন করতে এবং জাভাস্ক্রিপ্ট ডিবাগ করতে DevTools ব্যবহার করতে শিখুন।
এছাড়াও দেখুন
স্থানীয় ওভাররাইডগুলি হল আরেকটি DevTools এর কিছুটা অনুরূপ বৈশিষ্ট্য যা আপনাকে ওয়েব সামগ্রী উপহাস করতে বা শিরোনামগুলির অনুরোধ করতে দেয়৷ এইভাবে, আপনি ব্যাকএন্ড ধরার জন্য অপেক্ষা না করে একটি পৃষ্ঠায় পরিবর্তন নিয়ে অবাধে পরীক্ষা করুন। স্থানীয় ওভাররাইডের সাথে, পরিবর্তনগুলি পৃষ্ঠা লোড জুড়ে থাকে কিন্তু আপনার পৃষ্ঠার উত্স কোডে ম্যাপ করে না৷