Get started with Amazon EC2 (original) (raw)
Use this tutorial to get started with Amazon Elastic Compute Cloud (Amazon EC2). You'll learn how to launch and connect to an EC2 instance. An instance is a virtual server in the AWS Cloud. With Amazon EC2, you can set up and configure the operating system and applications that run on your instance.
Overview
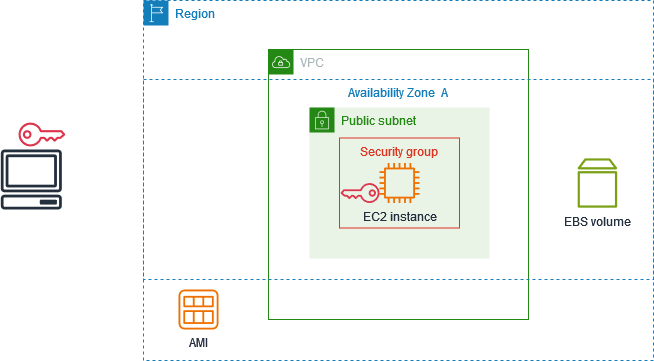
The following diagram shows the key components that you'll use in this tutorial:
- An image – A template that contains the software to run on your instance, such as the operating system.
- A key pair – A set of security credentials that you use to prove your identity when connecting to your instance. The public key is on your instance and the private key is on your computer.
- A network – A virtual private cloud (VPC) is a virtual network dedicated to your AWS account. To help you get started quickly, your account comes with a default VPC in each AWS Region, and each default VPC has a default subnet in each Availability Zone.
- A security group – Acts as a virtual firewall to control inbound and outbound traffic.
- An EBS volume – We require a root volume for the image. You can optionally add data volumes.
Cost for this tutorial
When you sign up for AWS, you can get started with Amazon EC2 using the AWS Free Tier. If you created your AWS account less than 12 months ago, and have not already exceeded the Free Tier benefits for Amazon EC2, it won't cost you anything to complete this tutorial, because we help you select options that are within the Free Tier benefits. Otherwise, you'll incur the standard Amazon EC2 usage fees from the time that you launch the instance until you terminate the instance (which is the final task of this tutorial), even if it remains idle.
For instructions to determine whether you are eligible for the Free Tier, see Track your Free Tier usage for Amazon EC2.
Tasks
- Step 1: Launch an instance
- Step 2: Connect to your instance
- Step 3: Clean up your instance
- Next steps
Step 1: Launch an instance
You can launch an EC2 instance using the AWS Management Console as described in the following procedure. This tutorial is intended to help you quickly launch your first instance, so it doesn't cover all possible options.
To launch an instance
- Open the Amazon EC2 console athttps://console.aws.amazon.com/ec2/.
- In the navigation bar at the top of the screen, we display the current AWS Region — for example, Ohio. You can use the selected Region, or optionally select a Region that is closer to you.
- From the EC2 console dashboard, in the Launch instance pane, choose Launch instance.
- Under Name and tags, for Name, enter a descriptive name for your instance.
- Under Application and OS Images (Amazon Machine Image), do the following:
- Choose Quick Start, and then choose the operating system (OS) for your instance. For your first Linux instance, we recommend that you choose Amazon Linux.
- From Amazon Machine Image (AMI), select an AMI that is marked Free Tier eligible.
- Under Instance type, for Instance type, choose
t2.micro, which is eligible for the Free Tier. In Regions wheret2.microis not available,t3.microis eligible for the Free Tier. - Under Key pair (login), for Key pair name, choose an existing key pair or choose Create new key pair to create your first key pair.
Warning
If you choose Proceed without a key pair (Not recommended), you won't be able to connect to your instance using the methods described in this tutorial.
8. Under Network settings, notice that we selected your default VPC, selected the option to use the default subnet in an Availability Zone that we choose for you, and configured a security group with a rule that allows connections to your instance from anywhere (0.0.0.0.0/0).
Warning
If you specify 0.0.0.0/0, you are enabling traffic from any IP addresses in the world. For the SSH and RDP protocols, you might consider this acceptable for a short time in a test environment, but it's unsafe for production environments. In production, be sure to authorize access only from the appropriate individual IP address or range of addresses.
For your first instance, we recommend that you use the default settings. Otherwise, you can update your network settings as follows:
- (Optional) To use a specific default subnet, choose Edit and then choose a subnet.
- (Optional) To use a different VPC, choose Edit and then choose an existing VPC. If the VPC isn't configured for public internet access, you won't be able to connect to your instance.
- (Optional) To restrict inbound connection traffic to a specific network, choose Custom instead of Anywhere, and enter the CIDR block for your network.
- (Optional) To use a different security group, choose Select existing security group and choose an existing security group. If the security group does not have a rule that allows connection traffic from your network, you won't be able to connect to your instance. For a Linux instance, you must allow SSH traffic. For a Windows instance, you must allow RDP traffic.
- Under Configure storage, notice that we configured a root volume but no data volumes. This is sufficient for test purposes.
- Review a summary of your instance configuration in the Summary panel, and when you're ready, choose Launch instance.
- If the launch is successful, choose the ID of the instance from the Success notification to open the Instances page and monitor the status of the launch.
- Select the checkbox for the instance. The initial instance state is
pending. After the instance starts, its state changes torunning. Choose theStatus and alarms tab. After your instance passes its status checks, it is ready to receive connection requests.
Step 2: Connect to your instance
The procedure that you use depends on the operating system of the instance. If you can't connect to your instance, see Troubleshoot issues connecting to your Amazon EC2 Linux instance for assistance.
You can connect to your Linux instance using any SSH client. If you are running Windows on your computer, open a terminal and run the ssh command to verify that you have an SSH client installed. If the command is not found, install OpenSSH for Windows.
To connect to your instance using SSH
- Open the Amazon EC2 console athttps://console.aws.amazon.com/ec2/.
- In the navigation pane, choose Instances.
- Select the instance and then choose Connect.
- On the Connect to instance page, choose the SSH client tab.
- (Optional) If you created a key pair when you launched the instance and downloaded the private key (.pem file) to a computer running Linux or macOS, run the example chmod command to set the permissions for your private key.
- Copy the example SSH command. The following is an example, where
key-pair-name.pem is the name of your private key file,ec2-useris the username associated with the image, and the string after the @ symbol is the public DNS name of the instance.
ssh -i key-pair-name.pem ec2-user@ec2-198-51-100-1.us-east-2.compute.amazonaws.com - In a terminal window on your computer, run the ssh command that you saved in the previous step. If the private key file is not in the current directory, you must specify the fully-qualified path to the key file in this command.
The following is an example response:
The authenticity of host 'ec2-198-51-100-1.us-east-2.compute.amazonaws.com (198-51-100-1)' can't be established.
ECDSA key fingerprint is l4UB/neBad9tvkgJf1QZWxheQmR59WgrgzEimCG6kZY.
Are you sure you want to continue connecting (yes/no)? - (Optional) Verify that the fingerprint in the security alert matches the instance fingerprint contained in the console output when you first start an instance. To get the console output, choose Actions, Monitor and troubleshoot, Get system log. If the fingerprints don't match, someone might be attempting a man-in-the-middle attack. If they match, continue to the next step.
- Enter
yes.
The following is an example response:
Warning: Permanently added 'ec2-198-51-100-1.us-east-2.compute.amazonaws.com' (ECDSA) to the list of known hosts.
To connect to a Windows instance using RDP, you must retrieve the initial administrator password and then enter this password when you connect to your instance. It takes a few minutes after instance launch before this password is available. Your account must have permission to call the GetPasswordData action. For more information, see Example policies to control access the Amazon EC2 API.
The default username for the Administrator account depends on the language of the operating system (OS) contained in the AMI. To determine the correct username, identify the language of the OS, and then choose the corresponding username. For example, for an English OS, the username is Administrator, for a French OS it's Administrateur, and for a Portuguese OS it's Administrador. If a language version of the OS does not have a username in the same language, choose the username Administrator (Other). For more information, see Localized Names for Administrator Account in Windows in the Microsoft website.
To retrieve the initial administrator password
- Open the Amazon EC2 console athttps://console.aws.amazon.com/ec2/.
- In the navigation pane, choose Instances.
- Select the instance and then choose Connect.
- On the Connect to instance page, choose the RDP client tab.
- For Username, choose the default username for the Administrator account. The username you choose must match the language of the operating system (OS) contained in the AMI that you used to launch your instance. If there is no username in the same language as your OS, choose Administrator (Other).
- Choose Get password.
- On the Get Windows password page, do the following:
- Choose Upload private key file and navigate to the private key (
.pem) file that you specified when you launched the instance. Select the file and choose Open to copy the entire contents of the file to this window. - Choose Decrypt password. The Get Windows password page closes, and the default administrator password for the instance appears underPassword, replacing the Get password link shown previously.
- Copy the password and save it in a safe place. This password is required to connect to the instance.
- Choose Upload private key file and navigate to the private key (
The following procedure uses the Remote Desktop Connection client for Windows (MSTSC). If you're using a different RDP client, download the RDP file and then see the documentation for the RDP client for the steps to establish the RDP connection.
To connect to a Windows instance using an RDP client
- On the Connect to instance page, choose Download remote desktop file. When the file download is finished, choose Cancel to return to the Instances page. The RDP file is downloaded to your
Downloadsfolder. - Run
mstsc.exeto open the RDP client. - Expand Show options, choose Open, and select the .rdp file from your
Downloadsfolder. - By default, Computer is the public IPv4 DNS name of the instance and User name is the administrator account. To connect to the instance using IPv6 instead, replace the public IPv4 DNS name of the instance with its IPv6 address. Review the default settings and change them as needed.
- Choose Connect. If you receive a warning that the publisher of the remote connection is unknown, choose Connect to continue.
- Enter the password that you saved previously, and then choose OK.
- Due to the nature of self-signed certificates, you might get a warning that the security certificate could not be authenticated. Do one of the following:
- If you trust the certificate, choose Yes to connect to your instance.
- [Windows] Before you proceed, compare the thumbprint of the certificate with the value in the system log to confirm the identity of the remote computer. Choose View certificate and then choose Thumbprint from the Details tab. Compare this value to the value of
RDPCERTIFICATE-THUMBPRINTin Actions, Monitor and troubleshoot, Get system log. - [Mac OS X] Before you proceed, compare the fingerprint of the certificate with the value in the system log to confirm the identity of the remote computer. Choose Show Certificate, expand Details, and choose SHA1 Fingerprints. Compare this value to the value of
RDPCERTIFICATE-THUMBPRINTin Actions, Monitor and troubleshoot, Get system log.
- If the RDP connection is successful, the RDP client displays the Windows login screen and then the Windows desktop. If you receive an error message instead, see Remote Desktop can't connect to the remote computer. When you are finished with the RDP connection, you can close the RDP client.
Step 3: Clean up your instance
After you've finished with the instance that you created for this tutorial, you should clean up by terminating the instance. If you want to do more with this instance before you clean up, see Next steps.
Important
Terminating an instance effectively deletes it; you can't reconnect to an instance after you've terminated it.
You'll stop incurring charges for that instance or usage that counts against your Free Tier limits as soon as the instance status changes to shutting down orterminated. To keep your instance for later, but not incur charges or usage that counts against your Free Tier limits, you can stop the instance now and then start it again later. For more information, see Stop and start Amazon EC2 instances.
To terminate your instance
- In the navigation pane, choose Instances. In the list of instances, select the instance.
- Choose Instance state, Terminate (delete) instance.
- Choose Terminate (delete) when prompted for confirmation.
Amazon EC2 shuts down and terminates your instance. After your instance is terminated, it remains visible on the console for a short while, and then the entry is automatically deleted. You cannot remove the terminated instance from the console display yourself.
Next steps
After you start your instance, you might want to explore the following next steps:
- Explore the Amazon EC2 core concepts with the introductory tutorials. For more information, seeTutorials for launching EC2 instances.
- Learn how to track your Amazon EC2 Free Tier usage using the console. For more information, see Track your Free Tier usage for Amazon EC2.
- Configure a CloudWatch alarm to notify you if your usage exceeds the Free Tier. For more information, see Tracking your AWS Free Tier usage in the_AWS Billing User Guide_.
- Add an EBS volume. For more information, see Create an Amazon EBS volume in the Amazon EBS User Guide.
- Learn how to remotely manage your EC2 instance using the Run command. For more information, see AWS Systems Manager Run Command in the AWS Systems Manager User Guide.
- Learn about instance purchasing options. For more information, see Amazon EC2 billing and purchasing options.
- Get advice about instance types. For more information, see Get recommendations from EC2 instance type finder.