Performance and scaling for Aurora Serverless v2 (original) (raw)
The following procedures and examples show how you can set the capacity range for Aurora Serverless v2 clusters and their associated DB instances. You can also use procedures following to monitor how busy your DB instances are. Then you can use your findings to determine if you need to adjust the capacity range upward or downward.
Before you use these procedures, make sure that you are familiar with how Aurora Serverless v2 scaling works. The scaling mechanism is different than in Aurora Serverless v1. For details, seeAurora Serverless v2 scaling.
Contents
- Choosing the Aurora Serverless v2 capacity range for an Aurora cluster
- Choosing the minimum Aurora Serverless v2 capacity setting for a cluster
- Choosing the maximum Aurora Serverless v2 capacity setting for a cluster
- Example: Change the Aurora Serverless v2 capacity range of an Aurora MySQL cluster
- Example: Change the Aurora Serverless v2 capacity range of an Aurora PostgreSQL cluster
- Working with parameter groups for Aurora Serverless v2
- Avoiding out-of-memory errors
- Important Amazon CloudWatch metrics for Aurora Serverless v2
- Monitoring Aurora Serverless v2 performance with Performance Insights
- Troubleshooting Aurora Serverless v2 capacity issues
Choosing the Aurora Serverless v2 capacity range for an Aurora cluster
With Aurora Serverless v2 DB instances, you set the capacity range that applies to all the DB instances in your DB cluster at the same time that you add the first Aurora Serverless v2 DB instance to the DB cluster. For the procedure to do so, seeSetting the Aurora Serverless v2 capacity range for a cluster.
You can also change the capacity range for an existing cluster. The following sections discuss in more detail how to choose appropriate minimum and maximum values and what happens when you make a change to the capacity range. For example, changing the capacity range can modify the default values of some configuration parameters. Applying all the parameter changes can require rebooting each Aurora Serverless v2 DB instance.
Topics
- Choosing the minimum Aurora Serverless v2 capacity setting for a cluster
- Choosing the maximum Aurora Serverless v2 capacity setting for a cluster
- Example: Change the Aurora Serverless v2 capacity range of an Aurora MySQL cluster
- Example: Change the Aurora Serverless v2 capacity range of an Aurora PostgreSQL cluster
Choosing the minimum Aurora Serverless v2 capacity setting for a cluster
It's tempting to always choose 0.5 for the minimum Aurora Serverless v2 capacity setting. That value allows the DB instance to scale down to the smallest capacity when it's completely idle, while remaining active. You can also enable automatic pause behavior by specifying a minimum capacity of 0 ACUs, as explained inScaling to Zero ACUs with automatic pause and resume for Aurora Serverless v2. However, depending on how you use that cluster and the other settings that you configure, a different minimum capacity might be the most effective. Consider the following factors when choosing the minimum capacity setting:
- The scaling rate for an Aurora Serverless v2 DB instance depends on its current capacity. The higher the current capacity, the faster it can scale up. If you need the DB instance to quickly scale up to a very high capacity, consider setting the minimum capacity to a value where the scaling rate meets your requirement.
- If you typically modify the DB instance class of your DB instances in anticipation of especially high or low workload, you can use that experience to make a rough estimate of the equivalent Aurora Serverless v2 capacity range. To determine the memory size to use in times of low traffic, consultHardware specifications for DB instance classes for Aurora.
For example, suppose that you use the db.r6g.xlarge DB instance class when your cluster has a low workload. That DB instance class has 32 GiB of memory. Thus, you can specify a minimum Aurora capacity unit (ACU) setting of 16 to set up an Aurora Serverless v2 DB instance that can scale down to approximately that same capacity. That's because each ACU corresponds to approximately 2 GiB of memory. You might specify a somewhat lower value to let the DB instance scale down further in case your db.r6g.xlarge DB instance was sometimes underutilized. - If your application works most efficiently when the DB instances have a certain amount of data in the buffer cache, consider specifying a minimum ACU setting where the memory is large enough to hold the frequently accessed data. Otherwise, some data is evicted from the buffer cache when the Aurora Serverless v2 DB instances scale down to a lower memory size. Then when the DB instances scale back up, the information is read back into the buffer cache over time. If the amount of I/O to bring the data back into the buffer cache is substantial, it might be more effective to choose a higher minimum ACU value.
- If your Aurora Serverless v2 DB instances run most of the time at a particular capacity, consider specifying a minimum capacity setting that's lower than that baseline, but not too much lower. Aurora Serverless v2 DB instances can most effectively estimate how much and how fast to scale up when the current capacity isn't drastically lower than the required capacity.
- If your provisioned workload has memory requirements that are too high for small DB instance classes such as T3 or T4g, choose a minimum ACU setting that provides memory comparable to an R5 or R6g DB instance.
In particular, we recommend the following minimum capacity for use with the specified features (these recommendations are subject to change):- Performance Insights – 2 ACUs
- Aurora global databases – 8 ACUs (applies only to the primary AWS Region)
- In Aurora, replication occurs at the storage layer, so reader capacity doesn't directly affect replication. However, for Aurora Serverless v2 reader DB instances that scale independently, make sure that the minimum capacity is sufficient to handle workloads during write-intensive periods to avoid query latency. If reader DB instances in promotion tiers 2–15 experience performance issues, consider increasing the cluster's minimum capacity. For details on choosing whether reader DB instances scale along with the writer or independently, see Choosing the promotion tier for an Aurora Serverless v2 reader.
- If you have a DB cluster with Aurora Serverless v2 reader DB instances, the readers don't scale along with the writer DB instance when the promotion tier of the readers isn't 0 or 1. In that case, setting a low minimum capacity can result in excessive replication lag. That's because the readers might not have enough capacity to apply changes from the writer when the database is busy. We recommend that you set the minimum capacity to a value that represents a comparable amount of memory and CPU to the writer DB instance.
- The value of the
max_connectionsparameter for Aurora Serverless v2DB instances is based on the memory size derived from the maximum ACUs. However, when you specify a minimum capacity of 0 or 0.5 ACUs on PostgreSQL-compatible DB instances, the maximum value ofmax_connectionsis capped at 2,000.
If you intend to use the Aurora PostgreSQL cluster for a high-connection workload, consider using a minimum ACU setting of 1 or higher. For details about how Aurora Serverless v2 handles themax_connectionsconfiguration parameter, see Maximum connections for Aurora Serverless v2. - The time it takes for an Aurora Serverless v2 DB instance to scale from its minimum capacity to its maximum capacity depends on the difference between its minimum and maximum ACU values. When the current capacity of the DB instance is large, Aurora Serverless v2 scales up in larger increments than when the DB instance starts from a small capacity. Thus, if you specify a relatively large maximum capacity and the DB instance spends most of its time near that capacity, consider increasing the minimum ACU setting. That way, an idle DB instance can scale back up to maximum capacity more quickly.
Choosing the maximum Aurora Serverless v2 capacity setting for a cluster
It's tempting to always choose some high value for the maximum Aurora Serverless v2 capacity setting. A large maximum capacity allows the DB instance to scale up the most when it's running an intensive workload. A low value avoids the possibility of unexpected charges. Depending on how you use that cluster and the other settings that you configure, the most effective value might be higher or lower than you originally thought. Consider the following factors when choosing the maximum capacity setting:
- The maximum capacity must be at least as high as the minimum capacity. You can set the minimum and maximum capacity to be identical. However, in that case the capacity never scales up or down. Thus, using identical values for minimum and maximum capacity isn't appropriate outside of testing situations.
- The maximum capacity must be higher than 0.5 ACUs. You can set the minimum and maximum capacity to be the same in most cases. However, you can't specify 0.5 for both the minimum and maximum. Use a value of 1 or higher for the maximum capacity.
- If you typically modify the DB instance class of your DB instances in anticipation of especially high or low workload, you can use that experience to estimate the equivalent Aurora Serverless v2 capacity range. To determine the memory size to use in times of high traffic, consultHardware specifications for DB instance classes for Aurora.
For example, suppose that you use the db.r6g.4xlarge DB instance class when your cluster has a high workload. That DB instance class has 128 GiB of memory. Thus, you can specify a maximum ACU setting of 64 to set up an Aurora Serverless v2 DB instance that can scale up to approximately that same capacity. That's because each ACU corresponds to approximately 2 GiB of memory. You might specify a somewhat higher value to let the DB instance scale up farther in case your db.r6g.4xlarge DB instance sometimes doesn't have enough capacity to handle the workload effectively. - If you have a budgetary cap on your database usage, choose a value that stays within that cap even if all your Aurora Serverless v2 DB instances run at maximum capacity all the time. Remember that when you have_n_ Aurora Serverless v2 DB instances in your cluster, the theoretical maximum Aurora Serverless v2 capacity that the cluster can consume at any moment is_n_ times the maximum ACU setting for the cluster. (The actual amount consumed might be less, for example if some readers scale independently from the writer.)
- If you make use of Aurora Serverless v2 reader DB instances to offload some of the read-only workload from the writer DB instance, you might be able to choose a lower maximum capacity setting. You do this to reflect that each reader DB instance doesn't need to scale as high as if the cluster contains only a single DB instance.
- Suppose that you want to protect against excessive usage due to misconfigured database parameters or inefficient queries in your application. In that case, you might avoid accidental overuse by choosing a maximum capacity setting that's lower than the absolute highest that you could set.
- If spikes due to real user activity are rare but do happen, you can take those occasions into account when choosing the maximum capacity setting. If the priority is for the application to keep running with full performance and scalability, you can specify a maximum capacity setting that's higher than you observe in normal usage. If it's OK for the application to run with reduced throughput during very extreme spikes in activity, you can choose a slightly lower maximum capacity setting. Make sure that you choose a setting that still has enough memory and CPU resources to keep the application running.
- If you turn on settings in your cluster that increase the memory usage for each DB instance, take that memory into account when deciding on the maximum ACU value. Such settings include those for Performance Insights, Aurora MySQL parallel queries, Aurora MySQL performance schema, and Aurora MySQL binary log replication. Make sure that the maximum ACU value allows the Aurora Serverless v2 DB instances to scale up enough to handle the workload when those feature are being used. For information about troubleshooting problems caused by the combination of a low maximum ACU setting and Aurora features that impose memory overhead, seeAvoiding out-of-memory errors.
Example: Change the Aurora Serverless v2 capacity range of an Aurora MySQL cluster
The following AWS CLI example shows how to update the ACU range for Aurora Serverless v2 DB instances in an existing Aurora MySQL cluster. Initially, the capacity range for the cluster is 8–32 ACUs.
aws rds describe-db-clusters --db-cluster-identifier serverless-v2-cluster \
  --query 'DBClusters[*].ServerlessV2ScalingConfiguration|[0]'
{
    "MinCapacity": 8.0,
    "MaxCapacity": 32.0
}
The DB instance is idle and scaled down to 8 ACUs. The following capacity-related settings apply to the DB instance at this point. To represent the size of the buffer pool in easily readable units, we divide it by 2 to the power of 30, yielding a measurement in gibibytes (GiB). That's because memory-related measurements for Aurora use units based on powers of 2, not powers of 10.
mysql> select @@max_connections;
+-------------------+
| @@max_connections |
+-------------------+
|              3000 |
+-------------------+
1 row in set (0.00 sec)

mysql> select @@innodb_buffer_pool_size;
+---------------------------+
| @@innodb_buffer_pool_size |
+---------------------------+
|                9294577664 |
+---------------------------+
1 row in set (0.00 sec)

mysql> select @@innodb_buffer_pool_size / pow(2,30) as gibibytes;
+-----------+
| gibibytes |
+-----------+
|   8.65625 |
+-----------+
1 row in set (0.00 sec)
Next, we change the capacity range for the cluster. After the modify-db-cluster command finishes, the ACU range for the cluster is 12.5–80.
aws rds modify-db-cluster --db-cluster-identifier serverless-v2-cluster \
  --serverless-v2-scaling-configuration MinCapacity=12.5,MaxCapacity=80

aws rds describe-db-clusters --db-cluster-identifier serverless-v2-cluster \
  --query 'DBClusters[*].ServerlessV2ScalingConfiguration|[0]'
{
    "MinCapacity": 12.5,
    "MaxCapacity": 80.0
}
Changing the capacity range caused changes to the default values of some configuration parameters. Aurora can apply some of those new defaults immediately. However, some of the parameter changes take effect only after a reboot. Thepending-reboot status indicates that a reboot is needed to apply some parameter changes.
aws rds describe-db-clusters --db-cluster-identifier serverless-v2-cluster \
  --query '*[].{DBClusterMembers:DBClusterMembers[*].{DBInstanceIdentifier:DBInstanceIdentifier,DBClusterParameterGroupStatus:DBClusterParameterGroupStatus}}|[0]'
{
    "DBClusterMembers": [
        {
            "DBInstanceIdentifier": "serverless-v2-instance-1",
            "DBClusterParameterGroupStatus": "pending-reboot"
        }
    ]
}
At this point, the cluster is idle and the DB instance serverless-v2-instance-1 is consuming 12.5 ACUs. Theinnodb_buffer_pool_size parameter is already adjusted based on the current capacity of the DB instance. Themax_connections parameter still reflects the value from the former maximum capacity. Resetting that value requires rebooting the DB instance.
Note
If you set the max_connections parameter directly in a custom DB parameter group, no reboot is required.
mysql> select @@max_connections;
+-------------------+
| @@max_connections |
+-------------------+
|              3000 |
+-------------------+
1 row in set (0.00 sec)

mysql> select @@innodb_buffer_pool_size;
+---------------------------+
| @@innodb_buffer_pool_size |
+---------------------------+
|               15572402176 |
+---------------------------+
1 row in set (0.00 sec)

mysql> select @@innodb_buffer_pool_size / pow(2,30) as gibibytes;
+---------------+
| gibibytes     |
+---------------+
| 14.5029296875 |
+---------------+
1 row in set (0.00 sec)
Now we reboot the DB instance and wait for it to become available again.
aws rds reboot-db-instance --db-instance-identifier serverless-v2-instance-1
{
  "DBInstanceIdentifier": "serverless-v2-instance-1",
  "DBInstanceStatus": "rebooting"
}

aws rds wait db-instance-available --db-instance-identifier serverless-v2-instance-1
The pending-reboot status is cleared. The value in-sync confirms that Aurora has applied all the pending parameter changes.
aws rds describe-db-clusters --db-cluster-identifier serverless-v2-cluster \
  --query '*[].{DBClusterMembers:DBClusterMembers[*].{DBInstanceIdentifier:DBInstanceIdentifier,DBClusterParameterGroupStatus:DBClusterParameterGroupStatus}}|[0]'
{
    "DBClusterMembers": [
        {
            "DBInstanceIdentifier": "serverless-v2-instance-1",
            "DBClusterParameterGroupStatus": "in-sync"
        }
    ]
}
The innodb_buffer_pool_size parameter has increased to its final size for an idle DB instance. Themax_connections parameter has increased to reflect a value derived from the maximum ACU value. The formula that Aurora uses for max_connections causes an increase of 1,000 when the memory size doubles.
mysql> select @@innodb_buffer_pool_size;
+---------------------------+
| @@innodb_buffer_pool_size |
+---------------------------+
|               16139681792 |
+---------------------------+
1 row in set (0.00 sec)

mysql> select @@innodb_buffer_pool_size / pow(2,30) as gibibytes;
+-----------+
| gibibytes |
+-----------+
|  15.03125 |
+-----------+
1 row in set (0.00 sec)

mysql> select @@max_connections;
+-------------------+
| @@max_connections |
+-------------------+
|              4000 |
+-------------------+
1 row in set (0.00 sec)
We set the capacity range to 0.5–128 ACUs, and reboot the DB instance. Now the idle DB instance has a buffer cache size that's less than 1 GiB, so we measure it in mebibytes (MiB). The max_connections value of 5000 is derived from the memory size of the maximum capacity setting.
mysql> select @@innodb_buffer_pool_size / pow(2,20) as mebibytes, @@max_connections;
+-----------+-------------------+
| mebibytes | @@max_connections |
+-----------+-------------------+
|       672 |              5000 |
+-----------+-------------------+
1 row in set (0.00 sec)
Example: Change the Aurora Serverless v2 capacity range of an Aurora PostgreSQL cluster
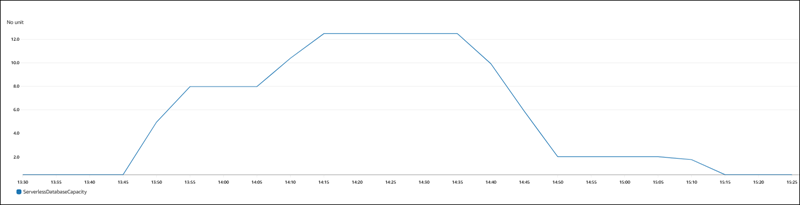
The following CLI examples show how to update the ACU range for Aurora Serverless v2 DB instances in an existing Aurora PostgreSQL cluster.
- The capacity range for the cluster starts at 0.5–1 ACU.
- Change the capacity range to 8–32 ACUs.
- Change the capacity range to 12.5–80 ACUs.
- Change the capacity range to 0.5–128 ACUs.
- Return the capacity to its initial range of 0.5–1 ACU.
The following figure shows the capacity changes in Amazon CloudWatch.
The DB instance is idle and scaled down to 0.5 ACUs. The following capacity-related settings apply to the DB instance at this point.
postgres=> show max_connections;
 max_connections
-----------------
 189
(1 row)

postgres=> show shared_buffers;
 shared_buffers
----------------
 16384
(1 row)
Next, we change the capacity range for the cluster. After the modify-db-cluster command finishes, the ACU range for the cluster is 8.0–32.
aws rds describe-db-clusters --db-cluster-identifier serverless-v2-cluster \
  --query 'DBClusters[*].ServerlessV2ScalingConfiguration|[0]'
{
    "MinCapacity": 8.0,
    "MaxCapacity": 32.0
}
Changing the capacity range causes changes to the default values of some configuration parameters. Aurora can apply some of those new defaults immediately. However, some of the parameter changes take effect only after a reboot. Thepending-reboot status indicates that you need a reboot to apply some parameter changes.
aws rds describe-db-clusters --db-cluster-identifier serverless-v2-cluster \
  --query '*[].{DBClusterMembers:DBClusterMembers[*].{DBInstanceIdentifier:DBInstanceIdentifier,DBClusterParameterGroupStatus:DBClusterParameterGroupStatus}}|[0]'
{
    "DBClusterMembers": [
        {
            "DBInstanceIdentifier": "serverless-v2-instance-1",
            "DBClusterParameterGroupStatus": "pending-reboot"
        }
    ]
}
At this point, the cluster is idle and the DB instance serverless-v2-instance-1 is consuming 8.0 ACUs. Theshared_buffers parameter is already adjusted based on the current capacity of the DB instance. Themax_connections parameter still reflects the value from the former maximum capacity. Resetting that value requires rebooting the DB instance.
Note
If you set the max_connections parameter directly in a custom DB parameter group, no reboot is required.
postgres=> show max_connections;
 max_connections
-----------------
 189
(1 row)

postgres=> show shared_buffers;
 shared_buffers
----------------
 1425408
(1 row)
We reboot the DB instance and wait for it to become available again.
aws rds reboot-db-instance --db-instance-identifier serverless-v2-instance-1
{
  "DBInstanceIdentifier": "serverless-v2-instance-1",
  "DBInstanceStatus": "rebooting"
}

aws rds wait db-instance-available --db-instance-identifier serverless-v2-instance-1
Now that the DB instance is rebooted, the pending-reboot status is cleared. The value in-sync confirms that Aurora has applied all the pending parameter changes.
aws rds describe-db-clusters --db-cluster-identifier serverless-v2-cluster \
  --query '*[].{DBClusterMembers:DBClusterMembers[*].{DBInstanceIdentifier:DBInstanceIdentifier,DBClusterParameterGroupStatus:DBClusterParameterGroupStatus}}|[0]'
{
    "DBClusterMembers": [
        {
            "DBInstanceIdentifier": "serverless-v2-instance-1",
            "DBClusterParameterGroupStatus": "in-sync"
        }
    ]
}
After rebooting, max_connections shows the value from the new maximum capacity.
postgres=> show max_connections;
 max_connections
-----------------
 5000
(1 row)

postgres=> show shared_buffers;
 shared_buffers
----------------
 1425408
(1 row)
Next, we change the capacity range for the cluster to 12.5–80 ACUs.
aws rds modify-db-cluster --db-cluster-identifier serverless-v2-cluster \
  --serverless-v2-scaling-configuration MinCapacity=12.5,MaxCapacity=80

aws rds describe-db-clusters --db-cluster-identifier serverless-v2-cluster \
  --query 'DBClusters[*].ServerlessV2ScalingConfiguration|[0]'
{
    "MinCapacity": 12.5,
    "MaxCapacity": 80.0
}
At this point, the cluster is idle and the DB instance serverless-v2-instance-1 is consuming 12.5 ACUs. Theshared_buffers parameter is already adjusted based on the current capacity of the DB instance. Themax_connections value is still 5000.
postgres=> show max_connections;
 max_connections
-----------------
 5000
(1 row)

postgres=> show shared_buffers;
 shared_buffers
----------------
 2211840
(1 row)
We reboot again, but the parameter values stay the same. This is because max_connections has a maximum value of 5000 for an Aurora Serverless v2 DB cluster running Aurora PostgreSQL.
postgres=> show max_connections;
 max_connections
-----------------
 5000
(1 row)

postgres=> show shared_buffers;
 shared_buffers
----------------
 2211840
(1 row)
Now we set the capacity range from 0.5 to 128 ACUs. The DB cluster scales down to 10 ACUs, then to 2. We reboot the DB instance.
postgres=> show max_connections;
 max_connections
-----------------
 2000
(1 row)

postgres=> show shared_buffers;
 shared_buffers
----------------
 16384
(1 row)
The max_connections value for Aurora Serverless v2 DB instances is based on the memory size derived from the maximum ACUs. However, when you specify a minimum capacity of 0 or 0.5 ACUs on PostgreSQL-compatible DB instances, the maximum value of max_connections is capped at 2,000.
Now we return the capacity to its initial range of 0.5–1 ACU and reboot the DB instance. Themax_connections parameter has returned to its original value.
postgres=> show max_connections;
 max_connections
-----------------
 189
(1 row)

postgres=> show shared_buffers;
 shared_buffers
----------------
 16384
(1 row)
Working with parameter groups for Aurora Serverless v2
When you create your Aurora Serverless v2 DB cluster, you choose a specific Aurora DB engine and an associated DB cluster parameter group. If you aren't familiar with how Aurora uses parameter groups to apply configuration settings consistently across clusters, seeParameter groups for Amazon Aurora. All of those procedures for creating, modifying, applying, and other actions for parameter groups apply to Aurora Serverless v2.
The parameter group feature works generally the same between provisioned clusters and clusters containing Aurora Serverless v2 DB instances:
- The default parameter values for all DB instances in the cluster are defined by the cluster parameter group.
- You can override some parameters for specific DB instances by specifying a custom DB parameter group for those DB instances. You might do so during debugging or performance tuning for specific DB instances. For example, suppose that you have a cluster containing some Aurora Serverless v2 DB instances and some provisioned DB instances. In this case, you might specify some different parameters for the provisioned DB instances by using a custom DB parameter group.
- For Aurora Serverless v2, you can use all the parameters that have the value
provisionedin theSupportedEngineModesattribute in the parameter group. In Aurora Serverless v1, you can only use the subset of parameters that haveserverlessin theSupportedEngineModesattribute.
Topics
- Default parameter values
- Maximum connections for Aurora Serverless v2
- Parameters that Aurora adjusts as Aurora Serverless v2 scales up and down
- Parameters that Aurora computes based on Aurora Serverless v2 maximum capacity
Default parameter values
The crucial difference between provisioned DB instances and Aurora Serverless v2 DB instances is that Aurora overrides any custom parameter values for certain parameters that are related to DB instance capacity. The custom parameter values still apply to any provisioned DB instances in your cluster. For more details about how Aurora Serverless v2 DB instances interpret the parameters from Aurora parameter groups, seeConfiguration parameters for Aurora clusters. For the specific parameters that Aurora Serverless v2 overrides, seeParameters that Aurora adjusts as Aurora Serverless v2 scales up and down andParameters that Aurora computes based on Aurora Serverless v2 maximum capacity.
You can get a list of default values for the default parameter groups for the various Aurora DB engines by using thedescribe-db-cluster-parameters CLI command and querying the AWS Region. The following are values that you can use for the--db-parameter-group-family and -db-parameter-group-name options for engine versions that are compatible with Aurora Serverless v2.
| Database engine and version | Parameter group family | Default parameter group name |
|---|---|---|
| Aurora MySQL version 3 | aurora-mysql8.0 | default.aurora-mysql8.0 |
| Aurora PostgreSQL version 13.x | aurora-postgresql13 | default.aurora-postgresql13 |
| Aurora PostgreSQL version 14.x | aurora-postgresql14 | default.aurora-postgresql14 |
| Aurora PostgreSQL version 15.x | aurora-postgresql15 | default.aurora-postgresql15 |
| Aurora PostgreSQL version 16.x | aurora-postgresql16 | default.aurora-postgresql16 |
The following example gets a list of parameters from the default DB cluster group for Aurora MySQL version 3 and Aurora PostgreSQL 13. Those are the Aurora MySQL and Aurora PostgreSQL versions that you use with Aurora Serverless v2.
For Linux, macOS, or Unix:
aws rds describe-db-cluster-parameters \
  --db-cluster-parameter-group-name default.aurora-mysql8.0 \
  --query 'Parameters[*].{ParameterName:ParameterName,SupportedEngineModes:SupportedEngineModes} |
    [?contains(SupportedEngineModes, `provisioned`) == `true`] | [*].[ParameterName]' \
  --output text

aws rds describe-db-cluster-parameters \
  --db-cluster-parameter-group-name default.aurora-postgresql13 \
  --query 'Parameters[*].{ParameterName:ParameterName,SupportedEngineModes:SupportedEngineModes} |
    [?contains(SupportedEngineModes, `provisioned`) == `true`] | [*].[ParameterName]' \
  --output text
For Windows:
aws rds describe-db-cluster-parameters ^
  --db-cluster-parameter-group-name default.aurora-mysql8.0 ^
  --query 'Parameters[*].{ParameterName:ParameterName,SupportedEngineModes:SupportedEngineModes} |
    [?contains(SupportedEngineModes, `provisioned`) == `true`] | [*].[ParameterName]' ^
  --output text

aws rds describe-db-cluster-parameters ^
  --db-cluster-parameter-group-name default.aurora-postgresql13 ^
  --query 'Parameters[*].{ParameterName:ParameterName,SupportedEngineModes:SupportedEngineModes} |
    [?contains(SupportedEngineModes, `provisioned`) == `true`] | [*].[ParameterName]' ^
  --output text
Maximum connections for Aurora Serverless v2
For both Aurora MySQL and Aurora PostgreSQL, Aurora Serverless v2 DB instances hold the max_connections parameter constant so that connections aren't dropped when the DB instance scales down. The default value for this parameter is derived from a formula based on the memory size of the DB instance. For details about the formula and the default values for provisioned DB instance classes, see Maximum connections to an Aurora MySQL DB instance and Maximum connections to an Aurora PostgreSQL DB instance.
When Aurora Serverless v2 evaluates the formula, it uses the memory size based on the maximum Aurora capacity units (ACUs) for the DB instance, not the current ACU value. If you change the default value, we recommend using a variation of the formula instead of specifying a constant value. That way, Aurora Serverless v2 can use an appropriate setting based on the maximum capacity.
When you change the maximum capacity of an Aurora Serverless v2 DB cluster, you have to reboot the Aurora Serverless v2 DB instances to update the max_connections value. This is because max_connections is a static parameter for Aurora Serverless v2.
The following table shows the default values for max_connections for Aurora Serverless v2 based on the maximum ACU value.
| Maximum ACUs | Default maximum connections on Aurora MySQL | Default maximum connections on Aurora PostgreSQL |
|---|---|---|
| 1 | 90 | 189 |
| 4 | 135 | 823 |
| 8 | 1,000 | 1,669 |
| 16 | 2,000 | 3,360 |
| 32 | 3,000 | 5,000 |
| 64 | 4,000 | 5,000 |
| 128 | 5,000 | 5,000 |
| 192 | 6,000 | 5,000 |
| 256 | 6,000 | 5,000 |
Note
The max_connections value for Aurora Serverless v2DB instances is based on the memory size derived from the maximum ACUs. However, when you specify a minimum capacity of 0 or 0.5 ACUs on PostgreSQL-compatible DB instances, the maximum value of max_connections is capped at 2,000.
For specific examples showing how max_connections changes with the maximum ACU value, see Example: Change the Aurora Serverless v2 capacity range of an Aurora MySQL cluster and Example: Change the Aurora Serverless v2 capacity range of an Aurora PostgreSQL cluster.
Parameters that Aurora adjusts as Aurora Serverless v2 scales up and down
During autoscaling, Aurora Serverless v2 needs to be able to change parameters for each DB instance to work best for the increased or decreased capacity. Thus, you can't override some parameters related to capacity. For some parameters that you can override, avoid hardcoding fixed values. The following considerations apply to these settings that are related to capacity.
For Aurora MySQL, Aurora Serverless v2 resizes some parameters dynamically during scaling. For the following parameters, Aurora Serverless v2 doesn't use any custom parameter values that you specify:
innodb_buffer_pool_sizeinnodb_purge_threadstable_definition_cachetable_open_cache
For Aurora PostgreSQL, Aurora Serverless v2 resizes the following parameter dynamically during scaling. For the following parameters, Aurora Serverless v2 doesn't use any custom parameter values that you specify:
shared_buffers
For all parameters other than those listed here, Aurora Serverless v2 DB instances work the same as provisioned DB instances. The default parameter value is inherited from the cluster parameter group. You can modify the default for the whole cluster by using a custom cluster parameter group. Or you can modify the default for certain DB instances by using a custom DB parameter group. Dynamic parameters are updated immediately. Changes to static parameters only take effect after you reboot the DB instance.
Parameters that Aurora computes based on Aurora Serverless v2 maximum capacity
For the following parameters, Aurora PostgreSQL uses default values that are derived from the memory size based on the maximum ACU setting, the same as with max_connections:
autovacuum_max_workersautovacuum_vacuum_cost_limitautovacuum_work_memeffective_cache_sizemaintenance_work_mem
Avoiding out-of-memory errors
If one of your Aurora Serverless v2 DB instances consistently reaches the limit of its maximum capacity, Aurora indicates this condition by setting the DB instance to a status of incompatible-parameters. While the DB instance has the incompatible-parameters status, some operations are blocked. For example, you can't upgrade the engine version.
Typically, your DB instance goes into this status when it restarts frequently due to out-of-memory errors. Aurora records an event when this type of restart happens. You can view the event by following the procedure inViewing Amazon RDS events. Unusually high memory usage can happen because of overhead from turning on settings such as Performance Insights and IAM authentication. It can also come from a heavy workload on your DB instance or from managing the metadata associated with a large number of schema objects.
If the memory pressure becomes lower so that the DB instance doesn't reach its maximum capacity very often, Aurora automatically changes the DB instance status back to available.
To recover from this condition, you can take some or all of the following actions:
- Increase the lower limit on capacity for Aurora Serverless v2 DB instances by changing the minimum Aurora capacity unit (ACU) value for the cluster. Doing so avoids issues where an idle database scales down to a capacity with less memory than is needed for the features that are turned on in your cluster. After changing the ACU settings for the cluster, reboot the Aurora Serverless v2 DB instance. Doing so evaluates whether Aurora can reset the status back to
available. - Increase the upper limit on capacity for Aurora Serverless v2 DB instances by changing the maximum ACU value for the cluster. Doing so avoids issues where a busy database can't scale up to a capacity with enough memory for the features that are turned on in your cluster and the database workload. After changing the ACU settings for the cluster, reboot the Aurora Serverless v2 DB instance. Doing so evaluates whether Aurora can reset the status back to
available. - Turn off configuration settings that require memory overhead. For example, suppose that you have features such as AWS Identity and Access Management (IAM), Performance Insights, or Aurora MySQL binary log replication turned on but don't use them. If so, you can turn them off. Or you can adjust the minimum and maximum capacity values for the cluster higher to account for the memory used by those features. For guidelines about choosing minimum and maximum capacity settings, seeChoosing the Aurora Serverless v2 capacity range for an Aurora cluster.
- Reduce the workload on the DB instance. For example, you can add reader DB instances to the cluster to spread the load from read-only queries across more DB instances.
- Tune the SQL code used by your application to use fewer resources. For example, you can examine your query plans, check the slow query log, or adjust the indexes on your tables. You can also perform other traditional kinds of SQL tuning.
Important Amazon CloudWatch metrics for Aurora Serverless v2
To get started with Amazon CloudWatch for your Aurora Serverless v2 DB instance, seeViewing Aurora Serverless v2 logs in Amazon CloudWatch. To learn more about how to monitor Aurora DB clusters through CloudWatch, seeMonitoring log events in Amazon CloudWatch.
You can view your Aurora Serverless v2 DB instances in CloudWatch to monitor the capacity consumed by each DB instance with the ServerlessDatabaseCapacity metric. You can also monitor all of the standard Aurora CloudWatch metrics, such as DatabaseConnections and Queries. For the full list of CloudWatch metrics that you can monitor for Aurora, seeAmazon CloudWatch metrics for Amazon Aurora. The metrics are divided into cluster-level and instance-level metrics, inCluster-level metrics for Amazon Aurora andInstance-level metrics for Amazon Aurora.
The following CloudWatch instance-level metrics are important to monitor for you to understand how your Aurora Serverless v2 DB instances are scaling up and down. All of these metrics are calculated every second. That way, you can monitor the current status of your Aurora Serverless v2 DB instances. You can set alarms to notify you if any Aurora Serverless v2 DB instance approaches a threshold for metrics related to capacity. You can determine if the minimum and maximum capacity settings are appropriate, or if you need to adjust them. You can determine where to focus your efforts for optimizing the efficiency of your database.
ServerlessDatabaseCapacity. As an instance-level metric, it reports the number of ACUs represented by the current DB instance capacity. As a cluster-level metric, it represents the average of theServerlessDatabaseCapacityvalues of all the Aurora Serverless v2 DB instances in the cluster. This metric is only a cluster-level metric in Aurora Serverless v1. In Aurora Serverless v2, it's available at the DB instance level and at the cluster level.ACUUtilization. This metric is new in Aurora Serverless v2. This value is represented as a percentage. It's calculated as the value of theServerlessDatabaseCapacitymetric divided by the maximum ACU value of the DB cluster. Consider the following guidelines to interpret this metric and take action:- If this metric approaches a value of
100.0, the DB instance has scaled up as high as it can. Consider increasing the maximum ACU setting for the cluster. That way, both writer and reader DB instances can scale to a higher capacity. - Suppose that a read-only workload causes a reader DB instance to approach an
ACUUtilizationof100.0, while the writer DB instance isn't close to its maximum capacity. In that case, consider adding additional reader DB instances to the cluster. That way, you can spread the read-only part of the workload spread across more DB instances, reducing the load on each reader DB instance. - Suppose that you are running a production application, where performance and scalability are the primary considerations. In that case, you can set the maximum ACU value for the cluster to a high number. Your goal is for the
ACUUtilizationmetric to always be below100.0. With a high maximum ACU value, you can be confident that there's enough room in case there are unexpected spikes in database activity. You are only charged for the database capacity that's actually consumed.
- If this metric approaches a value of
CPUUtilization. This metric is interpreted differently in Aurora Serverless v2 than in provisioned DB instances. For Aurora Serverless v2, this value is a percentage that's calculated as the amount of CPU currently being used divided by the CPU capacity that's available under the maximum ACU value of the DB cluster. Aurora monitors this value automatically and scales up your Aurora Serverless v2 DB instance when the DB instance consistently uses a high proportion of its CPU capacity.
If this metric approaches a value of100.0, the DB instance has reached its maximum CPU capacity. Consider increasing the maximum ACU setting for the cluster. If this metric approaches a value of100.0on a reader DB instance, consider adding additional reader DB instances to the cluster. That way, you can spread the read-only part of the workload spread across more DB instances, reducing the load on each reader DB instance.FreeableMemory. This value represents the amount of unused memory that is available when the Aurora Serverless v2 DB instance is scaled to its maximum capacity. For every ACU that the current capacity is below the maximum capacity, this value increases by approximately 2 GiB. Thus, this metric doesn't approach zero until the DB instance is scaled up as high as it can.
If this metric approaches a value of0, the DB instance has scaled up as much as it can and is nearing the limit of its available memory. Consider increasing the maximum ACU setting for the cluster. If this metric approaches a value of0on a reader DB instance, consider adding additional reader DB instances to the cluster. That way, the read-only part of the workload can be spread across more DB instances, reducing the memory usage on each reader DB instance.TempStorageIops. The number of IOPS done on local storage attached to the DB instance. It includes the IOPS for both reads and writes. This metric represents a count and is measured once per second. This is a new metric for Aurora Serverless v2. For details, seeInstance-level metrics for Amazon Aurora.TempStorageThroughput. The amount of data transferred to and from local storage associated with the DB instance. This metric represents bytes and is measured once per second. This is a new metric for Aurora Serverless v2. For details, seeInstance-level metrics for Amazon Aurora.
Typically, most scaling up for Aurora Serverless v2 DB instances is caused by memory usage and CPU activity. TheTempStorageIops and TempStorageThroughput metrics can help you to diagnose the rare cases where network activity for transfers between your DB instance and local storage devices is responsible for unexpected capacity increases. To monitor other network activity, you can use these existing metrics:
NetworkReceiveThroughputNetworkThroughputNetworkTransmitThroughputStorageNetworkReceiveThroughputStorageNetworkThroughputStorageNetworkTransmitThroughput
You can have Aurora publish some or all database logs to Amazon CloudWatch Logs. For instructions, see the following depending on your database engine:
- Publishing Aurora PostgreSQL logs to Amazon CloudWatch Logs
- Publishing Amazon Aurora MySQL logs to Amazon CloudWatch Logs
How Aurora Serverless v2 metrics apply to your AWS bill
The Aurora Serverless v2 charges on your AWS bill are calculated based on the sameServerlessDatabaseCapacity metric that you can monitor. The billing mechanism can differ from the computed CloudWatch average for this metric in cases where you use Aurora Serverless v2 capacity for only part of an hour. It can also differ if system issues make the CloudWatch metric unavailable for brief periods. Thus, you might see a slightly different value of ACU-hours on your bill than if you compute the number yourself from the ServerlessDatabaseCapacity average value.
Examples of CloudWatch commands for Aurora Serverless v2 metrics
The following AWS CLI examples demonstrate how you can monitor the most important CloudWatch metrics related to Aurora Serverless v2. In each case, replace the Value= string for the --dimensions parameter with the identifier of your own Aurora Serverless v2 DB instance.
The following Linux example displays the minimum, maximum, and average capacity values for a DB instance, measured every 10 minutes over one hour. The Linux date command specifies the start and end times relative to the current date and time. The sort_by function in the --query parameter sorts the results chronologically based on the Timestamp field.
aws cloudwatch get-metric-statistics --metric-name "ServerlessDatabaseCapacity" \
  --start-time "$(date -d '1 hour ago')" --end-time "$(date -d 'now')" --period 600 \
  --namespace "AWS/RDS" --statistics Minimum Maximum Average \
  --dimensions Name=DBInstanceIdentifier,Value=my_instance \
  --query 'sort_by(Datapoints[*].{min:Minimum,max:Maximum,avg:Average,ts:Timestamp},&ts)' --output table
The following Linux examples demonstrate monitoring the capacity of each DB instance in a cluster. They measure the minimum, maximum, and average capacity utilization of each DB instance. The measurements are taken once each hour over a three-hour period. These examples use the ACUUtilization metric representing a percentage of the upper limit on ACUs, instead of ServerlessDatabaseCapacity representing a fixed number of ACUs. That way, you don't need to know the actual numbers for the minimum and maximum ACU values in the capacity range. You can see percentages ranging from 0 to 100.
aws cloudwatch get-metric-statistics --metric-name "ACUUtilization" \
  --start-time "$(date -d '3 hours ago')" --end-time "$(date -d 'now')" --period 3600 \
  --namespace "AWS/RDS" --statistics Minimum Maximum Average \
  --dimensions Name=DBInstanceIdentifier,Value=my_writer_instance \
  --query 'sort_by(Datapoints[*].{min:Minimum,max:Maximum,avg:Average,ts:Timestamp},&ts)' --output table

aws cloudwatch get-metric-statistics --metric-name "ACUUtilization" \
  --start-time "$(date -d '3 hours ago')" --end-time "$(date -d 'now')" --period 3600 \
  --namespace "AWS/RDS" --statistics Minimum Maximum Average \
  --dimensions Name=DBInstanceIdentifier,Value=my_reader_instance \
  --query 'sort_by(Datapoints[*].{min:Minimum,max:Maximum,avg:Average,ts:Timestamp},&ts)' --output table
The following Linux example does similar measurements as the previous ones. In this case, the measurements are for the CPUUtilization metric. The measurements are taken every 10 minutes over a 1-hour period. The numbers represent the percentage of available CPU used, based on the CPU resources available to the maximum capacity setting for the DB instance.
aws cloudwatch get-metric-statistics --metric-name "CPUUtilization" \
  --start-time "$(date -d '1 hour ago')" --end-time "$(date -d 'now')" --period 600 \
  --namespace "AWS/RDS" --statistics Minimum Maximum Average \
  --dimensions Name=DBInstanceIdentifier,Value=my_instance \
  --query 'sort_by(Datapoints[*].{min:Minimum,max:Maximum,avg:Average,ts:Timestamp},&ts)' --output table
The following Linux example does similar measurements as the previous ones. In this case, the measurements are for the FreeableMemory metric. The measurements are taken every 10 minutes over a 1-hour period.
aws cloudwatch get-metric-statistics --metric-name "FreeableMemory" \
  --start-time "$(date -d '1 hour ago')" --end-time "$(date -d 'now')" --period 600 \
  --namespace "AWS/RDS" --statistics Minimum Maximum Average \
  --dimensions Name=DBInstanceIdentifier,Value=my_instance \
  --query 'sort_by(Datapoints[*].{min:Minimum,max:Maximum,avg:Average,ts:Timestamp},&ts)' --output table
Monitoring Aurora Serverless v2 performance with Performance Insights
You can use Performance Insights to monitor the performance of Aurora Serverless v2 DB instances. For Performance Insights procedures, see Monitoring DB load with Performance Insights on Amazon Aurora.
The following new Performance Insights counters apply to Aurora Serverless v2 DB instances:
os.general.serverlessDatabaseCapacity– The current capacity of the DB instance in ACUs. The value corresponds to theServerlessDatabaseCapacityCloudWatch metric for the DB instance.os.general.acuUtilization– The percentage of current capacity out of the maximum configured capacity. The value corresponds to theACUUtilizationCloudWatch metric for the DB instance.os.general.maxConfiguredAcu– The maximum capacity that you configured for this Aurora Serverless v2 DB instance. It's measured in ACUs.os.general.minConfiguredAcu– The minimum capacity that you configured for this Aurora Serverless v2 DB instance. It's measured in ACUs
For the full list of Performance Insights counters, see Performance Insights counter metrics.
When vCPU values are shown for an Aurora Serverless v2 DB instance in Performance Insights, those values represent estimates based on the ACU value for the DB instance. At the default interval of one minute, any fractional vCPU values are rounded up to the nearest whole number. For longer intervals, the vCPU value shown is the average of the integer vCPU values for each minute.
Troubleshooting Aurora Serverless v2 capacity issues
In some cases, Aurora Serverless v2 doesn't scale down to the minimum capacity, even with no load on the database. This can happen for the following reasons:
- Certain features can increase resource usage and prevent the database from scaling down to minimum capacity. These features include the following:
- Aurora global databases
- Exporting CloudWatch Logs
- Enabling
pg_auditon Aurora PostgreSQL–compatible DB clusters - Enhanced Monitoring
- Performance Insights
For more information, see Choosing the minimum Aurora Serverless v2 capacity setting for a cluster.
- If a reader instance isn't scaling down to the minimum and stays at the same or higher capacity than the writer instance, then check the priority tier of the reader instance. Aurora Serverless v2 reader DB instances in tier 0 or 1 are kept at a minimum capacity at least as high as the writer DB instance. Change the priority tier of the reader to 2 or higher so that it scales up and down independently of the writer. For more information, see Choosing the promotion tier for an Aurora Serverless v2 reader.
- Set any database parameters that impact the size of shared memory to their default values. Setting a value higher than the default increases the shared memory requirement and prevents the database from scaling down to the minimum capacity. Examples are
max_connectionsandmax_locks_per_transaction.
Note
Updating shared memory parameters requires a database restart for the changes to take effect.
- Heavy database workloads can increase resource usage.
- Large database volumes can increase resource usage.
Amazon Aurora uses memory and CPU resources for DB cluster management. Aurora requires more CPU and memory to manage DB clusters with larger database volumes. If your cluster’s minimum capacity is less than the minimum required for cluster management, your cluster won't scale down to the minimum capacity. - Background processes, such as purge, can also increase resource usage.
If the database still doesn't scale down to the minimum capacity configured, then stop and restart the database to reclaim any memory fragments that might have built up over time. Stopping and starting a database results in downtime, so we recommend doing this sparingly.