d-SEAMS: d-SEAMS (original) (raw)
The C++ core of d-SEAMS, a molecular dynamics trajectory analysis engine. Deferred Structural Elucidation Analysis for Molecular Simulations
![]()
![]()
- Check our build status here.
- The docs themselves are here and development is ongoing on GitHub
- We also have a Zenodo community for user-contributions like reviews, testimonials and tutorials
- Trajectories are hosted on figshare.
- Our wiki is here
Note
The related pages describe the examples and how to obtain the data-sets (trajectories) from figshare.
Warning
If you are unwilling to use the nix build system, then please note that you must manage the dependencies MANUALLY, including the compiler versions. Optionally, use the provided conda environment.
Citation
- This has been published at the Journal of Chemical Information and Modeling (JCIM)
- You may also read the preprint on arXiv
If you use this software please cite the following:
Goswami, R., Goswami, A., & Singh, J. K. (2020). d-SEAMS: Deferred Structural Elucidation Analysis for Molecular Simulations. Journal of Chemical Information and Modeling. https://doi.org/10.1021/acs.jcim.0c00031
The corresponding bibtex entry is:
@Article{Goswami2020, author={Goswami, Rohit and Goswami, Amrita and Singh, Jayant Kumar}, title={d-SEAMS: Deferred Structural Elucidation Analysis for Molecular Simulations}, journal={Journal of Chemical Information and Modeling}, year={2020}, month={Mar}, day={20}, publisher={American Chemical Society}, issn={1549-9596}, doi={10.1021/acs.jcim.0c00031}, url={https://doi.org/10.1021/acs.jcim.0c00031} }
Compilation
We use a deterministic build system to generate both bug reports and uniform usage statistics. This also handles the lua scripting engine.
Note
The lua functions are documented on the on the API Docs
We also provide a conda environment as a fallback, which is also recommended for MacOS users.
Build
Conda (working now)
Although we strongly suggest using nix, for MacOS systems, the following instructions may be more suitable. We will assume the presence of micromamba:
cd ~/seams-core
micromamba create -f environment.yml
micromamba activate dseams
luarocks install luafilesystem
Now the installation can proceed.
Note
we do not install lua-luafilesystem within the conda environment because it is outdated on osx
mkdir build
cd build
export EIGEN3_INCLUDE_DIR=$CONDA_PREFIX/include/eigen3
cmake -DCMAKE_BUILD_TYPE=Release -DCMAKE_EXPORT_COMPILE_COMMANDS=YES -DCMAKE_INSTALL_PREFIX:PATH=$CONDA_PREFIX ../
make -j$(nproc)
make install
LD_LIBRARY_PATH=$LD_LIBRARY_PATH:$CONDA_PREFIX/lib $CONDA_PREFIX/bin/yodaStruct -c lua_inputs/config.yml
We have opted to install into the conda environment, if this is not the intended behavior, use /usr/local instead.
Spack (not working at the moment)
Manually this can be done in a painful way as follows:
spack install eigen@3.3.9 lua@5.2
spack install catch2 fmt yaml-cpp openblas boost cmake ninja meson
spack load catch2 fmt yaml-cpp openblas boost cmake ninja meson eigen@3.3.9 lua@5.2
luarocks install luafilesystem
Or better:
spack env activate $(pwd)
# After loading the packages
luarocks install luafilesystem
Now we can build and install as usual.
cmake -S . -B build -DCMAKE_BUILD_TYPE=RelWithDebInfo \
-DCMAKE_EXPORT_COMPILE_COMMANDS=YES -GNinja \
-DCMAKE_INSTALL_PREFIX=$HOME/.local \
-DCMAKE_CXX_FLAGS="-pg -fsanitize=address " \
-DCMAKE_EXE_LINKER_FLAGS=-pg -DCMAKE_SHARED_LINKER_FLAGS=-pg \
-DBUILD_TESTING=NO
cmake --build build
Or more reasonably:
export INST_DIR=$HOME/.local
cd src
meson setup bbdir --prefix $INST_DIR
meson compile -C bbdir
meson install -C bbdir
# if not done
export PATH=$PATH:$INST_DIR/bin
export LD_LIBRARY_PATH=$LD_LIBRARY_PATH:$INST_DIR/lib
cd ../
yodaStruct -c lua_inputs/config.yml
Nix (not working at the moment)
Since this project is built with nix, we can simply do the following from the root directory (longer method):
# Make sure there are no artifacts
rm -rf build
# This will take a long time the first time as it builds the dependencies
nix-build . # Optional
# Install into your path
nix-env -if . # Required
# Run the command anywhere
yodaStruct -c lua_inputs/config.yml
A faster method of building the software is by using the cachix binary cache as shown:
# Install cachix
nix-env -iA cachix -f https://cachix.org/api/v1/install
# Use the binary cache
cachix use dseams
# Faster with the cache than building from scratch
nix-build . # Optional
# Install into your path
nix-env -if . # Required
# Run the command anywhere
yodaStruct -c lua_inputs/config.yml
Usage
Having installed the yodaStruct binary and library, we can now use it.
yodaStruct -c lua_inputs/config.yml
Note
The paths in the .yml should be relative to the folder from which the binary is called.
If you're confused about how to handle the relative paths, run the command yodaStruct -c lua_inputs/config.yml in the top-level directory, and set the paths relative to the top-level directory. This is the convention used in the examples as well.
Language Server Support
To generate a compile_commands.json file for working with a language server like ccls use the following commands:
# Pure environment
nix-shell --pure
mkdir -p build && cd build
cmake -DCMAKE_BUILD_TYPE=Debug -DCMAKE_EXPORT_COMPILE_COMMANDS=YES ../
cp compile_commands.json ../
Note that there is no need to actually compile the project if you simply need to get the compiler database for the language server.
Do Not commit the .json file.
Development
We can simply use the nix environment:
# From the project root
nix-shell --pure
Running
This is built completely with nix:
# Install systemwide
nix-env -if .
To run the sample inputs, simply install the software, and ensure that input/ is a child directory.
# Assuming you are in the src directory
# Check help with -h
yodaStruct -c lua_inputs/config.yml
Tests
Apart from the examples, the test-suite can be run with the yodaStruct_test binary, which will drop into the nix environment before building and executing gdb:
# Just run this
./testBuild.sh
# At this point the binary and library are copied into the root
# One might, in a foolhardy attempt, use gdb at this point
# Here be dragons :)
# USE NIX
# Anyway
gdb --args ./yodaStruct -c lua_inputs/config.yml
# quit gdb with quit
# Go run the test binary
cd shellBuild
./yodaStruct_test
Do note that the regular installation via nix-env runs the tests before the installation
Developer Documentation
While developing, it is sometimes expedient to update the packages used. It is then useful to note that we use niv to handle our pinned packages (apart from the ones built from Github). Thus, one might need, say:
niv update nixpkgs -b nixpkgs-unstable
Test the build with nix:
nix-build .
# Outputs are in ./result
# If you get a CMake error
rm -rf build
nix-store --delete /nix/store/$whatever # $whatever is the derivation complaining
nix-collect-garbage # then try again [worst case scenario]
Leaks and performance
While testing for leaks, use clang (for AddressSanitizer and LeakSanitizer) and the following:
# From the developer shell
export CXX=/usr/bin/clang++ && export CC=/usr/bin/clang
cmake .. -DCMAKE_CXX_FLAGS="-pg -fsanitize=address " -DCMAKE_EXE_LINKER_FLAGS=-pg -DCMAKE_SHARED_LINKER_FLAGS=-pg
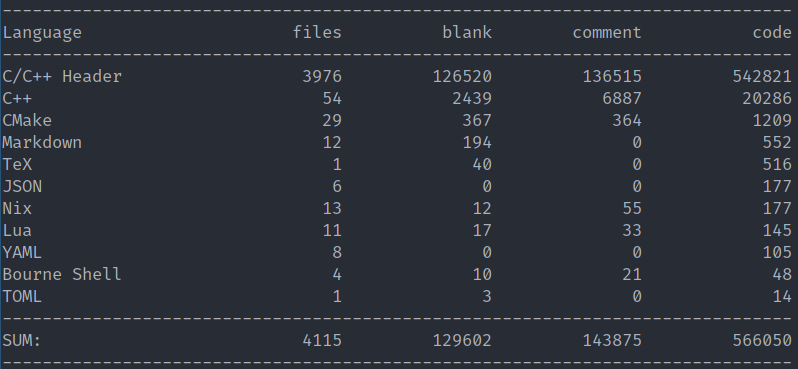
Overview
As of Mon Jan 20 15:57:18 2020, the lines of code calculated by cloc are as follows:
Contributing
Please ensure that all contributions are formatted according to the clang-format configuration file.
Specifically, consider using the following:
- Sublime Plugin for users of Sublime Text
- format-all for Emacs
- vim-clang-format for Vim
- Visual Studio: http://llvm.org/builds/, or use the integrated support in Visual Studio 2017
- Xcode: https://github.com/travisjeffery/ClangFormat-Xcode
Where some of the above suggestions are derived from this depreciated githook.
Also, do note that we have a CONTRIBUTING file you need to read to contribute, for certain reasons, like, common sense.
Commit Hook
Note that we expect compliance with the clang-format as mentioned above, and this may be enforced by using the provided scripts for a pre-commit hook:
./scripts/git-pre-commit-format install
This will ensure that new commits are in accordance to the clang-format file.
Development Builds
The general idea is to drop into an interactive shell with the dependencies and then use cmake as usual.
nix-shell --pure --run bash --show-trace --verbose
cd build
cmake .. -DCMAKE_BUILD_TYPE=Debug -DNO_WARN=TRUE \
-DFIND_EIGEN=TRUE \
-DCMAKE_EXPORT_COMPILE_COMMANDS=1 \
-G "Ninja"
ninja
# Test
cd ../
yodaStruct -c lua_inputs/config.yml
# Debug
gdb --args yodaStruct -c lua_inputs/config.yml
To load debugging symbols from the shared library, when you are inside gdb (from the top-level directory, for instance), use the following command:
add-symbol-file build/libyodaLib.so
Then you can set breakpoints in the C++ code; for instance:
Acknowledgements
The following tools are used in this project:
- CMake for compilation (cmake-init was used as a reference)
- Clang because it is more descriptive with better tools
- Doxygen for the developer API
- clang-format for code formatting
- clang-format-hooks for
githooks to enforce formatting
- clang-format-hooks for
- lua for the scripting engine
- yaml for the configuration
Third Party Libraries
The libraries used are:
- backward-cpp for better stacktraces without
gdb - cxxopts for parsing command line options
- rang for terminal styles (ANSI)
- sol2 for interfacing with lua
- yaml-cpp for working with
yaml - fmt for safe and fast formatting
- Linear Algebra PACKage (LAPACK)
- Basic Linear Algebra Subprograms (BLAS)
- Spectra
- Boost Geometry for working with different coordinates
- Boost Math for spherical harmonics
- Blaze for very fast modern linear algebra
- nanoflann to calculate nearest neighbors
- icecream-cpp for pretty-printing and debugging