Change a Drive Letter (original) (raw)
- 2025-06-26
- Applies to: ✅ Windows Server 2025, ✅ Windows Server 2022, ✅ Windows Server 2019, ✅ Windows Server 2016, ✅ Windows 11, ✅ Windows 10
In this article
This article describes how to manage the drive letter assigned to a drive in Windows by using the Disk Management utility. Use this procedure to complete the following tasks:
- Change the assigned drive letter for an existing drive
- Assign a drive letter to a new drive
An alternate approach is to mount the drive in an empty folder so the drive appears as a folder. For more information, see Mount a drive in a folder.
Prerequisites
To complete the procedure in this article, the following prerequisites must be met:
- The user account must be a member of the Backup Operators or Administrators group.
- A new drive or an existing drive that doesn't store the Windows operating system or any applications.
Important
If you change the drive letter of a drive that contains Windows or apps, the apps might have trouble running or finding the drive. The recommended approach is to not change the drive letter of a drive that contains Windows or apps.
Change or assign a drive letter
The following steps show how to change the drive letter:
- From the Windows Start menu, search for and open Disk Management with Administrator permissions.
- Expand the Storage node and select Disk Management.
- Locate the volume for which you want to manage the assigned drive letter. Right-click the volume and select Change Drive Letter and Paths.

If the Change Drive Letter and Paths option is missing or not available, see Troubleshoot volume and drive. - Update the drive letter assignment:
- To change the existing drive letter assignment, select Change.
- To add a drive letter for a new drive, select Add.

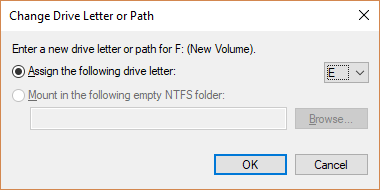
- Select the Assign the following drive letter option. Expand the dropdown list, select the drive letter to apply, and select OK.
- In the confirmation dialog, select Yes and complete the assignment.
Troubleshoot volume and drive
Here are some troubleshooting tips to help you manage the drive letter assignment process:
- If the Change Drive Letter and Paths option is missing for the volume you want to manage, or the option isn't available (grayed), then the volume isn't ready to receive an assigned drive letter.
Some possible issues include:- The selected drive is unallocated and needs to be initialized.
- The selected drive isn't accessible, which is the case for EFI System partitions and Recovery partitions. For more information, see View drives and partitions.
- You have insufficient permissions to change the assignment.
Ensure the volume you want to manage is initialized and accessible, and confirm your Administrator permissions.
- If the volume is formatted with a drive letter, and you have access to the volume but you're unable to change the assignment, the issue resolution requires assistance beyond the scope of this article. You can contact Microsoft Support or the manufacturer of your computer.
Related content
Feedback
Was this page helpful?
No
Need help with this topic?
Want to try using Ask Learn to clarify or guide you through this topic?