Build Instructions for NetCDF-C using CMake (original) (raw)
Overview
Starting with netCDF-C 4.3.0, we are happy to announce the inclusion of CMake support. CMake will allow for building netCDF on a wider range of platforms, include Microsoft Windows with Visual Studio. CMake support also provides robust unit and regression testing tools. We will also maintain the standard autotools-based build system in parallel.
In addition to providing new build options for netCDF-C, we will also provide pre-built binary downloads for the shared versions of netCDF for use with Visual Studio.
Requirements
The following packages are required to build netCDF-C using CMake.
- netCDF-C Source Code
- CMake version 2.8.12 or greater.
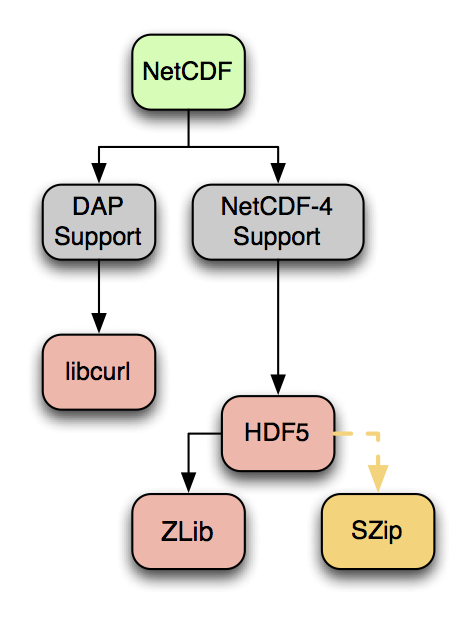
- Optional Requirements:
- HDF5 Libraries for netCDF4/HDF5 support.
- libcurl for DAP support.
The CMake Build Process
There are four steps in the Build Process when using CMake
- Configuration: Before compiling, the software is configured based on the desired options.
- Building: Once configuration is complete, the libraries are compiled.
- Testing: Post-build, it is possible to run tests to ensure the functionality of the netCDF-C libraries.
- Installation: If all tests pass, the libraries can be installed in the location specified during configuration.
For users who prefer pre-built binaries, installation packages are available at Installing and Using netCDF-C Libraries in Windows
Configuration
The output of the configuration step is a project file based on the appropriate configurator specified. Common configurators include:
- Unix Makefiles
- Visual Studio
- CodeBlocks
- ... and others
Common CMake Options
| Option | Autotools | CMake |
|---|---|---|
| Specify Install Location | –prefix=PREFIX | -D"CMAKE\_INSTALL\_PREFIX=PREFIX" |
| Enable/Disable netCDF-4 | –enable-netcdf-4–disable-netcdf-4 | -D"ENABLE\_NETCDF\_4=ON" -D"ENABLE\_NETCDF\_4=OFF" |
| Enable/Disable DAP | –enable-dap –disable-dap | -D"ENABLE\_DAP=ON" -D"ENABLE\_DAP=OFF" |
| Enable/Disable Utilities | –enable-utilities –disable-utilities | -D"BUILD\_UTILITIES=ON" -D"BUILD\_UTILITIES=OFF" |
| Specify shared/Static Libraries | –enable-shared –enable-static | -D"BUILD\_SHARED\_LIBS=ON" -D"BUILD\_SHARED\_LIBS=OFF" |
| Enable/Disable Tests | –enable-testsets –disable-testsets | -D"ENABLE\_TESTS=ON" -D"ENABLE\_TESTS=OFF" |
| Specify a custom library location | Use CFLAGS and LDFLAGS | -D"CMAKE\_PREFIX\_PATH=/usr/custom_libs/" |
A full list of basic options can be found by invoking cmake [Source Directory] -L. To enable a list of basic and advanced options, one would invoke cmake [Source Directory] -LA.
Configuring your build from the command line.
The easiest configuration case would be one in which all of the dependent libraries are installed on the system path (in either Unix/Linux or Windows) and all the default options are desired. From the build directory (often, but not required to be located within the source directory):
$ cmake [Source Directory]
If you have libraries installed in a custom directory, you may need to specify the CMAKE_PREFIX_PATH variable to tell cmake where the libraries are installed. For example:
$ cmake [Source Directory] -DCMAKE_PREFIX_PATH=/usr/custom_libraries/
Building with Parallel I/O.
NetCDF will build with parallel I/O if the C compiler is an MPI compiler, and HDF5 was built for parallel I/O. To build netcdf-c for parallel I/O, first build HDF5 for parallel I/O, then build netcdf-c like this:
$ CC=mpicc cmake [Source Directory] -DNETCDF_ENABLE_PARALLEL_TESTS=ON
The parallel I/O tests will only run if the additional configure option is used: NETCDF_ENABLE_PARALLEL_TESTS. Those tests run (by default) with mpiexec, on 4, 16, or 32 processors. If mpiexec cannot be used on your login-nodes, a different command can be used to launch the parallel I/O tests. Used the NETCDF_MPIEXEC option to set a different parallel I/O job launcher:
$ CC=mpicc cmake [Source Directory] -DNETCDF_ENABLE_PARALLEL_TESTS=ON -DNETCDF_MPIEXEC='srun -A account'
Building
The compiler can be executed directly with 'make' or the appropriate command for the configurator which was used.
$ make
Building can also be executed indirectly via cmake:
$ cmake –build [Build Directory]
Testing
Testing can be executed several different ways:
$ make test
or
$ ctest
or
$ cmake –build [Build Directory] –target test
Installation
Once netCDF has been built and tested, it may be installed using the following commands:
$ make install
or
$ cmake –build [Build Directory] –target install
See Also
For further information regarding NetCDF and CMake, see CMake-Related Frequently Asked Questions