Hibernate Annotations Example (original) (raw)
This is an example of how to make use of Hibernate annotations when interacting with a database. Hibernate is an object-relational mapping library for Java, that provides a framework for mapping an object-oriented domain model to a traditional relational database. It is also an implementation of the Java Persistence API (JPA) specification.
Hibernate provides an easy way to configure how a simple java class will represent an entity class in a database. With the use of JPA annotations you can map a Java class to a table and vice-versa, without having to use xml configuration.
The basic JPA annotations of Hibernate that can be used in an entity are the ones below:
- @Entity : specifies that the class is an entity.
- @Table : defines the primary table for the annotated entity.
- @Column : it is used to specify a mapped column for the persistent field.
- @Id : defines the primary key field of the entity.
- @GeneratedValue : allows the auto generation of the field’s values by hibernate, according to
strategyattribute.
So, below, we will make use of all the basic hibernate annotations to create, read, update and delete rows from a database table.
Tip
You may skip project creation and jump directly to the beginning of the example below.
Our preferred development environment is Eclipse. We are using Eclipse Juno (4.2) version, along with Maven Integration plugin version 3.1.0. You can download Eclipse from here and Maven Plugin for Eclipse from here. The installation of Maven plugin for Eclipse is out of the scope of this tutorial and will not be discussed. We are also using the JDK 7_u_21. The Hibernate version is 4.3.6, and the database used in the example is MySQL Database Server 5.6.
Let’s begin,
1. Create a new Maven project
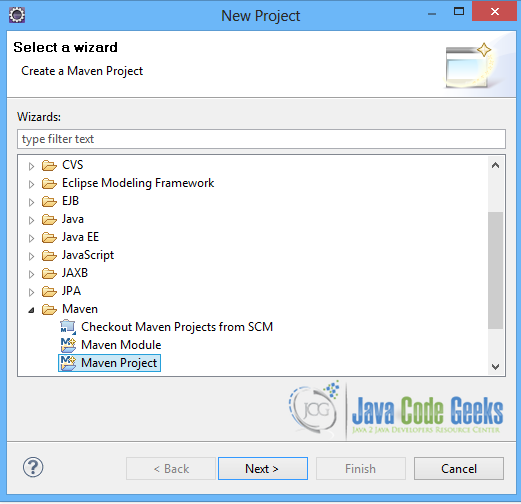
Go to File -> Project ->Maven -> Maven Project.
Figure 1: New Maven Project – step 1
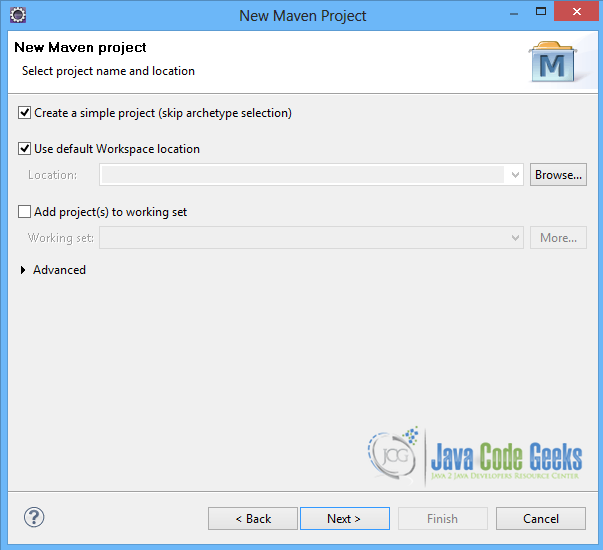
In the “Select project name and location” page of the wizard, make sure that “Create a simple project (skip archetype selection)” option is checked, hit “Next” to continue with default values.
Figure 2: New Maven Project 2
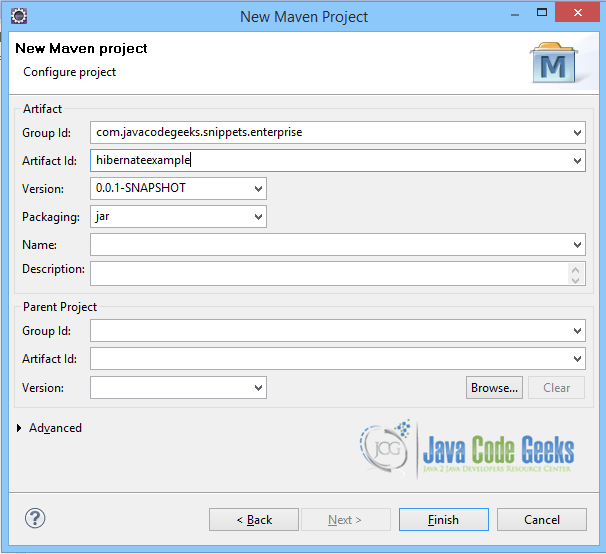
In the “Enter an artifact id” page of the wizard, you can define the name and main package of your project. We will set the “Group Id” variable to "com.javacodegeeks.snippets.enterprise" and the “Artifact Id” variable to "hibernateexample". The aforementioned selections compose the main project package as "com.javacodegeeks.snippets.enterprise.hibernateexample" and the project name as "hibernateexample". Hit “Finish” to exit the wizard and to create your project.
Figure 3: hibernate example
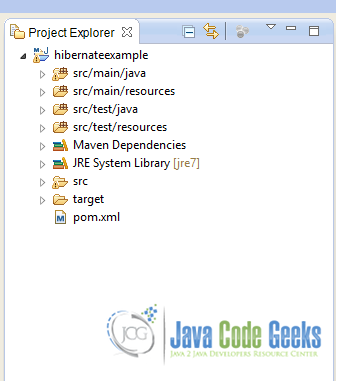
The Maven project structure is shown below:
Figure 4: Project Structure
- It consists of the following folders:
- /src/main/java folder, that contains source files for the dynamic content of the application,
- /src/test/java folder contains all source files for unit tests,
- /src/main/resources folder contains configurations files,
- /target folder contains the compiled and packaged deliverables,
- the pom.xml is the project object model (POM) file. The single file that contains all project related configuration.
2. Add hibernate 4.3.6 dependency
You can add all the necessary dependencies in Maven’s pom.xml file, by editing it at the “Pom.xml” page of the POM editor. Apart from hibernate dependency, we will also need the mysql-connector-java package, as well as the javassist package.
pom.xml:
| 0102030405060708091011121314151617181920212223242526 | <modelVersion>4.0.0</modelVersion> <groupId>com.javacodegeeks.snippets.enterprise</groupId> <artifactId>hibernateexample</artifactId> <version>0.0.1-SNAPSHOT</version> <dependencies> <dependency> <groupId>org.hibernate</groupId> <artifactId>hibernate-core</artifactId> <version>4.3.6.Final</version> </dependency> <dependency> <groupId>mysql</groupId> <artifactId>mysql-connector-java</artifactId> <version>5.1.6</version> </dependency> <dependency> <groupId>org.javassist</groupId> <artifactId>javassist</artifactId> <version>3.18.0-GA</version> </dependency> </dependencies></project> |
|---|
As you can see Maven manages library dependencies declaratively. A local repository is created (by default under {user_home}/.m2 folder) and all required libraries are downloaded and placed there from public repositories. Furthermore intra – library dependencies are automatically resolved and manipulated.
3. Create the entity class
Employee.java class is a class with three properties. It uses all annotations referenced above to be mapped to a table, EMPLOYEE in the database.
Employee.java
| 01020304050607080910111213141516171819202122232425262728293031323334353637383940414243444546474849505152535455565758596061626364656667 | package com.javacodegeeks.snippets.enterprise.hibernate;import javax.persistence.Column;import javax.persistence.Entity;import javax.persistence.GeneratedValue;import javax.persistence.GenerationType;import javax.persistence.Id;import javax.persistence.Table;@Entity@Table(name = "employee")public class Employee { @Id @GeneratedValue(strategy = GenerationType.IDENTITY) @Column(name = "id") private Integer id; @Column(name = "name") private String name; @Column(name="age") private Integer age; public Employee() { } public Employee(Integer id, String name, Integer age) { this.id = id; this.name = name; this.age = age; } public Employee(String name, int age) { this.name = name; this.age = age; } public Integer getId() { return id; } public void setId(Integer id) { this.id = id; } public String getName() { return name; } public void setName(String name) { this.name = name; } public Integer getAge() { return age; } public void setAge(Integer age) { this.age = age; } @Override public String toString() { return "Employee: " + this.id + ", " + this.name + ", " + this.age; }} |
|---|
4. Configure hibernate
The hibernate.cfg.xml file shown below is where all configuration needed for the interaction with the database is set. So, the database is defined here, as well as the database user credentials. The dialect is set to MySQL, and the driver is the com.mysql.jdbc.Driver. There is also a mapping attribute, where the entity class is defined.
You can also set specific database options here, such as whether the schema will be created or just updated, every time the sessionFactory is created. This is configured in the hibernate.hbm2ddl.auto property, which is set to update. So the schema is only updated. If this property is set to create, then every time we run our application, the schema will be re-created, thus deleting previous data. Another property set here is the show_sql, which specifies whether the sql queries will be shown in the console or the logger.
hibernate.cfg.xml
| 0102030405060708091011121314151617 | <session-factory> <property name="hibernate.dialect">org.hibernate.dialect.MySQLDialect</property> <property name="hibernate.connection.driver_class">com.mysql.jdbc.Driver</property> <property name="hibernate.connection.url">jdbc:mysql://localhost/company</property> <property name="hibernate.connection.username">root</property> <property name="hibernate.connection.password">root</property> <property name="hibernate.hbm2ddl.auto">update</property> <property name="show_sql">false</property> <mapping class="com.javacodegeeks.snippets.enterprise.hibernate.Employee"/></session-factory></hibernate-configuration> |
|---|
5. Run the Application
In App.java class we use basic CRUD methods to interact with the database. First of all, the getSessionFactory() is a method that provides a SessionFactory, the creator of Sessions, the basic interfaces between a Java application and Hibernate. The SessionFactory is built with the StandardServiceRegistryBuilder, making use of Configuration. The Configuration is where we can specify properties and mapping documents to be used when creating a SessionFactory.
So, every method that interacts with the database gets a Session, making use of the getSessionFactory(), and the using the openSession() API method of SessionFactory. Then, when needed, a new transaction may open, making use of the beginTransaction() API method of Session. After performing an action, we can commit the transaction and close the session, with getTransaction().commit() and session.close() API methods of Session.
Now, the basic CRUD methods to interact with a database are Create, Read, Update and Delete. Create is done with save(Object object) API method of Session, that persists an entity to the database. Read is done either with load(Class theClass, Serializable id) API method of Session, or by creating a new Query with a String SQL query. Update is easily done by finding and then changing the object. When the object is retrieved from the database within a transaction, any changes to the retrieved object are also performed to the persisted database object. Delete is also performed by making use of an SQL query, or by using delete(Object object) API method of Session.
So, run the example below to see what happens.
First, create a company database and add an employee table, using the SQL statement below:
Create Employee table statement
| 123456 | CREATE TABLE `company`.`employee` ( id INT NOT NULL AUTO_INCREMENT, name VARCHAR(20) default NULL, age INT default NULL, PRIMARY KEY (id)); |
|---|
Then run the application:
App.java
| 001002003004005006007008009010011012013014015016017018019020021022023024025026027028029030031032033034035036037038039040041042043044045046047048049050051052053054055056057058059060061062063064065066067068069070071072073074075076077078079080081082083084085086087088089090091092093094095096097098099100101102103104105106107108109110111112113114115116117118119120121122123124125 | package com.javacodegeeks.snippets.enterprise.hibernate;import java.util.List;import org.hibernate.Query;import org.hibernate.Session;import org.hibernate.SessionFactory;import org.hibernate.boot.registry.StandardServiceRegistryBuilder;import org.hibernate.cfg.Configuration;public class App { public static void main(String[] args) { Employee em1 = new Employee("Mary Smith", 25); Employee em2 = new Employee("John Aces", 32); Employee em3 = new Employee("Ian Young", 29); System.out.println(" =======CREATE ======="); create(em1); create(em2); create(em3); System.out.println(" =======READ ======="); List ems1 = read(); for(Employee e: ems1) { System.out.println(e.toString()); } System.out.println(" =======UPDATE ======="); em1.setAge(44); em1.setName("Mary Rose"); update(em1); System.out.println(" =======READ ======="); List ems2 = read(); for(Employee e: ems2) { System.out.println(e.toString()); } System.out.println(" =======DELETE ======= "); delete(em2.getId()); System.out.println(" =======READ ======="); List ems3 = read(); for(Employee e: ems3) { System.out.println(e.toString()); } System.out.println(" =======DELETE ALL ======= "); deleteAll(); System.out.println(" =======READ ======="); List ems4 = read(); for(Employee e: ems4) { System.out.println(e.toString()); } System.exit(0); } public static SessionFactory getSessionFactory() { Configuration configuration = new Configuration().configure(); StandardServiceRegistryBuilder builder = new StandardServiceRegistryBuilder() .applySettings(configuration.getProperties()); SessionFactory sessionFactory = configuration .buildSessionFactory(builder.build()); return sessionFactory; } public static Integer create(Employee e) { Session session = getSessionFactory().openSession(); session.beginTransaction(); session.save(e); session.getTransaction().commit(); session.close(); System.out.println("Successfully created " + e.toString()); return e.getId(); } public static List read() { Session session = getSessionFactory().openSession(); @SuppressWarnings("unchecked") List employees = session.createQuery("FROM Employee").list(); session.close(); System.out.println("Found " + employees.size() + " Employees"); return employees; } public static void update(Employee e) { Session session = getSessionFactory().openSession(); session.beginTransaction(); Employee em = (Employee) session.load(Employee.class, e.getId()); em.setName(e.getName()); em.setAge(e.getAge()); session.getTransaction().commit(); session.close(); System.out.println("Successfully updated " + e.toString()); } public static void delete(Integer id) { Session session = getSessionFactory().openSession(); session.beginTransaction(); Employee e = findByID(id); session.delete(e); session.getTransaction().commit(); session.close(); System.out.println("Successfully deleted " + e.toString()); } public static Employee findByID(Integer id) { Session session = getSessionFactory().openSession(); Employee e = (Employee) session.load(Employee.class, id); session.close(); return e; } public static void deleteAll() { Session session = getSessionFactory().openSession(); session.beginTransaction(); Query query = session.createQuery("DELETE FROM Employee "); query.executeUpdate(); session.getTransaction().commit(); session.close(); System.out.println("Successfully deleted all employees."); }} |
|---|
When you run the application, you will see that three employees are created, then one is updated, then one is deleted, and finally all employees are deleted. You can debug the example and see what happens in the database after every step. Enjoy!
Output
| 010203040506070809101112131415161718192021222324252627282930313233 | =======CREATE =======Successfully created Employee: 1, Mary Smith, 25Successfully created Employee: 2, John Aces, 32Successfully created Employee: 3, Ian Young, 29 =======READ =======Found 3 EmployeesEmployee: 1, Mary Smith, 25Employee: 2, John Aces, 32Employee: 3, Ian Young, 29 =======UPDATE =======Successfully updated Employee: 1, Mary Rose, 44 =======READ =======Found 3 EmployeesEmployee: 1, Mary Rose, 44Employee: 2, John Aces, 32Employee: 3, Ian Young, 29 =======DELETE ======= Successfully deleted Employee: 2, John Aces, 32 =======READ =======Found 2 EmployeesEmployee: 1, Mary Rose, 44Employee: 3, Ian Young, 29 =======DELETE ALL ======= Successfully deleted all employees. =======READ =======Found 0 Employees |
|---|
6. Download the Eclipse Project
This was an example of Hibernate annotations.
Theodora has graduated from Computer Engineering and Informatics Department in the University of Patras. She also holds a Master degree in Economics from the National and Technical University of Athens. During her studies she has been involved with a large number of projects ranging from programming and software engineering to telecommunications, hardware design and analysis. She works as a junior Software Engineer in the telecommunications sector where she is mainly involved with projects based on Java and Big Data technologies.


