Power Query If statement: nested ifs & multiple conditions (original) (raw)
In a previous post in this series, we briefly looked at the if statement in Power Query; now, we’re going to dig a bit deeper and understand how the Power Query if statement works.
In Excel, IF is a core function; it’s one of the first functions we learn and remains popular for advanced users. If logic enables us to compare values and follow different paths depending on the result of that comparison.
In a previous post, we looked at Functions in Power Query, but we didn’t cover a Power Query IF function. Surely there is an if function?… right?… well, kind of.
To use Power Query if logic, we need a programming-based approach rather than the function-based approach we find in Excel. You will be familiar with this method if you’ve ever programmed VBA or other languages. However, this may be new to you if you’re coming from a purely Excel world.
There are two ways to create this type of conditional logic in Power Query:
- Using the Conditional Column feature for basic scenarios
- Writing M code for more advanced scenarios
We’ll cover both in this post.
Table of Contents
- Basic if statement syntax
- Scenario
- Power Query If statement using a conditional column
- Power Query if statement by writing the M code
- Conclusion
Download the example file: Join the free Insiders Program and gain access to the example file used for this post.
File name: 0115 Power Query if statement.xlsx
Basic if statement syntax
The Power Query if statement syntax is different to Excel.
In Excel, the IF function has the following syntax:
IF(logical_test, value_if_true, [value_if_false])- logical_test – The condition you want to test.
- value_if_true – The value to return if the result of logical_test is TRUE.
- value_if_false (optional) – The value to return if the result of logical_test is FALSE. Where not argument provided the value returned if False.
However, in Power Query, the syntax is:
if logical_test then value_if_true else value_if_falseSo, if you are coming from an Excel world, you might initially think of this as an IF function with the following adjustments:
- remove brackets
- change the first comma to then
- change the second comma to else
- change IF for if
Once you’ve been through it a few times, you’ll get the hang of it. The Power Query syntax has the added advantage of sounding like a standard sentence, making it easier to read than the Excel equivalent.
One key point to be aware of is that Power Query is case sensitive; if, then, and else must be lowercase.
Scenario
The Power Query If statement.xlsx example file contains just one Table, which has already been loaded into Power Query. Then an additional Day Name column was added to that query.
To view the query, click Data > Queries & Connections from the ribbon, then double-click the Sales Data query in the Queries & Connections pane.
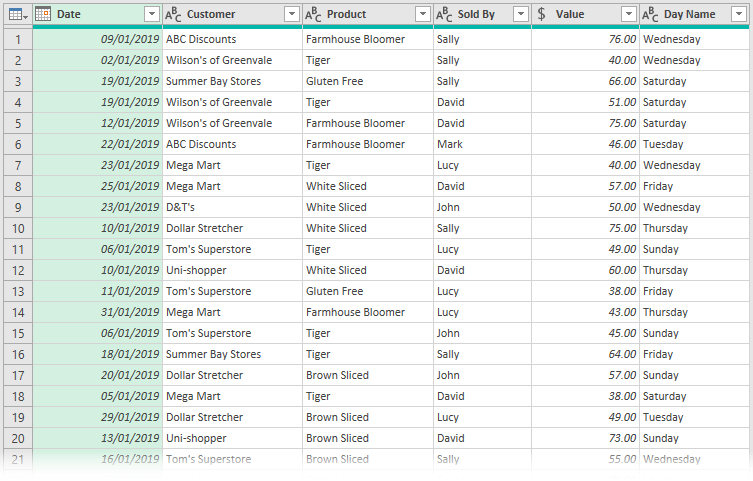
In this example, we will be calculating the value assuming the following:
- Scenario 1: Sundays have an additional 10% premium (requires basic logic)
- Scenario 2: Sundays have an additional 10% premium, with two products (Tiger & Farmhouse Bloomer) also attracting a 5% discount on that day (requires advanced logic).
Power Query If statement using a conditional column
Let’s start with Scenario 1 and use the Conditional Column feature in the user interface.
Example 1 – Basic if statement
In our first scenario, we want to add a 10% premium for sales on Sunday.
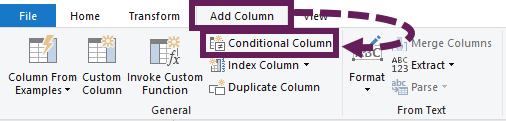
To use a Conditional Column, click Add Column > Conditional Column from the ribbon.
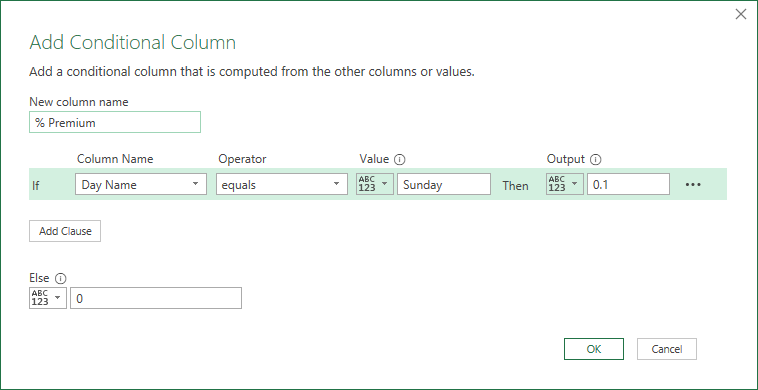
Enter the following options on the Add Conditional Column dialog box:
- New Column Name: % Premium
- If Day Name equals Sunday then 0.1 else 0
- Click OK to accept the formula.
We now have our query with the conditional column:
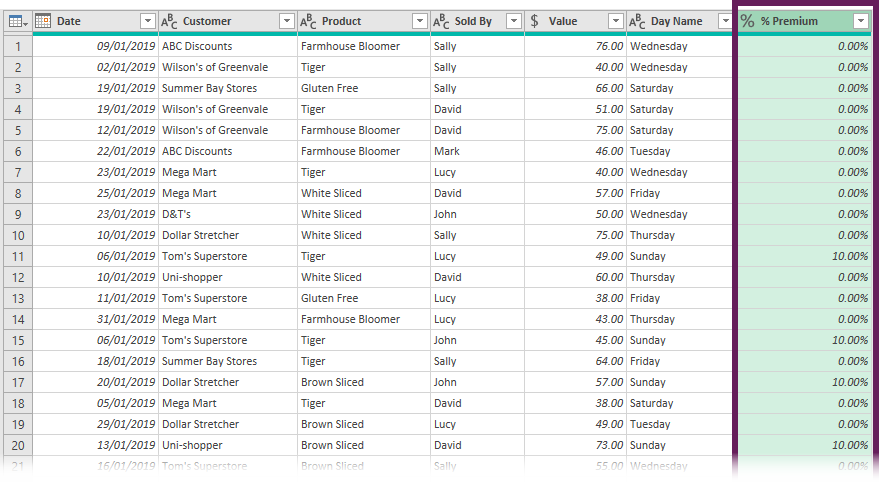
Also, take a look at the formula bar; this matches the syntax we saw earlier:
= Table.AddColumn(#"Inserted Day Name", "% Premium", each if [Day Name] = "Sunday" then 0.1 else 0)Conditional Column options
We have only used a few options in the Conditional Column dialog box in the scenario.
Depending on the data type of the selected column in the Column Name field, the operators change:
| Text | Number | Date |
|---|---|---|
| EqualsDoes not equalBegins withDoes not begin withEnds withDoes not end withContainsDoes not contain | EqualsDoes not equalGreater thanGreater than or equal toLess thanLess than or equal to | EqualDoes not equalIs beforeIs before or equal toIs afterIs after or equal toIs in the nextIs in the previousIs earliestIs latestIs not earliestIs not latestIs in year |
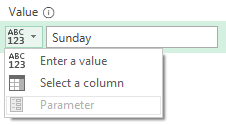
A nice feature about the add Conditional Column dialog box, we can click the 123ABC button to insert column values, or parameters, instead of hardcoded values.
Example 2 – Complex if statement
In scenario 2, Sundays have a 10% premium, and two products have a 5% discount. This adds the complexity of additional conditions.
Also, we can create as many nested if statements as we want by clicking the Add Clause button in the Conditional Column dialog box.
If statements execute each condition in turn. Where the first if statement is not triggered, it moves to the second, then the third, and so on. However, once an if statement evaluates to true, the remaining logic is skipped over.
If we try to use the Conditional Column feature with two or more conditions, things can get tricky. So we need to think differently about the logic.
The following would provide the relevant logic for our scenario:

Conditional Column Limitations
As demonstrated above, Conditional Columns are helpful for basic scenarios. But are limited for advanced uses. Some of the limitations are:
- Using multiple conditions with and or or logic is not possible.
- Unable able to use the not operator to reverse the true/false result
- Can only return the results specified. Additional query steps are required to use the result of the if statement.
Therefore, we must write the M code ourselves inside a Custom Column for more complex scenarios.
Power Query if statement by writing the M code
Don’t worry; I know M code can seem daunting. I believe in you. You can do this 😁
We have already seen the basic syntax of writing an if statement:
if logical_test then value_if_true else value_if_falseUnless we have a simple scenario, we will likely encounter nested if, including and and or logic. So, let’s take a look at each of these.
After we have looked at the syntax, we will apply them to our two scenarios.
Nested if statements
Often we may want to test sub-conditions; for this we use a nested if statement.
Note: The line spacing has been added in many of the examples. This is to make the code easier to read, but it is not necessary for the code to be valid.
The following syntax tests logical_test1. If true, the value_if_true is returned; otherwise, logical_test2 is tested, which leads to another test with two possible results.
if logical_test1 then value1_if_true else
  if logical_test2 then value2_if_true else value2_if_false
In the nested if above, there are 3 possible outcomes. But in more complex scenarios, there could be any number of outcomes.
For example, the syntax below handles a sub-condition inside the first true result, and multiple sub-conditions inside the first false result.
if logical_test1 then
  if logical_test2 then value2_if_true else value2_if_false
else
  if logical_test3 then value3_if_true else
    if logical_test4 then value4_if_true else value4_if_false
This illustrates that we can create complex logic when we write the M code.
Using “And” logic
“And” logic allows us to perform multiple logical tests inside a single if statement. All the tests must be true for the true result to be returned. If any of the tests are false, the false result is returned.
The syntax below performs two tests using and logic.
if logical_test1 and logical_test2 then value_if_true else value_if_falseUsing “Or” logic
“Or” logic performs multiple logical tests, but only requires a single true response to return the true result. All tests must be false to return the false response.
The syntax below returns the true result if either logical_test1 or logical_test2 is true. Otherwise, it returns the false result.
if logical_test1 or logical_test2 then value_if_true else value_if_falseUsing “Or” and “And” – order of precedence
When using both or and and logic in a single if statement, which evaluates first?
Look at the statement below. Will it return “True” or “False”?
if 1=1 or 2=2 and 1=3 then "True" else "False"It is useful to think of the operators as mathematical items
- or = addition
- and = multiplication
Also, think that:
- True = 1
- False = 0
When we think like this, normal mathematical precedence can be used (i.e., multiplication occurs before addition).
- 1=1 = True = 1
- 2=2 = True = 1
- 1=3 = False = 0
The mathematical calculation becomes: 1 + 1 * 0 = 1
Therefore, the result is True.
In these types of scenarios, I advise using brackets (or parentheses, as you may call them) to simplify the order of calculation.
Alternative comparison operators
In all our examples, we have used equals as the logic operator, but we can use the other logical operators too.
- = : Equals
- <> : Not equal to
- > : Greater than
- >= : Greater than or equal to
- < : Less than
- <= : Less than or equal to
Not operator to reverse value
The final piece of the logic syntax is the not statement. Not reverses the true/false result from the logic test.
For example, the syntax below reverses the result of the logical test. If the result of the logical test is true, it is reversed to false and vice versa.
if not logical_test then value_if_true else value_if_false
With all this knowledge, we can start writing our own if statements using M code.
Example 3 – Basic if statement
Let’s revisit Scenario 1. We aim to add a 10% premium for all sales on Sunday.
Add a Custom Column to the table by clicking Add Column > Custom Column

Enter the following:
New Column Name: % Premium
Custom column formula:
=if [Day Name] = "Sunday" then 0.1 else 0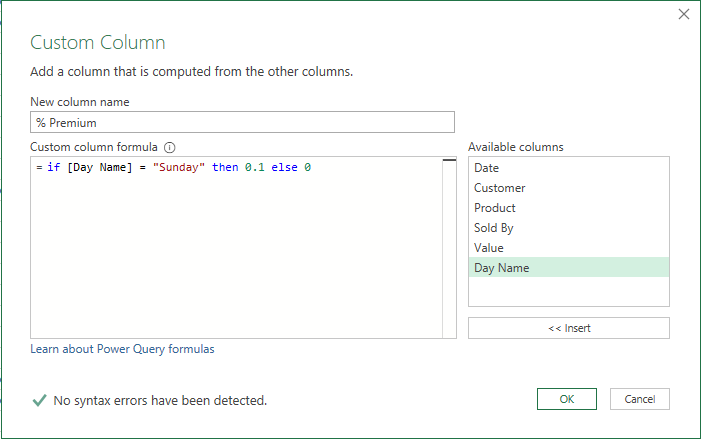
Remember to pay close attention to the words if, then, and else; they must all be lowercase. Power Query is case-sensitive, so if we get this wrong, the formula will not work. Also, notice Power Query highlights these words in blue to show that they are keywords.
Hopefully, you will agree that this is an intuitive method of writing an if statement.
That’s it. Click OK to add the new column to our query.
Example 4 – Complex if statement
Next, let’s revisit Scenario 2. Sundays have a 10% premium, and two products have a 5% discount.
There are multiple ways to write this formula. Based on our data set, there are three possible results for this scenario:
- Sunday premium & product discount
- Sunday premium only
- No premium or discount
Solution #1: Nested if + Or
=if [Day Name] = "Sunday" then
  if [Product] = "Tiger"
    or [Product] = "Farmhouse Bloomer" then
    0.05
  else
    0.1
else
  0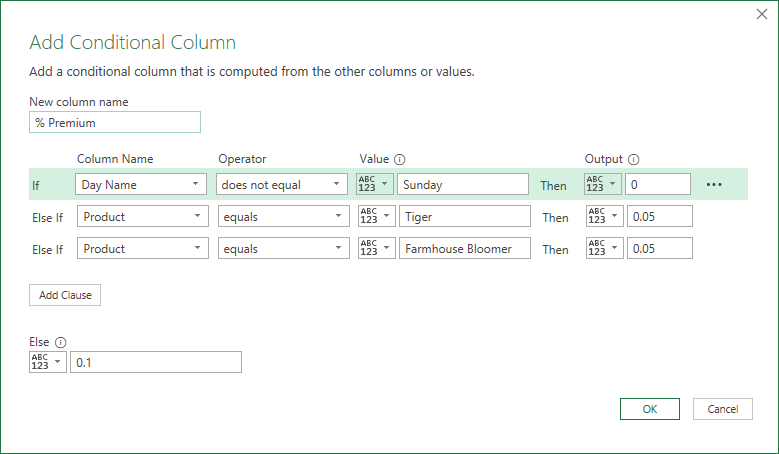
Solution #2: And, Or + Nested if
Here is another solution we could try.
if [Day Name] = "Sunday"
  and ([Product] = "Tiger"
    or [Product] = "Farmhouse Bloomer")
then
  0.05
else if [Day Name] <> "Sunday"
then
  0
else
    0.1
Solution #3: Nested if only
We could use similar logic to the Conditional Column we created earlier
=if [Day Name] <> "Sunday" then 0 else
  if [Product] = "Tiger" then 0.05 else
    if [Product] = "Farmhouse Bloomer" then 0.05
    else 0.1
Power Query always defaults to using the Conditional Column dialog box if it can. Therefore, if we use the formula above, then edit the step, Power Query will open the Conditional Column dialog box rather than the Custom Column dialog box.
Solution #4: Using Power Query functions
Finally, as we have a list of two products, we could use a function that returns a true/false result. In the example below, we use the List.Contains function.
=if [Day Name] = "Sunday"
    and List.Contains({"Tiger", "Farmhouse Bloomer"}, [Product]) then 0.05 else
  if [Day Name] = "Sunday" then 0.1
  else 0
Find out more about List.Contains here: https://learn.microsoft.com/en-us/powerquery-m/list-contains
There are many ways we could address this solution. The methods above provide examples of the various approaches we could take.
Common if statement syntax errors
The Custom Column dialog box provides a syntax check at the bottom. However, the error messages can be challenging to understand. Here is a list of the most common error messages and what they mean.
- Token Eof expected – The word if is not in lower case and not recognized by Power Query.
- Token Then expected – The word then is missing or not all in lowercase.
- Token Else expected – The word else is missing or not all in lowercase.
- Invalid literal – The double quotes of a text string have not been closed
- Token internal expected – The logical_test, value_if_true, or value_if_false arguments are missing, or a formula contained within these arguments is incomplete.
Conclusion
Conditional logic with a Power Query if statement is different. Once we understand the syntax, it’s not difficult to understand; it just requires practice.
Read more posts in this series
- Introduction to Power Query
- Get data into Power Query – 5 common data sources
- DataRefresh Power Query in Excel: 4 ways & advanced options
- Use the Power Query editor to update queries
- Get to know Power Query Close & Load options
- Power Query Parameters: 3 methods
- Common Power Query transformations (50+ powerful transformations explained)
- Power Query Append: Quickly combine many queries into 1
- Get data from folder in Power Query: combine files quickly
- List files in a folder & subfolders with Power Query
- How to get data from the Current Workbook with Power Query
- How to unpivot in Excel using Power Query (3 ways)
- Power Query: Lookup value in another table with merge
- How to change source data location in Power Query (7 ways)
- Power Query formulas (how to use them and pitfalls to avoid)
- Power Query If statement: nested ifs & multiple conditions
- How to use Power Query Group By to summarize data
- How to use Power Query Custom Functions
- Power Query – Common Errors & How to Fix Them
- Power Query – Tips and Tricks
Discover how you can automate your work with our Excel courses and tools.
The Excel Academy

Make working late a thing of the past.
The Excel Academy is Excel training for professionals who want to save time.