How to Build a Dialogue Box in Godot 4 (original) (raw)
In this thorough tutorial, we’re diving into the creation of a Godot dialogue box UI which can be used for a number of different games. With this detailed guide, we’ll walk you through creating a dialogue box that players can interact with when conversing with its non-player characters (NPCs). We will delve into the details of incorporating text and visual elements, and show you how to manage user interface (UI) anchoring and player inputs.
Learning these skills will enhance your game development abilities and help you construct a more immersive gaming experience for your players.
This Godot dialogue box tutorial assumes you have a basic understanding of using Godot and some prior experience with game development. It may prove challenging for absolute beginners, but those familiar with Godot’s interface and programming concepts will find themselves well-equipped to tackle this project. Feel free to review our full course, Create AI NPCs with Godot 4 and ChatGPT which covers Godot game development process in detail.
Table of contents
Project Files
Below you will find the full copy of the assets used in this Godot dialogue box. We highly recommend downloading these as they’ll be referred to throughout the guide.
Download Project Files Here
FREE COURSES AT ZENVA
LEARN GAME DEVELOPMENT, PYTHON AND MORE
AVAILABLE FOR A LIMITED TIME ONLY
Dialogue Box – Part 1
We will begin creating a Godot dialogue box that our player will be able to interact with when talking to an NPC. This dialogue box will show the NPC’s icon, along with their messages, and an area for the player to type their messages. Before we can start on this, we will first set up a camera for our scene. To do this, we will add a new Camera2D node.

This camera will define the player’s viewpoint of the world, which will help when moving the player around later in the game.
Creating the Dialogue UI
The first step in creating the Godot dialogue box system is to set up a User Interface (UI) for the player to interact with. We will do this as a child of a new Canvas Layer node. A canvas layer will render any child UI nodes onto the active camera so that the UI doesn’t move away when the camera moves.

Next, we will create a Panel node as a child of CanvasLayer.

You will notice this node is within the Control node section. In Godot, Control nodes are specifically UI elements that can be drawn onto the screen. In this case, our Panel node will act as a background for our dialogue box. If you zoom out in the scene view, you will see a blue rectangle. This shows the size of the screen, so any UI you place in this rectangle will be drawn as that position on the screen. Because of this, we will move the new Panel node to the center of this rectangle.

When you press play to run the game, you will see that the rectangle is in the same place on the game screen.

We can now begin designing the Godot dialogue box itself. To make this easier, you may want to enable the Grid Snap option, which will snap the UI element to a grid.

We can then resize the background Panel using the orange dots in the movement tool.

Remember, you can press play at any time to see how this UI will look in the game. Next, we can rename the Panel node to ‘DialogueBox’.

Adding Text
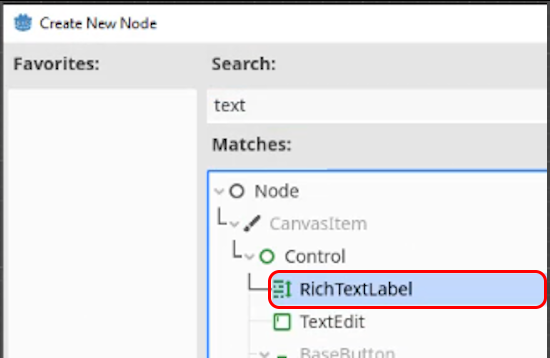
We can now begin adding text to the Godot dialogue box. This will be done with a new RichTextLabel node.
This can be renamed to ‘DialogueText’.

Before resizing the element, we can add some example text to see how the font will look.

We can then resize the DialogueText node to fit the dialogue box. Remember to leave room to place a character sprite to represent the NPC that the player is talking to.

If you want to modify the font size, you can change the Normal Font Size property in the Theme Override dropdown of the Inspector window.

Adding the NPC Sprite
Our Godot dialogue box will also contain a picture showing an icon of the current NPC. To do this, we will add a new TextureRect node to the box.

So that we can see where the sprite will be, we will add a New PlaceHolderTexture2D as the Texture property of the node.

This will make the TextureRect show as a pink square, allowing us to position it easily.

Finally, we can rename this node to ‘NPCIcon’ to make it easy to identify later.

Remember to press play to see how the dialogue box will look in the game.

Handling UI Anchoring
One element of our Godot dialogue box UI that we haven’t handled yet is anchoring. Anchoring is used to determine how the UI elements will react if the parent nodes change in size. Currently, if we resize the dialogue box, the text will scale outside of the box and not scale correctly. This can be fixed by setting an anchor. Currently, the anchor is set to position our text based on the top left corner, which can be seen by the four green arrows in the scene editor (visible when the DialogueText node is selected).

These arrows can be moved across the dialogue box to set the four anchor positions of the text.

When you resize the box now, you will see the text is scaled within the box.

We won’t change the anchor on the NPCIcon node, as we already want this node to anchor to the top left of the Godot dialogue box, which it does automatically.
Adding Player Inputs
There are now only three more elements we need to add to make this Godot dialogue box UI complete. These are:
- A text box for the player to type in.
- A button to talk.
- A button to leave the conversation.
For the text box, we can begin by adding a new TextEdit node to the dialogue box.

We can then position this within the box.

Next, we will set the Placeholder Text to ‘Talk to the NPC…’. This message will be shown to the player when they haven’t typed anything.

We can also rename this node to ‘PlayerTalkInput’.

We can then change the anchors to the bottom of the box so that when the dialogue box is resized, the input also scales.

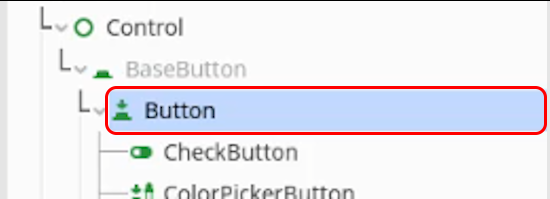
As mentioned, the final elements to implement are the buttons. We can begin by adding a new Button node to the box.
We can change the Text property to ‘Talk’.

This can then be positioned next to the PlayerTalkInput box.

We can also rename this node to ‘TalkButton’.

We can duplicate (CTRL+D) this node for the leave button as well.

This button will have the Text property of ‘Leave’.

Finally, we will rename this node to ‘LeaveButton’.

You may want to resize and reposition these nodes depending on how they fit into your box. You can also press play to see how the dialogue box fits into the window.

In the next part, we will implement the functionality to connect this Godot dialogue box to our scripting.
Dialogue Box – Part 2
In this part, we are going to be connecting the Godot dialogue box UI to a script that will handle all communications between the player and the NPC. To start with, we will add a New Script to the DialogueBox node.

Here, we will make sure our script is called ‘DialogueBox.gd’ and then select the Create button.

We won’t be needing the _process function so this can be removed, however, we will need the ready function later.
Creating the Variables
As with most Godot scripts, we will start by defining the variables that we will need throughout this part. The first of these will be references to the nodes we need from the Godot dialogue box scene.
For our first variable, we will call it ‘game_manager’ and use the get_node function to find the GameManager node from the scene. We won’t be getting a child node, so we will work down the tree from the root node. We will also add the onready tag so that the get_node function is run when the _ready function first runs.
@onready var game_manager = get_node("/root/Main/GameManager")
We then want to store each child node of the DialogueBox. Each of these will also use the onready tag and get_node function. The names, types, and child nodes of these variables include:
- The variable called ‘dialogue_text’ with a type of RichTextLabel will store a reference to the DialogueText child node.
- The variable called ‘npc_icon’ with a type of TextureRect will store a reference to the NPCIcon child node.
- The variable called ‘talk_input’ with a type of TextEdit will store a reference to the PlayerTalkInput child node.
- The variable called ‘talk_button’ with a type of Button will store a reference to the TalkButton child node.
- The variable called ‘leave_button’ with a type of Button will store a reference to the LeaveButton child node.
@onready var dialogue_text : RichTextLabel = get_node("DialogueText") @onready var npc_icon : RichTextLabel = get_node("NPCIcon") @onready var talk_input : RichTextLabel = get_node("PlayerTalkInput") @onready var talk_button : RichTextLabel = get_node("TalkButton") @onready var leave_button : RichTextLabel = get_node("LeaveButton")
Creating the Functions
We can also define some functions for our script. We won’t be filling out all of these functions, as some will be placeholders, so for these functions we will just place the pass keyword. The first function will be called initialize_with_npc and have a parameter of npc.
func initalize_with_npc (npc):
This will be used to show the dialogue box when a player interacts with an NPC. Currently, we can’t set up things like the NPC icon, but we can reset the dialogue_text so nothing is displayed in the Godot dialogue box when it first opens.
func initalize_with_npc (npc): dialogue_text.text = ""
We can also disable the talk_button so that the player can’t send a message until it’s ready. We will do this so that the player can’t send a message until the initial NPC message comes through.
func initalize_with_npc (npc): ... talk_button.disabled = true
Finally, we can add a comment showing where we will add the NPC icon process.
func initalize_with_npc (npc): # set npc icon ...
The next function will be a Singal that gets called when the TalkButton node is pressed. To connect this, we will use the Node > Signals tab in the Inspector window. Here, we will double-click the pressed signal.

This will bring up the Connect Singal window, where we can select the DialogueBox node as the node to connect the signal to.

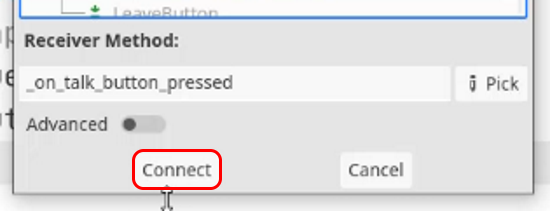
With this selected, we can press the Connect button to automatically create the _on_talk_button_pressed function in the DialogueBox script.
We can then repeat this process for the Leave Button, by selecting the pressed signal again in the Inspector.

Remember to select the DialogueBox as the target node, and then press the Connect button.

We won’t be implementing any functionality for these signals (as this depends on your Godot dialogue box project implementation), so we will leave the pass keywords. The next function to implement is the _on_player_talk function, which will be called when the player wants to communicate with the NPC.
func _on_player_talk ():
The first thing we will want to do in this function is clear the text_input field so that the player can type a new message.
func _on_player_talk (): talk_input.text = ""
We can also update the NPC’s dialogue_text to tell the player that the NPC is thinking of a response.
func _on_player_talk (): ... dialogue_text.text = "Hmm.."
We will also disable the talk_button so that the player can’t send a message before the NPC responds.
func _on_player_talk (): ... talk_button.disabled = true
The final function of this script will be the _on_npc_talk function, which will have a parameter of npc_dialogue. This will be called when the game successfully renders the NPC response.
func _on_npc_talk (npc_dialogue):
The first step this function will do is update the dialogue_text to be the npc_dialogue.
func _on_npc_talk (dialogue): dialogue_text = npc_dialogue
This function will also re-enable the talk_button so that the player can respond to this message.
func _on_npc_talk (dialogue): ... talk_button.disabled = false
Godot Dialogue Box Wrap-Up
We’ve reached the end of this in-depth exploration of creating a Godot dialogue box! Hopefully, you’ve learned some valuable concepts that you can apply in your own game projects. Incorporating dynamic dialogue systems into your games helps create a more immersive and interactive experience for players, and you now have the skills necessary to create such a system.
However, the learning doesn’t stop here! There’s always more to explore and master in the world of game development. You can expand upon the foundational knowledge you’ve gained from this guide by exploring other tutorials, courses, or resources – making your games even better, more interactive, and more fun for your players. You can also learn how to extend the topics covered here by integrating AI (like with the free video below which covers integrating ChatGPT into Godot!)
Always remember that the key to mastering game development is constant learning and experimentation. Good luck with your future projects, and we look forward to seeing what incredible games you’ll create!
Happy gaming!
Want to learn more? Try our complete CREATE AI NPCS WITH GODOT 4 AND CHATGPT course.
Did you come across any errors in this tutorial? Please let us know by completing this form and we’ll look into it!
