Complete Guide to Godot Procedural Generation (original) (raw)
You can access the full course here: DISCOVER PROCEDURAL GENERATION IN GODOT 4
Unlock the secrets of infinite creativity by diving into our Godot procedural generation tutorial, where you’ll master the art of creating immersive worlds!
In this tutorial, we delve into mesh generation and noise manipulation in Godot, an open-source 2D and 3D game engine. With a focus on developing a comprehensive terrain system, we’ll walk you through the process of creating a base mesh, working with subdivisions, and enhancing terrain features using noise. By the end of this guide, you’ll have acquired practical skills in 3D mesh generation and designing dynamic, realistic terrains in Godot.
We recommend extensive familiarity with Godot and GDScript for this tutorial – so it’d be good if you already have a few small Godot projects under your belt. If you start to struggle with this tutorial, though, you can also explore our full course, Discover Procedural Generation in Godot 4 which covers these concepts more in-depth.
Let’s dive into Godot procedural generation now!
Table of contents
- Project Files
- Mesh Generation
- Noise – Part 1
- Noise – Part 2
- Godot Procedural Generation Wrap-Up
- Transcript – Mesh Generation
- Transcript – Noise – Part 1
- Transcript – Noise – Part 2
Project Files
To give you the best experience while learning about Godot procedural generation, we’ve prepared some related assets you can apply to this tutorial as you go through it. Just click the link below!
FREE COURSES AT ZENVA
LEARN GAME DEVELOPMENT, PYTHON AND MORE
AVAILABLE FOR A LIMITED TIME ONLY
Mesh Generation
To start our Godot procedural generation process, we’ll focus on creating the base mesh for our terrain in Godot. We won’t be adding hills or valleys just yet, but we’ll set up the foundation that we can later modify to include these features. To create a new mesh from scratch, we’ll be using three different properties: size (width and depth) and mesh resolution.
Creating a Basic Square Plane Mesh
First, we’ll generate a basic square plane mesh with an arbitrary size, say 20 x 20 meters.

To be able to modify this mesh by adding hills and valleys, we need to subdivide it several times. This means we’ll add 20 subdivisions, creating a 20 x 20 grid or mesh. Each meter will have a new subdivision, and each of these vertices or points will be the ones we modify.

One thing to note is that if the vertices are one meter apart and we have very jagged terrain. The result might not look good as it could be quite blocky when we implement the Godot procedural generation. To remedy this, we can increase the mesh resolution by adding more subdivisions, which is where the mesh resolution property comes into play. The mesh resolution is multiplied by the width and depth to determine the subdivisions. So, with a mesh resolution of one, we’ll have 20 subdivisions on each side, with two we’ll have 40, and with three we’ll have 60.

The higher the mesh resolution, the more dense the vertices will be, leading to smoother terrain that will also be nicer for the player to walk on. However, this also means more vertices, more triangles, more processing time, and more rendering time. This can be a problem depending on how you use this Godot procedural generation in your project, so keep it in mind.
Setting Up the Mesh in Godot
Let’s now dive into how we can set this up in Godot. We’ll start by creating a new node, which will be our base node. 
We’ll rename this to be “TerrainGeneration”.

We then also need to go down to our Godot procedural generation folder, right click on it and create a new script called “TerrainGeneration.

We can then attach this to the node and open it up inside of the editor.

The first thing we’ll do in our script is delete the process function since we won’t be needing it for our Godot procedural generation. We will be using the ready function, so we’ll leave that for now. We’ll then give our script a class name of “terrain generation” so we can easily reference it in other scripts. Next, we’ll need to create some variables for our mesh, size depth, size width, and mesh resolution.
class_name TerrainGeneration var mesh : MeshInstance3D var size_depth : int = 100 var size_width : int = 102 var mesh_resolution : int = 2
Next, we need to generate the mesh. For this, we’ll create a new function called generate, which we’ll call inside the ready function.
func _ready(): generate() func generate(): pass
Generating the Plane Mesh Data
The first thing we need to do in the generate function is to generate our plane mesh – the first step for our Godot procedural generation. This is just going to generate the data for our mesh. We’ll create a variable called plane_mesh, and set its size and subdivisions. The size is a Vector2, so it has an X and a Y, or a width and a depth. The subdivisions will be determined by the size depth and size width multiplied by the mesh resolution.
var plane_mesh = PlaneMesh.new() plane_mesh.size = Vector2(size_width, size_depth) plane_mesh.subdivide_depth = size_depth * mesh_resolution plane_mesh.subdivide_width = size_width * mesh_resolution
Next, we’ll give the mesh a material. We’ll assign a preloaded terrain material to it.
plane_mesh.material = preload("res://Procedural Generation/Materials/TerrainMaterial.tres")
Generating the Mesh from the Given Data
Now that we have all the data, the next step is to generate the mesh from it for our Godot procedural generation. For this, we need a surface tool, which is a tool in Godot that allows us to construct a mesh from the given data. We’ll create a variable called surface and use it to create our mesh from the given plane mesh data.
var surface = SurfaceTool.new() surface.create_from(plane_mesh, 0)
Creating the Mesh Node
After that, we need to create the mesh node. This isn’t creating a node; it’s just creating a mesh resource that we then need to apply to our mesh node. We’ll create a new mesh, give it our mesh, create a collider for our terrain, determine the shadow settings, and add it to the group called “nav source”. Finally, we add it to the tree mesh.
mesh = MeshInstance3D.new() mesh.mesh = surface.commit() mesh.create_trimesh_collision() mesh.cast_shadow = GeometryInstance3D.SHADOW_CASTING_SETTING_OFF mesh.add_to_group("NavSource") add_child(mesh)
With this code, we should have set up to generate a flat 2D plane with the given material. Obviously it’s missing some things, but this is our first step into mastering Godot procedural generation.

Noise – Part 1
In this next section, we will explore how to shape our terrain – i.e. do the actual Godot procedural generation. At present, our terrain is merely a flat square. However, we want to incorporate hills, valleys, and cliffs. How do we achieve this? The answer lies in using noise.
Understanding Noise
Noise, in the context of computer graphics, resembles TV static. You may have encountered it as ‘Perlin noise.

Essentially, it is a formula that, given an X and Y position, returns a value between zero and one. This formula can be represented as a texture. The black and white image that represents noise transitions smoothly, with black standing for zero and white for one.
We can use these noise values to shape our terrain, which is the underlying idea for Godot procedural generation with terrain. For each point on our terrain, which is essentially a grid of vertices, we take its X and Y position and feed it into the noise algorithm.

This Godot procedural generation algorithm samples a position on the noise map and returns a value between zero and one.

By multiplying this value by another number, we can determine the Y position of the vertex, effectively shaping our terrain and doing so with Godot procedural generation.

Setting Up Noise in Godot
Let’s jump into Godot and see how we can set this up so our Godot procedural generation will work. First, we need to create a few new variables. We will start by creating a variable for our noise. This can be done using the following code:
var noise : FastNoiseLite
FastNoiseLite is a type of noise we will use. We will also add the export tag to make it exported. Now, if we click on our terrain generation node, we will see that the noise variable is a property. We can create a new FastNoiseLite and open it up to see the noise texture.
This noise texture represents the noise we will be working with. It transitions from black to white, i.e., zero to one. We can sample an X and a Y coordinate on this noise map to get one of those values.
Applying Noise to Our Mesh
To apply the noise map to our terrain for our Godot procedural generation, we need to access each of our individual vertices. We will use a tool in Godot called MeshDataTool for this purpose. The MeshDataTool allows us to access and edit the individual vertices of our plane. Once we have access to the vertices, we can loop through each vertex and modify its position.
Here is an example of how we might do this:
var data = MeshDataTool.new() var array_plane = surface.commit() data.create_from_surface(array_plane, 0) for i in range(data.get_vertex_count()): var vertex = data.get_vertex(i) vertex.y = randf_range(0, 10) data.set_vertex(i, vertex) array_plane.clear_surfaces() data.commit_to_surface(array_plane)
In the above code, we create a new MeshDataTool and commit the surface to an array. We then loop through each vertex in the mesh, get the vertex, modify its Y position, and set the vertex. After that, we clear the surfaces and commit the array plane to our data tool.
Once we have modified the vertices, we can then generate the surface with these new vertices and generate the normals for each of the surfaces. This is done for lighting and texturing purposes.
With the above setup, our terrain should now have a jagged, spike-like appearance. This is because, for each of the individual vertices, we are setting it to have a random position. We’ll address this next for our Godot procedural generation

Noise – Part 2
In this second part, we will continue generating our terrain by mapping each vertex to an individual point on our noise map. This will help us create flowing hills rather than just a random value for the Y-axis. This will also finish up our Godot procedural generation tutorial.
Creating a New Function
First, we need to create a new function called get_noise_Y. This function will take two parameters, X and Z, and will return a float. We will give this function a coordinate (X and Z), it will find that position on the noise map, determine the value and send it back to us.
func get_noise_Y(x, z): var value = noise.get_noise_2D(x, z) return value * 50
In the code snippet above, we create a variable called value which equals to noise.get_noise_2D, and we send over X and Z. Then we return that value multiplied by 50.
Updating the Generate Function
Next, we need to update our generate function for our Godot procedural generation. Instead of assigning a random position for the Y-axis of each vertex, we will use the get_noise_Y function to determine the Y value.
func generate(): for vertex in vertices: var y = get_noise_Y(vertex.x, vertex.z) vertex.y = y
Here we create a new variable y which equals to the get_noise_Y function, and we send over our vertex X and Z positions. Then we assign the Y value of our vertex to y.
Adjusting the Terrain
When we run the code, we may not see much difference in our Godot procedural generation terrain because the value returned by the get_noise_Y function is between 0 and 1. Since our terrain is about 100 meters by 100 meters, a maximum height of 1 meter is not very noticeable. Therefore, we multiply the value by 50 to increase the height of the terrain.
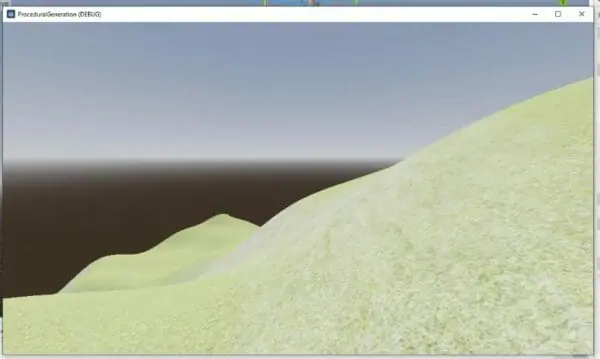
Now, we should start seeing our terrain with flowing hills.

If the Godot procedural generation terrain appears too jagged, we can modify the noise settings. For example, we can change the noise type from simplex smooth to simplex and reduce the frequency to make the terrain look smoother and less jagged.
noise.noise_type = FastNoiseLite.NOISE_TYPE_SIMPLEX noise.frequency = 0.002

Adding the Player to the Terrain
Now that we have our terrain, let’s add our player to it so we can see how well our Godot procedural generation techniques work in a practical sense. We can do this by dragging the player scene into the scene tree and setting their position to be zero. We also need to ensure the player spawns above the terrain, so we’ll adjust their Y position as well.
Once the player is added, we can walk around on our Godot procedural generation terrain. If we want a different terrain, we can change the seed of our Godot procedural generation to a random number to get a different looking terrain.
Increasing the Size of the Terrain
If we want to increase the size of our terrain, we can adjust the size_depth and size_width variables in our script. However, keep in mind that a larger terrain will take longer to load.
size_depth = 300 size_width = 300

And that’s it! We have now used Godot procedural generation techniques to dynamically create our terrain.
In closing, we’ve run the scope from creating a basic square plane mesh, incorporating noise, to ultimately generating a diverse and realistic terrain with Godot procedural generation. You’ve learned fundamental techniques for creating and modifying meshes in Godot, as well as implementing noise for more complex and visually appealing landscapes. From hereon, you can refine your skills by experimenting with different settings, sizes, and noise algorithms for unique terrain environments in your games.
Also know that procedural generation extends far beyond just 3D terrain. For example, you could use procedural generation techniques to generate a hexagonal map for a 4X style game (such as shown in this free video below)!
Remember, every new project is another opportunity to practice and advance your skills. For more Godot-related game development topics, consider exploring Zenva’s variety of expert-authored courses, including our Discover Procedural Generation in Godot 4 course which expands the content shown here. Continual learning is key—great job making it this far, and here’s to your further success in game development!
Did you come across any errors in this tutorial? Please let us know by completing this form and we’ll look into it!

Transcript – Mesh Generation
Hey everyone. In this Godot procedural generation lesson, we are going to be looking at generating our mesh. Now, we’re not going to be adding in the hills and valleys of our terrain, but what we are going to do is generate the base mesh so that in the future we can then start to modify it by adding in hills and valleys, just like I said.
So how are we going to generate a brand new mesh from scratch inside of our Godot script? Well, we’re going to be utilizing three different properties that we can of course modify throughout our project, and these are going to be size, width, size, depth, and mesh resolution.
So first thing we’re going to do is generate a basic square plane mesh like this with any arbitrary size, let’s just say 20 by 20 meters. Then in order to actually modify this mesh adding in hills and that we need to subdivide it a number of times, and this is going to involve adding in 20 subdivisions like this because as you can see, this is a 20 by 20 grid, 20 by 20 mesh. So every meter, we are basically going to have a brand new subdivision, and then each of these vertices, all these different points are going to be the things that we are going to modify.
Now, you may notice that if we are having each vertex one meter apart, then when it comes down to having very jagged terrain, it’s not going to look that good, okay? It’s going to be pretty blocky. So what we can then do is increase the mesh resolution by adding in even more subdivisions, and this is where that mesh resolution variable comes into play.
That property, pretty much the mesh resolution is just going to be multiplied by the width and the depth to determine the subdivisions. So at one, that is just going to be 20 on each side, two that is going to be 40, okay, 20 times two, and then three is going to be 60. So you can see the higher we set our mesh resolution, the more dense these vertices are going to be. So the smoother our terrain is going to look and it’s going to probably also be a bit nicer for the player to walk on as well.
But of course that means much more vertices, more triangles, more processing time and more rendering time as well. So let’s jump in and look at how we can actually set this up.
So here inside of Gado, what we’re going to do is we’re going to start off by creating a brand new node, and this is just going to be your base node right here. We’re going to rename this to be mesh terrain generation, and then we want to also go down to our Godot procedural generation folder, right-click on that and create a new script called Terrain Generation. We can then attach it to that node and then open it up inside of the editor right here.
So the first thing we’re going to do is we are going to delete the process function since we are not going to be needing it, we are going to be using the ready function though. So we will just leave that for now. And then up here we are going to give our script a class name, so class name of terrain generation. So if we wanted to reference it in other scripts, we can easily do that. And then we need to create some variables.
So the first variable is going to be our mesh, which is going to be of type mesh instance 3D. Now, we aren’t going to be creating a mesh instance 3D node because this is going to be spawned in and generated inside of this script. This variable is just going to be holding onto that mesh, so if we need it later on, we can easily access it.
Then we’re going to have another variable. This one is going to be for our size depth, and this is going to be basically how long our measure is going to be in terms of meters or gado units. So we’ll just have that at 100 for now, and it’s also going to be of type int, so we’ll make sure we do that as well. And then we also then want size width, which is going to be the other side into as well, and this is going to be equal to 102.
Then we need our mesh resolution. So it’ll create a mesh resolution variable of type int, and we’ll have that to be set to two right now. So this basically means every half meter there is going to be a subdivision.
Next, what we need to do is we need to then actually generate this mesh. So for this, we’re going to create a new function called generate, and we’ll set that to be passed for now because inside of ready we are going to call generate.
Okay, so down inside this generate function for our Godot procedural generation, the first thing we need to do is actually generate our plain mesh. This is just going to basically generate in the data that we’re going to have for our mesh. So for this, I’m going to create a variable called plain mesh, and this is going to be equal to plain mesh new, and a plane is basically just a flat square mesh, as simple as it can get.
Then we need to set the size of it, okay? How big is it going to be? Is it going to be a meter long? Is it going to be a thousand meters? So we’re going to go plain mesh size equals a vector, a vector two, so it has an X and a Y, a width and a depth. So we’ll go size, width and size depth.
Then we need to determine the subdivisions. This is basically how many times are we going to slice it along its depth, and how many times are we going to slice it along its width. This is adding in those new vertices for us to then modify. We’ll go plain mesh subdivide depth equals our size depth multiplied by the mesh resolution. And then we can do the same thing for the subdivide width.
So plain mesh subdivide width equals size width multiplied by mesh resolution. Now this here isn’t actually our mesh per se. This is more so the data that are creating, okay, we’re giving it the information it needs to then generate the mesh. So the next step is going to be giving it a material.
Now if we go down to our Godot procedural generation materials folder, you’ll notice we have a terrain material right here, which I’ve already gone ahead and created. Okay? So we’re going to assign that by going plain mesh material equals preload, and then we just want to go down here and search for that terrain material TRES right there.
Now that we have all that, the next step is going to be actually generating the mesh from the given data. So for this, we need a surface tool, and this is basically a tool in gado that allows us to construct a mesh from the given data. So I’ll create a variable here called surface, and this is going to be equal to surface tool new.
Now, what are we doing with this surface tool? Well, pretty much we are going to be creating our mesh from the given plain mesh data up here. Now to do this, all we need to do is just go surface dot create from, and then we send over our mesh. So we’ll go plain mesh, and then we also need to give it a surface id.
So we’ll just go zero. This is pretty much just boilerplate stuff, so don’t worry too much about that number. Then what we need to do is we of course then need to actually then create the node, because this isn’t creating a node, this is just creating a mesh resource that we then need to apply to our mesh node.
So for this, what we’re going to do is we are going to create a new mesh. So it will go mesh, which is referencing this variable here. Our mesh instance 3D is going to be equal to a mesh instance, 3D new. Okay? So this is creating that mesh instance 3D node. We can then give it our mesh. So go mesh mesh equals surface commit.
Now surface commit. This basically then generates the final mesh. Then what we can do is we can go mesh, create trim mesh collision. This is going to create the collider for our terrain. We then want to determine the shadow settings. So we’ll go mesh cast shadow equals geometry instance 3D, and we want to go shadow casting setting off.
And the next step is going to be adding it to the group called nav source. Now, this is for later on when we start generating our nav mesh. So we’ll just go mesh dot add to group, and then we’ll go nav source. Okay? This is optional if you want navigation on your terrain. And then finally add child, because we of course want to add this to the tree mesh.
So this code here should have us set up to generate a flat 2D plane with that given material. So if I go back into 3D mode here, I’m going to go. Ahead, create a new camera 3D node. We can then move this over here, rotate it down a bit, move it up, save that, set that as current press play, and we should then see our mesh right here.
Now let’s add in a light and some sky box. So up here I’m going to click on these three little dots, and I’m going to click add sun to scene and also add environment to scene. Let’s move the camera up as well a bit so we can see it a bit better.
There we go, press play, and there is our terrain. In fact, let’s move the camera down a tiny bit more so we can get a better view of the entire thing. And there we go. So we’ve got our terrain set up. Now the next step is going to be the process of modifying the height of each vertices so that we can have our terrain. So thanks for watching, and I’ll see you all then.
Transcript – Noise – Part 1
Welcome back, everyone. In this lesson, we are going to be looking at how we can begin to shape our terrain, because right now it is just a flat square and we want to give it hills. Valleys. We want to give it cliffs. So how can we actually do that? Well, we’re going to do this with noise.
Now you may have seen noise before. Okay? It looks a bit like TV static. You may have heard of Perlin noise before. Basically this is, it can be represented as a texture here, but it is basically a formula that we can give an X and a Y position to, and it will return to us a value between zero and one.
And with this, we can then start shaping our terrain. So yeah, you may have seen this before, represented as this black and white image. You can see how it smoothly transitions between black and white, black being zero, white being one. And what we’re going to do is basically, okay, we have our terrain here, which is basically a grid of vertices. Alright? All the individual points.
Now for each of these points, we are going to basically get it and we are going to get its X and Y position and feed it into the noise algorithm, which is then going to sample a position on the noise map and return to us a value between zero and one.
And using that zero and one, we’ll then multiply that by another number in order to get that vertex’s Y position. So we’ll then move it up a bit. We’ll get the vertices next to it, move that one up a bit, maybe a bit different than the one to its left. And overall our terrain will then begin to be taking shape. So this is basically us combining our mesh grid here with the noise map in order to create our terrain. So let’s jump in and actually look at how we can set this up.
So in Godot, we’re going to hop over back to our script here. And what we’re going to do is we are going to create a few new variables. So the first variable we are going to create is a variable for our noise.
And for this, I’m going to create a variable called noise, and this is going to be of type fast noise light. Now let’s also add the export tag here. So that is exported like so, and this noise variable. If we click on our terrain generation node, you’ll notice that it’s a property. So we can click on it, create a new fast noise light. And if I open it up, you’ll notice we get this noise texture right here.
Now this is basically the noise we’re going to be working with. Okay, so you can see it goes from black to white, zero to one, and we can then sample an X and Y coordinate on this noise map in order to get one of those values.
Down here we have a bunch of different settings such as the noise type, which we can change. Here we have the seed, so this is going to basically be what we randomly set at the start of the game to change our terrain. So it’s random each time. The frequency basically determines how zoomed into the noise map we are a high frequency will have much more jagged terrain while a lower one will have smoother hills.
And then we have an offset and some other properties as well that we can modify. But we’re going to keep this pretty much at default for now. So let’s actually have a look at how we can apply this to our mesh. In our script, to apply this noise map to our terrain, we first need to have access to each of our individual vertices. For this, we’re going to need a new tool. This tool is a new variable called data, and this is equal to our mesh data tool new.
Our mesh data tool is basically what we use in order to access and edit the individual vertices of our plane. And for this, we’re then going to create a new variable called array plane. And this is basically going to be an array of all the vertices in our mesh, and this is going to be equal to surface commit. We then need to apply this to our mesh data tool so we can start using it. For this, we’re going to go data create from surface, and send over our array plane and a surface ID of just zero.
The next step is to loop through each of the vertices with a for loop and then modify the vertices’ position. For this, we’re going to create a for loop for ‘I’ in range, and the range is going to be ‘data get vertex count. For each vertex, we first want to ‘get vertex’. For testing purposes to make sure it works, let’s modify the vertex’s y position. Then we need to go ‘data set vertex’, so we need to apply these changes.
After that, we need to clear our array plane. Then we need to commit this array plane to our data tool again. Then what we need to do is we need to begin generating our surface with these new vertices. Since we have our vertices, so we’ll have our faces pointing in different directions up, down, left and right. We then want to also generate the normals for each of the surfaces, which calculate which direction each of the individual faces are pointing. This is for lighting and texturing, etc.
Then we can pretty much go through the same process down here. After creating the surface and generating the normals, we should then be able to press play and see that our terrain now has this jagged spike appearance. Adjusting the camera for a better look, you will see the terrain has a very jagged spike because for each of these individual vertices, we are setting it to just have a random position. This is not following the noise map just yet.
But let’s also have a look at mesh resolution. Now if you bump it up to something like five, for example, that means each meter is going to have five vertices, and this is going to be very packed. A higher number will take a lot more processing time, so we’ll switch it back to two. We now have our terrain divided equally in all direction and altered in the same random manner. In the next lesson, we are going to look at actually not having random values for our vertical position. Instead, we are going to look at how we can actually map this to that noise map.
So thanks for watching and I’ll see all then.
Transcript – Noise – Part 2
Welcome back, everyone. In this lesson, we are going to continue on with generating our terrain by starting to actually map each of these vertices here to an individual point on our noise map so we can start getting these flowing hills rather than just a random value for the Y. So for this, we need to create a brand new function. We’re going to create a new function called get noise Y, and it’s going to have two parameters, an X and a Z.
Now this function is also going to return a value. It’s going to return a float, so add in the return type as float, and basically this function we are going to give it a coordinate, an X and a Z, and it’s going to look on the noise map, it’s going to find that position, it’s going to then determine what the value is and it’s going to send it back to us.
So what we’re going to do is we’re going to create a variable called value, and this is going to equal noise, get noise 2D, and we need to send over an X and a Y. So we’re going to send X and Z, and then we’re going to return that value.
Now we can go back up to our generate function and over to the fall loop where we are looping through each of our vertices. Now at the moment, for each vertices we are just giving it a random position for its y-axis between zero and 10. We don’t want to do that. Instead, what we’re going to do is delete that line and we are going to create a new variable called Y, which is going to equal to that get noise y function, and we’re going to send over our vertex X and vertex zed position. Then what we can do is we can then go vertex y equals y.
And now if we save that, we should then be able to click on our terrain generation. Make sure you have your fast noise light set up here, press play, and nothing really happens.
The reason why is that it’s a value between zero and one. This is a terrain that is about 100 meters by 100 meters. So if it’s only going up one meter at its highest, we’re not going to really see a difference. So what we’re going to do for now is we’re going to go down to where we have our get noise y function and we’re going to return value multiplied by 50. Press play again, and there we go. Okay, so we can start actually seeing our terrain now.
And the material I have provided actually does automatically set it up so that if the slope angle of the terrain is greater than certain threshold, it will turn to stone, otherwise it’s grass. Okay, so we have our terrain here.
We probably want to modify the noise a bit so it’s not so jaggedy. So what I’m going to do is I am going to set the noise type from simplex smooth to just simplex, so it’s a bit simpler and the frequency down to 0.002. Now this is going to create a bit of a nicer-looking terrain. Okay, something like that. It’s a bit hard to see. Let’s actually then maybe bump that up a bit. So 0.03. And yeah, basically you can modify this a bit. So you can see we now have these hills. It’s going down to a bit of a lower area here.
Now let’s actually go ahead and get our player in this terrain. So I’m going to delete that camera 3D node here. I’m going to open up the player controller and drag in the player scene, okay, because we want our actual player to be walking around, so I’ll set their position to be zero. I’m going to drag them up in the air as well so they don’t spawn under the terrain. Press play. And as you can see, we’re falling down and here we are. Now we are on our terrain, which is pretty cool.
If you want a different terrain, what we can do is just select our terrain generation and change the seed to a random number, something like five, and we’re going to get a different-looking terrain. And there we go. So now we can walk around, we can even increase the size of our terrain. So if we go to our script up to the top, let’s change the size, depth, and size width to be 300. Now, okay, we can probably also bring the player down a bit.
Press play. And now as you can see, our terrain is going to take of course longer to load up, but it is much larger and it actually looks pretty good with these hills.
We have these sort of valleys here, and this is just using a single noise map to generate this sort of thing. You could go ahead and change the noise settings a bit more, changing the noise type, the frequency. You probably don’t want the mountains to be this close together. You might want them to be spread apart. So for that, you would of course then decrease the frequency. But yeah, as you can see, we have our terrain. We can walk across it because if you remember, we did generate a collider for it as well.
In the next lesson, we’ll be looking at how we can make this noise a bit better, because right now it’s pretty simple. We have these hills and that’s it. In the next lesson we’ll look at an elevation curve. We’ll also be looking at fall-off towards the edges. So if you want to create an island, you could have the terrain dip down at the edges of the mesh. So thanks for watching and I’ll see you all then in the next lesson.
Want to keep learning? Explore our all-access plan with 300+ courses, guided learning pathways, new monthly content, and much more!