User Guide (original) (raw)
Table of Contents
- Getting Started
- Overview
* The Preferences Dialog - Basic Tutorial: Adding a project to version control
* Configuration
* Identifying yourself
* Setting up the Home Directory on Windows
* Pointing out the System wide configuration
* Create Repository
* Track Changes
* Inspect History - GitHub Tutorial
* Create Local Repository
* Create Repository at GitHub
* Eclipse SSH Configuration
* Push Upstream
- Overview
- Concepts
- Tasks
- Creating Repositories
* Considerations for Git Repositories to be used in Eclipse
* The short story
* The longer story
* Eclipse Workspace and Repository working directory
* Implications
* Creating a new empty Git Repository
* Creating a Git Repository for multiple Projects - Starting from existing Git Repositories
* Starting the import wizard
* Cloning or adding Repositories
* Cloning a Repository
* Adding a Repository
* Selecting a Repository from the List
* Importing projects
* Wizard for project import
* Import Existing Projects
* Limiting the Scope for Project Import
* Use the New Projects Wizard
* Import as General Project - Working with remote Repositories
* Cloning Remote Repositories
* Repository Selection
* Branch Selection
* Local Destination
* Cloning from specific locations
* Pushing to other Repositories
* Pushing to upstream
* Configuring upstream push
* Direct Push
* Push Wizard
* Push URI
* Push Ref Specifications
* Delete Ref Specifications
* Conflicting Push Ref Specifications
* Push Confirmation
* Push Result Report
* Fetching from other Repositories
* Fetching from upstream
* Configuring fetch from upstream
* Direct Fetch
* Fetch Wizard
* Fetch Ref Specifications
* Fetch Result Report
* Pulling New Changes from Upstream Branch - Working with Gerrit
* Enabling Gerrit for a repository
* Pushing a change to a Gerrit Code Review Server
* Pushing as Draft
* Editing a change
* Fetching a change from a Gerrit Code Review Server - Working with Gitflow
* Enabling Gitflow for a repository
* Starting a feature/release/hotfix
* Starting release from a commit other than HEAD - Inspecting the state of the Repository
* Label Decorations
* Text Decorations
* Icon Decorations
* Commit Dialog
* Comparing Content
* Compare editor and Synchronize View
* Compare working tree with last commit
* Comparing Working Tree with Index
* Comparing Working Tree with a branch, a tag or a reference
* Comparing Working Tree with Any Commit
* From the project explorer
* From the history view (files only)
* Comparing Two Commits
* Comparing Index with HEAD or Any Other Commit
* Comparing with Branches (Synchronize)
* Quickdiff
* Inspecting Commits
* View Diff for a Commit
* Showing the contents of a Commit - Committing Changes
* Modifying the content
* Committing
* Committing with the Staging View
* Committing using Commit Dialog
* Commit Message
* Amending Commits - Reverting Changes
* Reverting changes in the working tree
* Replace with File in Git Index
* Replace with HEAD
* Replace with Branch, Tag or Reference
* Replace with Commit
* Replace with Previous Revision
* Revert using quickdiff
* Reverting changes introduced by a specific commit
* Resetting your current HEAD
* Reset to specific branch or tag
* Reset to a specific commit
* Revert all local and staged changes - Branching
* General remarks about branches
* Upstream configuration
* Checking out an existing Branch
* From the team menu on a project node
* From the Git Repositories View
* From the History View
* Creating a New Local Branch
* From the team menu
* From the Repositories View
* From the History View
* Renaming an Existing Branch
* From the Team menu on a Project node
* From the Repositories View
* From the History View
* Deleting a Branch
* From the Team Menu on a Project node
* From the Repositories View
* From the History View
* Branch Creation Dialog
* Configure Branch Dialog - Merging
* Merging a branch or a tag into the current branch
* Starting merge from the History View
* Starting merge from the Team menu
* Starting merge from the Git Repositories View
* Merge options
* Possible merge results
* Merge Result dialog
* Resolving a merge conflict
* Using Merge Tool
* Manual conflict resolution
* Finding conflicting files
* Editing conflicting files
* Adding conflict resolution to the git index
* Committing a merge
* Aborting Merge - Rebasing
* Rebase Introduction
* Rebase, A Simple Example
* The Real World: Rebase Conflicts
* Starting Rebase
* Rebase Confirmation Dialog
* Rebase Conflicts
* Aborting Rebase - Interactive Rebase
* Synopsis
* Starting interactive rebase
* Planning rebase
* Executing interactive rebase
* Safety Instructions
* Rebase with auto-stashing - Cherry Picking
* Cherry-pick Introduction
* Cherry-pick Example - Tagging
* Creating a Tag
* Replacing an Existing Tag
* Deletion of tags
* Light-weight and Signed Tags - Patches
* Creating Patches
* Create a Patch from a Commit
* Patch Wizard
* Applying Patches - Managing Repositories
* Adding Repositories to the Git Repositories View
* Adding a Repository manually
* Cloning a Repository
* Creating a Repository
* Adding a Repository using Copy and Paste
* Removing Repositories
* Removing a Repository from the Repositories View
* Deleting a Repository
* Structure of the Git Repositories View
* Repository Groups
* Functions of the Git Repositories View
* Project Import
* Branch and Tag Support
* Check-out of Branches and Tags
* Creation and Deletion of Branches
* Rebasing
* Merging a Branch or a Tag
* Synchronizing with a Branch or a Tag
* Determining the Checked-out Branch
* Resetting to a Branch or a Tag
* "Detached" HEAD
* Inspecting References
* Browsing the Working Directory
* Repository Configuration
* Remote Repositories
* Direct Fetch and Push Support
* Adding a Remote Configuration
* Changing Remote Configurations
* Gerrit Configuration
* Refresh
* Link with Selection
* Link with Editor
* Hierarchical Branch Layout
* Bare Repositories
* Removing Repositories from the Git Repositories View
* Showing Repository in Related Views
* Show in History
* Show in Reflog
* Show in Properties - Working with Tasks
- Viewing Commits
* Tagging a commit
* Creating a branch from a commit
* Checking out a commit
* Cherry picking a commit
* Opening the commit viewer - Searching for commits
* Git Search page
* Browsing Search Results
* Launching Git Search
* Open commit dialog - Finding the author of each line in a file
- Working with Submodules
* Cloning Repositories with Submodules
* Browsing Submodules
* Adding a Submodule
* Updating Submodules - Team Project Sets
* Import
* Export
* Format - GIT LFS Support
- Creating Repositories
- Reference
- Menus
* Project Context Menu
* Resource Context Menu
* Repositories View Menus
* History View Menus
* Git Workbench Toolbar and Git Workbench Menu
* Menu Actions - Git Perspective and Views
* Git Perspective
* Git Repositories View
* History View
* Overview
* Opening the History View
* Organization of the History View
* Using the History View
* Inspecting the Commit Graph
* Displaying and Comparing versions of a File
* Working with the Filter Settings
* Toolbar actions
* Find
* Filter settings
* Compare Mode
* All Branches
* View Menu actions
* Configuring the View
* Context Menu actions
* Compare with working tree
* Compare with each other
* Open
* Checkout
* Create Branch
* Delete Branch
* Create Tag
* Create Patch
* Cherry Pick
* Revert Commit
* Merge
* Rebase on top of
* Reset > Soft/Mixed/Hard
* Quickdiff > Reset Quickdiff Basline to HEAD
* Quickdiff > Reset Quickdiff Basline to first parent of HEAD
* Quickdiff > Set as Baseline
* Copy
* Show Revision Comment
* Show Revision Details
* Wrap Comments
* Fill Paragraphs
* Drag and Drop Support
* Working with the Revision Details Area
* Synchronize View
* Synchronization State
* Mode
* Models
* Navigation
* Git Tree Compare View
* Git Staging View
* Partial Staging
* Git Reflog View - Git URLs
* HTTP(S) connections
* SSH connections - Git References
- Refspecs
* Push Refspecs
* Fetch Refspecs - Remotes
- Git Ignore
- Menus
Getting Started
Overview
If you're new to Git or distributed version control systems generally, then start here: https://git-scm.com/doc
The Preferences Dialog
Many of the configurations you will make in Eclipse are found in the Preferences Dialog. To open the Preference Dialog click Window > Preferences in the menu bar at the top. To see the preferences for git, click Team > Git in the tree on the left.
Basic Tutorial: Adding a project to version control
Configuration
Identifying yourself
Whenever the history of the repository is changed (technically, whenever a commit is created), Git keeps track of the user who created that commit. The identification consists of a name (typically a person's name) and an e-mail address. This information is stored in file~/.gitconfig under dedicated keys. EGit will ask you for this information when you create your first commit. By default, this dialog is shown only once until you create a new workspace or tick the checkbox "Show initial configuration dialog" on the Git Preference page:
You can also untick "Don't show this dialog again" if you want to see it again later.
Instead of using this dialog, you can always change this information using the Git configuration:
- Click Window > Preferences > Team > Git > Configuration
- Click New Entry and enter the key value pairs
user.emailanduser.name
Setting up the Home Directory on Windows
Add the environment variable HOME to your environment variables.
- In Windows 7, type "environment" at the start menu.
- Select "Edit environment variables for your account".
- Under "User Variables", click the "New" button.
- Enter "HOME" in the name field.
- Enter "%USERPROFILE%" or some other path in the value field.
- Click OK, and OK again. You have just added the Home directory on Windows.
- File > Exit, then restart the application.
Note that if you use Cygwin, you should already have HOME set. For example, if you installed Cygwin toC:\cygwin and your username is Fred, then Cygwin should have already set HOME to C:\cygwin\home\Fred (or something similar). You can verify this by entering echo %HOME% in the Windows command prompt, orecho $HOME in the Cygwin shell.
EGit needs this path for looking up the user configuration (.gitconfig).HOME should point to your home directory e.g. C:\Users\Tom. Ensure correct case! E.g. C:\users instead of C:\Users may cause problems!
If the HOME variable is not defined the home directory will be calculated by concatenating HOMEDRIVE and HOMEPATH.
If both HOME and HOMEDRIVE are not defined HOMESHARE will be used.
EGit shows a warning if HOME is not defined explicitly. Keep in mind that if you set the HOME environment variable while Eclipse is running, you will still see following warning. You will have to restart Eclipse for it to recognize the HOME value.
Pointing out the System wide configuration
If you use Git for Windows as a companion to EGit, make sure EGit knows where Git is installed so it can find the "system wide settings", e.g. how core.autocrlf is set. Go to the settings and look under Team>Git>Configuration and then the System Settings tab.
If you selected one of the options to use Git from the Command Line Prompt when you installed Git for Windows, then the location of the system wide settings is filled in with a path and everything is fine. If not, use the Browse button to locate where Git is installed, e.g. C:\Program Files(x86)\Git.
This advice also applies to users of other Git packagings, e.g. Git under Cygwin or TortoiseGit.
Non-Windows users should in theory check this setting, but the system wide settings are usually not used on non-Windows platforms.
Create Repository
- Create a new Java project
HelloWorld. (In this case, the project was built outside of your Eclipse Workspace.) - Select the project, click File > Team > Share Project.
- Select repository type Git and click Next.
- To configure the Git repository select the new project
HelloWorld. - Click Create Repository to initialize a new Git repository for the
HelloWorldproject. If your project already resides in the working tree of an existing Git repository the repository is chosen automatically. - Click Finish to close the wizard.
- The decorator text "[master]" behind the project shows that this project is tracked in a repository on the master branch and the question mark decorators show that the
.classpathand.projectand the.settingsfiles are not yet under version control.
Track Changes
- Click Team > Add to Index on the project node. (This menu item is named Add on older versions of Egit.)
- The + decorators show that now the project's files have been added to version control.
- Mark the "bin" folder as "ignored by Git", either by right-clicking on it and selecting Team > Ignore or by creating a file
.gitignorein the project folder with the following content:/bin - This excludes the
binfolder from Git's list of tracked files. - Add
.gitignoreto version control (Team > Add): - You may have to set your Package Explorer filters in order to see
.gitignoredisplayed in the Package Explorer. To access filters, select the down arrow on the right edge of the Package Explorer tab to display View Menu.
- Select Filters... from the View Menu and you will be presented with the Java Element Filters dialog. Unselect the top entry to display files that begin with . (period) such as
.gitignore. - Click Team > Commit in the project context menu.
- Enter a commit message explaining your change, the first line (followed by an empty line) will become the short log for this commit. By default the author and committer are taken from the
.gitconfigfile in your home directory. - You may click Add Signed-off-by to add a Signed-off-by: tag.
- If you are committing the change of another author you may alter the author field to give the name and email address of the author.
- Click Commit to commit your first change.
- Note that the decorators of the committed files have changed as a result of your commit.
Inspect History
- Click Team > Show in History from the context menu to inspect the history of a resource:
- Create a new Java class
Hello.javaand implement it. - Add it to version control and commit your change.
- Improve your implementation and commit the improved class.
- The resource history should now show 2 commits for this class.
- Click the Compare Mode toggle button in the History View.
- Double click
src/Hello.javain the Resource list of the History View to open your last committed change in the Compare View.
Congratulations, you just have mastered your first project using Git !
GitHub Tutorial
Note: pushing to a GitHub repository via HTTPS or fetching from a private GitHub repository via HTTPS may ask you for your log-in credentials (username and password). Use a**personal access token**(PAT) as the password. Do not use your normal log-in password for your user account at GitHub!
You have to create the PAT first via the GitHub web UI. GitHub personal access tokens give you fine-grained control over what the token holder may do. This is done by assigning "scopes" to tokens. See theGitHub documentationfor the details.
Some hints:
- A token without scopes gives only read-only access to public information.
- To get write access and access to private repositories your GitHub account has access to, set the repo scope for the token when you create it.
Create Local Repository
- follow Getting Started to create a new local repository (with your content instead of the demo project).
Create Repository at GitHub
- create a new repository at GitHub:
On the next screen you can see the URLs you may use to access your fresh new repository:
- click SSH to choose the SSH protocol. It can be used for read and write access.
- click HTTP to choose the HTTP protocol. It can also be used for read and write access.
- click Git Read-Only to choose the anonymous git protocol for cloning. It's the most efficient protocol git supports. Since the_git protocol_ doesn't support authentication it's usually used to provide efficient read-only access to public repositories.
Eclipse SSH Configuration
- Open the Eclipse Preference Dialog (Window > Preferences). Navigate to and expand the Network Connections option and select SSH. Ensure that your SSH2 home is configured correctly (usually this is
~/.ssh) and contains your SSH2 keys:
- if you don't have SSH keys yet you may generate them on the second tab of this dialog (Key Management). Use a good pass phrase to protect your private key, for more details see "working with key passphrases".
- upload your public SSH key to your GitHub account or GitLab profile settings.
Further information about advanced SSH configuration (such as using Putty or another SSH agent with EGit) is available in theEGit FAQ (section SSH).
Push Upstream
- Click Team > Remote > Push... and copy and paste the SSH URL of your new GitHub repository.
- If you are behind a firewall which doesn't allow SSH traffic, use the GitHub HTTPS URL instead and provide your GitHub user and password instead of using the uploaded public SSH key. To store your credentials into the Eclipse secure store click Store in Secure Store.
- Note: many HTTP proxies are configured to block HTTP URLs containing a user name, since disclosing a user name in an HTTP URL is considered a security risk. In that case remove the user name from the HTTP URL and only provide it in the user field. It will be sent as an HTTP header.
- Click Next and on first connection accept GitHub's host key.
- Enter your SSH key's passphrase and click OK.
- On the next wizard page click Add all branches spec to map your local branch names to the same branch names in the destination repository (on a one-to-one basis).
- Click Next. The push confirmation dialog will show a preview of the changes that will be pushed to the destination repository.
- Click Finish to confirm that you want to push these changes.
- The next dialog reports the result of the push operation.
- Point your browser at your GitHub repository to see that your new repository content has arrived.
Concepts
Git is built on a few simple and very powerful ideas. Knowing them helps to understand more easily how git works.
Repository
The Repository or Object Database stores all objects which make up the history of the project. All objects in this database are identified through a secure 20 byte SHA-1 hashof the object content. This has several advantages:
- comparing two objects boils down to comparing two SHA-1 hashes.
- since object names are computed from the object content in the same way in every git repository, the same object will be stored under the same name in all repositories which happen to contain this object.
- an object never changes once created (obvious since changing the contents means a new hash must be calculated and a new name assigned).
- repository corruption can easily be detected by checking if the SHA-1 object name still is the secure hash of the object's content.
Git has four object types :
- A Blob object stores file content.
- A Tree object stores the directory structure and contains Blob objects and other Tree objects together with their file system names and modes.
- A Commit object represents a snapshot of the directory structure at the time of the commit and has a link to its predecessor Commit object which form an acyclic graph of the repository revisions forming the repository history.
- A Tag object is a symbolic named link to another repository object which contains the object's name and type. Optionally, it also contains information about who created the tag and other signing information.
The object database is stored in the .git/objects directory. Objects are either stored as loose objects or in a single-file packed format for efficient storage and transport.
Trust
Git provides a built-in trust chain through secure SHA-1 hashes which allows it to verify if objects obtained from a (potentially untrusted) source are correct and have not been modified since they have been created.
If you get the signed tag for e.g. a project release which you can verify with e.g. the tagger's (the project lead's) public signing key, git ensures that the chain of trust covers the following:
- the signed tag identifies a commit object.
- the commit object represents exactly one project revision including its content and history.
- the commit object contains the tree of blob objects and other tree objects representing the directory structure of the project revision.
- the blob objects contain the file contents for this project revision.
All of the involved object names can be checked for consistency using the SHA-1 algorithm to ensure the correctness of the project revision and that the entire history can be trusted.
Index
The Git Index is a binary file stored in the .git/index directory containing a sorted list of file names, file modes, and file meta data used to efficiently detect file modifications. It also contains the SHA-1 object names of blob objects.
It has the following important properties:
- The index contains all information necessary to generate a single uniquely defined tree object. E.g. a commit operation generates this tree, stores it in the object database and associates it with the commit.
- The index enables fast comparison of the tree it defines with the current working directory. This is achieved by storing additional meta data about the involved files in the index data.
- The index can efficiently store information about merge conflicts between the trees involved in the merge so that for each pathname there is enough information about the involved trees to enable a three-way merge.
Branches
A branch in Git is a named reference to a commit. There are two types of branches, namely "Local" and "Remote Tracking" branches which serve different purposes.
Local Branches
Whenever a change to a (local) Repository is committed, a new commit object is created. Without any other means, it would be very difficult to keep track of the changes in the Repository, in particular when other commits are added to the Repository, for example due to an update from the remote Repository or when checking out another commit.
A local branch helps with this task by providing a (local) name by which the "current" commit can be found. When changes are committed to the local repository, the branch is automatically updated to point to the newly created commit.
In addition, it is possible to add a so-called upstream configuration to a local branch which can be helpful when synchronizing with a remote repository.
Remote Tracking Branches
Remote tracking branches are created automatically when cloning and fetching from remote repositories. A remote tracking branch in the local repository always corresponds to a (local) branch in the remote repository. The name of such a branch follows certain conventions.
The remote tracking branch points to the same commit as the corresponding branch in the remote repository (at the time of the clone/fetch).
Remote tracking branches can be used for automated creation of upstream configuration for local branches.
Working Directory
The working directory is the directory used to modify files for the next commit. By default it is located one level above the .git directory. Making a new commit typically involves the following steps:
- Check out the branch the new commit shall be based on. This changes the working directory so that it reflects the HEAD revision of the branch.
- Do modifications in the working directory.
- Tell git about these modifications (add modified files). This transfers the modified file contents into the object database and prepares the tree to be committed in the index.
- Commit the tree prepared in the index into the object database.
- The result is a new commit object and the HEAD of the current branch moves to the new commit.
Recording Changes in the Repository
You start from a fresh checkout of a branch of a local repository. You want to do some changes and record snapshots of these changes in the repository whenever you reach a state you want to record.
Each file in the working directory can either be tracked or_untracked_:
- Tracked files are those which were in the last snapshot or files which have been newly staged into the index. They can be_unmodified_, modified, or staged.
- Untracked files are all other files (they were not in the last snapshot and have not yet been added to the index).
When you first clone a repository, all files in the working directory will be tracked and unmodified since they have been freshly checked out and you haven't started editing them yet.
As you edit files, git will recognize they are modified with respect to the last commit. You stage the modified files into the index and then commit the staged changes. The cycle can then repeat.
This lifecycle is illustrated here:
Tasks
Creating Repositories
Considerations for Git Repositories to be used in Eclipse
The short story
When setting up Git Repositories with EGit, there are two recommendations for the creation of "productive" (as opposed to "playground") Repositories:
- Don't create the Repository within the Eclipse workspace.
- Be careful when cloning or creating a Repository.
- Make sure to use the Git Sharing Wizard correctly.
- Don't create a Repository with an Eclipse project as root.
- Make sure to use the Git Sharing Wizard correctly.
The first mistake happens when you specify a workspace folder during cloning or creation of a Repository.
Both mistakes will happen when you use the Git Sharing Wizard from an Eclipse project that you have created manually in your workspace without taking precautions (the wizard has been fixed in the latest version).
Below you will find some motivation for these recommendations.
The longer story
Eclipse Workspace and Repository working directory
Git Repositories can be created in different ways, for example by cloning from an existing Repository, by creating one from scratch, or by using the EGit Sharing wizard.
In any case (unless you create a "bare" Repository, but that's not discussed here), the new Repository is essentially a folder on the local hard disk which contains the "working directory" and the metadata folder. The metadata folder is a dedicated child folder named ".git" and often referred to as ".git-folder". It contains the actual repository (i.e. the Commits, the References, the logs and such).
The metadata folder is totally transparent to the Git client, while the working directory is used to expose the currently checked out Repository content as files for tools and editors.
Typically, if these files are to be used in Eclipse, they must be imported into the Eclipse workspace in one way or another. In order to do so, the easiest way would be to check in .project files from which the "Import Existing Projects" wizard can create the projects easily. Thus in most cases, the structure of a Repository containing Eclipse projects would look similar to something like this:
Implications
The above has the following implications:
- It is probably not a good idea to make a project the root folder of your Repository.
The reason is that you will never be able to add another project to this Repository, as the .project file will occupy the root folder; you could still add projects as sub-folders, but this kind of project nesting is known to cause lots of problems all over the place. In order to add another project, you would have to move the project to a sub-folder in the Repository and add the second project as another sub-folder before you could commit this change.
- It is a good idea to keep your Repository outside of your Eclipse Workspace.
There are several reasons for this:
The new Repository will consider the complete folder structure of the Eclipse workspace as (potential) content. This can result in performance issues, for example when calculating the changes before committing (which will scan the complete .metadata folder, for example); more often than not, the workspace will contain dead folders (e.g. deleted projects) which semantically are not relevant for EGit but cannot be excluded easily.
The metadata (.git-) folder will be a child of the Eclipse Workspace. It is unclear whether this might cause unwanted folder traversals by Eclipse.
You can easily destroy your Repository by destroying your Eclipse Workspace.
Creating a new empty Git Repository
You can create a project first and share it afterwards. The Share Project Wizard supports creation of Git repositories (seeAdding a project to version control).
You can also create a new empty Git Repository from the Git Repositories View (see Creating a Repository).
Creating a Git Repository for multiple Projects
You may create multiple projects under a common directory and then create a common repository for all projects in one go:
- create the Eclipse projects (e.g. a, b, c) under a common directory
- select all projects (a, b, c), and in the contextual menu clickTeam > Share Project > Git
- press Next
- select all projects (a, b, c)
- the wizard automatically moves up the default repository location to the parent folder since multiple projects have been selected
- click Create Repository and Finish
Starting from existing Git Repositories
In order to work with the content of a Git repository in the Eclipse workbench, the contained files and folders must be imported as projects. In principle, this import can be done using the generic "New Project" or "Import..." wizards, since the working directory of a Git Repository is just a normal directory in the local file system. However, the newly created projects would still have to be shared manually with Git. The "Import Projects from Git" wizard integrates project import and sharing and also offers some extra convenience.
Starting the import wizard
To start the wizard click Import > Git > Projects from Git.
If you started in a clean workspace, the first page will display an empty list:
Before you can continue, you need to add one or several Git repositories to the list. If you already have repositories in the list, this step is optional.
Cloning or adding Repositories
There are two ways to add Git repositories to the list:
- Clone a remote repository
- Add an existing repository from your local file system
Cloning a Repository
The first option is used if you start with a remote repository. The clone operation will copy that repository to your local file system. To start the Clone Wizard click Clone.... The Clone Wizard is described in more detail inCloning Remote Repositories. Upon successful completion of the clone operation, the newly cloned repository appears in the list automatically.
Adding a Repository
The second option is useful if you already have a repository in your local file system, for example because you have cloned it earlier, you created it from scratch or you copied it from somewhere else. ClickAdd...; and select a directory in the local file system. PressSearch to trigger a scan for Git repositories contained in this directory. If Git repositories are found, they will be listed and you can select repositories to add:
After successful completion, the repository list should contain some repositories:
Selecting a Repository from the List
You can now select a repository and click Next. On the following wizard page, you will decide how to import projects.
Importing projects
This page offers a group with radio buttons that allows you to select a wizard and a directory tree that optionally allows you to select a folder in the working directory.
Wizard for project import
Import Existing Projects
If this radio button is selected, the wizard will scan the local file system for .project files and display the projects found. This is the most comfortable solution and should be used if .project files are checked into the Repository.
Limiting the Scope for Project Import
In this case, the directory tree at the bottom is active. You can limit the search for .project files by selecting a folder in this tree, otherwise the complete working directory of the repository will be scanned. On the next page, a list of the found projects (if any) will be shown. This is very similar to the generic Import Existing Projectswizard, but has some additional filtering capabilities:
Use the New Projects Wizard
When this option is chosen, the generic "New Project" wizard will open. After completion of the "New Project" wizard, the "Import Projects from Git" wizard will resume and assist with sharing the projects you just created.
In this case, the directory tree at the bottom is inactive, as the selection is not relevant for the "New Project" wizard.
Import as General Project
This option can be helpful when there are neither .project files available nor a suitable "New Project" wizard. If chosen, the wizard will generate a .project file and point the project to a folder of the Repository's working directory. The result is a "General Project".
By default, the newly generated project will point to the working directory of the Repository. By selecting some folder from the directory tree at the bottom, you can have the project generated for that folder.
Click Next to open a simple dialog for entering a name and a directory for the new project:
By default the suggested project name matches the name of the directory.
Working with remote Repositories
Cloning Remote Repositories
Using the Git Clone Wizard you may clone remote repositories using different transport protocols.
The wizard can be started from the "Import Projects from Git" wizard usingFile > Import... > Git > Projects from Git > Next > Clone URI > Next
or from the "Git Repositories View" (described inManaging Repositories) using the Clone a Git Repository toolbar button or view menu.
Repository Selection
On the first page of the wizard enter the location of the remote repository:
- URI - The complete URI of the remote repository or the path on the file system. This field is automatically synchronized with the other fields. Note that you can use the Local file... button to browse for a local directory and that the URI field offers content assist by offering previously used values
- Host - The name of the remote host or empty if cloning from the file system.
- Repository Path - Path to the remote repository or on the file system.
- Protocol - One of the protocols described below.
- Port - Port number.
- User - The user name used for authentication.
- Password The password used for authentication.
- Store in Secure Store Whether the password is saved in the Eclipse secure store.
The following protocols are supported:
- file - File system access to the repository.
- ftp - File Transfer Protocol
- git - The most efficient built-in git protocol (default port 9418). This protocol doesn't provide authentication. Typically used for anonymous read access to the repository.
- http - Hypertext Transfer Protocol can be tunneled through firewalls.
- https - Hypertext Transfer Protocol Secure can be tunneled through firewalls.
- sftp - SSH File Transfer Protocol
- ssh - Git over secure shell (SSH) protocol. Typically used for authenticated write access to the repository.
Note: If you are behind a firewall you may need to configure your proxy settings (Preferences > General > Network Connections). Many HTTP proxies are configured to block URLs containing a username (and/or password) like e.g. http://fred:topsecret@egit.eclipse.org/egit.githence it's recommended to use the user, password fields at the bottom of the wizard page, the credentials will be transmitted as HTTP headers.
Branch Selection
On the next page choose which branches shall be cloned from the remote repository:
If you are not sure which branches you need, simply hit "Select All".
You can filter the branches by their name by typing using the text control above the list. Note, however, that branches that have been checked will always be shown in the list, i.e. they will not be filtered.
Local Destination
On the next page define where you want to store the repository on the local file system and define some initial settings.
- Directory - The directory which will contain the Git repository. It will be created by the wizard if it does not yet exist.
- Initial branch - Choose here which local branch will be created and initially checked out.
- Remote name - Define a name for the remote repository. The default is "origin".
The default root path for storing Git repositories can be configured in the Preference Menu Window > Team > Git > Default Repository FolderYou can press Finish on this page or press Next if you are working with Gerrit Code Review and you want to configure your repository accordingly.
Cloning from specific locations
The Clone wizard of EGit can be extended by other plugins in order to search for repositories on specific backends which host git repositories. Currently such an extension is available for Github and soon will be available for Gerrit. For both you need to install the respective Mylyn connectors. The Gerrit Mylyn connector extension then will also configure the remote repository for the work with Gerrit. This can also be done or changed later from the Git Repositories View, seeGerrit Configuration.
When you have installed such an extension, the Clone wizard opens with a selection page where you can choose between different sources of the repository to clone:
Pushing to other Repositories
Pushing to upstream
If you are working with a local branch which has a so-called "Upstream Configuration", the most convenient way for pushing relies on this upstream configuration.
Typically local branches are created based on a remote tracking branch. Since the remote tracking branch is associated with a remote and the remote contains the information required to access the corresponding remote repository, it is possible to automatically create this upstream configuration while creating the local branch (see Branchingfor more information).
When pushing upstream from the local branch, push requires no further parameters and hence can be performed without showing another dialog based on the stored upstream configuration.
In order to push upstream, right-click on a project and select Team > Push to upstream or right-click on a Repository in the Repositories View and click Push to upstream. There is also an action available in the Git Command Group. Push will then be executed immediately after selecting the action. Once finished, a confirmation dialog will be shown displaying information about the pushed data and/or error messages:
Configuring upstream push
The upstream push can be configured using the "Configure..." button on the confirmation dialog (see above) or by right-clicking a project and selecting Team > Remote > Configure push to upstream....
A configuration dialog will be shown for configuration of push URIs and corresponding branch mappings (RefSpecs):
The dialog is divided into three main sections. In the upper part, information about the currently checked out branch and the remote it's following is shown. Usually local branches are created based on a remote tracking branch which auto-configures that the local branch tracks this remote tracking branch.
In this specific example, there is a warning message that there are several branches that use the remote named "origin". This means that changes in the push configuration will affect all these branches, not just the branch shown in the Branch field. Move your mouse over the warning to display these branches in a tooltip.
The URI Group contains two controls, a URI field and a Push URIs list. If the list is empty, the URI in the URI field will be used for Push, if at least one entry is in the Push URIs list, the URIs in the list will be used instead. It should be noted that if the Push URIs list is empty and the URI is changed in this dialog, the new URI will also be used for Pull, so care should be taken when doing so.
The RefMapping Group allows specification of one or several RefSpecs (see Refspecs) for Push.
"Add" will open a small wizard that helps in the creation of the RefSpecs. You can also paste a RefSpec from the clipboard into the list.
Clicking on the "Advanced" control will show/hide an "Edit (Advanced...)" button that allows for more complex RefSpec editing similar to the Push Wizard below.
The buttons in the lower button bar allow you to save your changes and do the push immediately, save the changes without fetching, dry-run (push without saving the configuration), revert your changes, and Cancel.
Direct Push
Alternatively, you can use Direct Push Supporton a Push Specification of a Remote.
Push Wizard
The most powerful (but also most complex) way is using the Push WizardTeam > Remote > Push...
Push URI
- If you already configured a Push Specification in the Repositories View you may also select it here using the drop-down list underConfigured remote repositories. The Finish button will be enabled if the Push Specification for this remote is configured properly (i.e. has at least one URI and a ref spec.
- Otherwise click Custom URI and enter the URI of the upstream repository you want to push to.
Push Ref Specifications
See also Refspecs for more explanations.
Click NextIf this is the first time you connect to this repository via ssh you will have to accept the host key of the remote repository
If your ssh key is protected by a passphrase (which is recommended) you have to enter it here
Click Add all branches spec
This is a convenient way to declare that you want to map your local branch names to the same branch names on the upstream repository you want to push changes to.
Click Add all tags spec to map local tags 1:1 to tags in the repository you want to push to.
If you want to map local branches to those in the upstream repository in a different way you may define more detailed mapping specifications in the following way
- enter source and destination ref or select already existing branches from the drop-down lists
- click Add Spec
This will transfer the newly defined mapping to the listSpecifications for push
Other common push specs:
- You may e.g. map
refs/heads/*torefs/heads/joe/*if you want to name the branches you push to according to your nickname joe. This is useful if multiple users want to publish their local branches on personal branches in a jointly used public repository. - Another usual mapping is to map the source ref
HEADto the destinationrefs/heads/master. This means you want to map your currentHEAD(which might currently point e.g. to any local topic branch) to the upstream master branch.
Delete Ref Specifications
To delete a ref in the destination repository select the ref to be deleted from the drop-down list Remote ref to delete and click Add Spec. This will create a corresponding entry in the Specifications for push list. Alternatively you may type in the specification for the refs to be deleted, this may also use wildcards. Pushing Delete Ref Specifications will delete the matching Refs in the destination repository.
Conflicting Push Ref Specifications
If you add multiple conflicting Push Ref Specifications they will be marked in red, solve this by removing or editing the conflicting specs. It is also possible to edit the specs in-place in the listSpecifications for push
Push Confirmation
Click Next
This will open the Push Confirmation dialog showing a preview which changes will be pushed to the destination repository. If this does not match your expectation click Back and correct your push specs accordingly.
- For ref updates the range of commits to be pushed will be shown in the format
..e.g.d97f5a2e..adfdbfd2means all commits between **d97f5a2e**andadfdbfd2will be pushed. - For refs which do not yet exist in the destination repository**
[new`` ``branch]** or[new`` ``tag]is displayed. - For refs which will be delete
[deleted]is shown.
- Select the Push only if remote refs don't change in the mean time check box if you want to be sure that what you see in this preview is also what you get when pushing these changes out.
- Select the Show final report dialog only when it differs from this confirmation report check box if you only want to get a report after executing the push if the result differs from this preview.
Push Result Report
Click Finish
Depending on the options you have chosen a push result report dialog is shown. It displays the list of commits which are pushed to the remote.
In the box at the bottom the push confirmation message from the remote server is displayed. In case of any errors you will find the error message from the remote server here. To see the message for a given list entry simply select it in the list.
Click Ok to close the dialog.
Fetching from other Repositories
Fetching from upstream
If you are working with a local branch which has a so-called "Upstream Configuration", the most convenient way for fetching relies on this upstream configuration.
A local branch is typically created based on a remote tracking branch. Since the remote tracking branch is associated with a remote and this remote contains the information required to access the remote repository, it is possible to automatically create this upstream configuration while creating the local branch (seeBranching for more information).
When fetching from upstream, this persisted configuration can be used to fetch automatically without the need to provide further parameters in a dialog.
In order to fetch from upstream, click Team > Fetch from upstreamon a project or click Fetch from upstream on a Repository in the Repositories View. There is also an action available in theGit Command Group.
Fetch will be executed immediately after selecting the action. Once finished, a confirmation dialog will be shown displaying information about the fetched data and/or error messages:
Configuring fetch from upstream
The upstream fetch can be configured using the "Configure..." button on the confirmation dialog (see above) or by clicking Team > Remote > Configure fetch from upstream... on a project.
A configuration dialog will be shown for configuring the fetch URI and branch mappings (RefSpecs):
The dialog is divided into three main sections. In the upper part, information about the currently checked out branch and the remote it's following is shown.
The URI field can be used to add/change the fetch URI.
The RefMapping Group allows specification of one or several RefSpecs (see Refspecs) for Fetch.
The "Add" button will open a small wizard that helps in the creation of the RefSpecs. You can also paste a RefSpec from the clipboard into the list.
Clicking on the "Advanced" control will show/hide an "Edit (Advanced...)" button that allows for more complex RefSpec editing similar to the Fetch Wizard.
The buttons in the lower button bar allow you to save your changes and do the fetch immediately, save the changes without fetching, dry-run (fetch without saving the configuration), revert your changes, and Cancel.
Direct Fetch
Another way for fetching is to useDirect Fetch Support on a Fetch Specification of a Remote.
Fetch Wizard
The most powerful (but also most complex) way is using the Fetch Wizard Team > Fetch...
- If you already configured a Fetch Specification in the Repositories View you may also select it here using the drop-down list underConfigured remote repositories. The Finish button will be enabled if the Fetch Specification for this remote is configured properly (i.e. has at least one URI and a ref spec.
- Otherwise click Custom URI and enter the URI of the upstream repository you want to fetch changes from.
Fetch Ref Specifications
See also Refspecs for more explanations.
Click NextClick Add all branches spec
This is a convenient way to declare that you want to map the branch names in the upstream repository you want to fetch changes from 1:1 to the same local branch names.
- Click in the edit field Destination Ref and replace the path segment choose_remote_name with a symbolic name for the upstream repository you are going to fetch from.
- The default remote name for the repository your repository has been cloned from is
origin. The master of this remote maps by default fromrefs/heads/masterto**refs/remotes/origin/master**. - If you e.g. want to additionally track branches from Joe's repository in your local repository you would map the branch in his repository
refs/heads/*to the following tracking branches**refs/remotes/joe/***. - Deselect Force Update if you want to allow fast-forward updates only, select this option if you also want to allow non-fast-forward changes.
- ick Force Update all Refs to set the force update option on all specs
- ick Remove all specs to remove all specs from the list
- Click Add all tags spec to map tags tags in the repository you want to fetch from 1:1 to local tags.
If you want to map branches or tags in the upstream repository to local branches in a different way you may define more detailed mapping specifications in the following way
- enter source (ref in source repository) and destination ref (tracking branch or tag in local repository) or select already existing branches from the drop-down lists
- click Add Spec
This will transfer the newly defined mapping to the listSpecifications for fetch
Fetch Result Report
Click Finish
A fetch result dialog is shown.
- For ref updates the list commits which have been fetched will be shown.
- For refs which didn't exist before in the local repository**
[new`` ``branch]** or[new`` ``tag]is displayed. - For refs which have been deleted
[deleted]is shown.
Pulling New Changes from Upstream Branch
- Right-click on a project in the Package Explorer and select Team > Pull or right-click on a repository in the Git Repositories view and select Pull to pull new changes from the upstream branch your local branch is tracking. This also works if resources are selected from more than one repository.
- Whenever you create a local branch based on a remote tracking branch EGit can configure a tracking relationship so that subsequent pulls will fetch and then merge or rebase (depending on the configuration of this tracking relationship) the changes from the tracked upstream branch; see Branching for details.
Ad-hoc selection of the upstream branch to pull from is not yet supported by EGit.
Available alternatives include:
- run git pull from outside eclipse (but beware on Windows)
- if you did no local change or want to discard your local changes, use Team > Reset...
Working with Gerrit
If you are working withGerrit Code Review, EGit allows you to conveniently push and fetch changes to and from the Gerrit servers.
Enabling Gerrit for a repository
When a repository is cloned in EGit from a Gerrit server using a http,https, or ssh URI, EGit will automatically set up the clone for use with Gerrit. The repository clone is configured such that
- fetching also fetches the review notes from Gerrit,
- pushing by default pushes the commits for review, and
- commit messages automatically get a Gerrit
Change-Idunless they already have one.
If a repository cloned from a Gerrit server outside of EGit is used in EGit, the clone may not be set up such that EGit recognizes it as a Gerrit repository. Gerrit operations in EGit will not appear in any menus unless you configure your repository first. To do that, open the Git Repositories view and browse down to the Remote that represents the Git repository server you want to use and select Gerrit Configuration....
Pushing a change to a Gerrit Code Review Server
Right-click on a project and select Team > Remote > Push to Gerrit... or right-click on a Repository node in the Repositories View and select Push to Gerrit...
A dialog will appear that lets you select or enter a URI and branch name:
- In the URI combo, select or enter the URI that points to your Gerrit instance; the combo will be pre-filled with all URIs defined in any remote of your current Repository; in addition you can type any URI into this field
- In the Gerrit Branch field, enter the name of the branch to select the review queue your changes will be be pushed to
- Optionally, enable the topic and enter a topic identifier. EGit proposes the last used topic for the local branch being pushed, or the local branch name.
The dialog also offers a content assist for the Gerrit branch. Simply press "Ctrl+Space" to activate this (consult the tooltip that appears when hovering over the little bulb decorator near the Gerrit Branch field). The remote tracking branches for the current repository will be shown. Note that this content assist is filtered, so in order to see all proposals, you need to make sure to have the Gerrit Branch field empty before requesting the content assist.
Upon clicking Finish, the currently checked out commit will be pushed to the Gerrit branch specified. Also, the URI and Gerrit Branch values will be remembered and suggested again when the dialog is opened again later.
This allows for more flexibility when working with different Gerrit branches in parallel (e.g. frequently switching between development and hotfixing).
Pushing as Draft
The "refs/for" in the "Push to Gerrit" wizard is a combo drop-down box; click it and select "refs/drafts" instead of "refs/for" to push a draft change to Gerrit.
Editing a change
When a change has been pushed to Gerrit and the reviewers suggest to make some improvements, a new patch set for the change has to be uploaded. First, edit the commit(s):
- In case you have one commit corresponding to one change, you can amend the commit (see Amending Commits).
- In case you have multiple dependent commits and need to edit a commit other than the last one, you can do an interactive rebase (see Interactive Rebase). Alternatively, check out the commit you want to edit, amend it and then cherry-pick the later commits on top (this is what interactive rebase does for you).
Then push again to the same branch. Gerrit will detect that you are updating existing changes and will add new patch sets.
Fetching a change from a Gerrit Code Review Server
Right-click on a project and select Team > Remote > Fetch from Gerrit... or right-click on a Repository node in the Repositories View and select Fetch from Gerrit...
A dialog will appear that lets you select or enter a URI and a change as well as some additional options:
- In the URI combo, select or enter the URI that points to your Gerrit instance; the combo will be pre-filled with all URIs defined in any remote of your current Repository; in addition you can type any URI into this field
- In the Change field, you must enter the full name of a change; you can either take this value from the Gerrit Web UI, use the content assist described below, or build the name using the following pattern: "refs/changes/" + (last two digits from change number) + / + (change number) + / + (revision number)
- In the "Actions to perform after fetch" you can decide what to do after the change has been fetched; you can either create and checkout a branch pointing to the change, create and checkout a tag pointing to the change, or simply checkout the change (thus making HEAD detached); the last option does nothing after fetch, but you will be able to find the commit pertaining to the change at FETCH_HEAD (go to the Repositories View and find FETCH_HEAD under the References node of your Repository, seeInspecting References). The name for the branch or tag is suggested by the dialog but can be overwritten as needed. Since deletion of tags is currently not supported in EGit, we suggest to use local branches rather than tags for the time being. Since the Repositories view allows to group branches hierarchically using "/" as hierarchy separator, the suggested names can come in very handy when dealing with large numbers of changes.
Instead of the tedious copy-paste or manual entering of the change ID, the dialog also offers a content assist for the change. Simply press "Ctrl+Space" to activate this (consult the tooltip that appears when hovering over the little bulb decorator near the Change field). The Gerrit Server will be contacted and all available changes will be fetched and shown in a content assist dialog:
The list will be filtered with your input in the change field. After selecting the change in the content assist, the Change field will be filled with the correct information.
You can also copy the download command from the Gerrit WebUI to the clipboard before opening the Fetch from Gerrit... wizard. This will automatically populate the dialog with the values needed to fetch this change.
The Change field is also automatically filled in (and content assist is triggered) if the clipboard contains a web URL pointing to a Gerrit change, or the change number part of such a URL (numbers separated by "/"), or a plain change number.
Working with Gitflow
If you are using Gitflow (http://nvie.com/posts/a-successful-git-branching-model/), EGit allows you to work with Gitflow operations, managing feature, release and hotfix branches. Install the feature "Git integration for Eclipse - Gitflow support" in order to install EGit's Gitflow integration.
Enabling Gitflow for a repository
Gitflow operations will not appear unless the selected repository is configured for Gitflow. To do that, open the context menu on a repository in the Git Repositories view and select Init Git Flow.
You can skip this step if your repository was already configured for Gitflow by another client.
Starting a feature/release/hotfix
Right-click on a repository, select Git Flow, and select the appropriate start command.

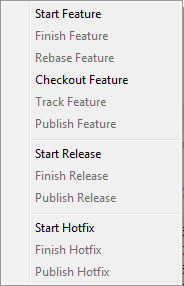
A dialog will appear that lets you enter a name for the Gitflow branch, adding the correct prefix automatically.
Starting release from a commit other than HEAD
Go to the EGit History view, and right-click the commit you want to start the release from. In the context menu, go to Git Flow, and select Start release from commit .
Inspecting the state of the Repository
Label Decorations
Label decorations show Git-specific information about resources under Git version control. They appear in all views showing model objects, like Package Explorer, Project Explorer, Navigator, and Hierarchy View.
The Git label decorations can be switched on globally in the Preference Menu (Window > Preferences) under General > Appearance > Label Decorations, and more detailed settings can be modified in Preferences under Window > Preferences > Team > Git > Label Decorations.
There are two different types of label decorations: text decorations and icon decorations.
Text Decorations
Text decorations appear on the left or right side of the text label. They can be configured on the Preferences dialog under Team > Git > Label Decorations on the Text Decorations tab. For example, the default for a dirty resource is a > on the left side of its name.
These are the default settings:
For files and folders there are the variables "name", "dirty" and"staged". "Dirty" and "staged" are flags; if they are true, the text after the colon is displayed.
For projects there are the additional variables "repository","branch" and "branch_status". The "repository" variable displays the name of the repository.
The "branch" variable displays the name of the currently checked out branch. If no branch is checked out, the decoration shows the shortened name of the commit (first seven characters followed by ellipsis). If tags and/or remote branches are pointing to this commit, a "best guess" heuristic is applied to also show this information: tags take precedence over remote branches, and if several tags apply, the newest one is displayed. If there are several remote branches or tags that have no modification date, then alphabetic sorting is applied and the last one is shown. Example: the checked out commit e49f576... refers to tag**v.0.7.1** of repository egit:
The "branch_status" variable shows the status of the local branch compared to the remote-tracking branch that is set as upstream:
- ↑N – The local branch has N commits that are not yet on the remote-tracking branch. This can be read as "N commits to push".
- ↓M – The remote-tracking branch has M commits that are not on the local branch. This can be read as "M commits to merge/rebase".
- ↑N↓M – The local branch and the remote-tracking branch have diverged (the two above apply both).
- – Empty if the local branch and the remote-tracking branch have the same state.
The status variable can be used with a leading space like this:{ branch_status}. This results in the space being added only when the status is not empty.
Icon Decorations
Icon decorations appear on the lower right corner of the icon displayed in front of the label. They can be configured on the Preferences dialog under Team > Git > Label Decorations on the tab Icon Decorations.
These are the default decorations:
- dirty (folder) - At least one file below the folder is dirty; that means that it has changes in the working tree that are neither in the index nor in the repository.
- tracked - The resource is known to the Git repository and hence under version control.
- untracked - The resource is not known to the Git repository and will not be version controlled until it is explicitly added.
- ignored - The resource is ignored by the Git team provider. The preference settings under Team > Ignored Resources, "derived" flag and settings from
.gitignorefiles are taken into account. - dirty - The resource has changes in the working tree that are neither in the index nor in the repository.
- staged - The resource has changes which have been added to the index. Note that adding changes to the index is currently possible only in the commit dialog via the context menu of a resource.
- partially-staged - The resource has changes which are added to the index and additional changes in the working tree that neither reached the index nor have been committed to the repository. Seepartial staging from the Git Staging viewfor how to do that.
- added - The resource has not yet reached any commit in the repository but has been freshly added to the Git repository in order to be tracked in future.
- removed - The resource is staged for removal from the Git repository.
- conflict - A merge conflict exists for the file.
- assume-valid - The resource has the "assume unchanged" flag. This means that Git stops checking the working tree files for possible modifications, so you need to manually unset the bit to tell Git when you change the working tree file. Also seeAssume unchanged action.
Commit Dialog
A summary of the status of all modified tracked files is displayed on the commit dialog. By double clicking a file the changes to be committed will be displayed in a compare dialog. As EGit currently always commits the content of the working tree (corresponding to git commit -a on the command line) the compare dialog will compare the working tree with the last commit.
Comparing Content
In daily work you will often want to see the changes between your last commit, the index, and the current working tree. In order to do so, select a Resource (project, folder, or file) in the project explorer or navigator and right-click an action under Compare With.
To analyze the contents of a specific commit you should use theHistory View which supports this task much better, see task Inspecting Commits.
Compare editor and Synchronize View
If you use any of the submenu actions of Compare With on a single file, a compare editor will be shown, otherwise (since EGit 3.1) theSynchronize View will be opened that lets you browse the changes; by double-clicking on a changed file in this view, a compare editor will be opened for this file. In the toolbar of the Synchronize View you can select the Sychronize Model you want to use for presenting the changes you are inspecting.
Compare working tree with last commit
The difference between a resource in the current working directory and in the last commit in the current branch can be viewed from the context menu Compare With > HEAD revision. This feature is also available in the Commit dialog. Double clicking on an entry in the Commit dialog opens a compare dialog.
Comparing Working Tree with Index
The differences between the current working tree and the index (based on the currently selected resource) can be viewed from the context menuCompare With > Git Index.
Comparing Working Tree with a branch, a tag or a reference
- Select a resource
- right-click Compare With > Branch, Tag, or Reference...
- select a branch, tag or reference
Comparing Working Tree with Any Commit
From the project explorer
- Select a resource
- right-click Compare With > Commit...
- select a commit from the commit graph
From the history view (files only)
- Select a file in the package explorer
- right-click Team > Show in History or Compare With > History...
- in the commit graph select a commit
- from the context menu select Compare with working tree
- this will open a compare dialog showing the changes between the selected commit and the current working tree
Comparing Two Commits
- Select a resource in the Package Explorer
- click Team > Show in History or Compare With > History...(the latter for files only)
- in the commit graph select two commits
- right-click Compare with each other
- this will open a compare dialog showing the changes between the two selected commits
- you can also open a Git Tree Compare view by right-clickingCompare with each other in Tree
Comparing Index with HEAD or Any Other Commit
You can compare Index with HEAD using the Staging View. Double click a file displayed in the "Staged Changes" pane to compare its Index version against the HEAD version. Comparison between Index and another commit isn't implemented yet.
Comparing with Branches (Synchronize)
The difference between the working tree (including not committed changes) and a branch or tag can be viewed (since EGit 3.1) by selecting the project(s) you want to compare and clicking Compare With > Branch, Tag or Reference. The result is filtered for the resources you selected before starting the comparison.
You can also compare with a branch by clicking the dynamic menuTeam > Synchronize on a project and selecting the Ref you want to synchronize your working tree against. If the Git repository contains multiple Eclipse projects it is sufficient to select one project, theSynchronization View will also include all other projects.
If you want to synchronize with a Ref not listed in the dynamic menu click Team > Synchronize > Other.... Then in the Synchronize Wizard click into the destination column of the repository you want to synchronize and select the Ref you want to compare against.
When clicking "Include local uncommitted changes in comparison" also local, not yet staged changes and the already staged changes will be shown in comparison.
It is also possible to compare multiple repositories at once. In this case in the Synchronize Wizard select for each repository the Ref you want to compare against.
Quickdiff
Instead of using a compare editor you can enable quick diff support and see the changes within the text editor. This feature can be enabled via theGeneral > Editors > Text Editors > Quick Diff preference page:
The difference annotation will then be displayed on the left hand side of the editor:
If you move your mouse over the annotation you see the content of the version you are comparing to:
Per default, the comparison is against the HEAD. You can determine the version you are comparing to, the so-called quickdiff baseline, from the context menu of a commit in the history view (Show in > History). There are three menu entries:
- Quick Diff -> Reset baseline to first parent of HEAD - Compare against the first commit before HEAD.
- Quick Diff -> Reset baseline to HEAD - Compare against HEAD.
- Quick Diff -> Set as baseline - Compare against the selected commit
Inspecting Commits
To inspect a given commit
- from the context menu in package explorer selectTeam > Show in History
- select the commit you want to inspect
View Diff for a Commit
The history view displays the diff in the lower left pane. Selecting a file in the lower right pane shows the diff for this file.
Showing the contents of a Commit
The behavior of a double click on a file in the lower right pane depends on the state of the compare mode toggle button. If it's on, a compare editor will be opened which compares the file content in the current commit with the content in the ancestor commit; if it's off, an editor will be opened showing the file content in the current commit.
Committing Changes
Modifications to a project under git version control are persisted in the git history through commits. Starting from the state checked out from the git repository modify your project until you have reached a state you are satisfied with and then commit all these changes into the repository as one single commit. Each commit represents a well defined snapshot of all the files stored in the repository.
Modifying the content
To modify a project which is already shared with Git modify or delete files either within Eclipse or directly in the file system. There is no need to tell Git in advance about these operations. New files which should be version-controlled have to be explicitly put under Git version control :
- click Team > Add in the file's context menu
Alternatively you may display untracked files in the Commit dialog and check the Show untracked Files checkbox to select them for inclusion into the commit.
Label decorators, e.g. in the Package Explorer View, show :
- untracked files which are not yet under git version control (marked with "?")
- files which have been added (marked with "+")
- modified files (marked with ">" in front of the filename)
For details see Label Decorations.
Here is an example in the Package Explorer for :
- a committed file
- a file modified in the working tree but not yet staged for the next commit
- a modified file which modifications have been staged for the next commit
- a file which has been newly staged for first-time inclusion with the next commit
- a file which is not under git version control
Committing
There are two ways to commit changes with EGit:
- using the Staging View, or
- using the Commit Dialog.
The Commit Dialog is considered deprecated and may be removed in future versions. Since EGit 4.4, the Team > Commit... context menu action by default opens the staging view instead of the commit dialog.
This behavior is, for the time being, configurable in the globalPreferences > Team > Git > Committing preferences.
If "Use Staging View to commit instead of Commit Dialog" is checked (the default setting), the Team > Commit... action will open the staging view. If it's unchecked, the commit dialog will be opened.
If the staging view is used an additional option "Automatically stage selected resources on commit" available since EGit 4.5 determines whether selected files should be automatically staged when Team > Commit... is invoked. This will stage all changes contained in the selected resources. It makes the behavior a bit more consistent with the way the commit dialog works: in the commit dialog, individual files can be checked or unchecked for inclusion in the commit, and selected files are checked by default. In the staging view, you compose your commit by staging changes, and only staged changes will be committed. Auto-staging thus includes the selected files automatically in the commit when the staging view is used.
The "Include selected untracked files" option determines whether selected files that are not yet in the git repository at all are included in the commit (checked in the commit dialog, or auto-staged in the staging view if auto-staging is on).
Committing with the Staging View
The preferred way to create commits with EGit is theStaging View since it always shows the current git status for the selected repository and allows to stage (add to git index) and unstage (remove from git index) modified files. Double click a file in the Unstaged Changes pane to compare it against the git index, double click a file in the Staged Changes pane to compare it's index version against HEAD. In the Staging View you can edit the commit message incrementally since it's a view and not a modal editor.
Committing using Commit Dialog
To commit a change click Team > Commit... in the context menu of a resource in the project.
Git tracks all changes made to the entire repository capturing the modifications of all version-controlled files in that repository not regarding if these files reside in the same Eclipse project or not.
Once you have triggered the commit the Commit Dialog will pop-up
Select the changes you want to commit, enter the commit message and to create the commit, press Ctrl+Enter (Command+Enter on Mac OS X) in the commit message text field, or click Commit.
Commit Message
In the Staging View or Commit Dialog you specify the commit message describing the change.
It is good practice to start the message with a short first line summarizing the change followed by a blank line and then the message body. In order to ensure that also git command line tools can format these messages nicely the lines shouldn't be formatted too wide (this is indicated by a grey vertical line).
The commit message text is checked for errors by the Eclipse spell checker. The spell checker can be configured via the EclipsePreferences > General > Editors > Text Editors > Spelling. PressCtrl+1 to open quick fixes which may help to fix the spelling errors.
The commit message editor supports content assist for file names shown in Files section of the commit dialog, which can be activated pressing Ctrl+Space.
Footer TagsIn the last paragraph of the commit message (i.e. after the last blank line), optional footer tags may follow:
Bug: 3176
Change-Id: I267b97ecccb5251cec54cec90207e075ab50503e
Reported-by: Joe Developer <joe@dev.org>
Signed-off-by: William Shakespeare <will.from@the.past>
The semantics of these tags are project or tool specific
- If there is an entry in a bug tracking system for the change to be committed it is a good idea to add it here as a bug tag
- Gerrit Code Review uses the_Change-Id:_ footer to correlate different patchsets of a change evolving during the review process towards the finally accepted patch. To generate a Gerrit Change-Id click Compute Change-Id for Gerrit Code Review; the ID will be generated on commit, until then a null Change-Id is shown as a placeholder. With the EGit configuration parameter gerrit.createchangeid set to true the corresponding checkbox in the Commit Dialog is always preselected. This parameter can be set on repository level, on system level or on user level. SeeRepository Configurationfor more information.
- The Signed-off-by: footer is used by many projects to create a formal track record of declarations that the signing author contributed the changes under the project's license and IP rules. This way the IP provenance of a project's evolving code base can be captured on a technical level. See e.g. the Developer Certificate Of Origin used by the Linux kernel project. If the EGit preference Insert Signed-off-by in Team > Git > Commit Dialog is set the corresponding checkbox in the Commit Dialog is always preselected.
Selecting changes to commit
- When you click Commit in the Staging View only staged changes will be committed. The native git command line works in the same way. All unstaged changes will stay untouched and remain in your working directory. This feature is often used to separate modifications done to a set of files into different commits.
- When you click Commit in the Commit Dialog you can use the checkbox in front of each file to decide if you want to include its changes into the new commit. If you clear the checkbox in front of a file, the changes to this file will not be included in the commit. The local file in your eclipse workspace will still contain the modifications giving you the chance to commit these changes with a subsequent commit.
One example: Imagine since the last commit you have fixed a bug in A.java and you have added a new method to B.java. These two modifications are logically independent from each other hence you may want to commit them in two independent commits. In this case you initate the commit, deselect B.java from the set of committed files and specify a commit message describing only the bugfix in A.java. After a successful first commit you just call commit again and the upcoming dialog will present you the remaining changes in B.java. Now you specify a commit message describing the addition of the method and finish the second commit.
In the Commit Dialog new files you added to the project which have not been explicitly added to version control (see "Modifying the content") will be listed in the commit dialog if you select the checkbox "Show untracked Files". If you select the checkbox in front of these files in the list they will be added to the repository and committed once you press the commit button. Files which are excluded by a .gitignore file will not be shown here. If you have no other changes in your repository than such untracked files the checkbox Show untracked Files is selected by default.
Amending Commits
If you recognize that you missed something when committing a change you may fix this: open the staging view or commit dialog again and specify that the current commit shall "amend" the previous commit in the current branch. The new commit will then replace the previous one. This feature is often used to correct incorrect commits before they are published to other repositories.
Note: do not amend commits if they have already been published to a shared repository since this may disturb others if they already based their changes on the published change.
**Amend example:**Imagine you have committed a change to a file containing a typo
After committing the change you detect a typo. In order to correct this typo and the corresponding commit you just fix the typo in the source file
Then open the Staging View or Commit Dialog again and select the Amend Previous Commit icon in the toolbar.
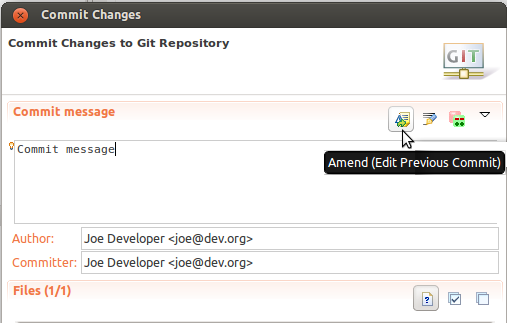
The commit message of your previous commit (the one you want to replace) is then filled into the "Commit Message" field. This gives you the chance not only to correct errors in the content of the version-controlled files but to also correct errors (e.g. typos) in the commit message describing your change.
As an alternative to amending you could just commit the corrected version as a subsequent commit. But the first commit containing the typo is of no use to anybody and in order not to clutter the history of your project with unneeded commits you should amend the commit.
Be aware that amending commits which are already published to other repositories may cause trouble. Once you have pushed a commit to a remote repository or your local repository was cloned by somebody else, you should be very careful with amending commits. In this case publishing a second commit which corrects the first one is probably a better solution. Otherwise inform all others that you amended a published commit so that they can react accordingly.
Reverting Changes
Reverting changes in the working tree
Replace with File in Git Index
Changes which are not yet committed and not yet staged can be reverted for a set of selected files. Select the file(s) in the Package Explorer or an analogous view and click Replace With > File in Git Index.
Replace with HEAD
Click Replace With > HEAD to replace the selected files with their HEAD version. You can also use Reset to with option hard to forcefully reset the entire working tree of your repository back to the state of the HEAD commit (See "Resetting your current HEAD" below). This operation will revert all changes in the working tree and the index.
Replace with Branch, Tag or Reference
Click Replace With > Branch, Tag or Reference to replace the selected files with their version corresponding to a branch, tag or reference.
Replace with Commit
Click Replace With > Commit to replace the selected files with their version corresponding to a selected commit.
Replace with Previous Revision
Changes that are already staged or even committed can be "reverted" by replacing them with a version from the previous commit. Select a single resource in the Package Explorer or an analogous view and clickReplace With > Previous Revision. The repository will determine the last commit that modified the selected resource and offer to replace the workspace resource with the contents of this commit.
This is mainly intended for "removing" single files from a commit (when committing the reverted workspace resources, they are effectively removed from the current commit). Even though this also works on folders and projects, the results of replacing a folder or project with a "previous revision" may be unexpected.
Revert using quickdiff
The quickdiff feature can be used to revert individual changes to a file. You can revert by line, block (se range of changes lines) or selection. Select all text and then Revert selection to revert a whole file.
Reverting changes introduced by a specific commit
Changes which are introduced by a given commit can be reverted by an automatically created new commit on top of the currently checked out commit. The commit which is to be reverted does not have to be checked out for that.
Select the commit in the History View, open the context menu and selectRevert Commit. This reverts the changes that the selected commit introduces by creating a new commit on top of the currently checked out commit.
Resetting your current HEAD
Git offers the possibility to reset the HEAD of the current branch to any other commit. It optionally resets the index and the working tree to match that commit. Note that this action affects all files and folders in the entire repository.
You have the option to do a hard reset, a mixed reset and a soft reset.
- soft - the HEAD points now to the new commit, the index and the working tree are unchanged
- mixed - the HEAD points now to the new commit, the index is updated, the working tree is unchanged
- hard - the HEAD points now to the new commit, the index and the working tree are updated
Reset to specific branch or tag
Select Team -> Reset... on a project. This opens a dialog where you can select a branch or a tag.
Reset to a specific commit
Select a commit in the History view and open the context menu. Here you find the entries Hard reset, Mixed reset and Soft reset.
Revert all local and staged changes
This can be done using a hard reset. If you reset to the current HEAD (normally the last commit on your branch) with the option hard you reset the currently checked out branch to this commit and overwrite the working tree and the index with the content of HEAD. You can do this in three ways:
- Select Team > Reset... on a project. In the dialog select HEAD or your current branch and switch the radio button to hard.
- Right click and select Reset... on any branch or tag in the Repositories view. This opens a dialog which lets you decide on the reset type. Choose hard here.
- Open the context menu on the HEAD commit in the history view and select Hard Reset.
Branching
General remarks about branches
Committing changes to a local repository is impractical without using a local branch (see concepts section above). Furthermore, by using several different branches, it is possible to work on different changes in parallel by switching among these branches.
Thus, before starting to change the local repository, the first step is typically to create a local branch. Local branches are "based upon" either a commit or a remote tracking branch.
The second option is recommended when working with remote repositories, as it simplifies the task of synchronizing the local changes with the remote ones by adding so-called "upstream configuration" to the new local branch.
See Branch Creation dialog for more details.
Upstream configuration
Each local branch which is based on a local tracking branch can have some additional configuration indicating the remote repository, the remote branch, and the so-called pull strategy. SeeBranch Creation dialog for more details.
Typically, this configuration is created automatically when creating the local branch based on a remote tracking branch. However, it can be displayed and edited in therepository configuration or by clickingShow In > Properties on a branch in the Repositories View.
Checking out an existing Branch
From the team menu on a project node
- Select Team > Switch To... and select a branch name from the list
If there are too many branches the list does not show all of them. In this case
- Select Team > Switch To... > Other...
- On the dialog, select a branch, a tag or a Reference
- Click Ok
From the Git Repositories View
- click Checkout on a branch node
- or double click a branch node
From the History View
- Click Checkout on a commit which has a branch label
- If more than one branch point to the commit a dialog will let you decide which branch to check out.
Creating a New Local Branch
This is always done with theBranch Creation dialog. The newly created branch can optionally be checked out by selecting a check box on the dialog.
From the team menu
- Select Team > Switch To... > New Branch....
- On the dialog, select a branch, a tag or a Reference.
- Click Create Branch....
- The Branch Creation dialogwill be opened.
From the Repositories View
- Select Create Branch... on the "Branches" node or on any "Branch", "Tag" or "References" node.
- The Branch Creation dialogwill be opened.
From the History View
- Select Create Branch...
- The Branch Creation dialogwill be opened
Renaming an Existing Branch
From the Team menu on a Project node
- Select Team > Advanced > Rename Branch...
- On the branch selection dialog, select the branch to rename
- Enter the new branch name and click OK
From the Repositories View
- Open the Git Repositories View
- Select Rename Branch... or press F2 on the branch you want to rename
- Enter the new branch name and click OK
From the History View
- Select Rename Branch... on a commit with a branch label
- Enter the new branch name and click Ok
Deleting a Branch
All the actions below show the same behavior with respect to the following:
- The currently checked out branch can not be deleted
- If deletion of the branch may result in data loss, a warning is displayed that must be confirmed
- EGit assumes a potential data loss if the branch points to a commit that is not reachable from the currently checked out commit
From the Team Menu on a Project node
- Select Team > Advanced > Delete Branch...
- Select the branch to delete from the dialog being displayed and press Ok
From the Repositories View
- Open the Git Repositories View
- Select Delete Branch on the branch you want to delete
From the History View
- Select Delete Branch on a commit with a branch label
- If multiple branches point to the commit, a selection dialog will be shown on which you can select the branches to delete
Branch Creation Dialog
There are several actions available to create a local branch. All these actions use the Branch Creation dialog:
Enter the name of the local branch you want to create. If a source branch is selected which is a remote tracking branch EGit will suggest to create the new local branch with the same name.
Click Select... to select the source branch the new branch shall be based on. Typically, this is a remote tracking branch, but it could be any branch or commit in the repository (selecting a local branch is not recommended if you are working with a remote repository). If you want to base the new branch on a commit no branch is referring to then clickCreate Branch... from the commit shown in the History View.
When a source branch is selected you can configure the "upstream configuration" of the new branch which is helpful when fetching and pushing, but particularly when pulling. Depending on the selected option the following configuration can be chosen:
- "Merge upstream commits into local branch": When pulling, the changes will be fetched from upstream and the remote tracking branch will be updated. Then the current local branch will be merged with the new changes. This is the default if the new branch is based on a remote tracking branch (but this default may be overridden by specific repository configuration)
- "Rebase commits of local branch onto upstream": When pulling, new changes will be fetched from upstream and the remote tracking branch will be updated. Then the current local branch will be rebased onto the updated remote tracking branch
- if you uncheck the option "Configure upstream for push and pull"): When pulling, no specific upstream configuration will be done for the new branch; however, if a default remote exists (a remote with name "origin", pull will try to use the configuration of this remote; this is the default if the new branch is not based on a remote tracking branch
You may view and edit the upstream configuration in therepository configuration or by selectingShow In > Properties on a branch in the Repositories View.
EGit also supports the git configuration parameterbranch.autosetuprebase, set it to always if you want to use the rebase pull strategy by default. If you set this in the repository configuration this is used for all local branches created based on a remote tracking branch in this repository, if you set it in your user configuration it will be used for all your repositories.
In the lower part, you can decide whether the new branch shall be checked out immediately.
Configure Branch Dialog
Click Configure Branch... on a branch in the Repositories View in order to change the upstream configuration of a local branch. Select which remote ("." means the local repository) and branch the selected local branch should track. Check "Rebase" if you want pull to rebase the local branch onto new changes arriving for the tracked branch, otherwise pull will merge new changes arriving for the tracked branch.
Merging
A merge incorporates changes from another branch or tag, since the time their histories diverged from the current branch, into the currently checked out branch.
Merging a branch or a tag into the current branch
You can trigger merge from:
- the History View
- the Team menu
- the Git Repositories View
Starting merge from the History View
This is the recommended view to start a merge since it shows you the history of your repository. Ensure that the toggle buttons Show all changes in repository and Show all Branches and Tags are selected in the History View's toolbar. This ensures that you see the complete history of your repository in order to decide which branch you want to merge. Select the commit with the branch or tag label you want to merge and click Merge.
Starting merge from the Team menu
In the Package Explorer or Navigator, open the context menu on a project node. Select Team > Merge...
Now the merge dialog opens:
On the dialog, select a branch or a tag you want to merge with your current branch. This dialog also allows you to select merge squash and fast-forward options.
Starting merge from the Git Repositories View
You can trigger a merge from any branch and tag node and from the repository node if you have checked out a local branch. SeeMerging a Branch or a Tag for further details.
Merge options
The following fast-forward configuration options for merge are recognized by EGit, which are used for all branches:
[merge] ff = true|false|only
When you only want to configure it for a certain branch, use the following:
[branch "name"] mergeoptions = --ff|--no-ff|--ff-only
fast-forward options ff = true or mergeoptions = --ff : When the merge resolves as a fast-forward, only update the branch pointer, without creating a merge commit. This is the default behavior.
ff = false or mergeoptions = --no-ff : Create a merge commit even when the merge resolves as a fast-forward.
ff = only or mergeoptions = --ff-only : Refuse to merge and abort the merge operation unless the current HEAD is already up-to-date or the merge can be resolved as a fast-forward.
When you start merge from the Team menu "Team > Merge..." you can set the fast-forward, squash or no-commit merge options in the merge dialog:
Possible merge results
After pressing the Merge button, the following scenarios can occur:
- Already up to date: Your current branch points to a commit that has the selected branch or tag as predecessor. In this case nothing is changed.
- Fast-forward: Your current branch points to a commit that is a predecessor of the selected branch or tag. In this case your branch is moved and points to the selected branch or tag; this new HEAD is checked out to the working tree. Fast-forward is very common when working with remote repositories: When a remote tracking branch is updated, the merge with the corresponding branch generally is a fast-forward. You can perform a pull by fetching the remote branch (e.g. origin/master) and merging it into the corresponding local branch (e.g. master).
- Real merge: When neither of the conditions above apply egit triggers a merge of the commits. There are two possible outcomes: If no conflicts occur the current branch will point to a newly created merge commit; if conflicts occur the conflicting files will be marked with label decorators (seeResolving a merge conflictfor further actions in case of merge conflicts).
Merge Result dialog
The result of a merge is summarized in a dialog:
On the first line you see the result of the merge. The possible results are "Already-up-to-date", "Fast-forward", "Merged", "Conflicting" or "Failed". A possible reason for "Failed" may be that there are conflicting changes in the working directory.
On the second line you see the new HEAD commit in case of a successful merge (Already-up-to-date, Fast-forward or Merged).
In the table you see the commits which were merged.
Resolving a merge conflict
A merge can result in conflicts which require user action. This is the case when the content of files cannot be merged automatically. These conflicts are marked with a label decoration in the Staging View. Using the Staging View to find the files with conflicts in order to resolve them is handy since the Staging View shows only modified files so that you don't have to wade through all of your resources but only those which might need your attention for resolving the conflicts.
Also the conflicting resources are decorated in the navigation trees like Project Explorer or Package Explorer views
The merge conflicts in the content of files are presented with textual conflict markers (seehttp://www.kernel.org/pub/software/scm/git/docs/git-merge.html#_how_conflicts_are_presentedfor more details).
Using Merge Tool
- select the top level resource showing the red conflict label decorator
- click Team > Merge Tool
- select the merge mode Use HEAD (the last local version) of conflicting files and click OK
- the merge editor opens showing the working tree version in the left pane and the version to be merged in the right pane
- edit the working tree version until you are happy with it
- Team > Add the merged resource to mark the conflict as resolved
- commit the merge commit via Team > Commit
Manual conflict resolution
To resolve a conflict you have to do the following steps:
- Navigate to the conflicting resource
- Edit the content of the conflicting resource
- Tell EGit that the conflict is resolved with Team > Add
- Commit the conflict resolution with Team > Commit
Finding conflicting files
A repository which contains conflicting files has the textual label decorator "|Conflicts" attached to the repository name. Conflicting resources and folders containing such conflicting resources get a conflict label decoration.
Alternativley, it's easy to find a list of all conflicting files in the staging area. Open the Git Staging view. The conflicting files with decorators will be seen on the left.
Editing conflicting files
In the file content, the area where a pair of conflicting changes happened is marked with markers <<<<<<<, =======, and>>>>>>>. The part before the ======= is typically your side, and the part afterwards is typically their side (seehttp://www.kernel.org/pub/software/scm/git/docs/git-merge.html#_how_conflicts_are_presentedfor more details).
Open the file in an editor, edit the content and save the editor.
Note that this step is not mandatory. EGit does not check the content to decide if a conflict is resolved. The next step is the relevant one.
Adding conflict resolution to the git index
Once you are finished with editing a file either click Add to Indexin the Staging View or click Team > Add to add the conflict resolution to the git index. This will also mark the corresponding conflict as resolved.
When you have resolved all conflicts the textual repository label decoration changes to "Merged". There are no conflict markers anymore.
Committing a merge
When the repository is in state "Merged" (as is indicated with the textual label decorator "|Conflicts" attached to the repository name) the merge can finally be committed.
In the Staging View you may want to remove the conflict remarks from the standard merge commit message which is generated by the merge operation and update the commit message if necessary. Then click Commit in order to commit the conflict resolution.
If you want to use the Commit Dialog to commit the conflict resolution click Team > Commit... anywhere in the navigation tree. The commit dialog opens with a slightly different look compared to a normal commit:
- The Commit message area is prefilled with a standard merge commit message.
- It is not possible to amend a previous commit.
- It is not possible to add untracked files.
- it is not possible to uncheck the checkboxes. This guarantees that all resolved conflicts are committed.
After pressing the "Commit" Button the merge is completed.
Aborting Merge
If a merge resulted in conflicts you can abort the merge with a hard reset to the current branch. This can be done in state "Conflicts" and in state "Merged", i.e. before and after you have resolved the conflicts.
The hard reset can be done from the team menu, the Git Repositories View or the History View. SeeRevert all local and staged changesfor more details.
Rebasing
Rebase Introduction
Rebase applies a chain of commits onto a given commit. A typical scenario is the development of some feature on a "topic" branch which was created from a "master" branch at some point in time. When "master" is updated with changes e.g. from other developers while "topic" is still under development, it may become necessary to incorporate these changes into "topic". Let's assume we start development on "topic" by creating the "topic" branch from master. At this point, both "master" and "topic" point to commit "E". When the first commit ("A") is added to "topic", the commit history of the repository looks like this:
Now, let's assume that there were some more commits on "topic" and as well some more commits on "master" (for example, "master" may track some remote repository and there were some changes in that remote repository that have been pulled into "master"):
          A---B---C topic
         /
    D---E---F---G master
Now, in order to incorporate the changes in "master" into "topic", a Rebase of "topic" onto "master" would produce
                  A'--B'--C' topic
                 /
    D---E---F---G master
Technically, the sequence of commits that are contained in "topic" but not in "master" are applied (that is, cherry-picked) on top of "master" one by one. Note that the commits A, B, C are neither lost nor changed, instead a new chain of commits A', B', C' with the same changes and commit messages as the original commits (but different commit IDs) will be created. The old commits A, B, C are still around in the object database but not visible anymore as they are no longer reachable from any branch. A', B', C' are different from the old ones as they now also contain changes F and G.
Rebase, A Simple Example
Let's have a look at some simple example: we have a text file "FamousWords.txt" which initially might have some content like
Chapter 1
Once upon a time...

Chapter 2
To be or not to be
Now, in "topic", two commits are created, the first one adding a French translation to Chapter 2, and another one adding a German translation:
After first change in "topic":
Chapter 1
Once upon a time...

Chapter 2
To be or not to be
Être ou ne pas être
After second change in "topic":
Chapter 1
Once upon a time...

Chapter 2
To be or not to be
Être ou ne pas être
Sein oder nicht sein
At the same time, the file was changed in "master" by adding two commits adding French and German translations to Chapter 1:
Chapter 1
Once upon a time...
Il était une fois
Es war einmal

Chapter 2
To be or not to be
The commit history looks like this:
Now, if "topic" is rebased onto "master", the two changes in topic are applied in the same sequence as they were applied during the evolution of "topic".
The result is a merged version of "FamousWords.txt":
Chapter 1
Once upon a time...
Il était une fois
Es war einmal

Chapter 2
To be or not to be
Être ou ne pas être
Sein oder nicht sein
and a commit history with the commit history of "topic" on top of the current "master":
The Real World: Rebase Conflicts
Up to now, we have assumed that the changes in "topic" can be auto-merged into "master". In the real world, however, it may happen that you encounter conflicts during rebase. Now, if a commit that is to be cherry-picked contains changes that conflict with changes in "master", the rebase operation is interrupted after applying the conflicting change; the conflicts are visualized in the usual way (with conflict markers) and the user gets a chance to decide whether to
- resolve these conflicts manually,
- skip the current commit, or
- abort the rebase completely
If Resolve Conflicts is chosen, and the conflicts have been resolved manually, the changes must be "Added", and then rebase can be resumed, i.e. the next commit in the chain will be applied.
If Skip was chosen, the conflicting changes will be reverted and the next commit in the chain will be applied.
If Abort was chosen, the rebase operation will be completely rolled back, returning the Repository into its original state before the rebase was started. This process is repeated until the last commit was applied successfully or skipped. Finally, the "topic" branch will be changed to point to the last commit.
To understand "Skip" better, let's look back to the introduction above. If we assume that commit "B" causes some conflicts with the current "master", the user might decide to simply skip "B"; the new commit history after the rebase would then look like this:
                  A'--C' topic
                 /
    D---E---F---G master
Starting Rebase
In the History View:
- Checkout the branch you want to rebase
- Select the commit onto which you want to rebase the checked out branch. This commit will become the new base for all commits being rebased
- Click Rebase
In the Git Repositories View: On Repository nodes, **Rebase...**opens a dialog asking the user to select a branch that is not checked out; the currently checked out branch will then be rebased onto the selected branch. On "Branch" nodes (both Local and Remote Tracking branches, but not on the currently checked out branch), Rebaseimmediately rebases the currently checked out branch onto the selected branch:
Rebase Confirmation Dialog
If Rebase was successful, a confirmation dialog will be displayed; this dialog can be suppressed by ticking a checkbox; a preference on the Git preference page allows to make the dialogs appear again. If the dialog is suppressed, an "Information" message is written to the Eclipse log instead.
Rebase Conflicts
If a conflict occurs during rebase, a dialog is shown giving some information about the commit that caused the conflict. By selecting a radio button, you can decide whether to
- Start the Merge Tool to resolve the conflicts manually
- Skip the current commit
- Abort the rebase altogether
- Do nothing (return to the workbench), this is equivalent to hitting "Escape":
Unless Skip or Abort was chosen in the dialog, the conflicts must be resolved manually by editing the conflicting files. When done with editing, the files must be declared as being resolved by adding them to the git index.
If you canceled the rebase wizard the easiest way to find the files with conflicts is using the Staging View. Click Merge Tool on the file with conflicts to open the merge tool for this file. The Merge Tool can also be started from the corresponding entry in the Team menu.
Edit the file until you are happy with the conflict resolution and clickAdd to Index on the corresponding entry in the Staging View. This stages the conflict resolution and marks the conflict resolved.
After all conflicts have been resolved, the Continue operation gets enabled. In order to continue the rebase operation which was stopped due to conflicts click the Continue button in the Staging View or clickRebase > Continue on the repository node in the Repositories View.
If instead of resolving conflicts you want to skip the commit which caused the conflicts click Skip instead.
If you want to abort the ongoing rebase operation click Abort. This reverts everything to the state before you started rebase.
Aborting Rebase
As long as the Repository is in "Rebasing" state, the user can always abort the rebase in the Git Repositories View using the menu action "Rebase > Abort" which is available on the Repository node.
Interactive Rebase
Synopsis
Interactive rebase allows to quickly edit a series of commits using the following actions defined in a rebase plan:
- pick to define the order of commits, moving pick entries enables reordering
- skip to remove a commit
- edit to amend a commit
- reword to edit a commit's message
- squash to squash a commit with its predecessor commit and including their commit messages
- fixup to squash a commit's diff into its predecessor discarding the squashed commit's message
Warning: don't rewrite commits you have already published on a remote repository, it's considered a bad practice for all but experimental or review branches since your colleagues may have already based their work on these published commits and you would force them to also rewrite their changes. Though it's a tool frequently used on review branches e.g. when using Gerrit to rework changes which have to be improved based on review feedback.
Starting interactive rebase
First checkout the local branch (here branch toRebase) containing the commit series you want to edit. Then open the History View for this repository and click Interactive Rebase on the commit preceding the oldest commit you want to rewrite. Often this is the one origin/master points at.
This opens the new view Git Interactive Rebase showing the rebase plan populated with the commits to be modified in topological order in the sequence they will be processed during the rebase operation. The initial action for all commits is Pick which would cherry-pick the corresponding commit. Note that EGit also rewinds HEAD to the commit preceding the first one in the edit list in order to prepare the repository for rebasing.
Planning rebase
Here the initial rebase plan, the first commit to be applied on the rewound HEAD comes first and then all the other commits to be rebased in the order they will be applied when clicking "Start".
Next we prepare the rebase plan, moving commits up and down using the arrow buttons to reorder commits and choosing the rebase action we want to apply on the commits we want to tweak.
In this example I first reordered the commits so that the implementation of new calculator operations immediately precedes the commit implementing tests for the respective operation.
Here what I want to modify in this series of commits:
I want to skip commit "TODO list" since it contains a private todo list I used while implementing the operations and I don't need this anymore. I need to amend commit "Add divide operation" since it's buggy, this was revealed by the corresponding test which was implemented in a later change, hence I select action Edit here the commit "Add multiply opration" obviously has a typo in the commit message header so I chooseReword. I want to squash commit de7647b into its predecessor since it doesn't make sense to have the JavaDoc fix separate from the implementation of what it describes, hence I choose Squash to squash it with its predecessor.
Executing interactive rebase
When you're done planning the rebase click Start to start execution of the rebase command. EGit will process the plan and stop at the commits where you have selected actions which need your intervention to interactively edit the corresponding commit.
In our little example rebase stops the first time on commit "Add divide operation" since we signaled that we want to edit it. The last picked commit is highlighted in bold. At this time the first step skipping the commit "TODO list" was already processed and this commit is no longer in our commit series we are rewriting while executing rebase. Also the commit "Add divide operation" was already cherry-picked since we want to amend it. Note that EGit has already selected the "Amend" option in the Staging View in order to prepare amending this commit.
Now we fix the bug in this commit, stage the changes needed to fix the bug, adjust the commit message if necessary and click Commit in order to amend the buggy commit.
Let's have a look at the History View to see the resulting commit graph. HEAD now points at the rewritten fixed commit "Add divide operation", note that its SHA1 is different from its original version since we rewrote the commit to fix the bug.
Next we click Continue in order to resume processing the rebase plan. Rebase picks the commits "Divide test" and "Add multiply opration" and stops again raising a commit message editor so that we can fix the typo in the commit message of the latter commit.
Edit the commit message to fix the typo and click OK in order to amend the commit message and resume processing.
Rebase picks the next 3 commits, squashes the commits "add power" and "Fix javadoc for power operation" into one new commit and stops again so that we can prepare the commit message of the new commit. Its initialized with the concatenation of the messages of the commits being squashed.
Edit the squashed commit's message and click OK to resume processing.
Rebase picks the final commit "Power test" and completes successfully.
Finally lets have another look in the History View to examine the result of the interactive rebase command. Compare the rewritten series of commits now contained in branch "toRebase" with the old commit series still visible since I have placed another local branch "start" there in order to keep the old series visible.
Safety Instructions
If you happen to go wrong during this multi-step process you can always hit Abort in order to stop the rebase operation in progress and roll back to the starting point.
When you are starting to use this feature it's maybe a good idea to place a second local branch on the starting point (as I showed in this example) to make it more obvious what's going on until you are familiar with this powerful git command.
Rebase with auto-stashing
EGit also supports the Git configuration option rebase.autostash. Set this option rebase.autostash = true to automatically create a temporary stash before a rebase operation begins, and apply it after the operation ends. This means that you can run rebase and also interactive rebase on a dirty worktree. However, use with care: the final stash application after a successful rebase might result in non-trivial conflicts.
Cherry Picking
Cherry-pick Introduction
A given commit C on branch stable-1.0 contains a set of changes you would like to integrate in your current development on branch master.
                  A--B--C--D stable-1.0
                 /
    D---E---F---G master HEAD
Cherry-pick the commit C to create a new commit C' on top of the head commit of the currently checked out branch master. C' will then contain the changes performed in C applied onto the HEAD of the currently checked out branch master.
                  A--B--C--D stable-1.0
                 /
    D---E---F---G--C' master HEAD
Cherry-pick Example
You are currently working on branch "feature2" (HEAD). There is a commit "feature 1" in another branch. You want to integrate the changes performed by commit "feature 1" into your current development on branch "feature 2".
- In the History View select commit "feature 1" and clickCherry-pick:
- As result you get a new commit "feature 1" at the tip of your current branch "feature" containing the changes of "feature 1":
- Cherry-picking can encounter conflicts. In this case conflict markers are rendered into the affected sources:
- Open the Staging View to quickly find the conflicting files.
- Click Merge Tool on a file with conflicts to open the merge tool for this file
- Resolve the conflicts by editing the corresponding sources in the same way as described inResolving a merge conflict
- Add the files you edited to mark the conflicts resolved
- Commit the conflict resolution
Tagging
Creating a Tag
- Open the History View and click Create Tag... on the commit you want to tag
- Enter the tag name
- Enter the tag message
- Click OK to create the annotated tag
To create a lightweight tag storing neither message nor author information leave the tag message empty.
Tags can also be created from the team menu, click Team > Advanced > Tag..., enter the tag name and message, select the commit you want to tag (default is HEAD) and click OK.
Replacing an Existing Tag
What to do if you tagged the wrong commit or ended up with some sort of typo ?
- If you didn't yet push this out just replace the tag and you are done.
- If it's already published you shouldn't replace the tag but use a new name since otherwise you have to tell everybody who got the old tag to replace it manually with your updated one. This is because, Git does not (and it should not) change tags behind users back. So if somebody already got the old tag, doing a git pull on your tree shouldn't just make them overwrite the old one.
So if your old tag wasn't yet pushed you may correct it in the following way :
- In the History View click Tag... on the commit you want to place the tag on
- Select the tag you want to replace from the list of existing tags
- or start typing any part of the tag you look for into the Tag Name field, this will filter the list of existing tags to those tags which contain the string you are typing, then select the tag you want to replace
- Mark the checkbox Force replace existing tag
- Change the tag and press OK
You can also change annotated tags into lightweight tags by removing the message or vice versa by adding a message.
Deletion of tags
In order to delete a tag, select the tag to be deleted and clickDelete Tag.
Note: it's a bad practice to delete tags which have already been published on a public server, some Git servers even disallow tag deletion to ensure traceability for releases which are usually tagged. Also see the section "On re-tagging" in the Git reference documentation of the tag command.
Light-weight and Signed Tags
Light-weight tags are shown in the Repositories View as well as in the Create Tag dialog. Tags are shown with a blue icon in the Repositories View; annotated tags are decorated with a yellow person icon.
In the History View, tags are shown as yellow labels.
Signed tags are not yet supported by EGit, use command line**git`` ``tag`` ``-s** instead.
Patches
Creating Patches
"A patch is a piece of software designed to fix problems with, or update a computer program or its supporting data" (wikipedia). A patch file contains a description of changes of a set of resources which can be automatically applied to another eclipse workspace or git repository.
The patch formats used by eclipse (Team > Apply Patch) and by git (git`` ``apply or git`` ``am on the command line) are different. It is possible to create both types of a patch in EGit.
Create a Patch from a Commit
This is the most common use case for a distributed versioning system. A developer commits a change on a local feature or bugfix branch and wants to export this change into a patch file.
It can be done from the history view:
The patch file will contain the difference between the commit and its parent in the history view. Note that the filter of the history view applies also for patch creation.
Patch Wizard
The Wizard consists of two pages. Page one lets you select the location of the patch:
The name of the patch file is created from the first line of the commit message.
On the second page you can change the patch format.
Currently there is one check box: Export in git patch format.
- If you do not check it (this is the default) the patch can be applied with the eclipse Apply Patch... wizard. The paths are relative to the eclipse projects and do not contain prefixes (like**
git format-patch --no-prefix** on the git command line). - If you check it the patch will look like the result of**
git format-patch --no-stat** on the git command line.
Binary diffs are currently not produced.
Applying Patches
Currently EGit isn't able to apply patches in git format. It is possible to apply patches using the standard Eclipse (unified diff) format usingTeam > Apply Patch.... Git patches may contain non-standard extensions for rename and binary diffs. The current version of EGit does not generate these extensions.
Managing Repositories
The "Git Repositories View" is the primary UI element to facilitate working with multiple Repositories simultaneously (i.e. within one Eclipse Workspace).
This view can be opened using the menu pathWindow > Show View > Other... > Git > Git Repositories
It is also part of the "Git Repository Exploring" perspective available using menu pathWindow > Open Perspective > Other... > Git Repository Exploring
If you already have projects in your workspace which are shared with a Git Repository, you can useTeam > Show in Repositories View
on any resource to open the view.
Adding Repositories to the Git Repositories View
Initially, the Git Repositories View is empty. In order to add Repositories to it, there are several options:
- Adding a Repository from the Local File System manually
- Cloning a Repository and having the cloned Repository added to the view automatically
- Creating a Repository on the Local File System
- Adding a Repository by pasting a Git Repository path to the view
Adding a Repository manually
You can add a Repository from your local file system to the Git Repositories View without cloning it. This can be helpful if you are setting up a new Eclipse workspace and want to re-use your Git Repositories. Use the Add an existing Git Repository button from the view's toolbar:
A dialog will appear prompting you for a directory of your local file system. After selecting the correct directory, you can hit theSearch button to see a list of Git Repositories in this directory. You can then select some or all found Repositories and add them to the view using OK:
Cloning a Repository
In order to clone a Repository, refer toCloning remote Repositories. After a successful clone operation, the newly cloned Repository should appear in the Git Repositories View automatically.
You can also use the Clone a Git Repository button from the view's toolbar to start the Clone wizard:
Please refer to Cloning remote Repositoriesabout how to use the wizard.
Creating a Repository
You can create a new, empty repository on the local file system. This is useful if you later on want to create one or more new projects below this repository. Another usecase is to create a new bare repository where you can push to. Use the Create a new Git Repository button from the view's toolbar:
A dialog will appear which lets you choose a directory:
If you select the checkbox Create as Bare Repository the new repository will not have a working directory. You then can only add content by pushing changes from another repository.
Adding a Repository using Copy and Paste
As a shortcut, it is also possible to paste the local file system path of a Git repository from the clipboard into this view. In order to do so, copy the path of a Git repository (the full path of its .gitfolder) to the clipboard, then open the context menu on the view panel:
or click Edit > Paste from the main menu (or the corresponding keyboard shortcut). If the clipboard content is not suitable, an error popup will be displayed, otherwise the added Repository should appear automatically.
After the view has been populated with some repositories, it should look like this:
Removing Repositories
Removing a Repository from the Repositories View
In order to remove a repository from the Repositories View select a repository and click "Remove Repository"
Deleting a Repository
In order to delete a repository, select it in the Repositories View and click "Delete Repository".
Then confirm that you want to delete the repository and decide if you want to delete the repository's working directory with the projects contained in the repository from the Eclipse workspace.
Attention: deleting the working tree (second checkbox) along with the repository (the .git directory; first checkbox) of course removes everything contained in that working tree directory. This includes Eclipse projects that were ever shared (seeAdding a project to version control) with that git repository, even if later disconnected (Team→Disconnect)! Sharing a project copies it into the git working tree; disconnecting it does not copy it back.
Structure of the Git Repositories View
The following screenshot shows the topmost two levels of the Git Repositories View:
The root node represents the Repository itself. The node text indicates the name of the Repository and its location in the local file system. The "Branches" and "Tags" nodes allow browsing and manipulation of tags and branches. The "References" node lists other references which are not branches or tags, most notably the "HEAD" and "FETCH_HEAD" symbolic references (see Git References).
The "Working Directory" node displays the location and structure of the working directory on the local file system (only in case of a development, or non-bare Repository, for bare Repositories, this node is always a leaf).
Finally, the "Remotes" node allows browsing and manipulating the remote configurations used for Fetch and Push.
Repository Groups
The repositories shown in the Git Repositories View can also be organized into groups. Groups are like logical folders; they are a purely visual structuring aid: moving a repository into or out of a group does not move the repository on disk. A group does not have a folder on the disk.
Repository groups can be created via the context menu, sub-menu "Repository Groups", or via the view menu, entry "Create Repository Group...". Repositories can be moved into or between groups by drag'n'drop or via the context menu. Dragging a repository from a group into the white unused area of the view moves the repository out of the group, back to top-level. Groups can be renamed or deleted via the context menu. Deleting a group never deletes the repositories contained, those just go back to the top level. Nested groups are not supported.
Functions of the Git Repositories View
Project Import
In order to work with the contents of a Git Repository, its files and folders must be imported into the Eclipse workspace in the form of projects. While the Git Clone wizard allows to do such imports directly after cloning, the Git Repositories View allows to trigger project imports independently of the clone operation.
The "Import Projects..." context menu is available on the "Repository" node as well as on any "Folder" node within the "Working Directory" node and the "Working Directory" node itself:
The rationale for offering the Import Projects... action on several nodes is that some of the wizards used for importing projects can take the file system directory into account, for example the Import Existing Projects wizard. If the import is started from the "Repository" or the "Working Directory" node, the working directory of the repository is set as context, otherwise the directory corresponding to the currently selected "Folder" node.
The details of project import are discussed inUse the New Projects Wizard.
Branch and Tag Support
The "Branches" node allows to create, browse, checkout and delete local and remote branches. The "Tags" node allows to browse and check out tags. Both the "Branches" node and the "Tags" node allow to merge the branch or tag into the currently checked out branch and also to synchronize with the currently checked out branch.
For better readability, branches are organized in two sub-nodes for local and remote branches, respectively, and only the shortened names are displayed, e.g. instead of "refs/heads/master" you would find an entry "master" under the "Local Branches" node, instead of"refs/remotes/origin/master" the shortened name "origin/master" is displayed under the "Remote Branches" node. Similarly, tag names are shortened by omitting the "refs/tags/" prefix:
Check-out of Branches and Tags
Branches and tags can be checked out by either double-clicking on the respective node or by selecting the corresponding context menu entry.
Creation and Deletion of Branches
Local branches can be created using theBranch Creation Dialog. The wizard is opened by right-clicking on the "Branches", the "Local Branches" on any "Branch" and "Tag" node).
Branch deletion is done using the corresponding context menu entry.
Rebasing
You can trigger rebasing of the currently checked-out branch onto another branch by right-clicking Rebase on any (local or remote tracking) branch node.
Merging a Branch or a Tag
You can trigger a merge from any branch and tag node and from the repository node if you have checked out a local branch. SeeMerging for further details of the merging features.
- When you select any branch node other than the currently checked out branch or any tag node, use Merge to directly trigger a merge into the currently checked out branch.
- When you select the repository node or the currently checked out branch, use Merge... to open the merge dialog. The merge dialog is described atMerging a branch or a tag into the current branch.
Synchronizing with a Branch or a Tag
You can perform a comparison of the changes in your HEAD with the changes done in any other branch or tag. Right click and selectSynchronize... on any branch or tag. Then the eclipse synchronize view opens which contains a representation of the changes that are contained in your HEAD but not on the other branch or tag (outgoing change) or vice versa (incoming change). Please refer to the documentation of the synchronize feature for further details.
Determining the Checked-out Branch
There are two ways to determine which branch or tag is currently checked out: the checked out branch/tag node is decorated with a little check mark and the "HEAD" entry under the "Symbolic References" node shows the (full) name of the checked out branch:
Resetting to a Branch or a Tag
Right click and select Reset... on any branch or tag. This opens a dialog which lets you decide on the reset type. SeeResetting you current HEAD for further details.
"Detached" HEAD
If HEAD is "detached", i.e. is not pointing to the tip of a local branch but to a commit or tag, then none or several "checked-out" markers may appear in the tree, since any number of remote branch or tags may point to the currently checked out commit. The state you are in while your HEAD is detached is not recorded by any branch (which is natural --- you are not on any branch).
Inspecting References
The References node displays some References other than branches and tags (the list is dynamic and depends on the current state of the Repository):
If the Reference is symbolic, i.e. points to another Reference, the name of the target reference is shown, followed by the object ID of the reference's target. If the Reference is not symbolic, only the object ID is shown.
In the example above, HEAD is a symbolic Reference pointing to branch "refs/heads/master" (i.e. branch "master" is checked out", while FETCH_HEAD points directly to commit 226a7f... .
The following actions are available on right-clicking on a Reference:Checkout(unless the Reference is already checked out) and Create Branch... .
Browsing the Working Directory
The "Working Directory" node visualizes the local file system structure of the Git Repository. It is also possible to open a text editor on the files:
Alternatively, files can be opened by dragging them from the Working Directory to the Editor Area.
Also, on all file and folder nodes as well as on the "Repository" node, an option is offered to copy the (file-system specific) path to the clipboard. This is sometimes useful when the path is needed, for example to open a directory using a file browser or to copy and paste Repositories between view instances (see above about how to add Repositories to the view). The Copy to Clipboard action is also available using Edit > Copy (or the corresponding keyboard shortcut).
Repository Configuration
Integration with the generic "Properties" view in Eclipse allows to view and edit the Git Configuration (global and repository-specific configuration). If the "Properties" view is open, it is updated automatically when a "Repository" node is selected. With a drop down box (left red box in the screen shot) you can switch between the display of the Repository Configuration, the Global Configuration and a view which aggregates both. If the view displays the Repository Configuration or the Global Configuration you can open an editor dialog with the Editbutton (right red box in the screen shot). The editor dialog has the same functionality as the preference page Team > Git > Configuration.
In the Git Repositories view, there is a Properties action in the context menu, which will open a configuration dialog allowing to edit the Repository Configuration. Here, key value pairs can be added, changed or deleted. The Open button allows to open the Repository Configuration file in a text editor.
Remote Repositories
The "Remotes" node allows for browsing and editing Remote configurations. Each Remote configuration has a name and either a Push Specification, a Fetch Specification, or both. If a "Remote Configuration" node or any of its children is selected, theProperties view will show a summary of the Remote configuration. In this example: there is a Remote configuration named "origin" which only has a Fetch Specification, but no Push Specification:
Menu actions are provided to add, configure, and remove Remote configurations and Fetch and Push Specifications.
Direct Fetch and Push Support
It is possible to execute fetch and push directly (i.e. without a wizard) on the remote node as well as on the respective "Fetch" and "Push" nodes:
Note that the fetch or push operation will be executed immediately in an asynchronous job; on completion you will get a confirmation pop-up displaying the fetch result.
The "Fetch" node contains a so called fetch specification and the "Push" node contains a so called push specification.
A default fetch specification is created when the repository is cloned. You can edit the fetch specification with the menu entry Configure Fetch.... This opens a wizard. On the first page you can edit the Fetch URI. Ob the second page you can determine the fetch ref specifications, see Fetch Ref Specifications.
You can create or edit a push specification with the menu entryConfigure Push.... This opens a wizard. On the first page you can edit the Push URIs. If a fetch is specified the fetch URI is automatically included into the push specification and no additional Push URI is needed. On the second page you can determine the push ref specifications, see Push Ref Specifications.
Adding a Remote Configuration
This is done using a context menu action on the "Remotes" node. A wizard is started asking for the name of the new configuration and whether to configure Fetch, Push, or both:
If the Configure Fetch checkbox was selected, the next wizard page will ask for the URI of the Repository to fetch from:
Click Change... to open a dialog that allows you to select a URI. The next step is to define the Remote Specification for the fetch URI. See Fetch Ref Specificationsabout the details.
If the Configure Push checkbox was selected, the next wizard page will ask for the URIs of the repositories to push to. This is actually a list, as you can push to multiple repositories at once. ClickAdd.... to add URIs to the list using the same dialog as above. You can remove URIs by marking them in the list and hitting Remove. This step is completely optional if there is already a fetch URI defined. In this case, the fetch URI will also be used for push. If at least one push URI is defined in this steps, it will override the fetch URI. In this example, there is already a fetch URI, so the Next button is enabled, even though there is no Push URI in the list:
The next step is to define the Remote Specification for the push URIs. See Push Ref Specifications about the details.
Upon completion, the new Remote configuration will be visible:
Changing Remote Configurations
It is also possible to add, remove, or change Fetch/Push Specifications for an existing Remote configuration using the context menu.
Gerrit Configuration
If you work with Gerrit Code Reviewas remote repository server you can
- specify the push configuration used to push changes to code review
- specify the fetch configuration to fetch the review notes from Gerrit
- configure your repository to select the Compute Change-Id for Gerrit Code Review option in the Commit dialog by default
Select Gerrit Configuration... from the context menu of a Remote. This opens a wizard with one page:
- When you click Finish the wizard sets the repository configuration parameter gerrit.createchangeid to true. This ensures that the checkbox Compute Change-Id for Gerrit Code Review in the Commit dialog is selected by default. SeeCommit Message for details.
- If you want to configure automatic Change-Id insertion at a later point in time you may use the repository configuration editor (Preferences > Team > Git > Configuration) to set the configuration parameter gerrit.createchangeid to true. If you want this configuration for all your repositories you may put it into ~/.gitconfig then you don't need to repeat this configuration for every new repository you happen to work on.
- Additionally the wizard adds a refspec "refs/notes/*:refs/notes/*" to your fetch specification. Gerrit stores data about the review in git notes. With this refspec these review data will be fetched automatically when you fetch from this remote and they will be displayed in the commit viewer.
- In the section Push URI you can configure the URI which is used for the default push configuration. It is pre-filled depending on the URI you are cloning from. If you clone with the git protocol, the protocol is automatically changed to ssh, and the default Gerrit ssh port 29418 is automatically added. For protocols which require a user there is a user field for convenience.
- The section Push Configuration has one field, Destination Branch. Here you should enter the name of the target branch where changes accepted in the Gerrit code review workflow will be submitted to. This yields an entry
HEAD:refs/for/<branchname>in the push configuration of the remote you specified in the clone wizard. - Repositories which have been configured for Gerrit are displayed with the green Gerrit decorator
Refresh
The view is auto-refreshed periodically. The Refresh button in the toolbar allows to trigger an immediate refresh:
Link with Selection
If the Link with selection toggle is enabled, the file or folder corresponding to the current workbench selection will be displayed automatically:
Link with Editor
If the Link with editor toggle is enabled, the file or folder corresponding to the currently active editor will be displayed automatically:
Hierarchical Branch Layout
If the Hierarchical Branch Layout toggle is enabled, branches will be shown in a hierarchical layout using slash (/) as hierarchy separator:
This can be helpful for organizing large numbers of branches.
Bare Repositories
"Bare" Git Repositories (as opposed to "development" or "standard" Repositories) have no working directory by definition, so all actions related to the working directory (check-out, project import, browsing the working directory) are not available for such Repositories. The "Bare-ness" of a Repository is visualized on the "Working Directory" node, which is always a leaf:
Bare repositories are only changed by pushing changes to them.
Removing Repositories from the Git Repositories View
This is offered as a menu action on the "Repository" node. Note that this does not delete the Repository, but just removes the node from the view. If there are projects in the workspace which are located in the working directory of the Repository, the user will be prompted to confirm deletion of these projects from the Eclipse workspace.
Showing Repository in Related Views
Show in History
The command Show in > History will open theHistory View showing all changes in the selected repository.
Show in Reflog
The command Show in > Reflog will open theGit Reflog view showing the Git reflog of the selected repository.
Show in Properties
The command Show in > Properties will open theProperties view showing the properties of the selected repository.
Working with Tasks
The EGit integration with Mylyn was moved to Mylyn in Eclipse 2023-06. Seemylyn.egit.
Viewing Commits
The Egit commit viewer allows commits to be opened in the Eclipse editor area.
The EGit commit viewer displays the following commit information:
- Commit tab
- Links to open parent commits
- Author
- Committer
- Message
- List of tags pointing to this commits
- List of branches that the commit exists on
- Diff tab
- Read-only text editor with the output of the file differences, with a content outline linked to the editor.
- The colors used in the viewer for highlighting lines can be configured from the Preferences > General >Appearance > Colors and Fonts > Git folder.
- The overview ruler right of the editor's text viewer shows colored annotations for all added or removed lines.
- Quick navigation between "hunks" (changes with added or removed lines) is available via clicking on an annotation in the overview ruler, or via the "Go To Next Annotation"/"Go To Previous Annotation" actions in the global Eclipse toolbar (default keyboard shortcuts are "Crtl/Cmd-." and "Shift-Ctrl/Cmd-.").
- Line numbers in hunk headers, as well as the file names in file diff headers are hyperlinks to open the old or the new version or also the current working tree version in an editor, or to show a two-way diff between the old and the new version. The latter is also available on the word "diff" in a file diff headline (the one starting with "diff --git"). These links are only available if applicable; for instance there will be no link to open the old version for an added file since there was no old version in this case.
- Notes tab
- All Git notes for the commit
Tagging a commit
- Select the Create Tag icon from the commit viewer toolbar
- The Tag dialog will open allowing you to create a tag from the commit.
Creating a branch from a commit
- Select the Create Branch icon from the commit viewer toolbar.
- The Branch dialog will open allowing you to create a new branch from the commit
Checking out a commit
This checks out the commit displayed in the commit viewer. The commit will be checked out and HEAD will become detached.
Cherry picking a commit
Applies the change introduced by the commit displayed in the commit viewer on top of the currently checked out commit or branch.
Opening the commit viewer
The commit viewer can be opened from the following places:
- History view table context menu
- Double-clicking commits in the Pull/Fetch dialog results table
- Open commit dialog
- Blame annotation popup
- Reflog View
Searching for commits
EGit supports searching for commits.
Git Search page
Commits can be searched from the Git Search tab in the standard Eclipse Search dialog.
This dialog supports searching for text or patterns present in the different fields of a Git commit such as the message, author line, committer line, and the SHA-1 ids of the commit, its parent(s), and the tree associated with it.
Browsing Search Results
Commit search results are displayed in the standard Eclipse Search view. Results are grouped by repository when in Tree mode. Double-clicking a commit from the Search view will open it in the commit viewer.
Launching Git Search
The Git Search page can be opened by selecting the Git Search option from the Search drop-down on the Eclipse toolbar.
Open commit dialog
EGit has an Open Git Commit dialog similar to the Mylyn Open Task and coreOpen Resource dialogs. The dialog searches every configured Git repository for the branch, tag, or commit SHA-1 entered into the filter box and displays the matching commits.
The dialog can be opened by selecting the Open Git Commit button on the Eclipse navigation toolbar.
Finding the author of each line in a file
EGit supports showing git blame information inside the editor ruler.
Selecting the Team > Show Revision Information action on file selections will open the editor and display an annotation ruler with commit and author information for each line in a file. Hovering over the ruler will display a pop-up showing the commit id, author, committer, commit message and the diff applied by this commit on the selected hunk.
The look and feel of the blame annotation editor ruler can be configured from the Revisions sub-menu available from the ruler context-menu.
Click open commit to open the commit in thecommit viewer, click show in history to show the commit in the History View. Click show annotations to show annotations of the parent commit of the commit shown in the hover.
Working with Submodules
You can read more about what Git submodules are and how they work in this Git Community Book chapter.
Cloning Repositories with Submodules
Submodules are repositories nested inside a parent repository. Therefore when doing a clone of a parent repository it is necessary to clone the submodule repositories so that the files/folders are available in the parent repository's working directory.
Checking the Clone Submodules button from the Git Clone wizard will clone all submodule repositories after the clone of the parent repository finishes.
Browsing Submodules
There is a Submodules node displayed in the Git Repositories view for repository's that contain submodules.
All submodules in the given parent repository are displayed under this node as well as information about what commit is currently checked out.
Adding a Submodule
You can add a new submodule to a repository by selecting a repository in the Git Repositories view and selecting the Add Submodule context menu option.
The wizard will prompt for the path and URL of the submodule being added. The path entered will be relative to the parent repository's working directory and the URL will be used to clone the repository locally.
Once the wizard is completed the submodule will be cloned, added to the index, and the submodule will be registered in the .gitmodules file as well as in the parent repository's .git/config file.
Updating Submodules
There are two actions that can be used to update submodules, Update Submodule and Sync Submodule.
Selecting the Update Submodule action on a submodule will check out the commit referenced in the parent repository's index for that submodule. This command will also perform a merge or rebase if that has been configured in the update field for the selected submodule's configuration section in the parent repository's .git/config file.
Selecting the Sync Submodule action on a submodule will update the remote URL used by the submodule from the current value in the_.gitmodules_ file at the root of the working directory of the parent repository.
Team Project Sets
Team project sets (.psf files) are supported by the Git team provider.
Import
To import an existing project set, use the Import... wizard and then select Team Project Set from Team.
You can then select a file which contains the import definitions and optionally choose to add imported projects to a working set.
In the next step, the repositories are cloned, the projects imported and connected. This can take a while depending on the size of the repositories.
Export
To create a project set file for existing Git projects, select the projects/working sets which are already connected to the Git team provider.
Then open the Export... wizard and select Team Project Set from_Team_. There you can choose to export working sets or projects only and can refine your selection. In the next step, select an output path and finish the wizard.
Format
You can also manually edit a .psf file. Each project has an entry which looks like this:
<project reference="1.0,git://egit.eclipse.org/egit.git,master,org.eclipse.egit"/>
The values are separated by commas and have the following meaning:
- Format version
- Git repository URL
- Name of branch to initially check out
- Path to the project to import (folder which contains
.project), relative to the repository
Each project has one entry. So for multiple projects in the same repository, create such an entry for each project with the same repository URL. The import is smart enough to only clone each repository once.
If the repository contains a project at the root, use . as the project path.
GIT LFS Support
Partial support for GIT LFS is included in EGit when the optional JGit LFS support bundle "Java implementation of Git - optional LFS support" is installed. This support works best when using the SSH protocol with a capable LFS remote (i.e. GitHub or Gerrit with LFS plugin).
To enable usage of EGit's LFS support, either enable it globally (for the current user) by pressing the "Enable LFS support globally" button:
... or configure Eclipse to automatically make sure the LFS support is enabled whenever Eclipse starts up. Check the "Automatically configure LFS..." checkbox:
... or - to enable builtin LFS support only for a single repository - right click a repository and select "Enable LFS locally"
Note that if the JGit LFS support has not been installed some actions are disabled. If LFS support is already enabled in a more global scope the "Enable LFS locally" action is not displayed.
Once LFS support is enable directly or indirectly for a repository, you can work as usual with files, more specifically these use cases should work:
- Fetching LFS objects from a LFS Server (note that HTTP authentication is not implemented yet, so SSH works best, as this provides a mechanism to authenticate).
- Pushing LFS objects to an LFS Server (same note about HTTP authentication applies).
- Staging and committing files which are managed by LFS (through .gitattributes).
- Checking out files managed by LFS
- Viewing LFS managed file's content from the GIT history
- Comparing actual file content for LFS managed files from the history
Reference
Menus
Project Context Menu
On project nodes in navigation views (Navigator, Package Explorer etc.) the following Git actions are available for projects shared with the Git team provider:
main project menu
"Remote" sub-menu
"Switch To" sub-menu
"Advanced" sub-menu
Resource Context Menu
On resource nodes (files and folders) in navigation views the following Git actions are available for projects shared with the Git team provider:
Repositories View Menus
In the Repositories View the menu depends on the node type which is selected
Menu on repository nodes:
Menu on branch nodes:
Menu on tag nodes:
Menu on Reference nodes:
Menu on Remote nodes:
Menu on Fetch Configuration nodes:
Menu on Push Configuration nodes:
Menu on Working Tree nodes:
History View Menus
Menu on entries in the History View's commit list
Menu entries in the History View's Quickdiff sub menu
Git Workbench Toolbar and Git Workbench Menu
In order to ease use of the most frequently used Git actions the Git Command Group can be activated to show a Git Workbench Toolbar and/or Menu
- Click Window > Customize perspective...
- in the tab Command Groups Availability click Git, this will enable both the Git workbench toolbar and menu
- in the tabs Toolbar Visibility and Menu Visibility you may configure which actions should appear in the Git Workbench toolbar and menu
Menu Actions
- Add
- Add changes present in the working tree to the git index, also known as staging changes.
- Put newly created resources under git version control (Git does not automatically start tracking resources).
- Resolve conflicts.
- Apply Patch - Apply a patch.
- Assume unchanged - Resources can be flagged "assume unchanged". This means that Git stops checking the working tree files for possible modifications, so you need to manually unset the bit to tell Git when you change the working tree file. This setting can be switched on with the menu action Team > Assume unchanged and switched back with the menu action Team > No Assume unchanged.
- Branch, Create Branch - Checkout a branch or create a branch.
- Change Credentials - Change logon credentials of a Fetch or Push Specification, credentials are stored per URL in the Eclipse Secure Store.
- Checkout - Checkout a Branch, Tag,Commit or Reference.
- Cherry-pick - Cherry-pick a single commit onto the tip of the currently checked out branch.
- Clear Credentials - Clear logon credentials of a Fetch or Push Specification, credentials are stored per URL in the Eclipse Secure Store.
- Commit - Commit changes.
- Delete Fetch - Delete a Fetch Specification.
- Delete Push - Delete a Push Specification.
- Configure Fetch - Configure a Fetch Specification.
- Configure Push - Configure a Push Specification.
- Delete Branch - Delete a branch.
- Delete Repository - Delete a repository.
- Disconnect - Disconnect the attached Git Team Provider from this project. The git repository still exists but is no longer integrated with Eclipse.
- Ignore - Add files to .gitignore so that git ignores them.
- Import Projects - Import projects into the Eclipse workbench.
- Merge - Merge branches.
- Merge Tool - Resolve conflicts using the Merge Tool.
- Open Properties View - View and edit the repository configuration.
- Pull - Pull changes from remote branch tracked by currently checked out local branch.
- Remote >Fetch From - Fetch changes from a remote repository
- Remote > Fetch from Gerrit - Fetch change from a Gerrit Code Review Server
- Remote > Push - Push changes to other repositories
- Remote > Configure Fetch from Upstream - Configure Upstream for automated fetch
- Remote > Configure Push to Upstream - Configure upstream for automated push
- Rebase - Rebase a branch onto another one.
- Remove Repository - Remove a repository from the Repositories View.
- Rename Branch - Rename a branch.
- Reset - Reset the current HEAD, Index or Working Tree.
- Show in History - Show the selected resource in the History View.
- Show in Repositories View - Show the selected resource in the Repositories View.
- Switch to... - Switch to (also known as checkout) another branch or tag.
- Synchronize - Synchronize local and remote branches with each other.
- Tag - Create, delete tags.
- Untrack - Remove resources from git version control. If you want to delete the resource from the working tree click also Deletein the resource's context menu.
Git Perspective and Views
Git Perspective
Window > Open Perspective > Git Repository Exploring opens the Git Repository Exploring perspective
Git Repositories View
Window > Open View > Git > Git Repositories opens the Git Repositories view which is explained in detail here.
History View
Overview
The History View for Resources under Git version control is a commit-centric view of the resources in a given Repository. It can be used to perform the following tasks:
- Inspecting the change history of a given File under Git version control (viewing and comparing the versions of such a File in the Repository)
- Search for a certain commit using different search criteria
- Check-out of a certain commit
- Creation of branches and tags based on a certain commit
- Creation of patches based on the changes in a certain commit
- Resetting the complete Repository to a certain commit
- Setting and resetting of the quickdiff baseline to a certain commit
Opening the History View
The History view can be opened by
- Right-clicking Show In > History View on any resource under Git version control in the explorer (not available in all Perspectives)
- Right-clicking Team > Show in History on any resource under Git version control in the explorer
- Clicking Window > Show View > Other..., then Team > History
Once the view is open, you can activate the Link with Selectionbutton to keep the input of the view in sync with the selection in the explorer automatically.
Organization of the History View
The History view is organized in several panes:
The upper pane is the Commit Graph displaying the commit log (or commit history) in reverse chronological order (newest commit on top). Below the commit graph, there are by default two panes: on the left side, the Revision Comment area, which shows the commit message and a textual Diff of the file or files in the commit, and on the right side, the Revision Detail area, which shows a table of the files that were changed by the commit.
The first column of this table describes the nature of the change for each file:
ADD the file was added by the commit
MODIFY the file was modified by the commit
DELETE the file was deleted by the commit
The content of the lower panes depends on the selection in the upper pane and is updated automatically when this selection changes.
Both lower panes can be switched on and off separately by right-clicking anywhere in the upper pane and selecting Show Revision Comment andShow Revision Details, respectively.
Above the Commit Graph, the current input is visualized. The input is always a workspace resource, either a project, a folder, or a file. After the type of the input, the path is shown, followed by the name of the Repository containing the resource in square brackets.
Using the History View
Inspecting the Commit Graph
The Commit Graph area is the main part of the History View. By default, it shows the currently checked out commit and all its ancestors, i.e. the first entry in the list is the checked out commit. The following picture is used to explain some of the features of the History View:
Each line in the Commit Graph corresponds to a commit. Branches, tags and HEAD are visualized as follows:
- The tips of local branches are shown as green rectangles
- The tips of remote branches are shown as grey rectangles
- The local HEAD is shown as a white rectangle
- Tags are shown as yellow rectangles
(our example doesn't have remote branches).
The line on the left side is the actual commit graph, which shows the parent-child relation of the commits in the list (each commit has at least one parent, except for the very first commit in a Repository). There can be forks, which correspond to a branch operation, and joins, which correspond to a merge operation. In our example, there was a branch "experimental" created after the commit with branch "beforeSplit", and the same file was changed both in the "master" and in the "experimental" branch. The last commit is a merge commit where the content of the "experimental" branch was merged with the "master" branch.
The exact change can be inspected by marking a commit and looking at the Revision Comment area. When scrolling down in the Revision Comment area, a textual diff for the changes will be visible, in our example it says that the content of Project1/f1/file1.txt was changed from "modified" to "modified in master". When selecting the next commit (which corresponds to the "experimental" branch), a similar diff would be displayed, saying that the content of that file was changed from "modified" to "modified in experimental". The newest commit is the result of merging "experimental" into "master". Accordingly, the new commit has two ancestors and the "master" and "experimental" lines are joined again.
Displaying and Comparing versions of a File
If the current input is already a file, right-clicking Open on a commit will open an editor with the file content corresponding to the currently selected commit. If the file does not exist in the selected commit, an error message will be displayed. Clicking Compare with working tree will open a compare editor comparing the file content of the currently selected commit with the file content in the workspace.
The Open and Compare with working tree actions can also be executed by double-clicking on a commit: if the "Compare Mode" toolbar button (see below) is down, Compare with working tree will be executed, otherwise Open.
It is possible to compare the contents of two commits filtered by the current input by selecting the two commits and right-clicking onCompare with each other. If the current input is not a file, there is an additional menu action Compare with each other in Tree. The first action opens an Eclipse compare editor, the second opens theGit Tree Compare View.
Furthermore, it is possible to select any number of commits and right-click Open to see all versions of the file corresponding to the selected commits (one editor will be opened per version).
If the current input is not a file, then there won't be menu actions forOpen. However, it is possible to double-click on an entry the Revision Detail area. If compare mode is active, a compare editor will be opened showing the changes for the file being double-clicked in the currently selected commit (i.e. a diff of the file content in the currently selected commit against the file content of this commit's ancestor). If compare mode is not active, an editor with the file content corresponding to the currently selected commit is shown.
Working with the Filter Settings
The filter settings can be changed using the corresponding toolbar actions (see below). By default, the "Resource" setting is active, i.e. only those commits are shown in the list that contain changes for the current input. If the current input is not a file, all commits are shown that contain changes for any child of the current input.
If the filter setting is "Resource" and the current input is a file, then the list of commits contains only those commits that contain changes for that file. This is useful when analyzing the history of that file. In some cases, however, it is helpful to also see other commits which do not change the actual file. For example, it may be interesting to see whether a given change in the file was before or after some other commit which does not change that file itself. In our example, we might want to know whether a given change was "before" or "after" the commit tagged as "Project1". By changing the filter setting from "Resource" to "Repository", this is easily done:
The behavior of the other two settings ("Folder" and "Project") is similar in that they include the commits that change any resource in the parent folder of the current input or any resource in the project of the current input, respectively. In our example above, if filter setting "Project" would be used, the commit "Add Project2 to Repository" would not be shown, is it doesn't change anything in the project of the current input (Project1/f1/file1.txt).
Alternatively, in order to see all commits pertaining to a specific project, one could change the history view input to that project. However, the file-specific menu actions would then not be available.
Toolbar actions
The first four buttons in the History View's toolbar are the standard buttons for Refresh, Link with Selection, Pinning and Navigation History.
Find
If the "Find" toolbar button is down, a search bar is displayed in the lower part of the view which allows to search for commits in the commit log. Depending on the setting in the drop-down list in the search bar the commit's title, comment, author or committer are searched.
The found search hits are high-lighted in bold and the "Next" and "Previous" buttons allow to jump to the next or previous commit matching the search criteria:
Filter settings
The next four toggle buttons in the view toolbar control how the displayed commits are filtered with respect to the current input:The buttons are working as radio buttons, i.e. one of the four buttons must always be down.
- If the "Repository" button is down, the commit log is not filtered and shows all commits reachable from the currently checked out branch (or all commits, see below about the "All Branches" action)
- If the "Project" button is down, the commit log is filtered to show all commits which affected any of the resources in the project containing the current input
- If the "Folder" toggle is down, the commit log is filtered to show all commits which affected any of the resources in the parent folder of the current input
- If the "Resource" button is down, the commit log is filtered to show only commits which affected the current input; the view menu itemShow > Follow Renames allows to toggle whether renames of the selected resource should be followed by this filter
Note that not all combinations of filter setting and current input are meaningful; for example, if the current input is a project, the "Project" option is in fact the same as the "Resource" option.
Compare Mode
The next button is again a toggle, activating "Compare Mode". If it is down, certain double-click actions (see above) will open a compare editor instead of a normal editor.
All Branches
This toggle activates the "All Branches" mode. By default, only those commits are shown in the commit log that can be reached from the currently checked out commit, i.e. the Commit Graph ends with the currently checked out commit and newer commits are not shown. If this button is down, all commits will be shown in the commit log. This is illustrated in the following picture from our example. The branch "beforeSplit" is currently checked out; by activating the toggle, the newer branches will become visible:
View Menu actions
Configuring the View
Most of the toolbar actions are available in the View Menu, too. In addition, the following toggles are available:
and the Filter submenu allows to configure filter settings
"Additional Refs" toggles the visibility of certain Refs created during actions like fetch, rebase, merge, for example FETCH_HEAD, ORIGIN_HEAD... This can be helpful to remove clutter from the history view.
"Notes History" toggles the displaying of Gerrit's review notes branch/ref in the History view
"Follow Renames" toggles whether renames of a selected resource should be followed in the History View, if the "Resource" filter is used. This preference can also be configured in the preference wizard Preferences > Team > Git > History > Follow Renames.
"Revision Comment" toggles the visiblity of the Revision Comment area.
"Revision Details" toggles the visibility of the Revision Detail area.
If "Relative Dates" is checked, the commit dates are shown as relative dates instead of absolute dates.
"E-mail Adresses" toggles the display of committer e-mails.
The sub-menu "In Revision Comment" opens a sub-menu with some more toggles that govern the appearance of the Revision Comment area:
"Tag sequence" allows to show/hide a couple of lines indicating the last tag in the list of ancestors of the given commit and the next tag in the list of successors of the given commit, i.e. the tags preceding/following the given commit.
The "Wrap Comments" and "Fill paragraphs" toggles govern the formatting within the Revision Comment area.
"Revision Details" and "Revision Comments" are also available by right-clicking anywhere in the Commit Graph area.
"Tag sequence", "Wrap Comments" and "Fill paragraphs" are also available by right-clicking anywhere in the Revision Comment area.
Context Menu actions
The context menu in the Commit Graph area is slightly different, depending on whether the current is a File or a Folder/Project, respectively. The following menu entries are always available:
If the current input is a File, there are some other actions available; if exactly one commit is selected, there are three additional options:
and if exactly two commits are selected, the menu will appear like this:
If more than two commits are selected, only the "Open" action and the "Quickdiff" menu will be available.
Compare with working tree
This action is only available if the current input is a file and a single commit is selected. It will open a compare editor comparing the file content of the selected commit with the file content in the working tree.
Compare with each other
This action is only available if the current input is a file and exactly two commits are selected. It will open a compare editor comparing the file content of the selected commits with each other.
Open
This action is only available if the current input is a file. It will open an editor for each selected commit displaying the content of the file for the given commit.
Checkout
This checks out the currently selected commit. If a branch exists for this commit, the branch is checked out, if more than one branch exists for this commit, a dialog will be shown asking which branch should be checked out. If no branches exist for the commit, the commit will be checked out and HEAD will become detached.
Create Branch
Creates a branch on the currently selected commit. A dialog will be shown asking for a branch name and whether the newly created branch should be checked out.
Delete Branch
This action will be enabled if a branch exists for the currently selected commit, which is not checked out. If there is a single branch on this commit, which is not checked out, this action will delete this branch immediately. If multiple such branches exist, a dialog will be shown asking which branches should be deleted. If commits become unreachable on "Delete Branch" a confirmation dialog will be shown to prevent accidental unreachability of commits.
Create Tag
Creates a tag on the currently selected commit. A dialog will be shown asking for a tag name and a tag message.
Create Patch
This action is not available on the very first commit of a Repository. It will create a patch containing the changes of the currently selected commit compared to that commit's predecessor. A dialog will be shown asking whether the patch should be created as file or in the clipboard and whether to use the Git patch format of the generic patch format.
Cherry Pick
Applies the change introduced by the selected commit on top of the currently checked out commit.
Revert Commit
Reverts the changes that the selected commit introduces by creating a new commit on top of the currently checked out commit.
Merge
Merges the selected commit into the currently checked out branch.
Rebase on top of
Rebases the currently checked out branch on top of the selected commit.
Reset > Soft/Mixed/Hard
This action resets the Repository containing the current input to the currently selected commit. Depending on the choice of the sub-menu, a soft, mixed, or hard reset will be performed.
Quickdiff > Reset Quickdiff Basline to HEAD
Quickdiff > Reset Quickdiff Basline to first parent of HEAD
These two actions set the quickdiff basline for the repository to HEAD or to the parent of HEAD. These actions are always available, even if more than one commit is selected.
Quickdiff > Set as Baseline
This action is only available if a single commit is selected; it will st the quickdiff baseline for the repository to the selected commit.
Copy
Copies the IDs of the currently selected commit or commits into the clipboard.
Show Revision Comment
Toggles the visibility of the Revision Comment area.
Show Revision Details
Toggles the visibility of the Revision Details area.
Wrap Comments
Only available when right-clicking on the Revision Comment area. If active, the comments will be auto-wrapped to fill the display area, otherwise the wrapping of the commit message will be used.
Fill Paragraphs
Only available when right-clicking on the Revision Comment area. If active, the commit message will be displayed without unnecessary line breaks.
Drag and Drop Support
You may drag and drop commits from the commit graph either onto aMylyn Task or into a folder on your harddisk. In both cases, EGit will automatically create a patch you may attach to a bug or store on disk.
Working with the Revision Details Area
The Revision Details Area shows a table of the files that were changed by the selected commit. Selecting the context menu action Show Annotations on selected files will open the file in a (read-only) editor and display an annotation ruler with commit and author information for each line in a file. Seethis section.
Synchronize View
The menu command Team > Synchronize Workspace will launch the Synchronize View. This view allows you to inspect the differences between the resources in the local workspace and a local or remote tracking branch. Alternatively you may compare a local and a remote tracking branch. Comparison of two remote tracking branches as well as menu commands on the Synchronize View are not yet available in this EGit version and will be provided in a future release.
Here is what the Git Synchronize View looks like:
Synchronization State
The Synchronize View shows the synchronization state of resources in your workspace or a local branch compared to those in another local or remote tracking branch representing the state of a branch from a remote repository. This state is shown by using icons and can also be configured to show the state as text appended to the resource name.
A description of the icons is shown in the table below:
| Icon | Description |
|---|---|
| An incoming addition means that a resource has been added to the target branch. | |
| ![Image:Egit-0.9-synchronize-incoming-change.png]images/Egit-0.9-synchronize-incoming-change.png "Image:Egit-0.9-synchronize-incoming-change.png") | An incoming change means that the file has changed in the target branch. |
| An incoming deletion means that a resource was deleted from the target branch. | |
| An outgoing addition means that the file was added to your workspace or source branch and is not yet in the target branch. | |
| An outgoing change means that the file was changed in your workspace or source branch. | |
| An outgoing deletion is a resource that has been deleted in your workspace or source branch. | |
| A conflicting addition means that the resource has been added in your workspace or source branch and in the target branch. | |
| A conflicting change means that the file has been changed in your workspace or local branch and in the target branch. A manual or automatic merge will be required. Also, any entries in the view that contain children that are conflicts will also be decorated with the conflict icon. This is done to make conflicts easy to find. | |
| A conflicting deletion means that the resource was deleted in your workspace or source branch and in the target branch. |
Mode
The Synchronize View can be filtered using modes using either the toolbar actions or the menu items in the view's drop down menu. Modes can be used to show only incoming, outgoing or conflicting changes.
Models
The Synchronize View is capable of displaying different model representations of the resources. Each product may contain its own product specific representations. The Eclipse SDK comes with three models:
Workspace Model: displays a resource based model. Layout options for this model can be controlled from the Preferences dialog in the drop down menu. The layout options for the Workspace model are
Flat layout: shows all the out-of-sync resources as direct children of their project.
Tree layout: shows the resource hierarchy as it is shown in the Project Explorer.
Compress Folders: shows changes grouped by project and then by folder. This results in a hierarchy that is at most three levels deep with folder paths being compressed into a single level (similar to a Java package).
Java Model: displays a Java based model (similar to what appears in the Package Explorer). Git Commits: displays a Git Commit based model. This model shows incoming changes grouped by commit which is handy for seeing who released what and why. For outgoing changes, you can create commits by creating commits. The display format of the Git commit description can be configured in the preferences under Team > Git > Label Decorationsin the tab Other.
In addition to to the models, there is also a Flat Presentationwhich displays all the out-of-sync elements as top level elements.
Navigation
The Synchronize view provides toolbar actions for navigating through the changes in the view. These actions not only navigate between files but also go from change to change within a file.
The tree in the Synchronize View can easily be expanded and collapsed from the tool bar.
Git Tree Compare View
This view will be opened by some of the Compare With actions (seeComparing Content). When started from a resource (e.g. a project or folder), it will look similar to the resources in the workspace. However, the usual icons on the files will be replaced with icons showing the change state (added, deleted, changed, or unchanged).
The changes can be browsed and a double-click on a file will open a compare editor for this file (this only makes sense on "changed" files, in case of added or deleted files, one side of the compare editor will be empty, whereas unchanged files will show the same content on both sides of the editor):
It is possible to hide unchanged files by clicking the "Hide files with equal content" button in the toolbar.
The Git Tree Compare View can also be started without having workspace resources as starting point (for example by comparing two commits in the history view when the input of the history view is a Repository and not a workspace resource). In this case, the complete content of the Repository is shown and both projects and folders appear as simple "folder" icons:
Git Staging View
This view provides an equivalent for git status showing changes made in the working tree. Unstaged changes which have not yet been transferred to the git index are displayed in the Unstaged Changespane, changes which have already been "added" (staged) to the Git index are shown in the Staged Changes pane. By default these panes are displayed in a row layout, which can be changed to a column layout by the Column Layout option. The Staged- and Unstaged Changes panes by default show the full path of the files. They can be configured by theShow File Names First option to show the file names first, followed by the directory that the files are located in.
Double-click modified files to open a compare view. If fired from the "unstaged" pane the compare view will show the not-yet staged changes. When fired from the "staged" pane it will display the already staged changes. To open a file in the editor, use the Open Workspace Version action on the file's context menu.
To stage a file, drag it from the Unstaged Changes pane to theStaged Pages pane. Alternatively, use the Add to Git Indexaction on the file's context menu in the Unstaged Changes pane. TheReplace with File in Git Index action will replace the selected file in the working tree. If the file is unstaged, it will be reset. If it is staged, the working tree version will be replaced with the staged version from the Git index.
To unstage a file, drag it from the Staged Changes pane to theUnstaged Changes pane. Alternatively, use the Remove from Git Index action on the file's context menu.
The commit action will commit the staged changes only -- similar to whatgit commit does in native git. An integrated commit message editor allows to edit the commit message for the commit. In contrast to the commit dialog, the staging view can be kept open while doing changes. This allows for incrementally writing the commit message along with the changes. The commit message being edited is associated with the repository, the staging view is linked with. It is not stored persistently and will get lost if the staging view or Eclipse are closed.
To commit, press Ctrl+Enter (Command+Enter on Mac OS X) in the commit message text field, or click on the Commit or Commit and Push button.
The Staging View's view menu allows to configure the Staging View
If you are working on a large change and many files are displayed in the Staging View you may use the "Filter Files" filter field which will filter the content of the Staging View to only show the files matching the filter you entered.
Partial Staging
Sometimes it's useful to commit only some changes of a file. An example is when working on a feature and noticing a typo or small bug, which is unrelated to the feature.
To commit only certain changes, these changes have to be staged first. To do this, double-click on the file in the Unstaged Changes pane. This will open the compare editor. On the left side is the workspace version, on the right is the index (staged) version.
Both sides of the compare editor are editable. When changing something in the right side (index) and saving, the file will turn up in theStaged Changes pane and when committing, exactly that content will be committed.
To stage a group of changed lines, the Copy Current Change from Left to Right toolbar button (arrow icon) can be used.
Git Reflog View
The Reflog View shows the Git reflog for a selected repository. It supports showing the reflog for a specific branch by selecting the hyperlink ref name in the top right of the view. Double-clicking or selecting the context menu action Open in Commit Viewer on a reflog entry opens the corresponding commit in the commit viewer. The context menu action Checkout will checkout the selected commit and theHEAD will become detached.
Git URLs
Git URLs in general consist of transport protocol scheme, address of the remote server and the repository path within the remote server and for some authenticating protocols also the user ID.
EGit supports the following protocols
- file - Direct file system access to the repository.
- git - The most efficient built-in git protocol (default port 9418). This protocol doesn't provide authentication. Typically used for anonymous read access to the repository.
- ssh - Git over secure shell (SSH) protocol. Typically used for authenticated write access to the repository.
- http - Hypertext Transfer Protocol can be tunneled through firewalls.
- https - Hypertext Transfer Protocol Secure can be tunneled through firewalls.
- ftp - File Transfer Protocol
- sftp - SSH File Transfer Protocol
Git URLs are used when
- cloning repositories
- fetching changes from another repository
- pushing changes to another repository
HTTP(S) connections
EGit provides two ways to connect to http or https URLs:
- via the Java built-in http(s) implementation, or
- via the Apache httpclient Java library.
The user can choose between these two in the main Git preferences. The default is to use the Apache httpclient library.
Using the Apache httpclient library, it is possible to connect to a https git URL via an http proxy. The Java built-in http support does not allow this.
EGit supports the BASIC, DIGEST, and NEGOTIATION (Kerberos) authentication schemes. (Kerberos needs non-trivial setup for the JDK/JRE outside of EGit, though; if you work in an environment where this is used, your system administrator should have done all the necessary things already.)
Some git servers, most notably Microsoft TFS and its successors, are sometimes configured to require NTLM authentication. EGit does not support this proprietary authentication scheme. If you need NTLM authentication, try choosing the Java built-in http support, and set the Java system property -Djdk.http.ntlm.transparentAuth=allHosts. One way to set this system property for Eclipse is to include it in theeclipse.ini file.
SSH connections
By default EGit uses the Apache MINA sshd Java library for SSH connections. If environment variable GIT_SSH is set, it should be the path of an SSH executable on your system, and EGit will use that instead of its built-in Java SSH client.
The Java SSH client tries to be as compliant to OpenSSH as possible. A few differences exist in the handling of the SSH configuration file~/.ssh/config, though; in particular, the Match and Includedirectives are not supported. ProxyCommand is not supported, butProxyJump is. GlobalKnownHostsFile is ignored.
Eclipse lets the user define the SSH_HOME directory in the preferences under Preferences→General→Network Connections→SSH2, field "SSH2 home". Setting this to anything else but .ssh in your user home directory is going to be confusing, since it'll mean that EGit may use other settings than your command-line utilities. It is strongly recommended to set this path to .ssh in your user home directory.
Git References
Git References are also known shortly as Refs. They comprise
- branches
- remote-tracking branches
- tags
They all are named with a path using '/' as path separator and are starting with "refs".
- Local branches start with "refs/heads/"
- Remote tracking branches start with "refs/remotes/". Remote tracking branches proxy branches located in a remote repository so that their state at the time of the last transport operation can be queried also when no connection to the repository is available (offline).
- Tags start with "refs/tags/"
Ref names can be abbreviated as long as the abbreviated form is unique. E.g.
- "master" is short for "refs/heads/master"
- "origin/master" is short for "refs/remotes/origin/master"
- "v1.0.1" is short for "refs/tags/v1.0.1"
There is also a number of "reserved" names for Refs that are useful for certain scenarios:
| Ref Name | Remark |
|---|---|
| HEAD | Points to the currently checkout out commit |
| FETCH_HEAD | Points to the result of the last fetch operation |
| ORIG_HEAD | Points to the commit that was checked out before a merge or rebase operation was started |
For a complete list for Ref names and the order of precedence if multiple references have the same shorthand form see the section "Specifying Revisions" section of git rev-parse.
Refspecs
A "refspec" is used by fetch and push operations to describe the mapping between remote Ref and localRef. Semantically they define how local branches or tags are mapped to branches or tags in a remote repository. In native git they are combined with a colon in the format :, preceded by an optional plus sign, + to denote forced update. In EGit they can be displayed and also edited in tabular form in thePush Ref Specification and theFetch Ref Specification and other dialogs.
The "left-hand" side of a RefSpec is called source and the "right-hand" side is called destination. Depending on whether the RefSpec is used for fetch or for push, the semantics of source and destination differ: for a Push RefSpec, the source denotes a Ref in the source Repository and the destination denotes a Ref in the target Repository.
Push Refspecs
A typical example for a Push RefSpec could be
This means that the currently checked out branch (as signified by the HEAD Reference, see Git References) will be pushed into the master branch of the remote repository.
Fetch Refspecs
A typical example for a Fetch RefSpec could be
refs/heads/*:refs/remotes/origin/*
This means that all branches from the remote repository will be fetched into the corresponding remote tracking branches of the local repository.
Remotes
Remotes are used to manage the repositories ("remotes") whose branches you track from your repository.
In EGit Remotes are defined when
- Cloning a repository from another repository, by convention this repository the newly cloned one has been created from is named "origin". If you prefer a different name the clone wizard allows to specify that.
- Defining Remotes in the Repositories View
A Remote first of all defines a name for the repository whose branches you track, this is important since you may want to track branches from different repositories so the name helps to understand what repository a certain operation is dealing with. In additionRefspecs specified for a given Remote define amapping of branches and tags in your local repository to branches and tags in the remote repository. You may want to use different mappings for inbound or outbound transport operations hence there areeditors to define Fetch and Push Configurations available in EGit.
Git Ignore
.gitignore files located in the working tree specify files that intentionally should not be tracked by git. They only concern files that are not yet tracked by git. In order to ignore uncommitted changes in already tracked files refer to the assume unchanged action.
Each line in .gitignore files defines a pattern. Git checks ignore patterns following the hierarchy of the working tree from highest to lowest. Patterns defined in higher level .gitignore files are overridden by those defined in lower levels. Files which shall be ignored for all working on a given project are usually included in the project's repository to easily share them in the team.
Pattern formatdefinition:
- blank lines are ignored
- lines starting with # serve as comments
- the optional prefix ! negates the pattern. Files excluded by a matching previous pattern become included again. Patterns ending with a slash only match directories but not files or symbolic links.
- patterns not containing a slash are treated as shell glob patterns matched against the path relative to the location of the .gitignore file
- git treats patterns as shell globs as defined infnmatch(3)
- wildcards in patterns do not match / in path names
- a leading slash matches the beginning of a pathname
The EGit Ignore menu action adds the selected resource to the .gitignore file in the resource's parent directory. To enter other ignore patterns use a text editor.