DHT11 DHT22 with Raspberry Pi Pico using MicroPython (original) (raw)
This tutorial shows how to interface DHT11/DHT22 temperature and humidity sensors with Raspberry Pi Pico using MicroPython. First, we will learn to interface DHT22 with Raspberry Pi Pico. After that, we will see the MicroPython example code to measure current temperature and humidity and display it on the MicroPython terminal. Secondly, we will see a MicroPython example to display these sensor readings on an SSD1306 OLED.

Prerequisites
Before we start this lesson make sure you are familiar with and have the latest version Python 3 in your system, have set up MicoPython in Raspberry Pi Pico, and have a running Integrated Development Environment(IDE) in which we will be doing the programming. We will be using the same Thonny IDE as we have done previously when we learned how to blink and chase LEDs in micro-python. If you have not followed our previous tutorial, you check here:
If you are using uPyCraft IDE, you can check this getting started guide:

DHT11/DHT22 Introduction
The DHT11/DHT22 is a sensor which measures relative humidity and temperature sensor. It provides a calibrated digital output with a 1-wire protocol. Both sensors are inexpensive. They are quite similar to each other with some differences of specifications.
DHT22 is almost similar to the DHT11 but the former measures temperature and humidity with higher accuracy and support a wider range.
DHT11 vs DHT22
The following table lists the comparison of both DHT sensors.
| DHT22 | DHT11 | |
|---|---|---|
| Temperature | -40 to 80 ºC +/- 0.5ºC | 0 to 50 ºC +/-2 ºC |
| Humidity | 0 to 100% +/-2% | 20 to 90% +/-5% |
| Resolution | Humidity: 0.1%Temperature: 0.1ºC | Humidity: 1%Temperature: 1ºC |
| Operating Voltage | 3- 6 V DC( directly power able from Raspberry Pi Pico) | 3-5.5 V DC( directly power able from Raspberry Pi Pico) |
| Sampling time | 2 seconds | 1 second |
| Current rating | 4to4 to 4to10 | 1to1 to 1to5 |
| Output data type | float | int |
| Pinout | 4-pin (same as DHT11) | 4-pin (same as DHT22) |
| Price | 5 | 2 |
As you can see from the above comparison table that DHT22 offers wider temperature range and resolution for temperature and humidity. But it is more expensive than DHT11. However, DHT11 has a better sampling period. Furthermore, the operating voltage range for both sensors is almost and we can directly power these sensors from power pins of Raspberry Pi Pico.
Regardless of above differences, both DHT sensors have the same working principle and same pinout. We can use the same MicroPython script to read temperature and humidity readings by selecting DHT type inside the code.
DHT sensors are pre-calibrated. We can directly connect them with Raspberry Pi Pico to obtain sensor output reading. They are internally composed of a humidity sensing sensor and a thermistor. These two components measure humidity and temperature.
DHT11/DHT22 Pinout
This following figure shows the pinout diagram of DHT sensors. DHT sensor consists of four pins. But on DHT modules only three pins are exposed to the pinout of the module and10k ohm pull-up resistor is internally connected to pin 2.

Pin Description
The following lists the pinout of the DHT sensor and their brief description. Pin number starts from left to right when you hold the sensor from the front end.
| DHT11/DHT22 Pin | Connection with Raspberry Pi Pico |
|---|---|
| 1 ( VCC) | 3.3V |
| 2 (Data Out) | Any GPIO pins of Raspberry Pi Pico along with 10k ohm pull-up resistor |
| 3 (NC) | Not used |
| 4 (GND) | Ground |
- Vcc is the power supply pin. Apply voltage in a range of 3.3 V to 5.0 V to this pin
- Data Out is the digital output pin. It sends out the value of measured temperature and humidity in the form of serial data
- N/C is not connected
- GND: Connect the GND pin
Parts Required
You will need following components
- Raspberry Pi Pico
- DHT11 and DHT22
- Bread Board
- 10K ohm resistor (not required if using the module version of the sensor)
- Jumper wires
DHT22 Interfacing with Raspberry Pi Pico
Connect the DHT22 to Raspberry Pi Pico along with a 10K ohm pull-up resistor. The connection diagram is shown in the picture below.

Raspberry Pi Pico with DHT22 connection diagram
- The first pin for both sensors is a power supply(Vcc) pin. Connect it with the 3.3 volt pin of Raspberry Pi Pico.
- Data out is the pin through which we get temperature and humidity samples from the DHT sensor. Connect this pin with GPIO2 of Raspberry Pi Pico and also connect the data pin with a 10k pull-up resistor. But you can also use any digital pin of Raspberry Pi Pico as well.
A Pull-up resistor is used to keep the data pin high for proper communication between the microcontroller and sensor. You can check the datasheet of DHT11 and DHT22 to get more information about it. DHT22 is also known by the name of AM2302.
- Third pin is not used
- Connect the fourth pin (GND) to the ground pin of the board

Now let’s look at the MicroPython script for DHT11/DHT22 to get sensor readings. Copy the following code to the main.py file and upload the main.py file to Raspberry Pi Pico.
This MicroPython script reads temperature and humidity readings from the DHT22 sensor and prints it on the MicroPython shell console.
from machine import Pin
from time import sleep
import dht

sensor = dht.DHT22(Pin(2))

while True:
    sensor.measure()
    temp = sensor.temperature()
    hum = sensor.humidity()
    print("Temperature: {}°C   Humidity: {:.0f}% ".format(temp, hum))
    sleep(2)
How the Code Works?
Firstly, we import Pin, dht and sleep module so that we will be able to access it methods through its defined classes.
from machine import Pin
from time import sleep
import dht
Next, we will define a dht object named ‘sensor’ and assign the data pin to it. Here we are using DHT22 sensor with data pin connected at GPIO2. If using DHT11 replace ‘DHT22’ with ‘DHT11’ and change the pin number appropriately.
sensor = dht.DHT22(Pin(2))Inside the infinite loop, we will obtain the temperature and humidity reading and save it in ‘temp’ and ‘hum’ respectively. These will be printed in the shell console after a delay of 2 seconds.
while True:
    sensor.measure()
    temp = sensor.temperature()
    hum = sensor.humidity()
    print("Temperature: {}°C   Humidity: {:.0f}% ".format(temp, hum))
    sleep(2)
Demo
To test the MicroPython script for DHT22 with Raspberry Pi Pico, upload the main.py file to your board.
You will see the sensor readings getting printed on shell console after every two seconds as follows:

MicroPython Displaying DHT11/DHT22 Sensor values on OLED Display with Raspberry Pi Pico
In this section, we will see how to display DHT readings on a 0.96 SSD1306 OLED display using MicroPython and Raspberry Pi Pico.
SSD1306 OLED Display MicroPython Library
For an OLED display, we will also need to upload a library to Raspberry Pi Pico.
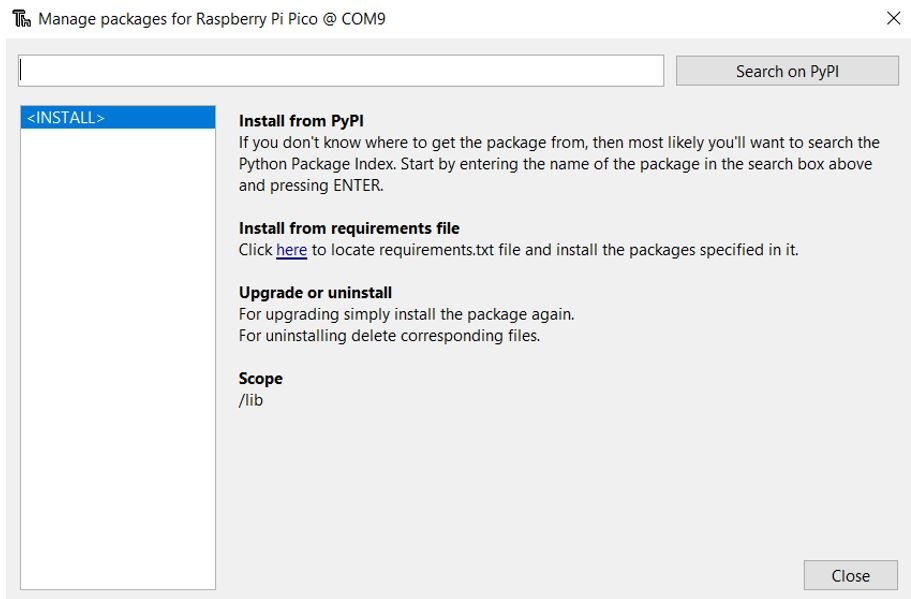
- To successfully do that, open your Thonny IDE with your Raspberry Pi Pico plugged in your system. Go to Tools > Manage Packages. This will open up the Thonny Package Manager.
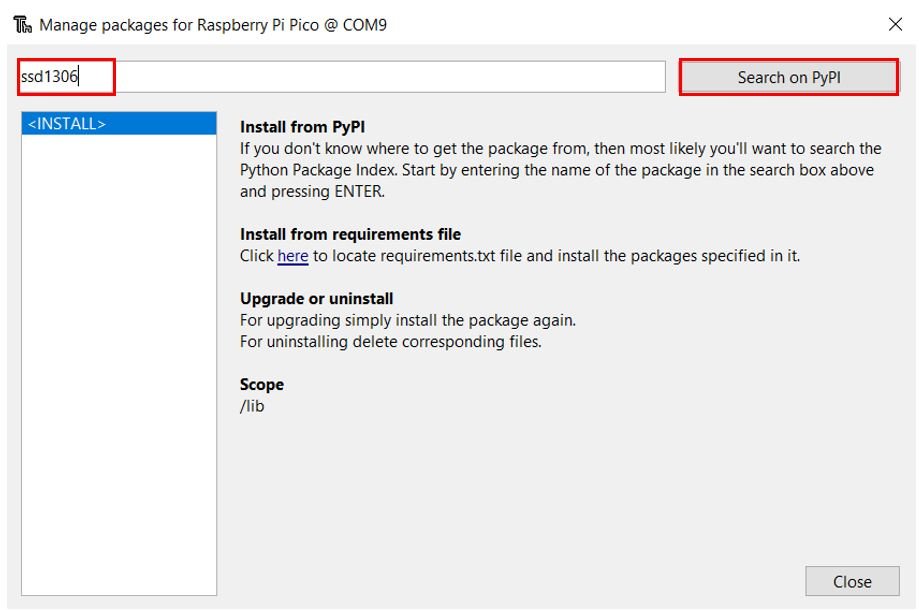
- Search for “ssd1306” in the search bar by typing its name and clicking the button ‘Search on PyPI.’
- From the following search results click on the one highlighted below: micropython-ssd1306
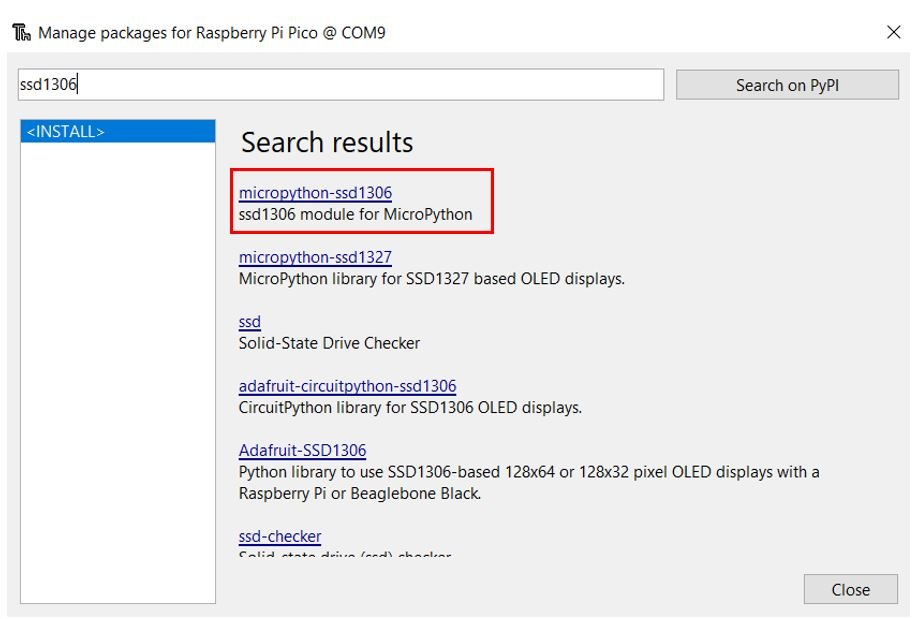
Install this library.

After a few moments this library will get successfully installed. Now we are ready to program our Raspberry Pi Pico with OLED display.
Connecting SSD1306 OLED Display with Raspberry Pi Pico and DHT11/DHT22
We will need the following components to connect our Raspberry Pi Pico with the OLED Display and HC-SR04.
- Raspberry Pi Pico
- DHT11/DHT22
- SSD1306 OLED Display
- Connecting Wires
The OLED display has 4 terminals which we will connect with the Raspberry Pi Pico. As the OLED display requires an operating voltage in the range of 3.3-5V hence we will connect the VCC terminal with 3.3V which will be in common with the board and sensor. SCL of the display will be connected with the SCL pin of the module and the SDA of the display will be connected with the SDA of the module. The ground of all three devices will be held common.
The connections between the three devices which we are using can be seen below.
| SSD1306 OLED Display | Raspberry Pi Pico |
|---|---|
| VCC | 3.3V |
| SDA | GP0 (I2C0 SDA) |
| SCL | GP1 (I2C0 SCL) |
| GND | GND |
| DHT11/DHT22 | Raspberry Pi Pico |
|---|---|
| Pin 1 (VCC) | 3.3V |
| Pin 2 (Data Out) | GP2 |
| Pin 3 (NC) | Not used |
| Pin 4 (GND) | GND |
Schematic Raspberry Pi Pico with OLED and DHT22
Follow the schematic diagram below connect them accordingly.
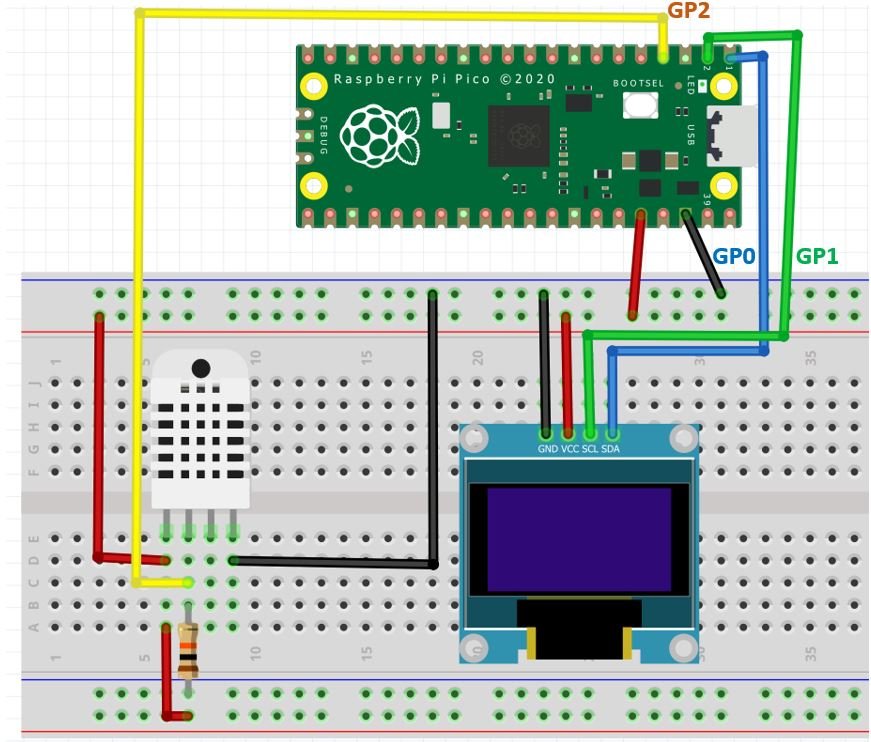
Raspberry Pi Pico with DHT22 and OLED connection diagram

MicroPython Code: Displaying DHT22 Readings on OLED Display
from machine import Pin, I2C
from time import sleep
import dht
from ssd1306 import SSD1306_I2C

sensor = dht.DHT22(Pin(2))
i2c=I2C(0,sda=Pin(0), scl=Pin(1), freq=400000)    #initializing the I2C method
oled = SSD1306_I2C(128, 64, i2c)

while True:
    oled.fill(0)
    sensor.measure()
    temp = str(sensor.temperature())
    hum = str(sensor.humidity())
    oled.text("Temperature",0,0)
    oled.text(temp +" C",0,10)
    oled.text("Humidity",0,35)
    oled.text(hum + " %",0,45)
    oled.show()
    sleep(2)
How Does the Code Work?
In the section, we only explained the MicroPython code part which is used to display DHT22 sensor values on OLED. Because rest of the code is the same as we have used in the previous section to display the sensor readings on the shell console.
We will import the ssd1306 which is the OLED display library that we installed earlier. This will help us in accessing all the functions defined inside it. Also, we will be importing the Pin class and I2C class from the machine module. This is because we have to specify the pin for I2C communication.
from machine import Pin, I2C
from ssd1306 import SSD1306_I2C
Next, we will initialize the I2C GPIO pins for SCL and SDA respectively. We have used the I2C0 SCL and I2C0 SDA pins.
We have created an I2C() method which takes in four parameters. The first parameter is the I2C channel that we are using. The second parameter specifies the I2C GPIO pin of the board which is connected to the SDA line. The third parameter specifies the I2C GPIO pin of the board which is connected to the SCL line. The last parameter is the frequency connection.
We are setting the SCL on pin 1 and the SDA on pin 0.
i2c=I2C(0,sda=Pin(0), scl=Pin(1), freq=400000) #initializing the I2C method
Now, we will create an object ‘oled’ of SSD1306_I2C which uses the width, height, and the i2c object as parameters.
oled = SSD1306_I2C(128, 64, i2c)Clears the OLED display with led.fill() routine.
oled.fill(0)Finally, display the text along with temperature and humidity readings on OLED after every 2 seconds.
    sensor.measure()
    temp = str(sensor.temperature())
    hum = str(sensor.humidity())
    oled.text("Temperature",0,0)
    oled.text(temp +" C",0,10)
    oled.text("Humidity",0,35)
    oled.text(hum + " %",0,45)
    oled.show()
    sleep(2)
In the end, call the show() method on the oled method for changes to show on OLED.
oled.show()Demonstration
Upload the above code as main.py file to Raspberry Pi Pico. You will get DHT22 readings on the OLED display as follows:

We have other guides with popular sensors:
- HC-SR04 Ultrasonic Sensor with Raspberry Pi Pico using MicroPython
- DS18B20 Temperature Sensor with Raspberry Pi Pico using MicroPython
- MPU6050 with Raspberry Pi Pico (Accelerometer, Gyroscope, and Temperature)
- BME280 with Raspberry Pi Pico using MicroPython
You may also like to read other DHT11 and DHT22 tutorials:
- DHT11/DHT22 Web Server ESP8266 NodeMCU using Arduino IDE
- ESP32 DHT11 and DHT22 Web Server using Arduino IDE
- DHT11 DHT22 with Arduino – Display Readings on OLED
- DHT11 DHT22 with ESP8266 NodeMCU – Display Readings on OLED
- DHT22 Data Logger with Arduino and Micro SD Card
- DHT11 DHT22 with ESP32 – Display Readings on OLED
- MicroPython: DHT11/DHT22 Web Server with ESP32/ESP8266 (Weather Station)