Blog · React Native for Windows + macOS (original) (raw)
React Native builds on top of the native platform for every OS it runs on; on Windows, this translates to producing a Universal Windows Platform (UWP) app.
We heard from some of our customers that build times for these types of apps can be pretty long - especially so when building the React Native for Windows framework from source. To mitigate this problem we offer pre-built binary distributions of the framework in the form of NuGet packages. This works pretty well but has a few shortcomings: even when not building the framework itself, building a UWP app requires several build steps behind the scenes (the steps below are what happens for C++/WinRT apps):
- the MIDL compiler is run to turn IDL files into Windows Metadata - this is required to produce information used by the XAML compiler
- the XAML compiler is invoked to convert XAML markup files into C++ code
- the MDMerge tool runs to merge all Windows Metadata files from the application
- C++/WinRT is invoked to turn Windows Metadata into C++ projection headers as well as component sources
- Only then, the C++ compiler and linker run on the app
We set out to address this since a lot of applications won't need to customize their native code (e.g. by having XAML UI that isn't rendered by RNW); these greenfield applications consist of the bare-bones native UWP app, and all of their app logic is confined to their JavaScript (and whatever native modules they require).
Enter CoreApp
To solve this issue, we came up with a very lean, yet flexible, API that enables a UWP Core Application (the kind that doesn't require XAML, or any interface definition) to host these greenfield apps. We call this API CoreApp. When using the CoreApp API, the React Native for Windows framework provides the required XamlApplication object as well as a simple XAML Page object, which contains a React root view.
This is a new, experimental C API that comes in two flavors:
RNCoreAppStart
void RNCoreAppStart(RNCoreAppCallback launched, void *data)
This API starts a CoreApp, and upon launch, it will call your app back and pass some optional custom data to it as a parameter. The callback enables you to customize a number of parameters, like your bundle name, app name, etc. See CoreApp Schema below for more info.
RNCoreAppStartFromConfigJson
void RNCoreAppStartFromConfigJson(wchar_t const *configJson,
      RNCoreAppCallback launched,
      void *data)
This API is similar to the previous one but it takes a path to a JSON configuration file. The callback is optional in this case, since more often than not, the configuration file will have all the necessary information.
The launched callback above gives you an output RNCoreApp structure, where you can set a number of parameters, as well as the data parameter that you passed in when you called the CoreApp API.
The contents of the RNCoreApp structure can be fully set via the JSON configuration file, so next we'll take a look at what is in this JSON configuration file.
CoreApp schema
Below are the properties you can set in your app.config.json, with their default values. These properties correspond to properties on the ReactInstanceSettings type.
{
  "jsBundleFile": "index.windows",
  "bundleRootPath": "ms-appx:///Bundle/",
  "componentName": null, // Required, this is your App's component name
  "useWebDebugger": true,
  "useFastRefresh": true,
  "useDeveloperSupport": true,
  "useDirectDebugger": false,
  "requestInlineSourceMap": true,
  "enableDefaultCrashHandler": false,
  "debuggerPort": 9229,
  "sourceBundlePort": 8081,
  "sourceBundleHost": "localhost",
  "jsEngine": "chakra", // possible values: "chakra", "hermes"
  "viewName": null, // adds an optional title to the window
  "nativeModules": [
    {
      // this corresponds to the DLL that hosts the native module,
      // or the name of the app's exe (or null) if the module is locally defined
      "moduleContainer": null,

      // the name of the factory function to call to produce a ReactPackageProvider for
      // the module; see Using native modules below.
      "factory": null,

    }
  ],
  "properties": {
    // these are all optional. They correspond to properties that will get set in the
    // ReactPropertyBag for the instance. Some examples:
    "someString": "string value",
    "someNumber": 42.5,
    "someBoolean": true,
    "namespace1.namespace2.foo": 22
  }
}
For building in Debug mode, your app will usually only need to set a few properties: componentName, and the native modules it uses.
Using native modules
There are a couple of ways that a CoreApp can load native modules.
The simplest way is using the RNCoreAppStartFromConfigJson API. As we saw above, this API allows us to pass an optional DLL name to load and a plain C function to call in that DLL, to produce the ReactPackageProvider for the module. Here's what this function would look like:
extern "C" __declspec(dllexport) void *__cdecl MySpecialPackageProvider() {
  auto provider = winrt::make<MyModulePackageProvider>();
  void *abi{nullptr};
  winrt::copy_to_abi(provider, abi);
  return abi;
}
This snippet will declare a plain C function (this is important so that C++ name mangling mechanism doesn't come into play, which is required to be able to use the function name in the JSON file), and export it from the DLL (or the application's EXE). It takes no parameters, and simply return a pointer to the package provider for the module.
If using RNCoreAppStart, you can create each the ReactPackageProvider for each native module you use, and pass it in the packageProvidersAbi and packageProvidersAbiCount members of the RNCoreApp structure:
app->packageProvidersAbiCount = 1;
app->packageProvidersAbi =
    reinterpret_cast<void **>(CoTaskMemAlloc(sizeof(void *) * app->packageProvidersAbiCount));
app->packageProvidersAbi[0] = MySpecialPackageProvider();
where MySpecialPackageProvider is the same as above, only that the extern "C" __declspec(dllexport) part is not required since we don't care about the name, or exporting the function.
Get Started
For a sample, take a look at the Calculator CoreApp NuGet project in /samples/CalculatorCoreAppNuGet.
Wrapping up
With the RNCoreApp approach - combined with NuGet distribution - we are seeing extremely fast native builds; builds that used to take 15-30 minutes now are down to 10-15 seconds. Because your application actually has very little native code to build, and all of the native logic is encapsulated for you in the React Native for Windows framework, you can get back to being productive in JavaScript, avoid hard-to-diagnose native code errors, and ship your app more quickly!
Compare the calculator sample app (C++/WinRT, not using NuGet, not using CoreApp), takes almost 15 minutes to build: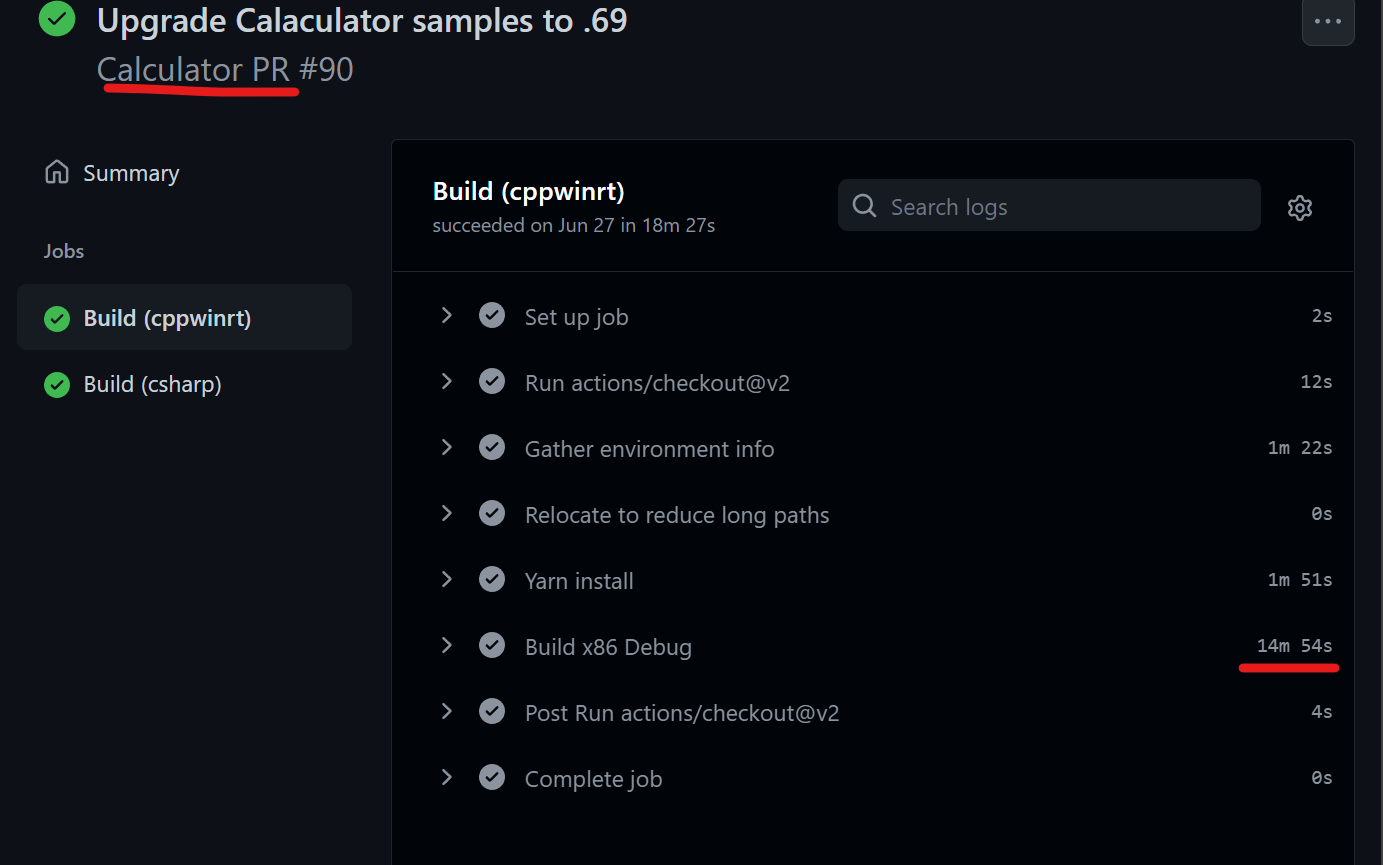
The same app built using NuGet (but not CoreApp), slashes this to 3.5 minutes: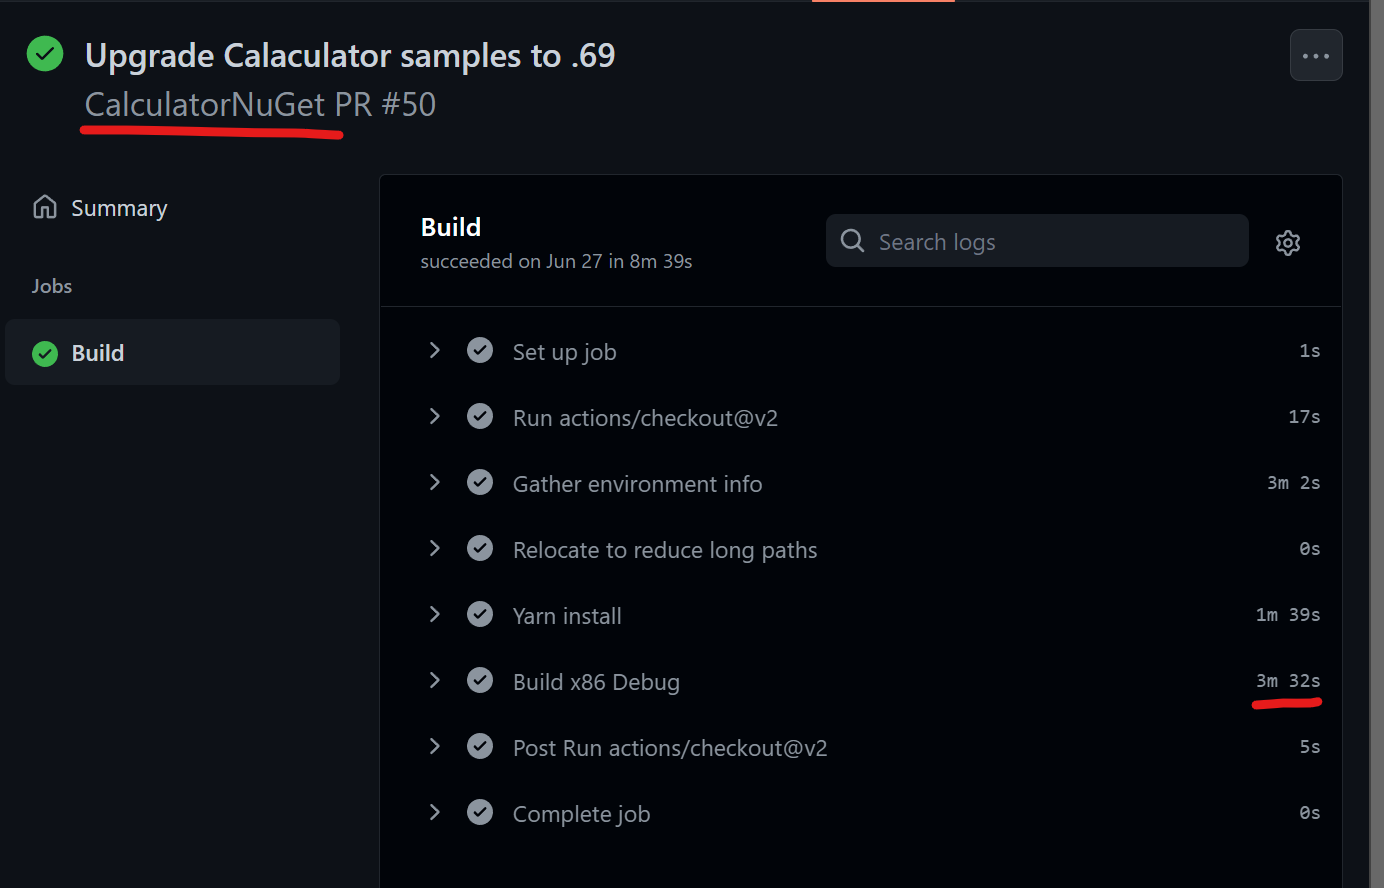
Meanwhile the CoreApp calculator sample clocks in at a speedy 1:49!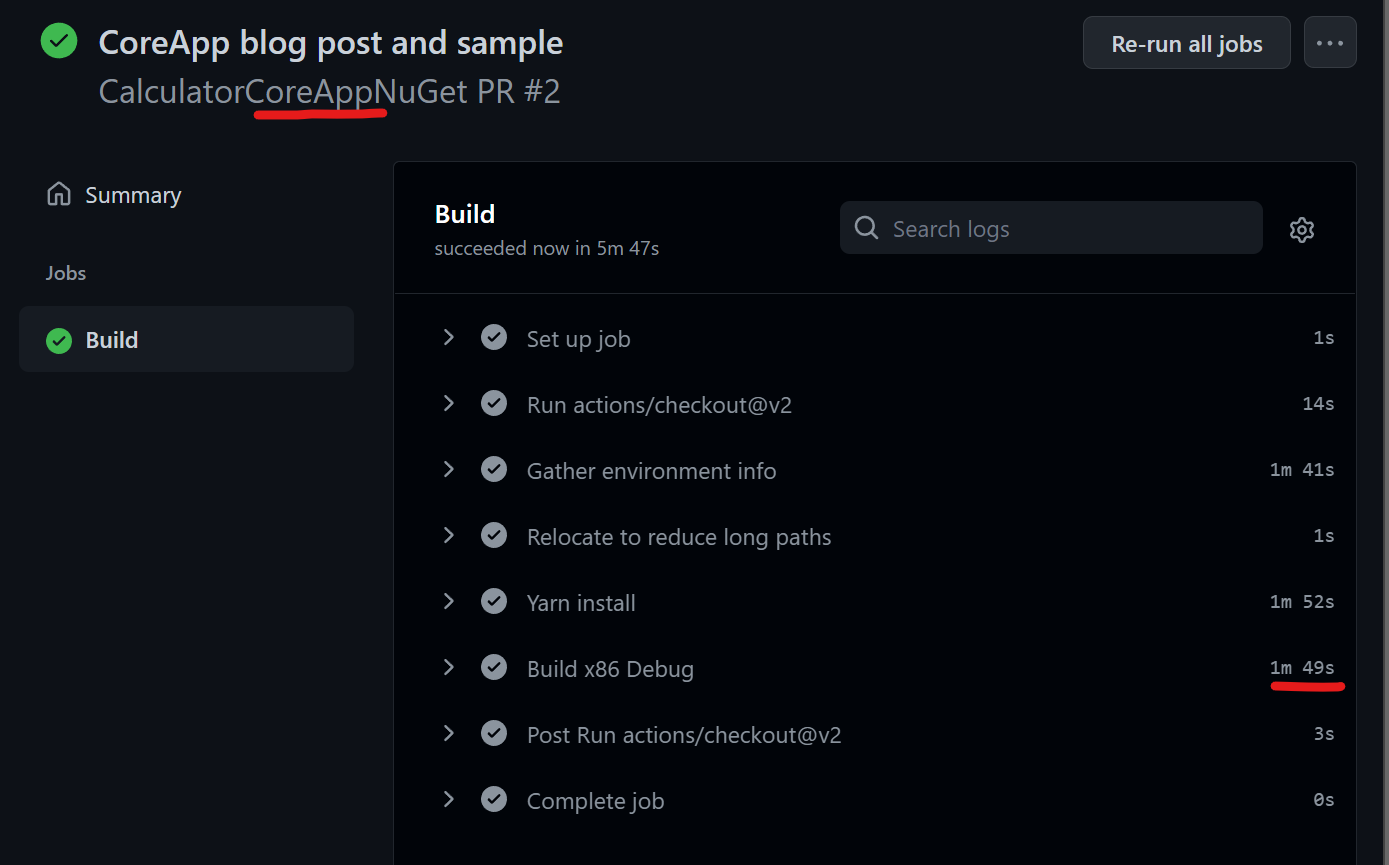
Look for this new API to make its debut in our 0.70 release, or try it today in our canary builds.
If you have any feedback, please don't hesitate to start a conversation on the GitHub repo!
React Native isn’t just for mobile! Check out how the Windows 11 Settings app is leveraging React Native for Windows to deliver new features and capabilities to users faster and with the same great visual fidelity as Windows 11.
In this blog post, we discuss how and why Microsoft is using React Native for Windows to deliver the Your Microsoft Account page in Windows 11 Settings.
We are excited to announce the React Native WinRT project, a new extension that makes it easier for React Native for Windows developers to call Windows Runtime APIs directly from JavaScript! With React Native WinRT, developers can light up experiences that take advantage of unique platform features on Windows.
In this blog post, we will dive a little deeper into the technology, walk through some sample code, and show how React Native WinRT is already in use today.
The React Native WinRT repo is now public, and a preview is available for developers to get started!
If you have adopted React Native to build your Windows applications, you'll know that the final output is a Universal Windows Platform application. This development platform gives you access to all the latest enhancements in the Windows ecosystem (modern UI platform, notifications, integration with features like inking and Windows Hello, etc.), plus greater security and reliability thanks to the sandbox the application runs in. However, there might be scenarios where UWP isn't enough and you need to perform one or more tasks which are supported only by the Win32 ecosystem: working with any file on the disk without user intervention, reading a key from the registry, integrating a SDK which doesn't support the Windows Runtime.
In this post we're going to explore a solution that will enable you to get the best of both worlds: a React Native for Windows application which integrates a classic Win32 process. We're going to build a sample React Native application which will be able to read a registry key and display it. The goal is to display to the user values stored in the \HKEY_LOCAL_MACHINE\SOFTWARE\Microsoft\Windows NT\CurrentVersion hive, which contains many information about the currently installed version of Windows.
In this article, we will discuss how to enable your app to show toast notifications, which you can use to notify the user that something needs their attention, or to notify them that a long running operation has completed.
Windows 10 is one of the most powerful platforms on the market when it comes to supporting digital inking experiences. As such, the Universal Windows Platform comes with a dedicated series of controls that you can add to your application to enable inking experiences. Thanks to these controls, you can easily implements features like capturing signatures, text and shape recognition, etc.
If you're building a Windows application with React Native, there are a few options you can explore to add such a feature. One of them is using a community module called react-native-sketch-canvas, which provides a Windows implementation as well. This module is based on Win2D and it enables the recording and playback of ink strokes. While this solution can be a great fit for many applications, there are scenarios in which you need more precision and better integration with the Windows ecosystem, like when you need to capture a signature. For these purposes, Windows 10 offers a native control called InkCanvas, which enables powerful inking experiences. InkCanvas is specifically a Windows control and isn't exposed automatically by React Native. As such, we'll have to wrap it with a native UI component, which is a feature provided by React Native which exposes native UI controls for Windows, Android or iOS to the JavaScript layer using JSX.
In this article we'll walk through the process of wrapping the InkCanvas control, with the dual goals of enabling your apps to support inking and walking you through the process of creating a native UI component, which can be useful for exposing other native controls.
CodePush is a service built by Microsoft, now incorporated into the Visual Studio App Center platform, which provides a way for React Native and Cordova developers to be more agile in delivering updates to their applications. Thanks to CodePush, you are able to deliver a new bundle (which might contain updated JavaScript files, new images, etc.) without having to fully redeploy a new package. This means, for example, that you can update the content of your application published on a Store without submitting a new package and waiting for the certification process to be completed; or that you can add a new feature in your LOB app without having to redeploy it via Intune or another MDM solution to all your employees.
React Native 0.64 is out! Which means it's time to showcase all the work we've put in around supporting more community modules, TurboModules, APIs improvements, and even some tools, all in the effort to improve the developer experience.
React Native for Windows is now on a 0.63 stable release with React Native core, lighting up some fun new APIs.
React Native for Windows released latest stable 0.62.2 with Fast Refresh, RTL support, RedBox and thread safe property storage APIs.