esp8266 OTA update with Web Browser: custom web interface - 3 (original) (raw)
OTA (Over the Air) update is the process of uploading firmware to an ESP module using a Wi-Fi connection rather than a serial port. Such functionality becomes extremely useful in case of limited or no physical access to the module.
esp8266 OTA update with Web Browser: custom web interface
OTA may be done using:
- Arduino IDE
- Web Browser
- HTTP Server
First of all read the tutorial “esp8266: flash firmware binary (.bin) compiled and signed“.
In this article,e we are going to explain OTA updates via Web Browser with a custom web page.
Custom web interface
Custom Arduino OTA page
I already explain how to manage WebPage and how to do a REST calls, now we are going to manage the existing endpoint of ArduinoOTA with a custom WebPage.
First of all we are going to analize the original web page.
Original ArduinoOTA page description
The ESP8266HTTPUpdateServer wrap ESP8266WebServer and add an endpoint that in GET response with a simple page
static const char serverIndex[] PROGMEM =
R"(
Firmware:
FileSystem:
)";
static const char successResponse[] PROGMEM =
"<META http-equiv="refresh" content="15;URL=/">Update Success! Rebooting...";
Here the handle
// handler for the /update form page
_server->on(path.c_str(), HTTP_GET, [&](){
  if(_username != emptyString && _password != emptyString && !_server->authenticate(_username.c_str(), _password.c_str()))
    return _server->requestAuthentication();
  _server->send_P(200, PSTR("text/html"), serverIndex);
});
Original ArduinoOTA end points description
In POST check the name of input (firmware or filesystem) to understand if the file is for FLASH or FileSystem, then upload the file and Update service do the work, here the POST code.
// handler for the /update form POST (once file upload finishes)
_server->on(path.c_str(), HTTP_POST, [&](){
  if(!_authenticated)
    return _server->requestAuthentication();
  if (Update.hasError()) {
    _server->send(200, F("text/html"), String(F("Update error: ")) + _updaterError);
  } else {
    _server->client().setNoDelay(true);
    _server->send_P(200, PSTR("text/html"), successResponse);
    delay(100);
    _server->client().stop();
    ESP.restart();
  }
},[&](){
  // handler for the file upload, gets the sketch bytes, and writes
  // them through the Update object
  HTTPUpload& upload = _server->upload();

  if(upload.status == UPLOAD_FILE_START){
    _updaterError.clear();
    if (_serial_output)
      Serial.setDebugOutput(true);

    _authenticated = (_username == emptyString || _password == emptyString || _server->authenticate(_username.c_str(), _password.c_str()));
    if(!_authenticated){
      if (_serial_output)
        Serial.printf("Unauthenticated Update\n");
      return;
    }

    WiFiUDP::stopAll();
    if (_serial_output)
      Serial.printf("Update: %s\n", upload.filename.c_str());
    if (upload.name == "filesystem") {
      size_t fsSize = ((size_t) &_FS_end - (size_t) &_FS_start);
      close_all_fs();
      if (!Update.begin(fsSize, U_FS)){//start with max available size
        if (_serial_output) Update.printError(Serial);
      }
    } else {
      uint32_t maxSketchSpace = (ESP.getFreeSketchSpace() - 0x1000) & 0xFFFFF000;
      if (!Update.begin(maxSketchSpace, U_FLASH)){//start with max available size
        _setUpdaterError();
      }
    }
  } else if(_authenticated && upload.status == UPLOAD_FILE_WRITE && !_updaterError.length()){
    if (_serial_output) Serial.printf(".");
    if(Update.write(upload.buf, upload.currentSize) != upload.currentSize){
      _setUpdaterError();
    }
  } else if(_authenticated && upload.status == UPLOAD_FILE_END && !_updaterError.length()){
    if(Update.end(true)){ //true to set the size to the current progress
      if (_serial_output) Serial.printf("Update Success: %u\nRebooting...\n", upload.totalSize);
    } else {
      _setUpdaterError();
    }
    if (_serial_output) Serial.setDebugOutput(false);
  } else if(_authenticated && upload.status == UPLOAD_FILE_ABORTED){
    Update.end();
    if (_serial_output) Serial.println("Update was aborted");
  }
  delay(0);
});
The page do a submit without action
<form method='POST' action='' enctype='multipart/form-data'>so if the page url is http://esp8266-webupdate.local/update the post point to the same url, the difference is that the page came in GET the submit of the data is in POST.
So _server->on(path.c_str(), HTTP_GET, [&](){ serve the web page and _server->on(path.c_str(), HTTP_POST, [&](){ manage the submit of the form data.
The POST manage firmware and filesystem binary,
    if (upload.name == "filesystem") {
      size_t fsSize = ((size_t) &_FS_end - (size_t) &_FS_start);
      close_all_fs();
      if (!Update.begin(fsSize, U_FS)){//start with max available size
        if (_serial_output) Update.printError(Serial);
      }
    } else {
      uint32_t maxSketchSpace = (ESP.getFreeSketchSpace() - 0x1000) & 0xFFFFF000;
      if (!Update.begin(maxSketchSpace, U_FLASH)){//start with max available size
        _setUpdaterError();
      }
    }
and use the name of input file
name equal firmware to save sketch compiled binary
name equal filesytem to save filesystem binary. The upload is managed via standard multipart/form-data.
Web pages
For this test I create 2 web pages all in vanilla js and CSS.
You can find a simple project with these pages here on GitHub.
Download the project with the relative link or via GitHub client.
In the main directory of the project launch these commands
Now you can find in minified direcotry these files:
- index_black_white.html
- index_black_white.html.gz
- index_black_white_ita.html
- index_black_white_ita.html.gz
- index_color.html
- index_color.html.gz
- index_color_ita.html
- index_color_ita.html.gz
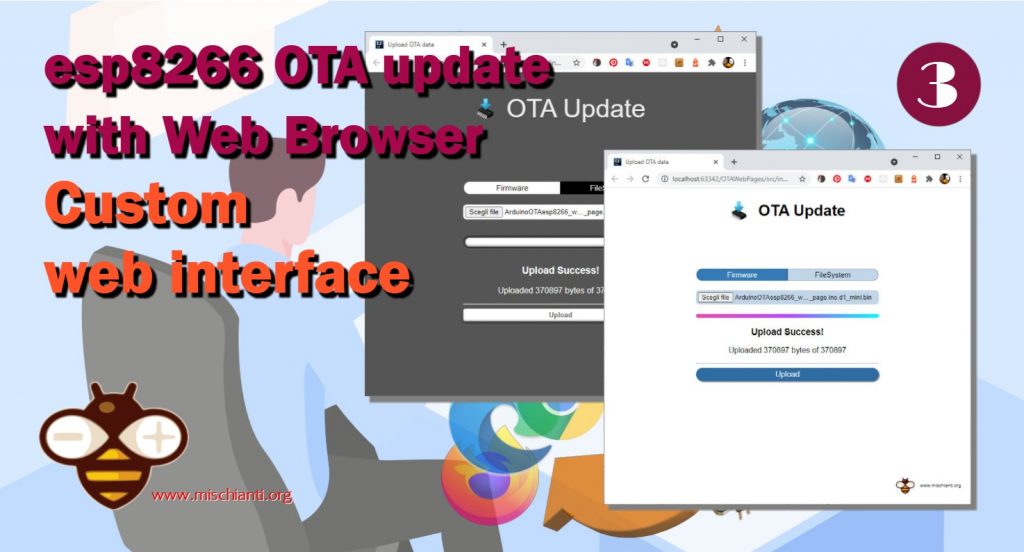
The result of these 2 simple pages is this.
Color version

ArduinoOTA custom color web page
Here the page
Upload OTA data