FTP server on esp8266 and esp32 (original) (raw)
When I develop a new solution, I’d like to divide the application into layers, and so I’d like to focus my attention on only one aspect at a time.
In detail, I separate the REST layer (written inside the microcontroller) and the Front-End (composed in Angular, React/Redux, or vanilla JS), so I’d like to upload a new web interface directly to the microcontroller via FTP.

FTP file transfer on esp8266 or esp32
For static information (Web pages, for example) that do not change frequently, esp8266 or esp32 have internal SPIFFS (SPI Flash File System). You can upload data via Arduino IDE as explained in the article “WeMos D1 mini (esp8266), integrated SPIFFS Filesystem” for esp8266 or “ESP32: integrated SPIFFS FileSystem” for esp32 or with LittleFS “WeMos D1 mini (esp8266), integrated LittleFS Filesystem” for esp8266 or “ESP32: integrated LittleFS FileSystem” for esp32 or “ESP32: integrated FFat (FAT/exFAT) FileSystem” but for fast operation and future support It usefully uses FTP.
I find a simple library that works quite well, and It’s not hungry for resources; you can find It here.
In time, this library becomes buggy and had deficient support, so I fix It, and now you can retrieve the library from here.
Library
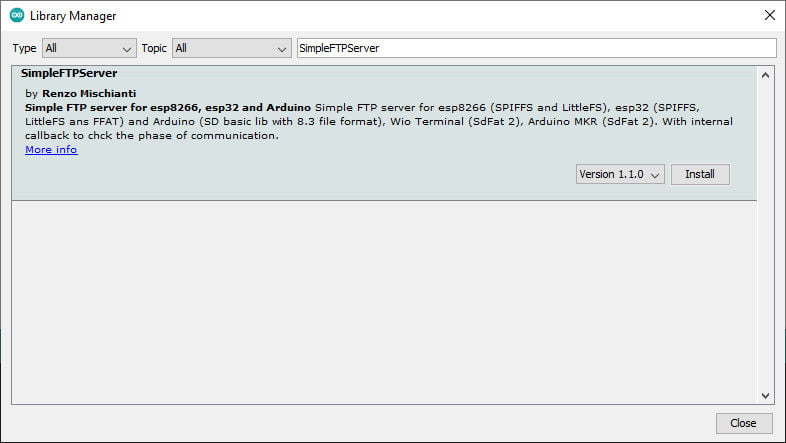
The library is available directly from the Library Manager of Arduino IDE.

SimpleFTPServer on Arduino library manager
Or the source code from GitHub.
You can find my library here.
To download.
Click the DOWNLOADS button in the top right corner, and rename the uncompressed folder SimpleFTPServer.
Check that the SimpleFTPServer contains FtpServer.cpp, FtpServer.h, FtpServerKey.h e SimpleFTPServer.h .
Place the SimpleFTPServer library folder in your /libraries/ folder.
You may need to create the libraries subfolder if it’s your first library.
Restart the IDE.
Select FS on esp8266
You can also enable LittleFS for esp8266 by editing the line in the FtpServerKey.h file
#define DEFAULT_STORAGE_TYPE_ESP8266 STORAGE_SPIFFSin
#define DEFAULT_STORAGE_TYPE_ESP8266 STORAGE_LITTLEFSUsage
Here is an example for esp8266
/*
- WeMos D1 mini (esp8266)
- Start FTP server to upload data on SPIFFS
- by Mischianti Renzo https://mischianti.org
- https://mischianti.org/wemos-d1-mini-esp8266-integrated-spiffs-filesistem-part-2/
- */
#include "Arduino.h"
#include <ESP8266WiFi.h> #include <SimpleFtpServer.h>
const char* ssid = "YOUR_SSID"; const char* password = "YOUR_PASS";
FtpServer ftpSrv; //set #define FTP_DEBUG in ESP8266FtpServer.h to see ftp verbose on serial
void setup(void){ Serial.begin(115200); WiFi.begin(ssid, password); Serial.println("");
// Wait for connection while (WiFi.status() != WL_CONNECTED) { delay(500); Serial.print("."); } Serial.println(""); Serial.print("Connected to "); Serial.println(ssid); Serial.print("IP address: "); Serial.println(WiFi.localIP());
/////FTP Setup, ensure SPIFFS is started before ftp; ///////// if (SPIFFS.begin()) { // SPIFFS.format(); Serial.println("SPIFFS opened!"); ftpSrv.begin("esp8266","esp8266"); //username, password for ftp. set ports in ESP8266FtpServer.h (default 21, 50009 for PASV) } } void loop(void){ ftpSrv.handleFTP(); //make sure in loop you call handleFTP()!! }
Select FS on esp32
You can also enable LittleFS for esp32 by editing the line in the FtpServerKey.h file
#define DEFAULT_STORAGE_TYPE_ESP32 STORAGE_SPIFFSin
#define DEFAULT_STORAGE_TYPE_ESP32 STORAGE_LITTLEFSor this for FFAT
#define DEFAULT_STORAGE_TYPE_ESP32 STORAGE_FFATHere the complete list of options.
#define STORAGE_SDFAT1 1 // Library SdFat version 1.4.x #define STORAGE_SDFAT2 2 // Library SdFat version >= 2.0.2 #define STORAGE_SPIFM 3 // Libraries Adafruit_SPIFlash and SdFat-Adafruit-Fork #define STORAGE_FATFS 4 // Library FatFs #define STORAGE_SD 5 // Standard SD library (suitable for Arduino esp8266 and esp32 #define STORAGE_SPIFFS 6 // SPIFFS #define STORAGE_LITTLEFS 7 // LITTLEFS #define STORAGE_SEEED_SD 8 // Seeed_SD library #define STORAGE_FFAT 9 // ESP32 FFAT #define STORAGE_SD_MMC 10 // SD_MMC library
Not all are compatible with our device.
Usage
Here for esp32
/*
- ESP32 Dev Kit (esp32)
- Start FTP server to upload data on SPIFFS
- by Mischianti Renzo https://mischianti.org
- https://mischianti.org/wemos-d1-mini-esp8266-integrated-spiffs-filesistem-part-2/
- */
#include <WiFi.h> #include "SPIFFS.h"
#include <SimpleFtpServer.h>
const char* ssid = "YOUR_SSID"; const char* password = "YOUR_PASS";
FtpServer ftpSrv; //set #define FTP_DEBUG in ESP8266FtpServer.h to see ftp verbose on serial
void setup(void){ Serial.begin(115200); WiFi.begin(ssid, password); Serial.println("");
// Wait for connection while (WiFi.status() != WL_CONNECTED) { delay(500); Serial.print("."); } Serial.println(""); Serial.print("Connected to "); Serial.println(ssid); Serial.print("IP address: "); Serial.println(WiFi.localIP());
/////FTP Setup, ensure SPIFFS is started before ftp; /////////
if (SPIFFS.begin(true)) {
Serial.println("SPIFFS opened!");
ftpSrv.begin("esp8266","esp8266"); //username, password for ftp. set ports in ESP8266FtpServer.h (default 21, 50009 for PASV)
}
}
void loop(void){
ftpSrv.handleFTP(); //make sure in loop you call handleFTP()!!
}
This library support only passive mode and you must force only one connection at time.
I use FileZilla as a client, and you can download It here; It is pretty simple to use and configure.
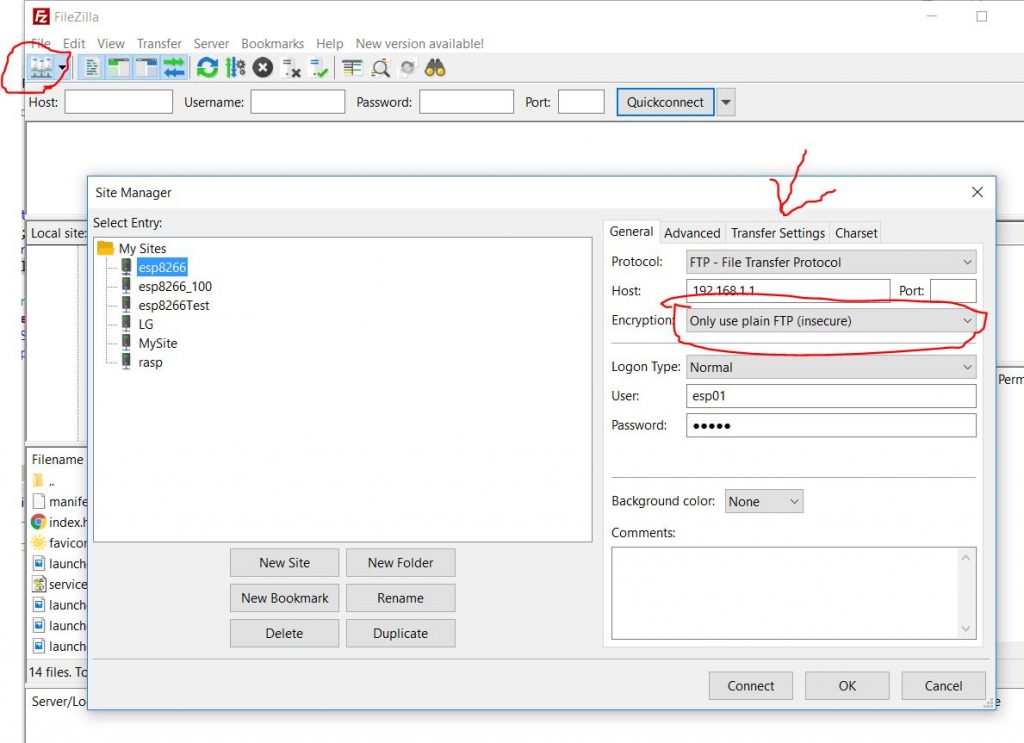
Filezilla configuration for access esp8266, select plain FTP on Manage Site
First, you must go on Manage site --> New site and now set this parameter:
- Select
FTPas protocol; - Select
Use plain FTP (insecure); - Set your login and password (you choose that in the sketch);
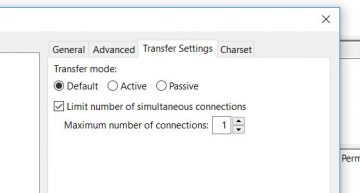
- Than on
Trasfer settingsselectMaximun number of connectionequal 1; - Now connect to your device.
Filezilla configuration for access esp8266, select max num connections
Now, you can manage your SPIFFS with drag and drop.
Remember that SPIFFS does not manage folders, so all files must be flat.
Test
To check the upload, you can use the simple sketch used in the SPIFFS article linked up:
/*
- WeMos D1 mini (esp8266)
- SPIFFS get info, read dir and show all file uploaded
- add a data folder to use with esp8266 data uploader
- by Mischianti Renzo https://mischianti.org
- https://mischianti.org/wemos-d1-mini-esp8266-integrated-spiffs-filesistem-part-2/
- */
#include "Arduino.h" #include "FS.h"
void setup() { Serial.begin(112500);
delay(500);

Serial.println(F("Inizializing FS..."));
if (SPIFFS.begin()){
    Serial.println(F("done."));
}else{
    Serial.println(F("fail."));
}

// To format all space in SPIFFS
// SPIFFS.format()

// Get all information of your SPIFFS
FSInfo fs_info;
SPIFFS.info(fs_info);

Serial.println("File sistem info.");

Serial.print("Total space:      ");
Serial.print(fs_info.totalBytes);
Serial.println("byte");

Serial.print("Total space used: ");
Serial.print(fs_info.usedBytes);
Serial.println("byte");

Serial.print("Block size:       ");
Serial.print(fs_info.blockSize);
Serial.println("byte");

Serial.print("Page size:        ");
Serial.print(fs_info.totalBytes);
Serial.println("byte");

Serial.print("Max open files:   ");
Serial.println(fs_info.maxOpenFiles);

Serial.print("Max path length:  ");
Serial.println(fs_info.maxPathLength);

Serial.println();

// Open dir folder
Dir dir = SPIFFS.openDir("/");
// Cycle all the content
while (dir.next()) {
    // get filename
    Serial.print(dir.fileName());
    Serial.print(" - ");
    // If element have a size display It else write 0
    if(dir.fileSize()) {
        File f = dir.openFile("r");
        Serial.println(f.size());
        f.close();
    }else{
    	Serial.println("0");
    }
}
}
void loop() {
}
Test with callback
An interesting feature I added recently was the callback on some action
/*
- FtpServer esp8266 and esp32 with SPIFFS
- AUTHOR: Renzo Mischianti
- https://mischianti.org/ftp-server-on-esp8266-and-esp32
- */
#ifdef ESP8266 #include <ESP8266WiFi.h> #elif defined ESP32 #include <WiFi.h> #include "SPIFFS.h" #endif
#include <SimpleFTPServer.h>
const char* ssid = "YOUR_SSID"; const char* password = "YOUR_PASS";
FtpServer ftpSrv; //set #define FTP_DEBUG in ESP8266FtpServer.h to see ftp verbose on serial
void _callback(FtpOperation ftpOperation, unsigned int freeSpace, unsigned int totalSpace){ switch (ftpOperation) { case FTP_CONNECT: Serial.println(F("FTP: Connected!")); break; case FTP_DISCONNECT: Serial.println(F("FTP: Disconnected!")); break; case FTP_FREE_SPACE_CHANGE: Serial.printf("FTP: Free space change, free %u of %u!\n", freeSpace, totalSpace); break; default: break; } }; void _transferCallback(FtpTransferOperation ftpOperation, const char* name, unsigned int transferredSize){ switch (ftpOperation) { case FTP_UPLOAD_START: Serial.println(F("FTP: Upload start!")); break; case FTP_UPLOAD: Serial.printf("FTP: Upload of file %s byte %u\n", name, transferredSize); break; case FTP_TRANSFER_STOP: Serial.println(F("FTP: Finish transfer!")); break; case FTP_TRANSFER_ERROR: Serial.println(F("FTP: Transfer error!")); break; default: break; }
/* FTP_UPLOAD_START = 0,
- FTP_UPLOAD = 1,
- FTP_DOWNLOAD_START = 2,
- FTP_DOWNLOAD = 3,
- FTP_TRANSFER_STOP = 4,
- FTP_DOWNLOAD_STOP = 4,
- FTP_UPLOAD_STOP = 4,
- FTP_TRANSFER_ERROR = 5,
- FTP_DOWNLOAD_ERROR = 5,
- FTP_UPLOAD_ERROR = 5 */ };
void setup(void){ Serial.begin(115200); WiFi.begin(ssid, password); Serial.println("");
// Wait for connection while (WiFi.status() != WL_CONNECTED) { delay(500); Serial.print("."); } Serial.println(""); Serial.print("Connected to "); Serial.println(ssid); Serial.print("IP address: "); Serial.println(WiFi.localIP());
/////FTP Setup, ensure SPIFFS is started before ftp; /////////
/////FTP Setup, ensure SPIFFS is started before ftp; ///////// #ifdef ESP32 //esp32 we send true to format spiffs if cannot mount if (SPIFFS.begin(true)) { #elif defined ESP8266 if (SPIFFS.begin()) { #endif ftpSrv.setCallback(_callback); ftpSrv.setTransferCallback(_transferCallback);
  Serial.println("SPIFFS opened!");
  ftpSrv.begin("esp8266","esp8266");    //username, password for ftp.   (default 21, 50009 for PASV)
}
}
void loop(void){
ftpSrv.handleFTP(); //make sure in loop you call handleFTP()!!
// server.handleClient(); //example if running a webserver you still need to call .handleClient();
}
Here is a simple upload of a README.md file.
....... Connected to reef-casa-sopra IP address: 192.168.1.127 LittleFS opened! FTP: Connected! FTP: Upload start! FTP: Upload of file README.md byte 1072 FTP: Upload of file README.md byte 3120 FTP: Upload of file README.md byte 3559 FTP: Finish transfer! FTP: Free space change, free 1019904 of 1036288!

