i2c Arduino: how to create network, parameters and address scanner (original) (raw)
I love the I2C protocol, and when I need a sensor, every time I try to find one with this protocol, I have also written some libraries for various sensors that use I2C. So I want to write some articles explaining (Arduino, Arduino SAMD MKR, esp8266, and esp32) some exciting features, and I will try to explain how to solve the problems you can have when working with multiple I2C devices.
Arduino i2c protocol
In this first article, we will check how to create a network with our Arduino UNO and MEGA. Arduino has an interesting feature that can work as a Master and as a Slave.
Toggle
Introduction to I2C protocol
I2C (Inter-Integrated Circuit, eye-squared-C) is alternatively known as I2C or IIC. It is a synchronous, multi-master, multi-slave, packet switched, single-ended, serial communication bus. It was invented in 1982 by Philips Semiconductors. It is widely used for attaching lower-speed peripheral ICs to processors and microcontrollers in short-distance, intra-board communication. (cit. WiKi)
Speed
I2C supports 100 kbps, 400 kbps, and 3.4 Mbps. Some variants also support 10 Kbps and 1 Mbps.
| Mode | Maximum speed | Maximum capacitance | Drive | Direction |
|---|---|---|---|---|
| Standard-mode (Sm) | 100 kbit/s | 400 pF | Open drain | Bidirectional |
| Fast-mode (Fm) | 400 kbit/s | 400 pF | Open drain | Bidirectional |
| Fast-mode Plus (Fm+) | 1 Mbit/s | 550 pF | Open drain | Bidirectional |
| High-speed mode (Hs) | 1.7 Mbit/s | 400 pF | Open drain | Bidirectional |
| High-speed mode (Hs) | 3.4 Mbit/s | 100 pF | Open drain | Bidirectional |
| Ultra Fast-mode (UFm) | 5 Mbit/s | Push-pull | Unidirectional |
Interface
Like UART communication, I2C only uses two wires to transmit data between devices:
- SDA (Serial Data) – The line for the master and slave to send and receive data.
- SCL (Serial Clock) – The line that carries the clock signal (standard clock signal between multiple masters and multiple slaves).
I2C is a serial communication protocol, so data is transferred bit by bit along a single wire (the SDA line).
Like SPI, I2C is synchronous, so the output of bits is synchronized to the sampling of bits by a clock signal shared between the master and the slave. The master always controls the clock signal.
There will be multiple slaves and multiple masters, and all masters can communicate with all the slaves.

i2c data packet
- Start: The SDA line switches from a high voltage level to a low voltage level before the SCL line switches from high to low.
- Stop: The SDA line switches from a low voltage level to a high voltage level after the SCL line switches from low to high.
- Address Frame: A 7 or 10-bit sequence unique to each slave identifies the slave when the master wants to talk to it.
- Read/Write Bit: A single bit specifying whether the master is sending data to the slave (low voltage level) or requesting data from it (high voltage level).
- ACK/NACK Bit: Each frame in a message is followed by an acknowledge/no-acknowledge bit. If an address frame or data frame was successfully received, an ACK bit is returned to the sender from the receiving device.
Devices connections

i2c wiring one master one slave
Because I2C uses addressing, multiple slaves can be controlled by a single master. Up to 27 slave devices can be connected/addressed in the I2C interface circuit. With a 7-bit address, 128 (27) unique addresses are available. Using 10-bit addresses is uncommon but provides 1,024 (210) unique addresses.
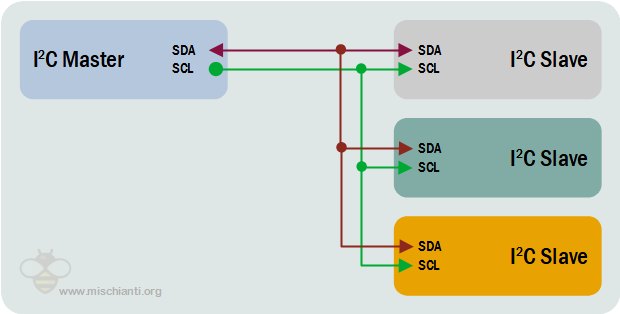
i2c wiring one master multiple slaves
Multiple masters can be connected to a single slave or numerous slaves. The problem with multiple masters in the same system comes when two masters try to send or receive data simultaneously over the SDA line. Each master needs to detect if the SDA line is low or high before transmitting a message to solve this problem. If the SDA line is low, this means that another master has control of the bus, and the master should wait to send the message. If the SDA line is high, then it’s safe to transmit the message. To connect multiple masters to multiple slaves

i2c wiring multiple masters multiple slaves
Distance
The vast majority of applications use I2C in the way it was initially designed—peripheral ICs directly wired to a processor on the same printed circuit board, and therefore over relatively short distances of less than 1 foot (30 cm) without a connector. However, using a different driver, an alternate version of I2C can communicate up to 20 meters (possibly over 100 meters) over CAT5 or other cables.
How to on Arduino
Here the Arduinos used in the article Arduino UNO - Arduino MEGA 2560 R3 - Arduino Nano - Arduino Pro Mini
As all people know to use the i2c protocol, you need the Wire library.
Every Arduino board has hardware i2c integrated but uses different pins.
| Board | I2C / TWI pins |
|---|---|
| Uno, Ethernet | A4 (SDA), A5 (SCL) |
| Mega2560 | 20 (SDA), 21 (SCL) |
| Leonardo | 2 (SDA), 3 (SCL) |
| Due | 20 (SDA), 21 (SCL), SDA1, SCL1 |
Arduino UNO has only one i2c, and the pins are static A4 (SDA) and A5 (SCL), and Wire is not allowed to specify other pins, so the management became simple.
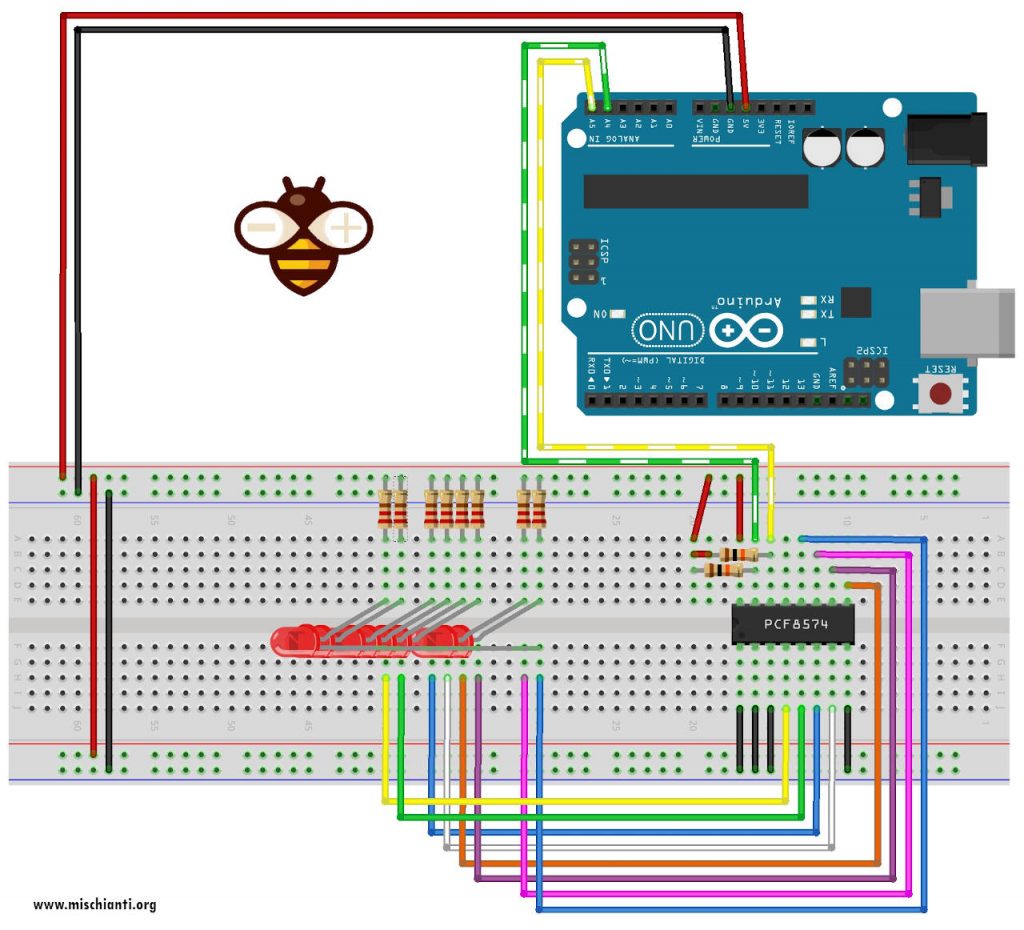
Arduino pcf8574 IC wiring schema eight LEDs
Here is a simple code that reads from Wire and prints to Serial.
#include <Wire.h>
void setup() { Wire.begin(); // join i2c bus (address optional for master) Serial.begin(9600); // start serial for output }
void loop() { Wire.requestFrom(8, 6); // request 6 bytes from slave device #8
while (Wire.available()) { // slave may send less than requested char c = Wire.read(); // receive a byte as character Serial.print(c); // print the character } }
You can specify the address as a parameter at the begin.
Network
Arduino has the possibility to self-assign an I2C address so we can create a network.
One master, one slave
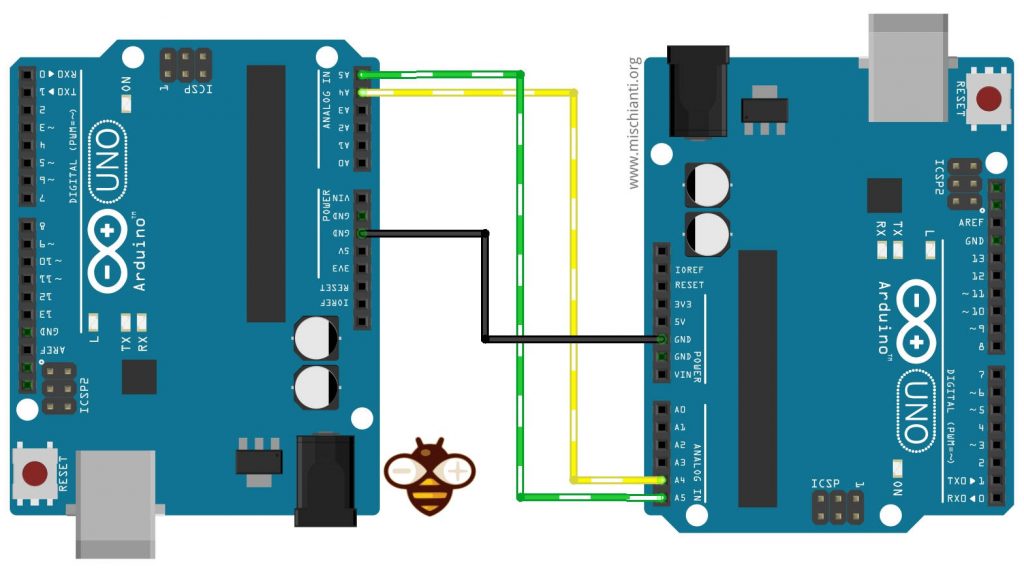
i2c Arduino UNO network master slave
The most common example you can find on the internet is this.
Master code
The master asks the slave with address 0x08, 6 bytes,
Wire.requestFrom(0x08, 6); // request 6 bytes from slave device with address 0x08
and if there is something in the buffer
while (Wire.available()) { // slave may send less than requested
It reads the byte and writes to the console.
char c = Wire.read(); // receive a byte as character
Serial.print(c);         // print the character
Here is the complete sketch.
#include <Wire.h>
void setup() { Wire.begin(); // join i2c bus (address optional for master) Serial.begin(9600); // start serial for output }
void loop() { Wire.requestFrom(0x08, 6); // request 6 bytes from slave device with address 0x08
while (Wire.available()) { // slave may send less than requested char c = Wire.read(); // receive a byte as character Serial.print(c); // print the character }
delay(500); }
Slave code
The slave set his own address to 0x08
Wire.begin(0x08); // join i2c bus with address 0x08
and when receiving a single request,
Wire.onRequest(requestEvent); // register event
execute an event that writes 6 bytes (the string “hello “) to the buffer.
Wire.write("hello "); // respond with message of 6 bytes
Here is the complete sketch code.
#include <Wire.h>
void setup() { Wire.begin(0x08); // join i2c bus with address 0x08 Wire.onRequest(requestEvent); // register event }
void loop() { delay(100); }
// function that executes whenever data is requested by master // this function is registered as an event, see setup() void requestEvent() { Wire.write("hello "); // respond with message of 6 bytes // as expected by master }
Here is the serial output of the master.
Connetti alla porta seriale COM5 a 9600 hello hello hello hello hello hello hello hello hello hello hello hello hello hello hello hello hello hello hello hello
Send request parameter
If you want to send a parameter to the slave device, you must establish a connection, then send data and alert that the communication is ended.
Wire.beginTransmission(0x08); 	// Start channel with slave 0x08
Wire.write(GET_NAME);        	// send data to the slave
Wire.endTransmission();       	// End transmission
The slave must register an event to manage this operation.
Wire.onReceive(receiveEvent); // register an event handler for received dataYou must manage the data reception in the function set as a parameter. I sent one-byte length instruction, so the numBytes was one then you must only retrieve the one-byte information and cast it in the format you need and save it to the main scope of the sketch.
// function that executes whenever data is received by master // this function is registered as an event, see setup() void receiveEvent(int numBytes) { if (numBytes==1){ int requestVal = Wire.read();
    Serial.print(F("Received request -> "));
    Serial.println(requestVal);
    request = static_cast<REQUEST_TYPE>(requestVal);
}else{
    Serial.print(F("No parameter received!"));
}
}
Now the Master is ready to request the data. It needs of
Wire.requestFrom(0x08, 14); // request 14 bytes from slave device 0x08The slave to the request made from the master return the relative information.
// function that executes whenever data is requested by master // this function is registered as an event, see setup() void requestEvent() { switch (request) { case NONE: Serial.println(F("Not good, no request type!")); break; case GET_NAME: Wire.write("ArduinoUNO "); // send 14 bytes to master request = NONE; break; case GET_AGE: Wire.write((byte)43); // send 1 bytes to master request = NONE; break; default: break; } }
Here is the complete master sketch.
/**
- i2c network: send parameter to client and receive response
- with data relative to the request. MASTER SKETCH
- by Renzo Mischianti <www.mischianti.org>
- https://mischianti.org
- Arduino UNO <------> Arduino UNO
- GND GND
- A4 A4
- A5 A5
- */
#include <Wire.h>
enum REQUEST_TYPE { NONE = -1, GET_NAME = 0, GET_AGE };
void setup() { Wire.begin(); // join i2c bus (address optional for master) Serial.begin(9600); // start serial for output
while (!Serial){}

Wire.beginTransmission(0x08); 	// Start channel with slave 0x08
Wire.write(GET_NAME);        		// send data to the slave
Wire.endTransmission();       	// End transmission

// Now the request

Wire.requestFrom(0x08, 14);    // request 14 bytes from slave device 0x08

while (Wire.available()) { // slave may send less than requested
    char c = Wire.read(); // receive a byte as character
    Serial.print(c);         // print the character
}

Serial.println();

delay(1000); // added to get better Serial print

Wire.beginTransmission(0x08); 	// Start channel with slave 0x08
Wire.write(GET_AGE);        		// send data to the slave
Wire.endTransmission();       	// End transmission

// Now the request

Wire.requestFrom(0x08, 1);    // request 1 bytes from slave device 0x08

while (Wire.available()) { // slave may send less than requested
    int c = (int)Wire.read(); // receive a byte as character
    Serial.println(c);         // print the character
}
}
void loop() { }
And here is the complete slave sketch.
/**
- i2c network: send parameter to client and receive response
- with data relative to the request. SLAVE SKETCH
- by Renzo Mischianti <www.mischianti.org>
- https://mischianti.org
- Arduino UNO <------> Arduino UNO
- GND GND
- A4 A4
- A5 A5
- */
#include <Wire.h>
enum REQUEST_TYPE { NONE = -1, GET_NAME = 0, GET_AGE };
void requestEvent(); void receiveEvent(int numBytes);
REQUEST_TYPE request = NONE;
void setup() { Wire.begin(0x08); // join i2c bus with address #8
  Serial.begin(9600);  // start serial for output

while (!Serial){}

// event handler initializations
Wire.onReceive(receiveEvent);    // register an event handler for received data
Wire.onRequest(requestEvent);   // register an event handler for data requests
}
void loop() { // delay(100); }
// function that executes whenever data is requested by master // this function is registered as an event, see setup() void requestEvent() { switch (request) { case NONE: Serial.println(F("Not good, no request type!")); break; case GET_NAME: Wire.write("ArduinoUNO "); // send 14 bytes to master request = NONE; break; case GET_AGE: Wire.write((byte)43); // send 1 bytes to master request = NONE; break; default: break; } }
// function that executes whenever data is received by master // this function is registered as an event, see setup() void receiveEvent(int numBytes) { if (numBytes==1){ int requestVal = Wire.read();
    Serial.print(F("Received request -> "));
    Serial.println(requestVal);
    request = static_cast<REQUEST_TYPE>(requestVal);
}else{
    Serial.print(F("No parameter received!"));
}
}
The Serial output of the master is this.
And here, the slave.
Received request -> 0 Received request -> 1
One master multiple slaves
When you understand the basic concept, the additional change becomes simple. Now we are going to add another device that works like a slave.

i2c Arduino UNO MEGA network master multiple slaves
Here the secondary SLAVE Arduino MEGA (or other Arduino) sketch.
/**
- i2c network: send parameter to client and receive response
- with data relative to the request. SLAVE SKETCH 2
- by Renzo Mischianti <www.mischianti.org>
- https://mischianti.org
- Arduino UNO <------> Arduino MEGA
- GND GND
- A4 20
- A5 21
- */
#include <Wire.h>
enum REQUEST_TYPE { NONE = -1, GET_NAME = 0, GET_AGE };
void requestEvent(); void receiveEvent(int numBytes);
REQUEST_TYPE request = NONE;
void setup() { Wire.begin(0x09); // join i2c bus with address #8
  Serial.begin(9600);  // start serial for output

while (!Serial){}

// event handler initializations
Wire.onReceive(receiveEvent);    // register an event handler for received data
Wire.onRequest(requestEvent);   // register an event handler for data requests
}
void loop() { // delay(100); }
// function that executes whenever data is requested by master // this function is registered as an event, see setup() void requestEvent() { switch (request) { case NONE: Serial.println(F("Not good, no request type!")); break; case GET_NAME: Wire.write("ArduinoMEGA "); // send 14 bytes to master request = NONE; break; case GET_AGE: Wire.write((byte)45); // send 1 bytes to master request = NONE; break; default: break; } }
// function that executes whenever data is received by master // this function is registered as an event, see setup() void receiveEvent(int numBytes) { if (numBytes==1){ int requestVal = Wire.read();
    Serial.print(F("Received request -> "));
    Serial.println(requestVal);
    request = static_cast<REQUEST_TYPE>(requestVal);
}else{
    Serial.print(F("No parameter received!"));
}
}
As you can see, I change only the address 0x09, the name “ArduinoMEGA ” , and the age 45.
On the Master sketch, we add the new request.
/**
- i2c network: send parameter to client and receive response
- with data relative to the request
- by Renzo Mischianti <www.mischianti.org>
- https://mischianti.org
- Arduino UNO <------> Arduino UNO
- GND GND
- A4 A4
- A5 A5
- */
#include <Wire.h>
enum REQUEST_TYPE { NONE = -1, GET_NAME = 0, GET_AGE };
void setup() { Wire.begin(); // join i2c bus (address optional for master) Serial.begin(9600); // start serial for output
while (!Serial){}
Serial.flush();
Serial.println();

Wire.beginTransmission(0x08); 	// Start channel with slave 0x08
Wire.write(GET_NAME);        		// send data to the slave
Wire.endTransmission();       	// End transmission

delay(1000); // added to get better Serial print

Wire.requestFrom(0x08, 14);    // request 14 bytes from slave device 0x08

while (Wire.available()) { // slave may send less than requested
    char c = Wire.read(); // receive a byte as character
    Serial.print(c);         // print the character
}

Serial.println();

delay(1000); // added to get better Serial print

Wire.beginTransmission(0x09); 	// Start channel with slave 0x09
Wire.write(GET_NAME);        		// send data to the slave
Wire.endTransmission();       	// End transmission

delay(1000); // added to get better Serial print

Wire.requestFrom(0x09, 14);    // request 14 bytes from slave device 0x09

while (Wire.available()) { // slave may send less than requested
    char c = Wire.read(); // receive a byte as character
    Serial.print(c);         // print the character
}

Serial.println();

delay(1000); // added to get better Serial print

Wire.beginTransmission(0x08); 	// Start channel with slave 0x08
Wire.write(GET_AGE);        		// send data to the slave
Wire.endTransmission();       	// End transmission

delay(1000); // added to get better Serial print

Wire.requestFrom(0x08, 1);    // request 1 bytes from slave device 0x08

while (Wire.available()) { // slave may send less than requested
    int c = (int)Wire.read(); // receive a byte as character
    Serial.println(c);         // print the character
}

delay(1000); // added to get better Serial print

Wire.beginTransmission(0x09); 	// Start channel with slave 0x09
Wire.write(GET_AGE);        		// send data to the slave
Wire.endTransmission();       	// End transmission

delay(1000); // added to get better Serial print

Wire.requestFrom(0x09, 1);    // request 1 bytes from slave device 0x09

while (Wire.available()) { // slave may send less than requested
    int c = (int)Wire.read(); // receive a byte as character
    Serial.println(c);         // print the character
}
}
void loop() { }
The result on Master Serial becomes like so.
ArduinoUNO
ArduinoMEGA
43
45
I2C address scanner
One of the useful sketches when you use i2c is the Address scanner. This simple program tries to find all devices connected to the I2C bus.
#include <Wire.h>
void setup() { Wire.begin();
Serial.begin(9600); Serial.println("\nI2C Scanner"); }
void loop() { byte error, address; int nDevices;
Serial.println("Scanning...");
nDevices = 0; for(address = 1; address < 127; address++ ) { // The i2c_scanner uses the return value of // the Write.endTransmisstion to see if // a device did acknowledge to the address. Wire.beginTransmission(address); error = Wire.endTransmission();
if (error == 0)
{
  Serial.print("I2C device found at address 0x");
  if (address<16)
    Serial.print("0");
  Serial.print(address,HEX);
  Serial.println("  !");

  nDevices++;
}
else if (error==4)
{
  Serial.print("Unknow error at address 0x");
  if (address<16)
    Serial.print("0");
  Serial.println(address,HEX);
}
} if (nDevices == 0) Serial.println("No I2C devices found\n"); else Serial.println("done\n");
delay(5000); // wait 5 seconds for next scan }
Its logic is very simple basically, use the standard SDA and SCL pin and start to try to establish a connection
Wire.beginTransmission(address);
error = Wire.endTransmission();
for all 27 address, when an error is equal to 0 mean that you successfully establish a connection.
The result for the master Arduino in the multi slave connection becomes like so.
I2C Scanner Scanning... I2C device found at address 0x08 ! I2C device found at address 0x09 ! done
Thanks
- i2c Arduino: how to create a network, parameters, and address scanner
- i2c Arduino SAMD MKR: additional interface SERCOM, network, and address scanner
- i2c esp8266: how to, network 5v, 3.3v, speed, and address scanner
- Guide to I2C on ESP32: Communication with Heterogeneous 5V and 3.3V Devices, Additional Interface Management and Scanner