Integrating W5500 with ESP32 Using Core 3: Native Ethernet Protocol Support with SSL and Other Features (original) (raw)
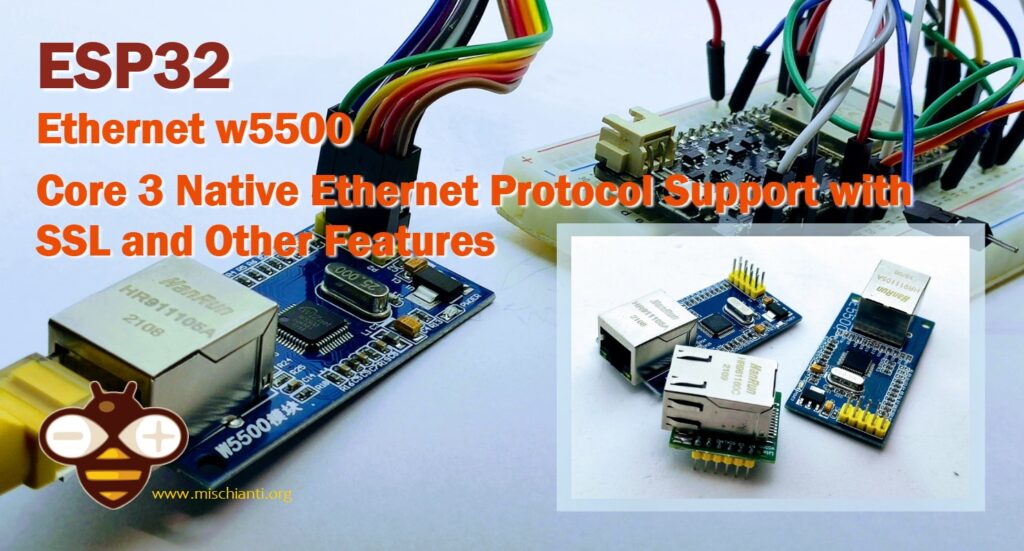
Integrating W5500 with ESP32 Using Core 3
The ESP32 has always been a popular choice for IoT projects, thanks to its robust Wi-Fi capabilities. However, with the new Core 3 release, the ESP32 now supports native Ethernet protocols with SSL, expanding its utility for wired network applications. This article explores how to integrate the W5500 Ethernet module with the ESP32 using the new Core 3, detailing the setup, configuration, and practical applications.
Toggle
- Introduction
- Hardware Requirements
- Wiring the W5500 to ESP32-S3
- Wiring the W5500 to ESP32
- Configuring the Ethernet Settings
- Conclusion
Introduction
The ESP32, with its dual-core processor and versatile connectivity options, is ideal for a range of IoT applications. The release of Core 3 has introduced native support for Ethernet protocols, making it easier to leverage wired connections with the same features as Wi-Fi, including SSL/TLS. This guide focuses on using the W5500 Ethernet module with the ESP32, providing secure and reliable network connectivity.
Hardware Requirements
To get started, you will need the following components:
- ESP32 development board
Here my selection of esp32 ESP32 Dev Kit v1 - TTGO T-Display 1.14 ESP32 - NodeMCU V3 V2 ESP8266 Lolin32 - NodeMCU ESP-32S - WeMos Lolin32 - WeMos Lolin32 mini - ESP32-CAM programmer - ESP32-CAM bundle - ESP32-WROOM-32 - ESP32-S
Here my selection of esp32s3 ESP32 S3 Purlple AI-S3 - YD-ESP32-S3 - ESP32-S3-DevKitC-1 - ESP32-S3-DevKitC-1 - ESP32-S3 Board screen
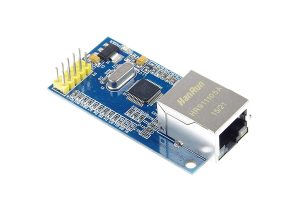
- W5500 Ethernet module
- Jumper wires
- Breadboard (optional)
Devices
The W5500 chip is a Hardwired TCP/IP embedded Ethernet controller that provides an easier Internet connection to embedded systems. W5500 enables users to have Internet connectivity in their applications just by using the single chip in which TCP/IP stack, 10/100 Ethernet MAC, and PHY are embedded.
WIZnet‘s Hardwired TCP/IP is the market-proven technology supporting TCP, UDP, IPv4, ICMP, ARP, IGMP, and PPPoE protocols. W5500 embeds the 32Kbyte internal memory buffer for the Ethernet packet processing. Using W5500, you can implement the Ethernet application by adding the simple socket program. It’s a faster and easier way than any other embedded Ethernet solution. Users can use eight independent hardware sockets simultaneously.
SPI (Serial Peripheral Interface) is provided for easy integration with the external MCU. The W5500’s SPI supports 80 MHz speed. To reduce the system’s power consumption, W5500 provides WOL (Wake on LAN) and power-down mode.
Features
- Supports Hardwired TCP/IP Protocols : TCP, UDP, ICMP, IPv4, ARP, IGMP, PPPoE
- Supports 8 independent sockets simultaneously
- Supports Power down mode
- Supports Wake on LAN over UDP
- Supports High Speed Serial Peripheral Interface(SPI MODE 0, 3)
- Internal 32Kbytes Memory for TX/RX Buffers
- 10BaseT/100BaseTX Ethernet PHY embedded
- Supports Auto Negotiation (Full and half duplex, 10 and 100-based )
- Not supports IP Fragmentation
- 3.3V operation with 5V I/O signal tolerance
- LED outputs (Full/Half duplex, Link, Speed, Active)
- 48 Pin LQFP Lead-Free Package (7x7mm, 0.5mm pitch)
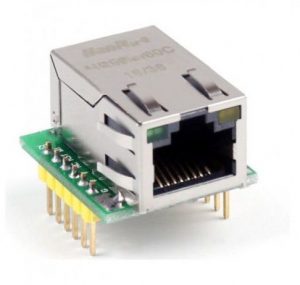
There is a wide series of w5500 devices, but the most popular are 2 in particular.
The less expensive is the w5500 that you can see in the photo.
w5500 ethernet network modules SPI
But now there is a compact version named W5500 lite, which is very interesting as a production device.
w5500 lite ethernet network modules SPI
Here my selection of tested ethernet devices w5500 lite - w5500 - enc26j60 mini - enc26j60 - lan8720
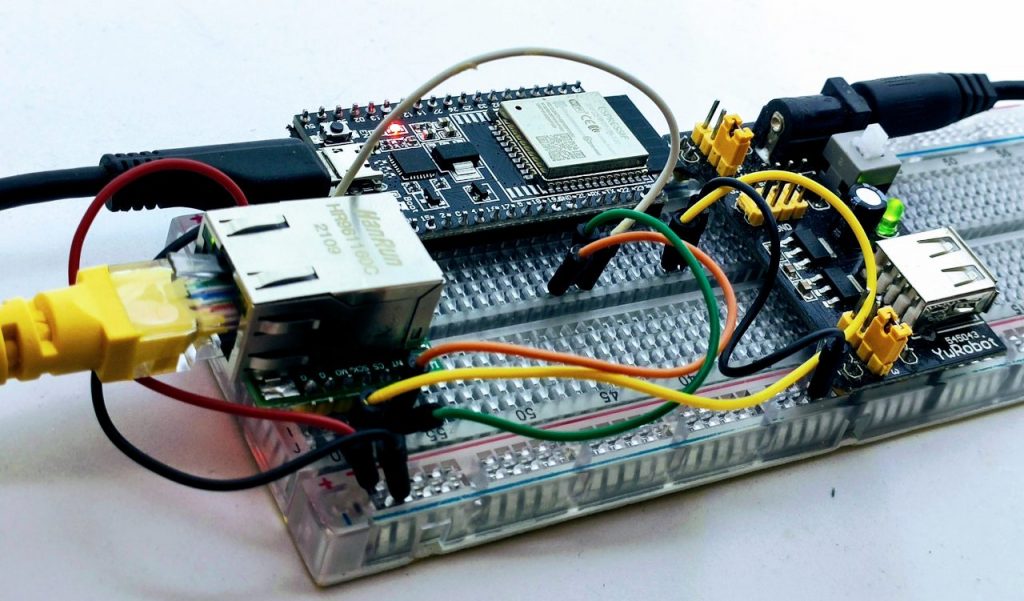
Wiring the W5500 to ESP32-S3
Proper wiring ensures stable communication between the ESP32 and the W5500 module. Below are the pin connections. For this test, we are going to use an esp32 s3.
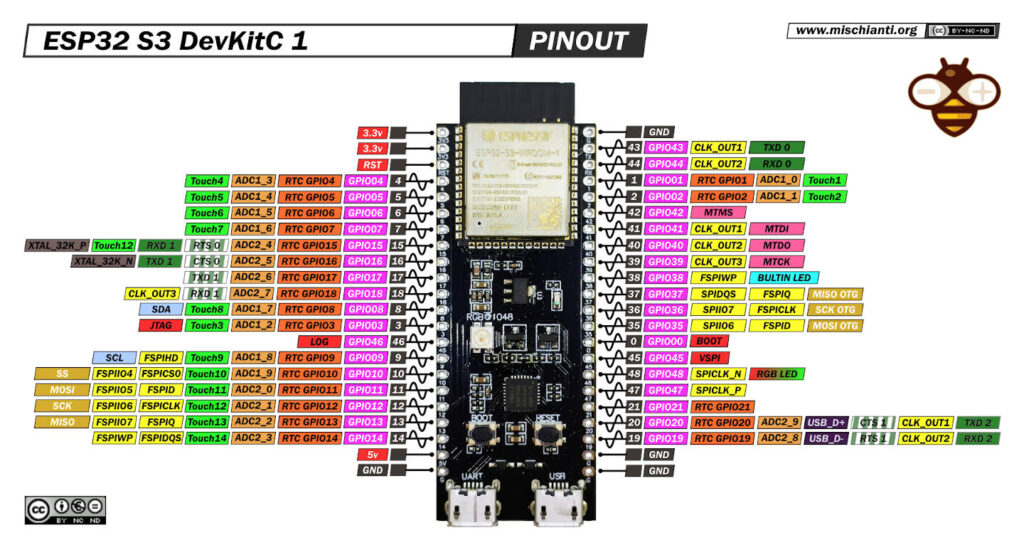
esp32 S3 DevKitC 1 original: pinout
Here my selection of esp32s3 ESP32 S3 Purlple AI-S3 - YD-ESP32-S3 - ESP32-S3-DevKitC-1 - ESP32-S3-DevKitC-1 - ESP32-S3 Board screen
w5500 mini wiring diagram
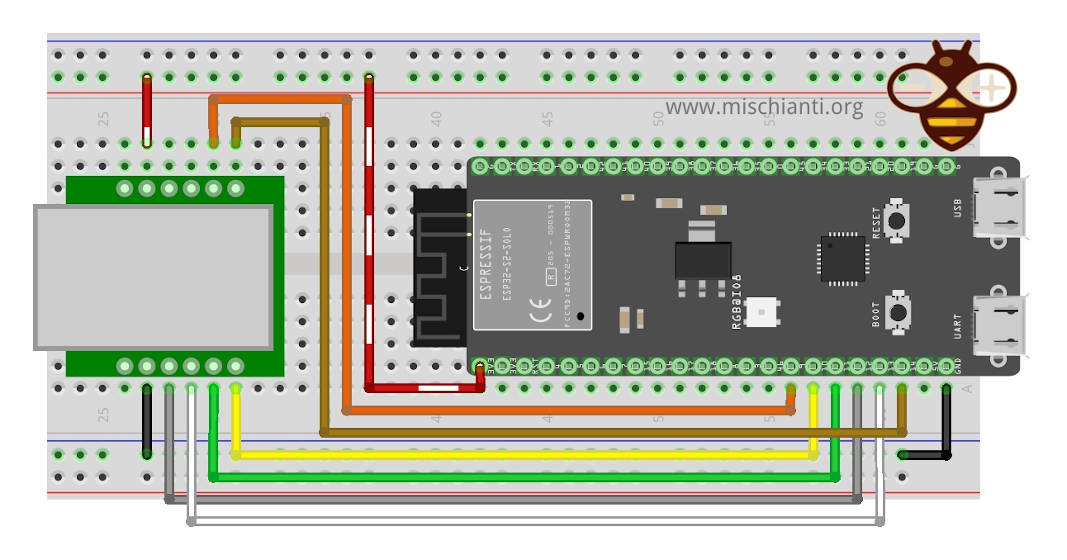
ESP32-S3 and W5500 Mini Ethernet Module Breadboard Wiring
w5500 wiring diagram
ESP32-S3 and W5500 Ethernet Module Breadboard Wiring
| esp32 s3 | w5500/w5500 mini |
|---|---|
| GPIO13 | MISO |
| GPIO12 | SCLK |
| GPIO11 | MOSI |
| GPIO10 | CS |
| GPIO9 (optional) | INT |
| GPIO3 (optional) | RST |
| 3v3 | 3v3 |
| GND | GND |
// Set this to 1 to enable dual Ethernet support #define USE_TWO_ETH_PORTS 0
#define ETH_PHY_TYPE ETH_PHY_W5500 #define ETH_PHY_ADDR 1 #define ETH_PHY_CS 10 #define ETH_PHY_IRQ 9 // -1 if you won't wire #define ETH_PHY_RST 3 // -1 if you won't wire
// SPI pins #define ETH_SPI_SCK SCK #define ETH_SPI_MISO MISO #define ETH_SPI_MOSI MOSI
Ensure the pins are connected as specified. This setup ensures that the ESP32 can communicate with the W5500 module over SPI.
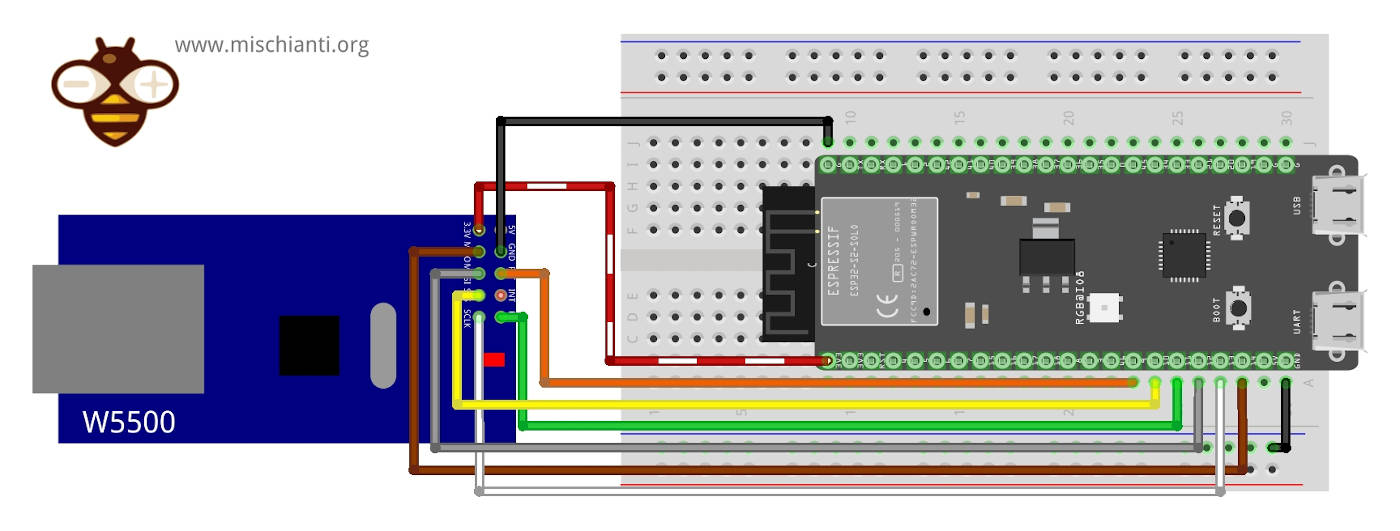
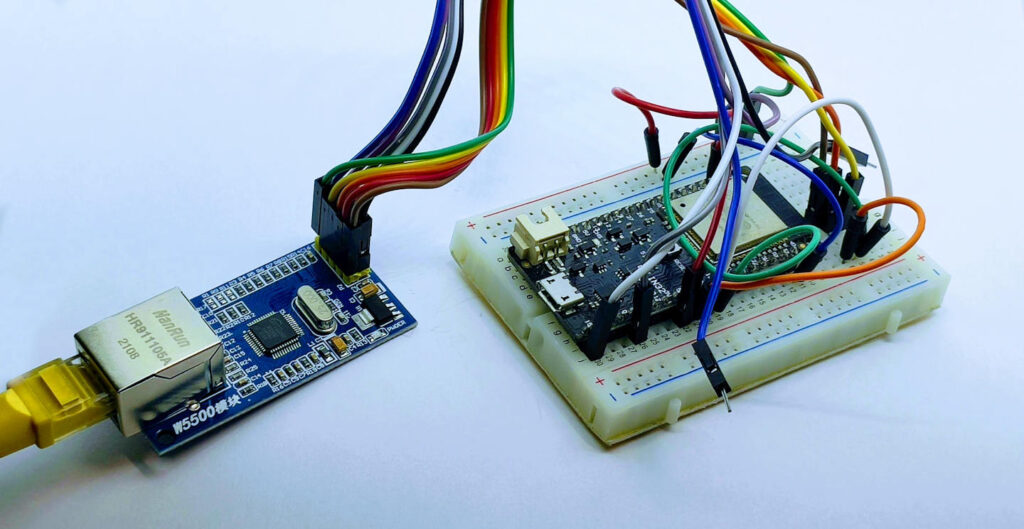
Wiring the W5500 to ESP32
Proper wiring ensures stable communication between the ESP32 and the W5500 module. Below are the pin connections.

ESP32 DOIT DEV KIT v1 pinout
Here my selection of esp32 ESP32 Dev Kit v1 - TTGO T-Display 1.14 ESP32 - NodeMCU V3 V2 ESP8266 Lolin32 - NodeMCU ESP-32S - WeMos Lolin32 - WeMos Lolin32 mini - ESP32-CAM programmer - ESP32-CAM bundle - ESP32-WROOM-32 - ESP32-S
w5500 mini wiring diagram
ESP32 and W5500 Mini Ethernet Module Breadboard Wiring
w5500 wiring diagram
ESP32 and W5500 Ethernet Module Breadboard Wiring
| esp32 | w5500/w5500 mini |
|---|---|
| GPIO19 | MISO |
| GPIO18 | SCLK |
| GPIO23 | MOSI |
| GPIO5 | CS |
| GPIO15 (optional) | INT |
| GPIO4 (optional) | RST |
| 3v3 | 3v3 |
| GND | GND |
// Set this to 1 to enable dual Ethernet support #define USE_TWO_ETH_PORTS 0
#define ETH_PHY_TYPE ETH_PHY_W5500 #define ETH_PHY_ADDR 1 #define ETH_PHY_CS 5 #define ETH_PHY_IRQ 15 // -1 if you won't wire #define ETH_PHY_RST 4 // -1 if you won't wire
// SPI pins #define ETH_SPI_SCK SCK #define ETH_SPI_MISO MISO #define ETH_SPI_MOSI MOSI
Ensure the pins are connected as specified. This setup ensures that the ESP32 can communicate with the W5500 module over SPI.
Configuring the Ethernet Settings
Configure the Ethernet settings in your sketch.
SPI.begin(ETH_SPI_SCK, ETH_SPI_MISO, ETH_SPI_MOSI); ETH.begin(ETH_PHY_TYPE, ETH_PHY_ADDR, ETH_PHY_CS, ETH_PHY_IRQ, ETH_PHY_RST, SPI);
Use the Network onEvent function to know when we are ready to make a request.
Network.onEvent(onEvent);
You must create a function to manage the connection event or to monitor all states of the network.
void onEvent(arduino_event_id_t event, arduino_event_info_t info) { switch (event) { case ARDUINO_EVENT_ETH_START: Serial.println("ETH Started"); //set eth hostname here ETH.setHostname("esp32-eth0"); break; case ARDUINO_EVENT_ETH_CONNECTED: Serial.println("ETH Connected"); break; case ARDUINO_EVENT_ETH_GOT_IP: Serial.printf("ETH Got IP: '%s'\n", esp_netif_get_desc(info.got_ip.esp_netif)); Serial.println(ETH); eth_connected = true; break; case ARDUINO_EVENT_ETH_LOST_IP: Serial.println("ETH Lost IP"); eth_connected = false; break; case ARDUINO_EVENT_ETH_DISCONNECTED: Serial.println("ETH Disconnected"); eth_connected = false; break; case ARDUINO_EVENT_ETH_STOP: Serial.println("ETH Stopped"); eth_connected = false; break; default: break; } }
After the connection, we will be ready to do the operations.
Simple HTTP request
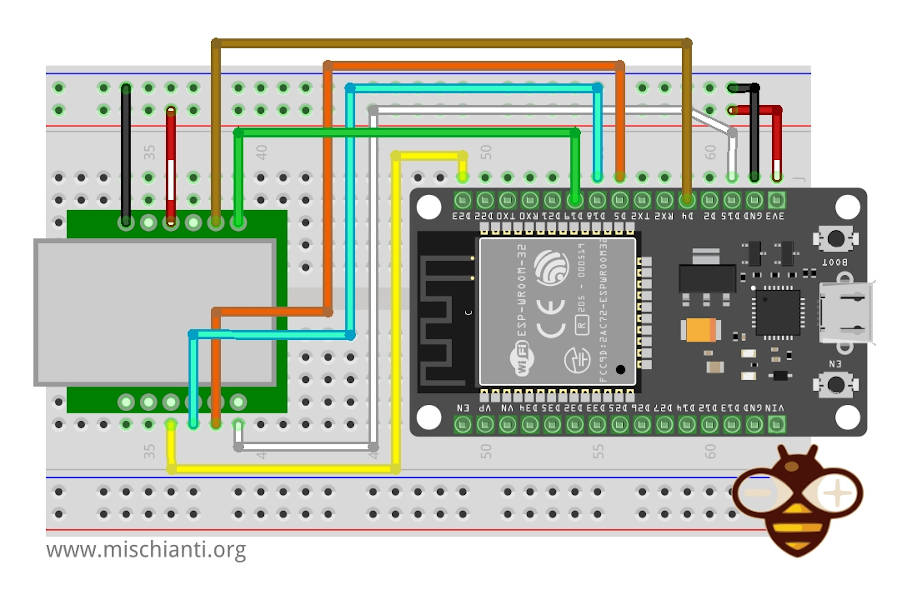
ESP32 DOIT DevKit v1 w5500 lite
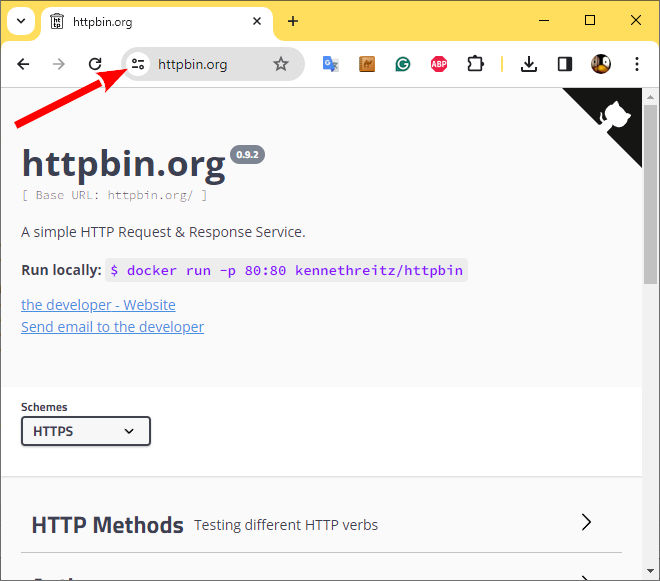
First of all, we’ll try to make a simple HTTP request. I chose an online service created to test this kind of request to do this test.
I’m going to use a simple service given from httpbin.org, and you can use the same REST API in HTTP and HTTPS.
Remember that HTTP works on port 80 and HTTPS on 443, so to query the endpoint on the 443 port, you must validate a certificate.
Then, we try to connect and request an endpoint in GET.
// Test client connection void testClient(const char * host, uint16_t port) { Serial.print("\nconnecting to "); Serial.println(host);
NetworkClient client;
if (!client.connect(host, port)) { Serial.println("connection failed"); return; } client.println("GET /get HTTP/1.1"); client.println("Host: httpbin.org"); client.println("Connection: close"); client.println();
while (client.connected() && !client.available()); while (client.available()) { Serial.write(client.read()); }
Serial.println("closing connection\n"); client.stop(); }
Remember to make the request after the module handshake is completed.
void loop() { if (eth_connected) { testClient("httpbin.org", 80); } delay(10000); }
And finally, the complete sketch.
/*
- Author: Renzo Mischianti
- Website: mischianti.org
- Description: This sketch demonstrates how to set up and use Ethernet on an ESP32 module using the W5500 Ethernet module.
The sketch initializes the Ethernet module, handles Ethernet events, and tests a simple client connection.
*/
#include "Arduino.h"
#include <ETH.h> #include <SPI.h>
// Set this to 1 to enable dual Ethernet support #define USE_TWO_ETH_PORTS 0
// #ifndef ETH_PHY_TYPE #define ETH_PHY_TYPE ETH_PHY_W5500 #define ETH_PHY_ADDR 1 #define ETH_PHY_CS 5 // CS esp32s3 10 esp32 5 #define ETH_PHY_IRQ -1 // 9 15 #define ETH_PHY_RST -1 // 3 4 // #endif
// SPI pins esp32s3 esp32 #define ETH_SPI_SCK SCK // 12 18 #define ETH_SPI_MISO MISO // 13 19 #define ETH_SPI_MOSI MOSI // 11 23
static bool eth_connected = false;
// Ethernet event handler void onEvent(arduino_event_id_t event, arduino_event_info_t info) { switch (event) { case ARDUINO_EVENT_ETH_START: Serial.println("ETH Started"); // Set Ethernet hostname here ETH.setHostname("esp32-eth0"); break; case ARDUINO_EVENT_ETH_CONNECTED: Serial.println("ETH Connected"); break; case ARDUINO_EVENT_ETH_GOT_IP: Serial.printf("ETH Got IP: '%s'\n", esp_netif_get_desc(info.got_ip.esp_netif)); Serial.println(ETH); eth_connected = true; break; case ARDUINO_EVENT_ETH_LOST_IP: Serial.println("ETH Lost IP"); eth_connected = false; break; case ARDUINO_EVENT_ETH_DISCONNECTED: Serial.println("ETH Disconnected"); eth_connected = false; break; case ARDUINO_EVENT_ETH_STOP: Serial.println("ETH Stopped"); eth_connected = false; break; default: break; } }
// Test client connection void testClient(const char * host, uint16_t port) { Serial.print("\nconnecting to "); Serial.println(host);
NetworkClient client; if (!client.connect(host, port)) { Serial.println("connection failed"); return; } client.println("GET /get HTTP/1.1"); client.println("Host: httpbin.org"); client.println("Connection: close"); client.println();
while (client.connected() && !client.available()); while (client.available()) { Serial.write(client.read()); }
Serial.println("closing connection\n"); client.stop(); }
void setup() { Serial.begin(115200); Network.onEvent(onEvent);
SPI.begin(ETH_SPI_SCK, ETH_SPI_MISO, ETH_SPI_MOSI, ETH_PHY_CS); ETH.begin(ETH_PHY_TYPE, ETH_PHY_ADDR, ETH_PHY_CS, ETH_PHY_IRQ, ETH_PHY_RST, SPI); }
void loop() { if (eth_connected) { testClient("httpbin.org", 80); } delay(10000); }
The result is this.
ETH Started ETH Connected ETH Got IP: 'eth0' *eth0: <UP,100M,FULL_DUPLEX,AUTO,ADDR:0x1> (DHCPC,GARP,IP_MOD) ether 32:AE:A4:F5:01:C0 inet 192.168.1.137 netmask 255.255.255.0 broadcast 192.168.1.255 gateway 192.168.1.1 dns 192.168.1.10
connecting to httpbin.org HTTP/1.1 200 OK Date: Mon, 22 Jul 2024 07:54:20 GMT Content-Type: application/json Content-Length: 199 Connection: close Server: gunicorn/19.9.0 Access-Control-Allow-Origin: * Access-Control-Allow-Credentials: true
{ "args": {}, "headers": { "Host": "httpbin.org", "X-Amzn-Trace-Id": "Root=1-669e102c-1868445a1fafaaf7199a5fe3" }, "origin": "84.221.199.122", "url": "http://httpbin.org/get" } closing connection
esp32 and w5500 on breadboard
HTTPS request
Now, if we change the endpoint to port 443, we will request a secure server with SSL encryption.
// Test client connection void testClient(const char * host, uint16_t port) { Serial.print("\nconnecting to "); Serial.println(host);
NetworkClientSecure client; client.setInsecure();
if (!client.connect(host, port)) { Serial.println("connection failed"); return; } client.println("GET /get HTTP/1.1"); client.println("Host: httpbin.org"); client.println("Connection: close"); client.println();
while (client.connected() && !client.available()); while (client.available()) { Serial.write(client.read()); }
Serial.println("closing connection\n"); client.stop(); }
If you don’t set insecure mode, you can’t connect and receive a message like this.
ETH Started ETH Connected ETH Got IP: 'eth0' *eth0: <UP,100M,FULL_DUPLEX,AUTO,ADDR:0x1> (DHCPC,GARP,IP_MOD) ether B8:D6:1A:68:E5:7F inet 192.168.1.146 netmask 255.255.255.0 broadcast 192.168.1.255 gateway 192.168.1.1 dns 192.168.1.10
connecting to httpbin.org connection failed
And use the 433 port.
void loop() { if (eth_connected) { testClient("httpbin.org", 443); } delay(10000); }
Here is the complete sketch.
/*
- Author: Renzo Mischianti
- Website: mischianti.org
- Description: This sketch demonstrates how to set up and use Ethernet on an ESP32 module using the W5500 Ethernet module.
The sketch initializes the Ethernet module, handles Ethernet events, and tests a simple client HTTPS connection.
*/
#include "Arduino.h"
#include <ETH.h> #include <SPI.h> #include <NetworkClientSecure.h>
// Set this to 1 to enable dual Ethernet support #define USE_TWO_ETH_PORTS 0
// #ifndef ETH_PHY_TYPE #define ETH_PHY_TYPE ETH_PHY_W5500 #define ETH_PHY_ADDR 1 #define ETH_PHY_CS 5 // CS esp32s3 10 esp32 5 #define ETH_PHY_IRQ -1 // 9 15 #define ETH_PHY_RST -1 // 3 4 // #endif
// SPI pins esp32s3 esp32 #define ETH_SPI_SCK SCK // 12 18 #define ETH_SPI_MISO MISO // 13 19 #define ETH_SPI_MOSI MOSI // 11 23
static bool eth_connected = false;
// Ethernet event handler void onEvent(arduino_event_id_t event, arduino_event_info_t info) { switch (event) { case ARDUINO_EVENT_ETH_START: Serial.println("ETH Started"); // Set Ethernet hostname here ETH.setHostname("esp32-eth0"); break; case ARDUINO_EVENT_ETH_CONNECTED: Serial.println("ETH Connected"); break; case ARDUINO_EVENT_ETH_GOT_IP: Serial.printf("ETH Got IP: '%s'\n", esp_netif_get_desc(info.got_ip.esp_netif)); Serial.println(ETH); eth_connected = true; break; case ARDUINO_EVENT_ETH_LOST_IP: Serial.println("ETH Lost IP"); eth_connected = false; break; case ARDUINO_EVENT_ETH_DISCONNECTED: Serial.println("ETH Disconnected"); eth_connected = false; break; case ARDUINO_EVENT_ETH_STOP: Serial.println("ETH Stopped"); eth_connected = false; break; default: break; } }
// Test client connection void testClient(const char * host, uint16_t port) { Serial.print("\nconnecting to "); Serial.println(host);
NetworkClientSecure client; client.setInsecure();
if (!client.connect(host, port)) { Serial.println("connection failed"); return; } client.println("GET /get HTTP/1.1"); client.println("Host: httpbin.org"); client.println("Connection: close"); client.println();
while (client.connected() && !client.available()); while (client.available()) { Serial.write(client.read()); }
Serial.println("closing connection\n"); client.stop(); }
void setup() { Serial.begin(115200); Network.onEvent(onEvent);
SPI.begin(ETH_SPI_SCK, ETH_SPI_MISO, ETH_SPI_MOSI, ETH_PHY_CS); ETH.begin(ETH_PHY_TYPE, ETH_PHY_ADDR, ETH_PHY_CS, ETH_PHY_IRQ, ETH_PHY_RST, SPI); }
void loop() { if (eth_connected) { testClient("httpbin.org", 443); } delay(10000); }
Now, when we execute the sketch, we obtain this output.
ETH Started ETH Connected ETH Got IP: 'eth0' *eth0: <UP,100M,FULL_DUPLEX,AUTO,ADDR:0x1> (DHCPC,GARP,IP_MOD) ether 32:AE:A4:F5:01:C0 inet 192.168.1.137 netmask 255.255.255.0 broadcast 192.168.1.255 gateway 192.168.1.1 dns 192.168.1.10
connecting to httpbin.org HTTP/1.1 200 OK Date: Mon, 22 Jul 2024 10:10:17 GMT Content-Type: application/json Content-Length: 200 Connection: close Server: gunicorn/19.9.0 Access-Control-Allow-Origin: * Access-Control-Allow-Credentials: true
{ "args": {}, "headers": { "Host": "httpbin.org", "X-Amzn-Trace-Id": "Root=1-669e3009-5b117fd9360750c0582e7b17" }, "origin": "84.221.199.122", "url": "https://httpbin.org/get" } ÿclosing connection
Retrieve certificate
As you can see, for the test, I use the insecure mode
NetworkClientSecure client; client.setInsecure();
Bat, the right thing to do is to retrieve the Certification Authority certificate to validate the host.
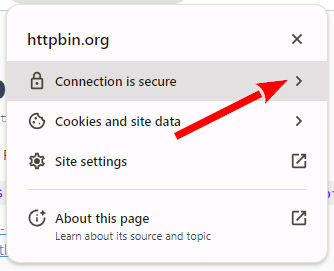
So, on the httpbin page, click on the site’s settings.
Select setting of the site
Then, you must select the connection information.
Select connection security
Now click on the certificate.
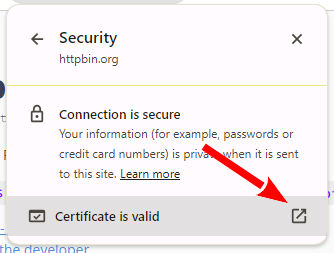
Select the certificate settings
And finally, select the line at the top of the list (the root certificate).
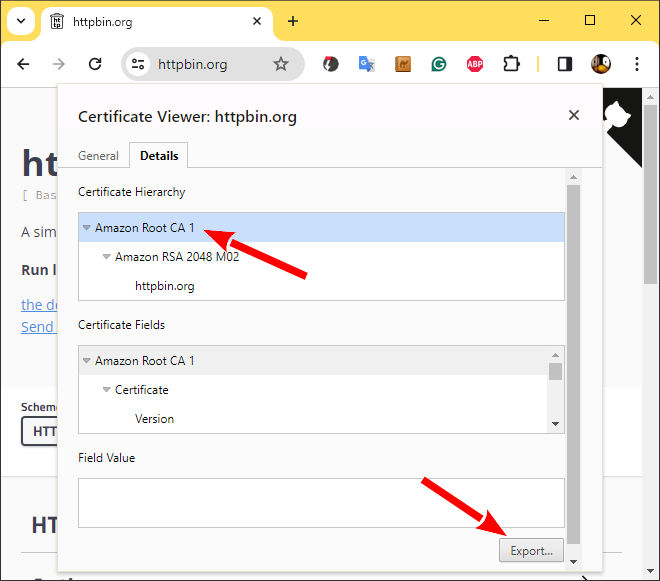
Select the root certificate and export in crt format
Export the certificate and open the file, copy the content and put all in a char array variable.
const char* rootCA= R""""(-----BEGIN CERTIFICATE----- MIIDQTCCAimgAwIBAgITBmyfz5m/jAo54vB4ikPmljZbyjANBgkqhkiG9w0BAQsF ADA5MQswCQYDVQQGEwJVUzEPMA0GA1UEChMGQW1hem9uMRkwFwYDVQQDExBBbWF6 b24gUm9vdCBDQSAxMB4XDTE1MDUyNjAwMDAwMFoXDTM4MDExNzAwMDAwMFowOTEL MAkGA1UEBhMCVVMxDzANBgNVBAoTBkFtYXpvbjEZMBcGA1UEAxMQQW1hem9uIFJv b3QgQ0EgMTCCASIwDQYJKoZIhvcNAQEBBQADggEPADCCAQoCggEBALJ4gHHKeNXj ca9HgFB0fW7Y14h29Jlo91ghYPl0hAEvrAIthtOgQ3pOsqTQNroBvo3bSMgHFzZM 9O6II8c+6zf1tRn4SWiw3te5djgdYZ6k/oI2peVKVuRF4fn9tBb6dNqcmzU5L/qw IFAGbHrQgLKm+a/sRxmPUDgH3KKHOVj4utWp+UhnMJbulHheb4mjUcAwhmahRWa6 VOujw5H5SNz/0egwLX0tdHA114gk957EWW67c4cX8jJGKLhD+rcdqsq08p8kDi1L 93FcXmn/6pUCyziKrlA4b9v7LWIbxcceVOF34GfID5yHI9Y/QCB/IIDEgEw+OyQm jgSubJrIqg0CAwEAAaNCMEAwDwYDVR0TAQH/BAUwAwEB/zAOBgNVHQ8BAf8EBAMC AYYwHQYDVR0OBBYEFIQYzIU07LwMlJQuCFmcx7IQTgoIMA0GCSqGSIb3DQEBCwUA A4IBAQCY8jdaQZChGsV2USggNiMOruYou6r4lK5IpDB/G/wkjUu0yKGX9rbxenDI U5PMCCjjmCXPI6T53iHTfIUJrU6adTrCC2qJeHZERxhlbI1Bjjt/msv0tadQ1wUs N+gDS63pYaACbvXy8MWy7Vu33PqUXHeeE6V/Uq2V8viTO96LXFvKWlJbYK8U90vv o/ufQJVtMVT8QtPHRh8jrdkPSHCa2XV4cdFyQzR1bldZwgJcJmApzyMZFo6IQ6XU 5MsI+yMRQ+hDKXJioaldXgjUkK642M4UwtBV8ob2xJNDd2ZhwLnoQdeXeGADbkpy rqXRfboQnoZsG4q5WTP468SQvvG5 -----END CERTIFICATE-----)"""";
Now, we can set the Certification Authority certificate. To do the check, we must validate the server httpbin to the NetworkClientSecure.
NetworkClientSecure client; client.setCACert(rootCA);
Conclusion
Integrating the W5500 Ethernet module with the ESP32 using Core 3 expands the capabilities of your IoT projects by providing robust and secure wired network connectivity. With the native support for Ethernet protocols, SSL/TLS, and other features, you can leverage the full potential of the ESP32 for diverse applications.
- ESP32: pinout, specs and Arduino IDE configuration
- ESP32: integrated SPIFFS Filesystem
- ESP32: manage multiple Serial and logging
- ESP32 practical power saving
- ESP32 practical power saving: manage WiFi and CPU
- ESP32 practical power saving: modem and light sleep
- ESP32 practical power saving: deep sleep and hibernation
- ESP32 practical power saving: preserve data, timer and touch wake up
- ESP32 practical power saving: external and ULP wake up
- ESP32 practical power saving: UART and GPIO wake up
- ESP32: integrated LittleFS FileSystem
- ESP32: integrated FFat (Fat/exFAT) FileSystem
- ESP32-wroom-32
- ESP32-CAM
- ESP32: use ethernet w5500 with plain (HTTP) and SSL (HTTPS)
- ESP32: use ethernet enc28j60 with plain (HTTP) and SSL (HTTPS)
- How to use SD card with esp32
- esp32 and esp8266: FAT filesystem on external SPI flash memory
- Firmware and OTA update management
- Firmware management
- OTA update with Arduino IDE
- OTA update with Web Browser
- Self OTA uptate from HTTP server
- Non-standard Firmware update
- Integrating LAN8720 with ESP32 for Ethernet Connectivity with plain (HTTP) and SSL (HTTPS)
- Connecting the EByte E70 to ESP32 c3/s3 devices and a simple sketch example
- ESP32-C3: pinout, specs and Arduino IDE configuration
- Integrating W5500 with ESP32 Using Core 3: Native Ethernet Protocol Support with SSL and Other Features
- Integrating LAN8720 with ESP32 Using Core 3: Native Ethernet Protocol Support with SSL and Other Features
- Dallas ds18b20:
- Guide to I2C on ESP32: Communication with Heterogeneous 5V and 3.3V Devices, Additional Interface Management and Scanner
- Display
- Complete Guide: Using an ILI9341 Display with the TFT_eSPI Library
- Integrating Touch Screen Functionality with Your ILI9341 TFT Display
- Complete guide to using an SSD1683 eInk Display with GxEPD and ESP32 – CrowPanel 4.2″ HMI included