Your First Embedded Single Page Application (original) (raw)
A Single Page Application (SPA) is a cutting-edge web application model. Instead of reloading the entire page every time you interact with it, a SPA loads all its content just once. After this initial load, the application operates within the browser, updating only the parts that change based on your interactions. This makes SPAs highly responsive, even on basic microcontrollers.
In this tutorial, we'll explore the Minnow Server Reference Example in a simplified manner, using the Barracuda App Server as our backend instead of the Minnow Server. You can run the included ready-to-use example either with our Mako Server or on our ESP32 microcontroller tool, known as Xedge32. The Mako Server and Xedge32 are ready-to-run application servers based on the Barracuda App Server source code library.
This tutorial can be used for several purposes:
- Introduction to WebSocket JSON Messaging: Understand the WebSocket JSON messages exchanged between the Minnow Server Reference Example's SPA and the server. The server-side code we provide for this tutorial prints all JSON messages sent between the server and the SPA, making it easier to grasp the Minnow Server Reference Example's C server-side code.
- An Alternative to the Minnow Server: By comparing the C code in the Minnow Server Reference Example with the server-side Lua code in this tutorial, you'll see how the Barracuda App Server and Lua can significantly reduce the code you need to write; the Lua code is substantially smaller. Plus, Lua code is more straightforward and more intuitive than C code.
- For Xedge32 Developers: Get introduced to the concept of responsive SPA applications as opposed to traditional server-side rendering. While the ESP32 performs decently and the tutorial Your First Embedded Server Side Generated Application works well, you'll find that the SPA approach is snappier, especially over secure TLS connections.
Note: This tutorial does not delve into the inner workings of the Minnow Server Reference Example's SPA (the front end). For a deep dive into that, refer to the Minnow Server Reference Example's SPA intro. We'll treat the application as a "black box" here. For example, suppose you're an embedded developer aiming to design a professional UI. In that case, you might prefer to delegate the SPA development to experts, treating it as a "black box", and focus solely on the server-side communication API defined for the SPA.
Prerequisite
Before diving into the tutorial, you must set up your environment. Start by downloading the necessary files from GitHub:
- Open your terminal or command prompt.
- Enter the following commands to clone the required repositories:
git clone https://github.com/RealTimeLogic/MinnowServer
git clone https://github.com/RealTimeLogic/LSP-Examples
Using the Mako Server
The Mako Server is a great tool to help you understand the WebSocket communication between the SPA and its server counterpart.
Note: When using the Mako Server for this tutorial, remember it's in simulation mode. This means it's excellent for learning but won't connect to actual hardware.
Here's how to set it up:
- After you have cloned the GitHub repositories mentioned above, launch the Mako Server with the following command:
mako -lminnow::MinnowServer/www -l::LSP-Examples/MinnowSim
The above command instructs the Mako Server to load two applications: the SPA and the server-side code. The SPA's base URL is set to http://localhost/minnow/, and the server-side code's base URL is set to http://localhost/. You must use these base addresses to get the complete application working. - Once the server is up and running, open your web browser and navigate to http://localhost.
- You'll be prompted to log in. Use the username root and the password password.
For a more visual guide on starting the Mako Server, we have a video tutorial on command line instructions. Additionally, you can explore all the command line options for the server in our official documentation.
Using Xedge32
Xedge32 is the ultimate tool to use for our example program's server-side Lua code. With Xedge32, you can control GPIOs (General-Purpose Input/Output) directly from the SPA's web user interface. See the Xedge32 introduction for selecting an ESP32 and flashing the Xedge32 firmware.
What Can You Do?
- The SPA includes a dedicated LED page, allowing you to control LEDs via the user interface.
- If you add a push button for each LED, the web UI will also automatically update based on the button's state.
- When you press a push button, an interrupt is generated, and a WebSocket message is sent from the ESP32 to all connected browsers, updating the LED's on/off status.
Our Setup: In our test setup, as shown below, we have four LEDs and four corresponding push buttons. The ESP32’s left-side GPIOs are used for controlling the LEDs and the ESP32’s right side GPIOs are used for reading the push buttons’ state asynchronously – i.e. in interrupt mode.
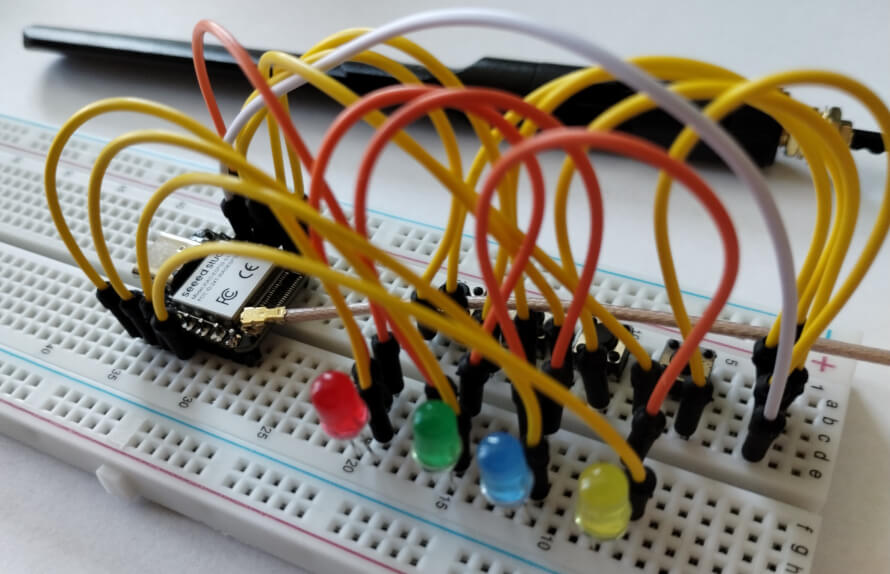
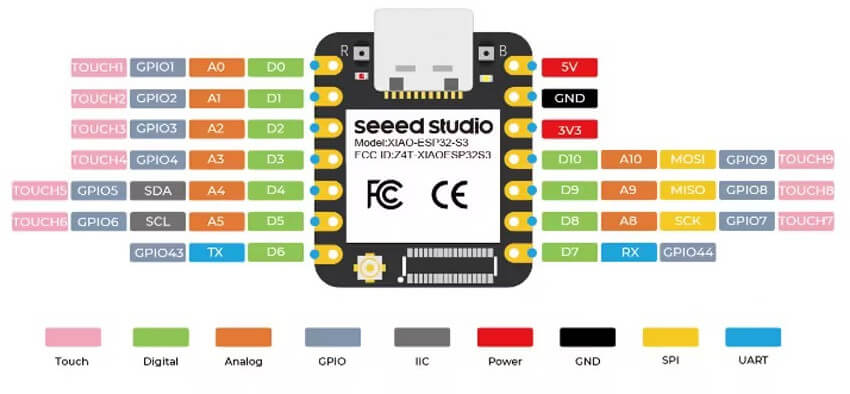
We have chosen the compact and breadboard-friendly Seeed Studio XIAO ESP32S3 for our test bench. But don't worry; you can use any ESP32 compatible with Xedge32.
Wiring Guide:
- LEDs: Connect the ESP32’s 3V to the LED's positive pin. Then, connect the LED's negative pin to the ESP32's GPIO PIN. Use GPIO1 to GPIO4 for the LEDs, dedicating one GPIO for each LED.
- Buttons: Connect the 3V to one pin of the button. Then, connect the button's other pin to the ESP32's GPIO PIN. Use GPIO9, GPIO8, GPIO7, and GPIO44 for the buttons, with one GPIO assigned to each button.
New to Wiring LEDs? Check out our beginner-friendly tutorial:Your First Xedge32 Project If this is your first time setting up LEDs. This tutorial also explains how to use the Xedge IDE.
The following figure shows the GPIOs for the XIAO ESP32S3.
Testing Your ESP32 Wiring
Once you have set up the ESP32 according to the instructions provided, it's a good idea to test the wiring to ensure everything is connected correctly before diving into the SPA.
To help you with this, we have provided a simple Lua script. This script will allow you to verify your wiring quickly. The Lua code is designed to configure and test the LEDs and buttons on the ESP32. The code below uses the Xedge32’s GPIO API.
local function cfgButton(pin,cb) local cfg={ pulldown=true, type="POSEDGE", callback=cb } return esp32.gpio(pin,"IN", cfg) end
local ledData -- initialized below
local function buttonClick(index) trace("Clicked:",index) local ledObj = ledData[index] local state = not ledObj.state -- toggle ledObj.state = state -- update ledObj.led:value(state) -- set LED end
local function cfgLed(pin) local led=esp32.gpio(pin,"OUT") led:value(true) -- Set high: led off return led end
ledData={ { state=true, button=cfgButton(9, function() buttonClick(1) end), led=cfgLed(1) }, { state=true, button=cfgButton(8, function() buttonClick(2) end), led=cfgLed(2) }, { state=true, button=cfgButton(7, function() buttonClick(3) end), led=cfgLed(3) }, { state=true, button=cfgButton(44,function() buttonClick(4) end), led=cfgLed(4) }, }
Function cfgButton:
- This function sets up a button on a specified GPIO pin.
- The pulldown=true ensures that the pin is in a known state (low) when the button is not pressed.
- The type="POSEDGE" configures the button to detect a rising edge, which means it will trigger when the button is pressed.
- The callback=cb assigns a function to be called when the button is pressed.
- The esp32.gpio(pin,"IN", cfg) initializes the specified GPIO pin as an input with the given configuration.
Function buttonClick:
- This function is called (triggered by interrupt) when a button is pressed.
- It toggles the state of the corresponding LED (turns it on if it was off, and vice versa).
- The trace function logs which button was clicked.
Function cfgLed:
- This function sets up an LED on a specified GPIO pin.
- The LED is initialized as an output.
- The initial state of the LED is set to off (led:value(true)).
Lua table ledData:
- This table contains the configuration and state of each LED and button pair.
- Each entry in the table represents one LED-button pair, with the button's GPIO pin, the LED's GPIO pin, and the initial state of the LED.
For a more in-depth explanation of the LED and button code, refer to sections 1, 2, and 3 of the tutorial Your First IoT Project. This tutorial uses the same button setup and provides a more detailed breakdown of the configuration and functionality.
How to run the LED and button test code on the ESP32
Using the Xedge32 IDE, create an application and then create an Xlua file – e.g testled.xlua. Copy the above code and paste the code into the Xlua file using the Xedge32 IDE. See the tutorial Your First Xedge32 Project if you are new to Xedge32. Save the file to start the Xlua file. You should now be able to turn the LEDs on and off using the buttons.
Note: Button bounce occurs when a button oscillates between on and off states briefly after being pressed, causing unintended multiple interrupts. This rapid, noisy transition can lead to unpredictable button click behavior. The above Lua code does not include debounce logic to counteract this effect. Consider adding debounce measures for consistent button responses if using this code in practical applications.
Uploading the SPA and Server-Side Code
Once you have verified the LED and button test program works, follow these steps to upload the SPA and server-side code:
Preparation:
Ensure your LED/button test program is turned off (disabled using Xedge IDE) to free up the GPIO resources for the SPA's server-side code.
Installing the SPA (client-side app):
**Packaging the SPA:**Since we are treating the SPA web app as a black box, we will package the app as a deployed application. A deployed application is simply a ZIP file containing all files that are part of the application.
- Zip the SPA application found in MinnowServer/www. Exclude the "www" root folder name from the ZIP file and name the file spa.zip.
- Upload spa.zip to the Xedge32 as follows:
- In the Xedge IDE, click the three dots in the top right corner to open the menu. Click "Firmware Update & App Upload"
- Drag & drop spa.zip onto the "Firmware Update & App Upload" page
- Do not select unpack the ZIP file. We will use this app as a black box
- Click the Save button
- Activate spa.zip as follows:
- Expand spa.zip in the left pane
- Click .appcfg
- Check (click) the button "LSP App"
- Set the Directory Name that now appears to: minnow
- Check the buttons Auto Start and Running.
- You do not need to click Save since clicking Running did it automatically.
Installing the MinnowSim (the server-side WebSocket app):
- ZIP the files in LSP-Examples/MinnowSim and exclude the root folder name in the ZIP file. Name the ZIP file MinnowSim.zip
- Upload MinnowSim.zip to the Xedge32 and activate it as follows:
- Click the three dots in the top right corner to open the menu. Click "Firmware Update & App Upload"
- Drag & drop MinnowSim.zip onto the "Firmware Update & App Upload" page
- Click Unpack ZIP file
- Click the Save button
- Activate MinnowSim as follows:
- Expand MinnowSim in the left pane
- Click .appcfg
- Check (click) the buttons in the following order: LSP App, Auto Start, and Running.
- The Directory Name must be empty
- You do not need to click Save since clicking Running did it automatically.
Testing the SPA:
- Visit http://xedge32.local/, which redirects to http://xedge32.local/minnow/.
- Log in using "root" for the username and "password" for the password.
- In the SPA, access the LEDs page. You can now control the LEDs.Toggling an LED button should also reflect its state in the SPA.
Note: You must change the button source code in the .preload script in MinnowSim if you used GPIO pins that differ from the pins used by the .preload script.
Conclusion
Congratulations on completing this tutorial! You've successfully set up and tested a Single Page Application (SPA) with the ESP32, delving deep into GPIO configurations and server-side integrations. By packaging the SPA and deploying the server-side code, you've navigated the complexities of embedded SPA web development, laying a strong foundation for future projects.
Building on this, it's worth noting the advantages of the Barracuda App Server over the simpler Minnow Server. Specifically, the Barracuda App Server's support for multiple WebSocket connections. The Lua server-side code in our example is tailored to leverage this feature. Try opening multiple browser windows and connecting them all to the SPA's LED page; you'll observe that the LED page seamlessly synchronizes the LED on/off state across all connected browsers. This synchronization is achieved using the design pattern detailed in the tutorial Modern Approach to Embedding a Web Server in a Device.
Dive Deeper:
Now that you have taken your first steps into designing a professional embedded SPA, there's so much more to explore. Continue your journey and expand your expertise with our embedded web server tutorials and Xedge32 microcontroller tutorials.
Looking for more than just ESP32 tutorials? Check out our full collection of Embedded Web Server Tutorials - covering a wide range of platforms, tools, and real-world use cases.
Posted in Xedge32