Redux Fundamentals, Part 3: State, Actions, and Reducers | Redux (original) (raw)
What You'll Learn
- How to define state values that contain your app's data
- How to define action objects that describe what happens in your app
- How to write reducer functions that calculate updated state based on existing state and actions
Prerequisites
- Familiarity with key Redux terms and concepts like "actions", "reducers", "store", and "dispatching". (See Part 2: Redux Concepts and Data Flow for explanations of these terms.)
Introduction
In Part 2: Redux Concepts and Data Flow, we looked at how Redux can help us build maintainable apps by giving us a single central place to put global app state. We also talked about core Redux concepts like dispatching action objects and using reducer functions that return new state values.
Now that you have some idea of what these pieces are, it's time to put that knowledge into practice. We're going to build a small example app to see how these pieces actually work together.
caution
Note that this tutorial intentionally shows older-style Redux logic patterns that require more code than the "modern Redux" patterns with Redux Toolkit we teach as the right approach for building apps with Redux today, in order to explain the principles and concepts behind Redux. It's not meant to be a production-ready project.
See these pages to learn how to use "modern Redux" with Redux Toolkit:
- The full "Redux Essentials" tutorial, which teaches "how to use Redux, the right way" with Redux Toolkit for real-world apps. We recommend that all Redux learners should read the "Essentials" tutorial!
- Redux Fundamentals, Part 8: Modern Redux with Redux Toolkit, which shows how to convert the low-level examples from earlier sections into modern Redux Toolkit equivalents
Project Setup
For this tutorial, we've created a pre-configured starter project that already has React set up, includes some default styling, and has a fake REST API that will allow us to write actual API requests in our app. You'll use this as the basis for writing the actual application code.
To get started, you can open and fork this CodeSandbox:
You can also clone the same project from this Github repo. After cloning the repo, you can install the tools for the project with npm install, and start it with npm start.
If you'd like to see the final version of what we're going to build, you can check out the tutorial-steps branch, or look at the final version in this CodeSandbox.
Creating a New Redux + React Project
Once you've finished this tutorial, you'll probably want to try working on your own projects. We recommend using the Redux templates for Create-React-App as the fastest way to create a new Redux + React project. It comes with Redux Toolkit and React-Redux already configured, using a modernized version of the "counter" app example you saw in Part 1. This lets you jump right into writing your actual application code without having to add the Redux packages and set up the store.
If you want to know specific details on how to add Redux to a project, see this explanation:
Detailed Explanation: Adding Redux to a React Project
The Redux template for CRA comes with Redux Toolkit and React-Redux already configured. If you're setting up a new project from scratch without that template, follow these steps:
- Add the
@reduxjs/toolkitandreact-reduxpackages - Create a Redux store using RTK's
configureStoreAPI, and pass in at least one reducer function - Import the Redux store into your application's entry point file (such as
src/index.js) - Wrap your root React component with the
<Provider>component from React-Redux, like:
root.render(
  <Provider store={store}>
    <App />
  </Provider>,
  document.getElementById('root')
)
Exploring the Initial Project
This initial project is based on the standard Vite project template, with some modifications.
Let's take a quick look at what the initial project contains:
/srcindex.js: the entry point file for the application. It renders the main<App>component.App.js: the main application component.index.css: styles for the complete application/api
*client.js: a smallfetchwrapper client that allows us to make HTTP GET and POST requests
*server.js: provides a fake REST API for our data. Our app will fetch data from these fake endpoints later./exampleAddons: contains some additional Redux addons that we'll use later in the tutorial to show how things work
If you load the app now, you should see a welcome message, but the rest of the app is otherwise empty.
With that, let's get started!
Starting the Todo Example App
Our example application will be a small "todo" application. You've probably seen todo app examples before - they make good examples because they let us show how to do things like tracking a list of items, handling user input, and updating the UI when that data changes, which are all things that happen in a normal application.
Defining Requirements
Let's start by figuring out the initial business requirements for this application:
- The UI should consist of three main sections:
- An input box to let the user type in the text of a new todo item
- A list of all the existing todo items
- A footer section that shows the number of non-completed todos, and shows filtering options
- Todo list items should have a checkbox that toggles their "completed" status. We should also be able to add a color-coded category tag for a predefined list of colors, and delete todo items.
- The counter should pluralize the number of active todos: "0 items", "1 item", "3 items", etc
- There should be buttons to mark all todos as completed, and to clear all completed todos by removing them
- There should be two ways to filter the displayed todos in the list:
- Filtering based on showing "All", "Active", and "Completed" todos
- Filtering based on selecting one or more colors, and showing any todos whose tag that match those colors
We'll add some more requirements later on, but this is enough to get us started.
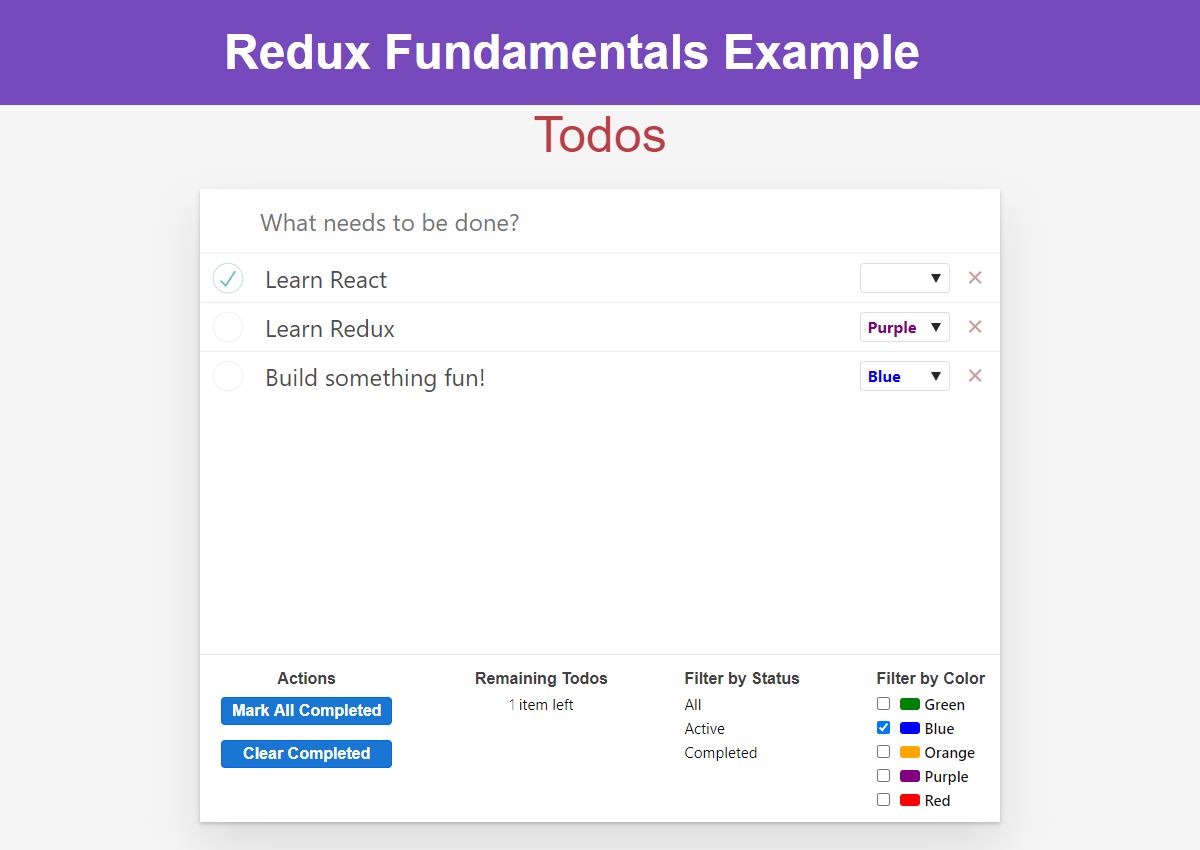
The end goal is an app that should look like this:
Designing the State Values
One of the core principles of React and Redux is that your UI should be based on your state. So, one approach to designing an application is to first think of all the state needed to describe how the application works. It's also a good idea to try to describe your UI with as few values in the state as possible, so there's less data you need to keep track of and update.
Conceptually, there are two main aspects of this application:
- The actual list of current todo items
- The current filtering options
We'll also need to keep track of the data the user is typing into the "Add Todo" input box, but that's less important and we'll handle that later.
For each todo item, we need to store a few pieces of information:
- The text the user entered
- The boolean flag saying if it's completed or not
- A unique ID value
- A color category, if selected
Our filtering behavior can probably be described with some enumerated values:
- Completed status: "All", "Active", and "Completed"
- Colors: "Red", "Yellow", "Green", "Blue", "Orange", "Purple"
Looking at these values, we can also say that the todos are "app state" (the core data that the application works with), while the filtering values are "UI state" (state that describes what the app is doing right now). It can be helpful to think about these different kinds of categories to help understand how the different pieces of state are being used.
Designing the State Structure
With Redux, our application state is always kept in plain JavaScript objects and arrays. That means you may not put other things into the Redux state - no class instances, built-in JS types like Map / Set / Promise / Date, functions, or anything else that is not plain JS data.
The root Redux state value is almost always a plain JS object, with other data nested inside of it.
Based on this information, we should now be able to describe the kinds of values we need to have inside our Redux state:
- First, we need an array of todo item objects. Each item should have these fields:
id: a unique numbertext: the text the user typed incompleted: a boolean flagcolor: An optional color category
- Then, we need to describe our filtering options. We need to have:
- The current "completed" filter value
- An array of the currently selected color categories
So, here's what an example of our app's state might look like:
const todoAppState = {
  todos: [
    { id: 0, text: 'Learn React', completed: true },
    { id: 1, text: 'Learn Redux', completed: false, color: 'purple' },
    { id: 2, text: 'Build something fun!', completed: false, color: 'blue' }
  ],
  filters: {
    status: 'Active',
    colors: ['red', 'blue']
  }
}
It's important to note that it's okay to have other state values outside of Redux! This example is small enough so far that we actually do have all our state in the Redux store, but as we'll see later, some data really doesn't need to be kept in Redux (like "is this dropdown open?" or "current value of a form input").
Designing Actions
Actions are plain JavaScript objects that have a type field. As mentioned earlier, you can think of an action as an event that describes something that happened in the application.
In the same way that we designed the state structure based on the app's requirements, we should also be able to come up with a list of some of the actions that describe what's happening:
- Add a new todo entry based on the text the user entered
- Toggle the completed status of a todo
- Select a color category for a todo
- Delete a todo
- Mark all todos as completed
- Clear all completed todos
- Choose a different "completed" filter value
- Add a new color filter
- Remove a color filter
We normally put any extra data needed to describe what's happening into the action.payload field. This could be a number, a string, or an object with multiple fields inside.
The Redux store doesn't care what the actual text of the action.type field is. However, your own code will look at action.type to see if an update is needed. Also, you will frequently look at action type strings in the Redux DevTools Extension while debugging to see what's going on in your app. So, try to choose action types that are readable and clearly describe what's happening - it'll be much easier to understand things when you look at them later!
Based on that list of things that can happen, we can create a list of actions that our application will use:
{type: 'todos/todoAdded', payload: todoText}{type: 'todos/todoToggled', payload: todoId}{type: 'todos/colorSelected', payload: {todoId, color}}{type: 'todos/todoDeleted', payload: todoId}{type: 'todos/allCompleted'}{type: 'todos/completedCleared'}{type: 'filters/statusFilterChanged', payload: filterValue}{type: 'filters/colorFilterChanged', payload: {color, changeType}}
In this case, the actions primarily have a single extra piece of data, so we can put that directly in the action.payload field. We could have split the color filter behavior into two actions, one for "added" and one for "removed", but in this case we'll do it as one action with an extra field inside specifically to show that we can have objects as an action payload.
Like the state data, actions should contain the smallest amount of information needed to describe what happened.
Writing Reducers
Now that we know what our state structure and our actions look like, it's time to write our first reducer.
Reducers are functions that take the current state and an action as arguments, and return a new state result. In other words, (state, action) => newState.
Creating the Root Reducer
A Redux app really only has one reducer function: the "root reducer" function that you will pass to createStore later on. That one root reducer function is responsible for handling all of the actions that are dispatched, and calculating what the entire new state result should be every time.
Let's start by creating a reducer.js file in the src folder, alongside index.js and App.js.
Every reducer needs some initial state, so we'll add some fake todo entries to get us started. Then, we can write an outline for the logic inside the reducer function:
src/reducer.js
const initialState = {
  todos: [
    { id: 0, text: 'Learn React', completed: true },
    { id: 1, text: 'Learn Redux', completed: false, color: 'purple' },
    { id: 2, text: 'Build something fun!', completed: false, color: 'blue' }
  ],
  filters: {
    status: 'All',
    colors: []
  }
}

// Use the initialState as a default value
export default function appReducer(state = initialState, action) {
  // The reducer normally looks at the action type field to decide what happens
  switch (action.type) {
    // Do something here based on the different types of actions
    default:
      // If this reducer doesn't recognize the action type, or doesn't
      // care about this specific action, return the existing state unchanged
      return state
  }
}
A reducer may be called with undefined as the state value when the application is being initialized. If that happens, we need to provide an initial state value so the rest of the reducer code has something to work with. Reducers normally use default argument syntax to provide initial state: (state = initialState, action).
Next, let's add the logic to handle the 'todos/todoAdded' action.
We first need to check if the current action's type matches that specific string. Then, we need to return a new object containing all of the state, even for the fields that didn't change.
src/reducer.js
function nextTodoId(todos) {
  const maxId = todos.reduce((maxId, todo) => Math.max(todo.id, maxId), -1)
  return maxId + 1
}

// Use the initialState as a default value
export default function appReducer(state = initialState, action) {
  // The reducer normally looks at the action type field to decide what happens
  switch (action.type) {
    // Do something here based on the different types of actions
    case 'todos/todoAdded': {
      // We need to return a new state object
      return {
        // that has all the existing state data
        ...state,
        // but has a new array for the `todos` field
        todos: [
          // with all of the old todos
          ...state.todos,
          // and the new todo object
          {
            // Use an auto-incrementing numeric ID for this example
            id: nextTodoId(state.todos),
            text: action.payload,
            completed: false
          }
        ]
      }
    }
    default:
      // If this reducer doesn't recognize the action type, or doesn't
      // care about this specific action, return the existing state unchanged
      return state
  }
}
That's... an awful lot of work to add one todo item to the state. Why is all this extra work necessary?
Rules of Reducers
We said earlier that reducers must always follow some special rules:
- They should only calculate the new state value based on the
stateandactionarguments - They are not allowed to modify the existing
state. Instead, they must make immutable updates, by copying the existingstateand making changes to the copied values. - They must not do any asynchronous logic or other "side effects"
tip
A "side effect" is any change to state or behavior that can be seen outside of returning a value from a function. Some common kinds of side effects are things like:
- Logging a value to the console
- Saving a file
- Setting an async timer
- Making an HTTP request
- Modifying some state that exists outside of a function, or mutating arguments to a function
- Generating random numbers or unique random IDs (such as
Math.random()orDate.now())
Any function that follows these rules is also known as a "pure" function, even if it's not specifically written as a reducer function.
But why are these rules important? There's a few different reasons:
- One of the goals of Redux is to make your code predictable. When a function's output is only calculated from the input arguments, it's easier to understand how that code works, and to test it.
- On the other hand, if a function depends on variables outside itself, or behaves randomly, you never know what will happen when you run it.
- If a function modifies other values, including its arguments, that can change the way the application works unexpectedly. This can be a common source of bugs, such as "I updated my state, but now my UI isn't updating when it should!"
- Some of the Redux DevTools capabilities depend on having your reducers follow these rules correctly
The rule about "immutable updates" is particularly important, and worth talking about further.
Reducers and Immutable Updates
Earlier, we talked about "mutation" (modifying existing object/array values) and "immutability" (treating values as something that cannot be changed).
warning
In Redux, our reducers are never allowed to mutate the original / current state values!
// ❌ Illegal - by default, this will mutate the state!
state.value = 123
There are several reasons why you must not mutate state in Redux:
- It causes bugs, such as the UI not updating properly to show the latest values
- It makes it harder to understand why and how the state has been updated
- It makes it harder to write tests
- It breaks the ability to use "time-travel debugging" correctly
- It goes against the intended spirit and usage patterns for Redux
So if we can't change the originals, how do we return an updated state?
tip
Reducers can only make copies of the original values, and then they can mutate the copies.
// ✅ This is safe, because we made a copy
return {
  ...state,
  value: 123
}
We already saw that we can write immutable updates by hand, by using JavaScript's array / object spread operators and other functions that return copies of the original values.
This becomes harder when the data is nested. A critical rule of immutable updates is that you must make a copy of every level of nesting that needs to be updated.
However, if you're thinking that "writing immutable updates by hand this way looks hard to remember and do correctly"... yeah, you're right! :)
Writing immutable update logic by hand is hard, and accidentally mutating state in reducers is the single most common mistake Redux users make.
tip
In real-world applications, you won't have to write these complex nested immutable updates by hand. In Part 8: Modern Redux with Redux Toolkit, you'll learn how to use Redux Toolkit to simplify writing immutable update logic in reducers.
Handling Additional Actions
With that in mind, let's add the reducer logic for a couple more cases. First, toggling a todo's completed field based on its ID:
src/reducer.js
export default function appReducer(state = initialState, action) {
  switch (action.type) {
    case 'todos/todoAdded': {
      return {
        ...state,
        todos: [
          ...state.todos,
          {
            id: nextTodoId(state.todos),
            text: action.payload,
            completed: false
          }
        ]
      }
    }
    case 'todos/todoToggled': {
      return {
        // Again copy the entire state object
        ...state,
        // This time, we need to make a copy of the old todos array
        todos: state.todos.map(todo => {
          // If this isn't the todo item we're looking for, leave it alone
          if (todo.id !== action.payload) {
            return todo
          }

          // We've found the todo that has to change. Return a copy:
          return {
            ...todo,
            // Flip the completed flag
            completed: !todo.completed
          }
        })
      }
    }
    default:
      return state
  }
}
And since we've been focusing on the todos state, let's add a case to handle the "visibility selection changed" action as well:
src/reducer.js
export default function appReducer(state = initialState, action) {
  switch (action.type) {
    case 'todos/todoAdded': {
      return {
        ...state,
        todos: [
          ...state.todos,
          {
            id: nextTodoId(state.todos),
            text: action.payload,
            completed: false
          }
        ]
      }
    }
    case 'todos/todoToggled': {
      return {
        ...state,
        todos: state.todos.map(todo => {
          if (todo.id !== action.payload) {
            return todo
          }

          return {
            ...todo,
            completed: !todo.completed
          }
        })
      }
    }
    case 'filters/statusFilterChanged': {
      return {
        // Copy the whole state
        ...state,
        // Overwrite the filters value
        filters: {
          // copy the other filter fields
          ...state.filters,
          // And replace the status field with the new value
          status: action.payload
        }
      }
    }
    default:
      return state
  }
}
We've only handled 3 actions, but this is already getting a bit long. If we try to handle every action in this one reducer function, it's going to be hard to read it all.
That's why reducers are typically split into multiple smaller reducer functions - to make it easier to understand and maintain the reducer logic.
Splitting Reducers
As part of this, Redux reducers are typically split apart based on the section of the Redux state that they update. Our todo app state currently has two top-level sections: state.todos and state.filters. So, we can split the large root reducer function into two smaller reducers - a todosReducer and a filtersReducer.
So, where should these split-up reducer functions live?
We recommend organizing your Redux app folders and files based on "features" - code that relates to a specific concept or area of your application. The Redux code for a particular feature is usually written as a single file, known as a "slice" file, which contains all the reducer logic and all of the action-related code for that part of your app state.
Because of that, the reducer for a specific section of the Redux app state is called a "slice reducer". Typically, some of the action objects will be closely related to a specific slice reducer, and so the action type strings should start with the name of that feature (like 'todos') and describe the event that happened (like 'todoAdded'), joined together into one string ('todos/todoAdded').
In our project, create a new features folder, and then a todos folder inside that. Create a new file named todosSlice.js, and let's cut and paste the todo-related initial state over into this file:
src/features/todos/todosSlice.js
const initialState = [
  { id: 0, text: 'Learn React', completed: true },
  { id: 1, text: 'Learn Redux', completed: false, color: 'purple' },
  { id: 2, text: 'Build something fun!', completed: false, color: 'blue' }
]

function nextTodoId(todos) {
  const maxId = todos.reduce((maxId, todo) => Math.max(todo.id, maxId), -1)
  return maxId + 1
}

export default function todosReducer(state = initialState, action) {
  switch (action.type) {
    default:
      return state
  }
}
Now we can copy over the logic for updating the todos. However, there's an important difference here. This file only has to update the todos-related state - it's not nested any more! This is another reason why we split up reducers. Since the todos state is an array by itself, we don't have to copy the outer root state object in here. That makes this reducer easier to read.
This is called reducer composition, and it's the fundamental pattern of building Redux apps.
Here's what the updated reducer looks like after we handle those actions:
src/features/todos/todosSlice.js
export default function todosReducer(state = initialState, action) {
  switch (action.type) {
    case 'todos/todoAdded': {
      // Can return just the new todos array - no extra object around it
      return [
        ...state,
        {
          id: nextTodoId(state),
          text: action.payload,
          completed: false
        }
      ]
    }
    case 'todos/todoToggled': {
      return state.map(todo => {
        if (todo.id !== action.payload) {
          return todo
        }

        return {
          ...todo,
          completed: !todo.completed
        }
      })
    }
    default:
      return state
  }
}
That's a bit shorter and easier to read.
Now we can do the same thing for the visibility logic. Create src/features/filters/filtersSlice.js, and let's move all the filter-related code over there:
src/features/filters/filtersSlice.js
const initialState = {
  status: 'All',
  colors: []
}

export default function filtersReducer(state = initialState, action) {
  switch (action.type) {
    case 'filters/statusFilterChanged': {
      return {
        // Again, one less level of nesting to copy
        ...state,
        status: action.payload
      }
    }
    default:
      return state
  }
}
We still have to copy the object containing the filters state, but since there's less nesting, it's easier to read what's happening.
info
To keep this page shorter, we'll skip showing how to write the reducer update logic for the other actions.
Try writing the updates for those yourself, based on the requirements described above.
If you get stuck, see the CodeSandbox at the end of this page for the complete implementation of these reducers.
Combining Reducers
We now have two separate slice files, each with its own slice reducer function. But, we said earlier that the Redux store needs one root reducer function when we create it. So, how can we go back to having a root reducer without putting all the code in one big function?
Since reducers are normal JS functions, we can import the slice reducers back into reducer.js, and write a new root reducer whose only job is to call the other two functions.
src/reducer.js
import todosReducer from './features/todos/todosSlice'
import filtersReducer from './features/filters/filtersSlice'

export default function rootReducer(state = {}, action) {
  // always return a new object for the root state
  return {
    // the value of `state.todos` is whatever the todos reducer returns
    todos: todosReducer(state.todos, action),
    // For both reducers, we only pass in their slice of the state
    filters: filtersReducer(state.filters, action)
  }
}
Note that each of these reducers is managing its own part of the global state. The state parameter is different for every reducer, and corresponds to the part of the state it manages.
This allows us to split up our logic based on features and slices of state, to keep things maintainable.
combineReducers
We can see that the new root reducer is doing the same thing for each slice: calling the slice reducer, passing in the slice of the state owned by that reducer, and assigning the result back to the root state object. If we were to add more slices, the pattern would repeat.
The Redux core library includes a utility called combineReducers, which does this same boilerplate step for us. We can replace our hand-written rootReducer with a shorter one generated by combineReducers.
Now that we need combineReducers, it's time to actually install the Redux core library:
Once that's done, we can import combineReducers and use it:
src/reducer.js
import { combineReducers } from 'redux'

import todosReducer from './features/todos/todosSlice'
import filtersReducer from './features/filters/filtersSlice'

const rootReducer = combineReducers({
  // Define a top-level state field named `todos`, handled by `todosReducer`
  todos: todosReducer,
  filters: filtersReducer
})

export default rootReducer
combineReducers accepts an object where the key names will become the keys in your root state object, and the values are the slice reducer functions that know how to update those slices of the Redux state.
Remember, the key names you give to combineReducers decides what the key names of your state object will be!
What You've Learned
State, Actions, and Reducers are the building blocks of Redux. Every Redux app has state values, creates actions to describe what happened, and uses reducer functions to calculate new state values based on the previous state and an action.
Here's the contents of our app so far:
Summary
- Redux apps use plain JS objects, arrays, and primitives as the state values
- The root state value should be a plain JS object
- The state should contain the smallest amount of data needed to make the app work
- Classes, Promises, functions, and other non-plain values should not go in the Redux state
- Reducers must not create random values like
Math.random()orDate.now() - It's okay to have other state values that are not in the Redux store (like local component state) side-by side with Redux
- Actions are plain objects with a
typefield that describe what happened- The
typefield should be a readable string, and is usually written as'feature/eventName' - Actions may contain other values, which are typically stored in the
action.payloadfield - Actions should have the smallest amount of data needed to describe what happened
- The
- Reducers are functions that look like
(state, action) => newState- Reducers must always follow special rules:
* Only calculate the new state based on thestateandactionarguments
* Never mutate the existingstate- always return a copy
* No "side effects" like HTTP requests or async logic
- Reducers must always follow special rules:
- Reducers should be split up to make them easier to read
- Reducers are usually split based on top-level state keys or "slices" of state
- Reducers are usually written in "slice" files, organized into "feature" folders
- Reducers can be combined together with the Redux
combineReducersfunction - The key names given to
combineReducersdefine the top-level state object keys
What's Next?
We now have some reducer logic that will update our state, but those reducers won't do anything by themselves. They need to be put inside a Redux store, which can call the reducer code with actions when something has happened.
In Part 4: Store, we'll see how to create a Redux store and run our reducer logic.