Dockerize Go Applications (original) (raw)
📥 This article is long. Download a PDF to read it later.
Introduction
While most Go applications compile to a single binary, web applications also ship with templates, assets and configuration files; these can get out of sync and cause faulty deployments.
Docker lets us create a self-contained image with everything our application needs to work. In this tutorial, you will learn how to deploy a Go web application with Docker, and how Docker can help improve your development workflow and deployment process.
Goals
By the end of this article, you will:
- Have a basic understanding of Docker,
- Find out how Docker can help you while developing a Go application,
- Learn how to create a Docker container for a Go application for production, and
- Know how to use Continuous Integration and Delivery (CI/CD) to automatically build a Docker image.
Prerequisites
For this tutorial, you will need:
- Docker installed on your machine.
- A free Docker Hub account.
- A Semaphore account.
You can find all the code for this tutorial in the golang-mathapp repository.
Understanding Docker
Docker helps you create a single deployable unit for your application. This unit, also known as a container, has everything the application needs to work. This includes the code (or binary), the runtime, the system tools and libraries.
Packing all the requirements into a single unit ensures an identical environment for the application, wherever it is deployed. It also helps to maintain identical development and production setups.
Containers also eliminate a whole class of issues caused by files being out of sync or due to subtle differences in the production environments.
Advantages over Virtual Machines
Containers offer similar resource allocation and isolation benefits as virtual machines. However, the similarity ends there.
A virtual machine needs its own guest operating system while a container shares the kernel of the host operating system. This means that containers are much lighter and need fewer resources. A virtual machine is, in essence, an operating system within an operating system. Containers, on the other hand, are just like any other application in the system. Basically, containers need fewer resources (memory, disk space, etc.) than virtual machines, and have much faster start-up times than virtual machines.
Benefits of Docker During Development
Some of the benefits of using Docker in development include:
- A standard development environment used by all team members,
- Updating dependencies centrally and using the same container everywhere,
- An identical environment in development to that of production, and
- Fixing potential problems that might appear only in production.
Why Use Docker with a Go Web Application?
Most Go applications are simple binaries. This begs the question—why use Docker with a Go application? Some of the reasons to use Docker with Go include:
- Web applications typically have templates and configuration files. Docker helps keep these files in sync with the binary.
- Docker ensures identical setups in development and production. There are times when an application works in development, but not in production. Using Docker frees you from having to worry about problems like these.
- Machines, operating systems, and installed software can vary significantly across a large team. Docker provides a mechanism to ensure a consistent development setup. This makes teams more productive and reduces friction and avoidable issues during development.
Creating a Simple Go Web Application
We’ll create a simple web application in Go for demonstration in this article. This application, which we’ll call MathApp, will:
- Expose routes for different mathematical operations,
- Use HTML templates for views,
- Use a configuration file to customize the application, and
- Include tests for selected functions.
Visiting /sum/3/6 will show a page with the result of adding 3 and 6. Likewise, visiting /product/3/6 will show a page with the product of 3 and 6.
In this article, we used the Beego framework. Note that you can use any framework (or none at all) for your application.
Final Directory Structure
Upon completion, the directory structure of MathApp will look like:
MathApp
    ├── Dockerfile
    ├── Dockerfile.production
    └── src
        ├── conf
        │   └── app.conf
        ├── go.mod
        ├── go.src
        ├── main.go
        ├── main_test.go
        ├── vendor
        └── views
            ├── invalid-route.html
            └── result.html
The main application file is main.go, located at the src directory. This file contains all the functionality of the app. Some of the functionality from main.go is tested using main_test.go.
The views folder contains the view files invalid-route.html and result.html. The configuration file app.conf is placed in the conf folder. Beego uses this file to customize the application.
Create the GitHub Repository
We’ll use Go mod, the official module manager, to handle Go modules in a portable way without having to worry about GOPATH.
We’ll start by creating a GitHub repository and cloning it to your machine.
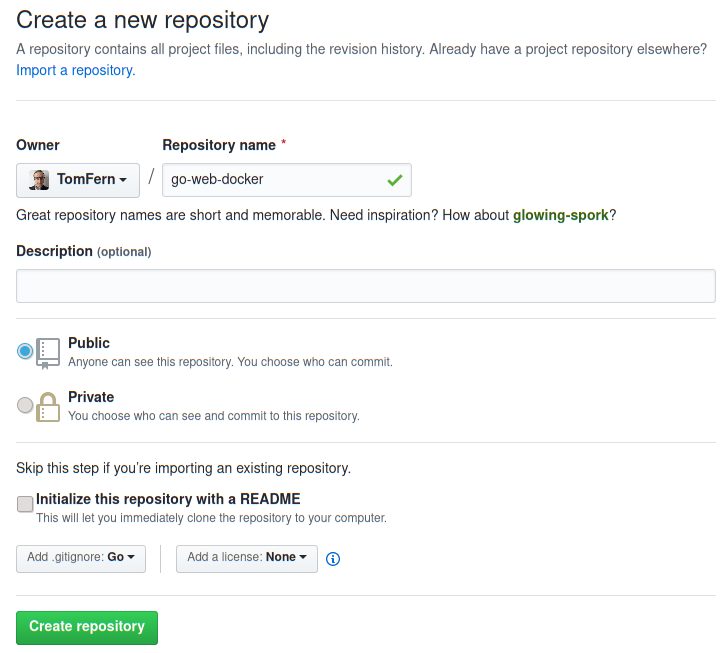
Use the repository name to initialize the project:
$ mkdir src
$ cd src
$ export GOFLAGS=-mod=vendor
$ export GO111MODULE=on
$ go mod init github.com/YOUR_GITHUB_USER/YOUR_REPOSITORY_NAME
# (example: go mod init github.com/tomfern/go-web-docker)
From now on, we can use these commands:
$ go mod download
$ go mod vendor
$ go mod verify
To download the required dependencies in the vendor/ folder (instead of downloading them in the GOROOT, this will come in handy later).
Application File Contents
Before continuing, let’s create the file structure:
$ mkdir conf viewsThe main application file (main.go) contains all the application logic. The contents of this file are as follows:
// main.go

package main

import (
    "strconv"

    "github.com/astaxie/beego"
)


func main() {
    /* This would match routes like the following:
       /sum/3/5
       /product/6/23
       ...
    */
    beego.Router("/:operation/:num1:int/:num2:int", &mainController{})
    beego.Run()
}

type mainController struct {
    beego.Controller
}


func (c *mainController) Get() {

    //Obtain the values of the route parameters defined in the route above
    operation := c.Ctx.Input.Param(":operation")
    num1, _ := strconv.Atoi(c.Ctx.Input.Param(":num1"))
    num2, _ := strconv.Atoi(c.Ctx.Input.Param(":num2"))

    //Set the values for use in the template
    c.Data["operation"] = operation
    c.Data["num1"] = num1
    c.Data["num2"] = num2
    c.TplName = "result.html"

    // Perform the calculation depending on the 'operation' route parameter
    switch operation {
    case "sum":
        c.Data["result"] = add(num1, num2)
    case "product":
        c.Data["result"] = multiply(num1, num2)
    default:
        c.TplName = "invalid-route.html"
    }
}

func add(n1, n2 int) int {
    return n1 + n2
}

func multiply(n1, n2 int) int {
    return n1 * n2
}
In your application, this might be split across several files. However, for the purpose of this tutorial, I like to have everything in one place.
Test File Contents
The main.go file has some functions which need to be tested. The tests for these functions can be found in main_test.go. The contents of this file are as follows:
// main_test.go

package main

import "testing"

func TestSum(t *testing.T) {
    if add(2, 5) != 7 {
        t.Fail()
    }
    if add(2, 100) != 102 {
        t.Fail()
    }
    if add(222, 100) != 322 {
        t.Fail()
    }
}

func TestProduct(t *testing.T) {
    if multiply(2, 5) != 10 {
        t.Fail()
    }
    if multiply(2, 100) != 200 {
        t.Fail()
    }
    if multiply(222, 3) != 666 {
        t.Fail()
    }
}
Testing your application is particularly useful if you want to do Continuous Deployment. If you have adequate testing in place, then you can make stress-free deployments anytime, any day of the week.
View Files Contents
The view files are HTML templates; these are used by the application to display the response to a request. The content of views/result.html is as follows:
<!-- views/result.html -->
<!doctype html>
<html>
    <head>
        <title>MathApp - {{.operation}}</title>
    </head>
    <body>
        The {{.operation}} of {{.num1}} and {{.num2}} is {{.result}}
    </body>
</html>
The content of views/invalid-route.html is as follows:
<!-- invalid-route.html -->
<!doctype html>
<html>
    <head>
        <title>MathApp</title>
        <meta name="viewport" content="width=device-width, initial-scale=1">
        <meta charset="UTF-8">
    </head>

    <body>
        Invalid operation
    </body>
</html>
Configuration File Contents
The conf/app.conf file is read by Beego to configure the application. Its content is as follows:
appname = mathapp
runmode = "dev"
httpport = 8010
In this file:
- appname: is the name of the process that the application will run as,
- httpport: is the port on which the application will be served, and
- runmode: specifies which mode the application should run in. Valid values include
devfor development andprodfor production.
Finally, if you haven’t yet done so, install the Go modules with:
$ go mod download
$ go mod vendor
$ go mod verify
Using Docker During Development
This section will explain the benefits of using Docker during development, and walk you through the steps required to use Docker in development.
Configuring Docker for Development
We’ll use a Dockerfile to configure Docker for development. The setup should satisfy the following requirements for the development environment:
- We will use the application mentioned in the previous section,
- The files should be accessible both from inside and outside of the container,
- We will use the
beetool, this will be used to live-reload the app (inside the Docker container) during development, - Docker will expose the application on port
8010, - In the Docker container, the application is located at
/home/app, - The name of the Docker image we’ll create for development will be
mathapp.
Step 1 – Creating the Dockerfile
Go back to the top level of your project:
$ cd ..The following Dockerfile should satisfy the above requirements.
FROM golang:1.18-bullseye

RUN go install github.com/beego/bee/v2@latest

ENV GO111MODULE=on
ENV GOFLAGS=-mod=vendor

ENV APP_HOME /go/src/mathapp
RUN mkdir -p "$APP_HOME"

WORKDIR "$APP_HOME"
EXPOSE 8010
CMD ["bee", "run"]
The first line:
FROM golang:1.18-bullseyeReferences the official image for Go as the base image. This image comes with Go 1.18 pre-installed.
The second line:
RUN go install github.com/beego/bee/v2@latestInstalls the bee tool globally (Docker commands run as root by default), which will be used to live-reload our code during development.
Next, we configure the environment variables for Go modules:
ENV GO111MODULE=on
ENV GOFLAGS=-mod=vendor
The next lines:
ENV APP_HOME /go/src/mathapp
RUN mkdir -p "$APP_HOME"
WORKDIR "$APP_HOME"
Creates a folder for the code and makes it active.
The next to last line tells Docker that port 8010 is of interest.
EXPOSE 8010The final line:
CMD ["bee", "run"]Uses the bee command to start our application.
Step 2 – Building the Image
Once the Docker file is created, run the following command to create the image:
$ docker build -t mathapp-development .Executing the above command will create an image named mathapp:
- -t mathapp: sets the tag name for the new image, we can reference the image later as
mathapp:latest - Don’t forget to type the last dot (.) in the command, otherwise you’ll get an error.
This command can be used by everyone working on this application. This will ensure that an identical development environment is used across the team.
To see the list of images on your system, run the following command:
$ docker imagesNote that the exact names and number of images might vary. However, you should see at least the golang and mathapp images in the list:
REPOSITORY               TAG            IMAGE ID            CREATED                 SIZE
golang                   1.18           25c4671a1478        2 weeks ago             809MB
mathapp-development      latest         8ae092824585        60 seconds ago          838MB
Step 3 – Running the Container
Once you have mathapp, you can start a container with:
$ docker run -it --rm -p 8010:8010 -v $PWD/src:/go/src/mathapp mathapp-developmentLet’s break down the above command to see what it does.
- The
docker runcommand is used to run a container from an image, - The
-itflag starts the container in an interactive mode (tie it to the current shell), - The
--rmflag cleans out the container after it shuts down, - The
--name mathapp-instancenames the containermathapp-instance, - The
-p 8010:8010flag allows the container to be accessed at port8010, - The
-v $PWD/src:/go/src/mathappis more involved. It maps thesrc/directory from the machine to/go/src/mathappin the container. This makes the development files available inside and outside the container, and - The
mathapppart specifies the image name to use in the container.
Executing the above command starts the Docker container. This container exposes your application on port 8010. It also rebuilds your application automatically whenever you make a change. You should see the following output in your console:
______
| ___ \
| |_/ / ___ ___
| ___ \ / _ \ / _ \
| |_/ /| __/| __/
\____/ \___| \___| v2.0.2
2022/05/10 13:39:29 INFO ▶ 0003 Using 'mathapp' as 'appname'
2022/05/10 13:39:29 INFO ▶ 0004 Initializing watcher...
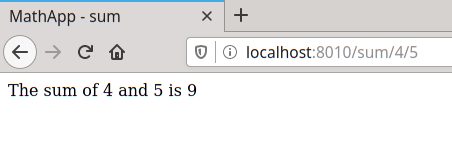
2020/03/17 14:43:24.912 [I] [asm_amd64.s:1373] http server Running on http://:8010To check the setup, visit http://localhost:8010/sum/4/5 in your browser. You should see something similar to the following:
Note: This assumes that you’re working on your local machine.
To try the live-reload feature, make a modification in any of the source files. For instance, edit src/main.go, replace this line:
c.Data["operation"] = operationTo something like this:
c.Data["operation"] = "real " + operationBee should pick up the change, even inside the container, and reload the application seamlessly:
______
| ___ \
| |_/ /  ___   ___
| ___ \ / _ \ / _ \
| |_/ /|  __/|  __/
\____/  \___| \___| v2.0.2
2022/05/10 13:39:29 INFO     ▶ 0003 Using 'mathapp' as 'appname'
2022/05/10 13:39:29 INFO     ▶ 0004 Initializing watcher...
2022/05/10 13:39:29 INFO.   [asm_amd64.s:1373]  http server Running on http://:8010
Now reload the page on the browser to see the modified message:

Using Docker in Production
This section will explain how to deploy a Go application in a Docker container. We will use Semaphore to do the following:
- Automatically build after changes are pushed to the git repository,
- Automatically run tests,
- Create a Docker image if the build is successful and if the tests pass, and
- Push the Docker image to Docker Hub.
Creating a Dockerfile for Production
We’ll write a new Dockerfile to create a complete, self-contained image; without external dependencies.
Enter the following contents in a new file called Dockerfile.production:
# Dockerfile.production

FROM registry.semaphore.io/golang:1.18 as builder

ENV APP_HOME /go/src/mathapp

WORKDIR "$APP_HOME"
COPY src/ .

RUN go mod download
RUN go mod verify
RUN go build -o mathapp

FROM registry.semaphore.io/golang:1.18

ENV APP_HOME /go/src/mathapp
RUN mkdir -p "$APP_HOME"
WORKDIR "$APP_HOME"

COPY src/conf/ conf/
COPY src/views/ views/
COPY --from=builder "$APP_HOME"/mathapp $APP_HOME

EXPOSE 8010
CMD ["./mathapp"]
Let’s take a detailed look at what each of these commands does. The first command:
FROM registry.semaphore.io/golang:1.18 as builderTells us this is a multi-stage build; it defines an intermediate image that will only have one job: compile the Go binary.
You might have noticed that we’re not pulling the image from Docker Hub, the default image registry. Instead, we’re using the Semaphore Docker Registry, which is more convenient, faster, and pulls don’t count against your Docker Hub rate limits.
The following commands:
ENV APP_HOME /go/src/mathapp

WORKDIR "$APP_HOME"
COPY src/ .
Creates the application folder for the app and copies the source code.
The last commands in the intermediate image download the modules and build the executable:
RUN go mod download
RUN go mod verify
RUN go build -o mathapp
Next comes the final and definitive container, where we will run the services.
FROM registry.semaphore.io/golang:1.18We use the COPY command to copy files into the image, the --from argument let us copy the generated binary from the builder stage.
COPY src/conf/ conf/
COPY src/views/ views/
COPY --from=builder <span class="katex"><span class="katex-mathml"><math xmlns="http://www.w3.org/1998/Math/MathML"><semantics><mrow><mi>A</mi><mi>P</mi><msub><mi>P</mi><mi>H</mi></msub><mi>O</mi><mi>M</mi><mi>E</mi><mi mathvariant="normal">/</mi><mi>m</mi><mi>a</mi><mi>t</mi><mi>h</mi><mi>a</mi><mi>p</mi><mi>p</mi></mrow><annotation encoding="application/x-tex">APP_HOME/mathapp </annotation></semantics></math></span><span class="katex-html" aria-hidden="true"><span class="base"><span class="strut" style="height:1em;vertical-align:-0.25em;"></span><span class="mord mathnormal">A</span><span class="mord mathnormal" style="margin-right:0.13889em;">P</span><span class="mord"><span class="mord mathnormal" style="margin-right:0.13889em;">P</span><span class="msupsub"><span class="vlist-t vlist-t2"><span class="vlist-r"><span class="vlist" style="height:0.3283em;"><span style="top:-2.55em;margin-left:-0.1389em;margin-right:0.05em;"><span class="pstrut" style="height:2.7em;"></span><span class="sizing reset-size6 size3 mtight"><span class="mord mathnormal mtight" style="margin-right:0.08125em;">H</span></span></span></span><span class="vlist-s"></span></span><span class="vlist-r"><span class="vlist" style="height:0.15em;"><span></span></span></span></span></span></span><span class="mord mathnormal" style="margin-right:0.05764em;">OME</span><span class="mord">/</span><span class="mord mathnormal">ma</span><span class="mord mathnormal">t</span><span class="mord mathnormal">ha</span><span class="mord mathnormal">pp</span></span></span></span>APP_HOMEWe finalize by exposing the port and starting the binary:
EXPOSE 8010
CMD ["./mathapp"]
To build the deployment image:
$ docker build -t mathapp-production -f Dockerfile.production .You can run it with:
$ docker run -it -p 8010:8010 mathapp-productionNotice that we don’t need to map any directories, as all the source files are included in the container.
Continuous Integration with Semaphore
Docker is a great solution to package and deploy Go applications. The only downside is the additional steps required to build and test the image. This hurdle is easily is best dealt with Continuous Integration and Continuous Delivery (CI/CD).
A Continuous Integration (CI) platform can test our code on every iteration, on every push and every merge. Developers adopting CI no longer have to fear of merging branches, nor be anxious about release day. In fact, CI lets developers merge all the time and make safe releases any day of the week. A good CI setup will run a series of comprehensive tests, like the ones we prepared so far, to weed out any bugs.
Once the code is ready, we can extend our CI setup with Continuous Delivery (CD). CD can prepare and build the Docker images, leaving them ready to deploy at any time.
Push the Code to GitHub
Let’s push our modifications to GitHub:
- Open
.gitignoreand uncomment thevendor/line, so vendored modules are not committed:
# Dependency directories (remove the comment below to include it)
vendor/

# Build artifact
src/mathapp- Push all the code with git:
$ git add Dockerfile*
$ git add src
$ git add .gitignore
$ git commit -m "initial commit"
$ git push origin master
Adding the Repository to Semaphore
We can add CI to our project for free in just a few minutes:
- Go to Semaphore and sign up using the Sign up with GitHub button. This will link up both accounts.
- Click on the + Create New create a new project:
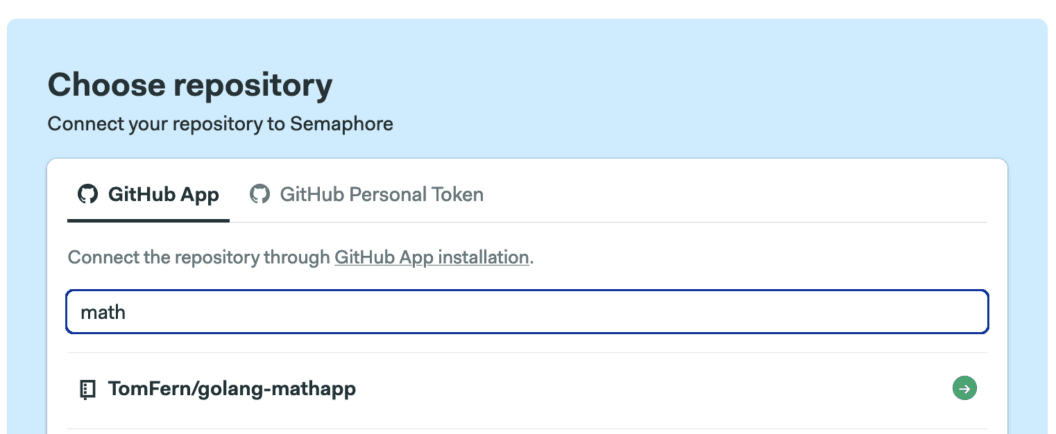
- Find your GitHub repository and click on Choose:
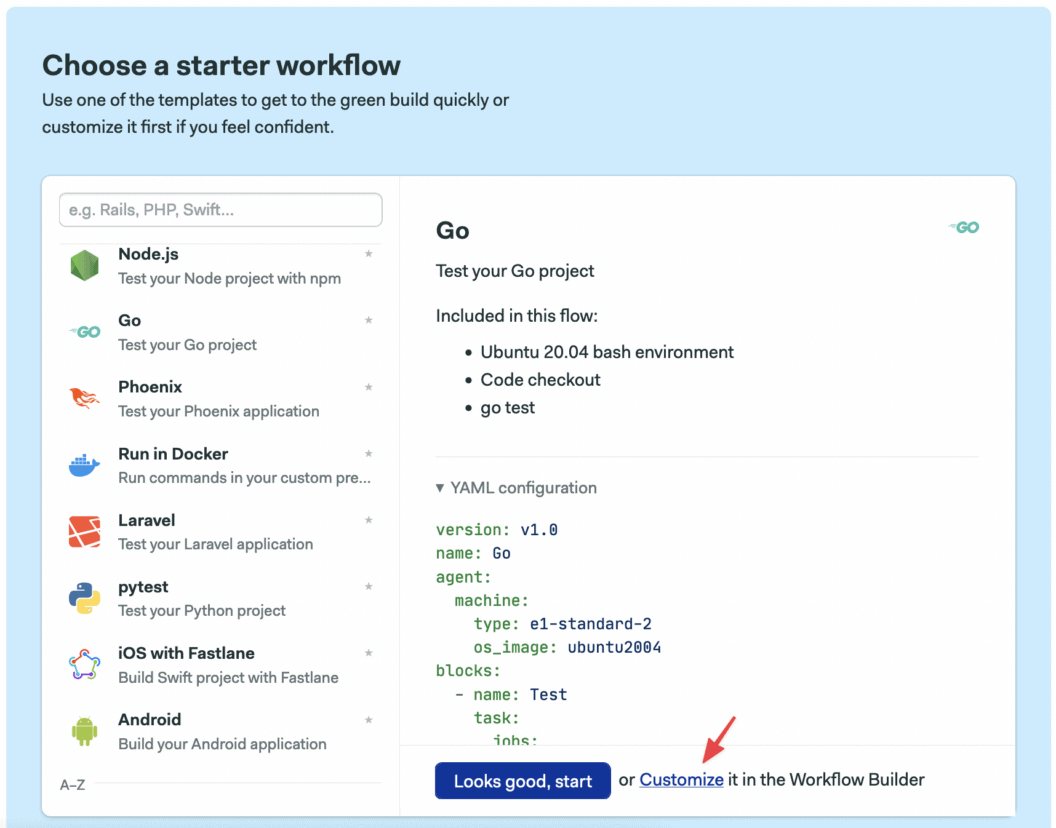
- Select the Go starter workflow. Click on Customize it first:
You’ll get the Workflow Editor. Here’s an overview of how it works:
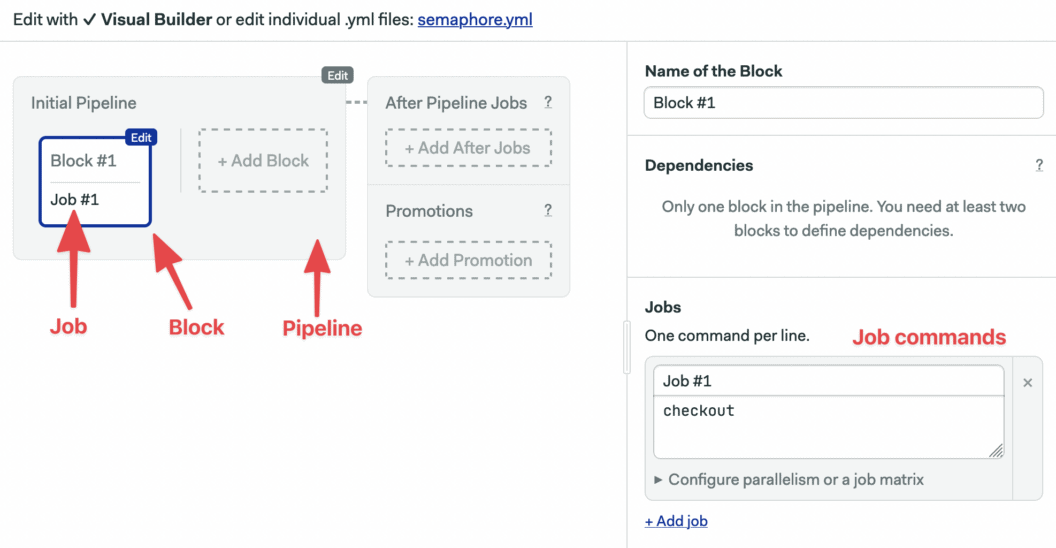
- Pipeline: A pipeline has a specific objective, e.g. building or testing. Pipelines are made of blocks that are executed from left to right in an agent.
- Agent: The agent is the virtual machine that powers the pipeline. We have three machine types to choose from. The machine runs an optimized Ubuntu 20.04 image with build tools for many languages.
- Block: blocks group jobs that can be executed in parallel. Jobs in a block usually have similar commands and configurations. Once all jobs in a block complete, the next block begins.
- Job: jobs define the commands that do the work. They inherit their configuration from their parent block.
Coming back to our setup. The started workflow expects the code at the project’s root, but our code is inside the src directory so we need to make a small modification:
- Click on the Test block.
- On the right side, you’ll find the job’s commands, change them so they look like this:
sem-version go 1.18
export GO111MODULE=on
export GOPATH=~/go
export PATH=/home/semaphore/go/bin:$PATH
checkout
cd src
go get ./...
go test ./...
go build -v .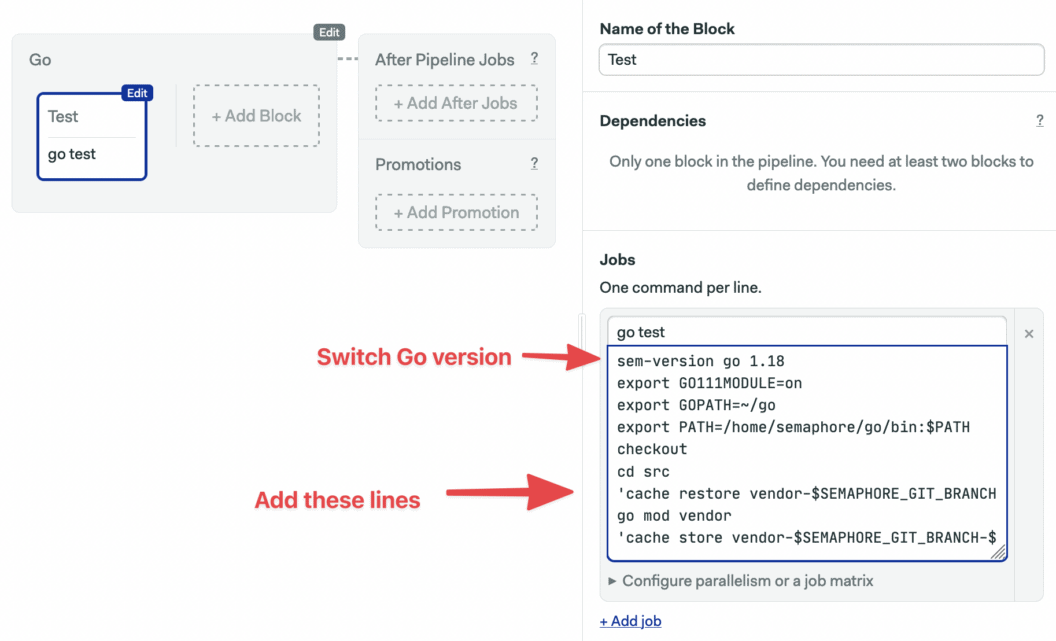
- Click on the Run the Workflow and then on Start to get the pipeline running:
If all goes well, after a few seconds the job should be completed without errors.
Enhancing the CI Pipeline
In this section, we’ll modify the pipeline so that:
- Go dependencies are cached to having to avoid re-download on each run.
- Tests get their own block so we can scale out testing more easily.
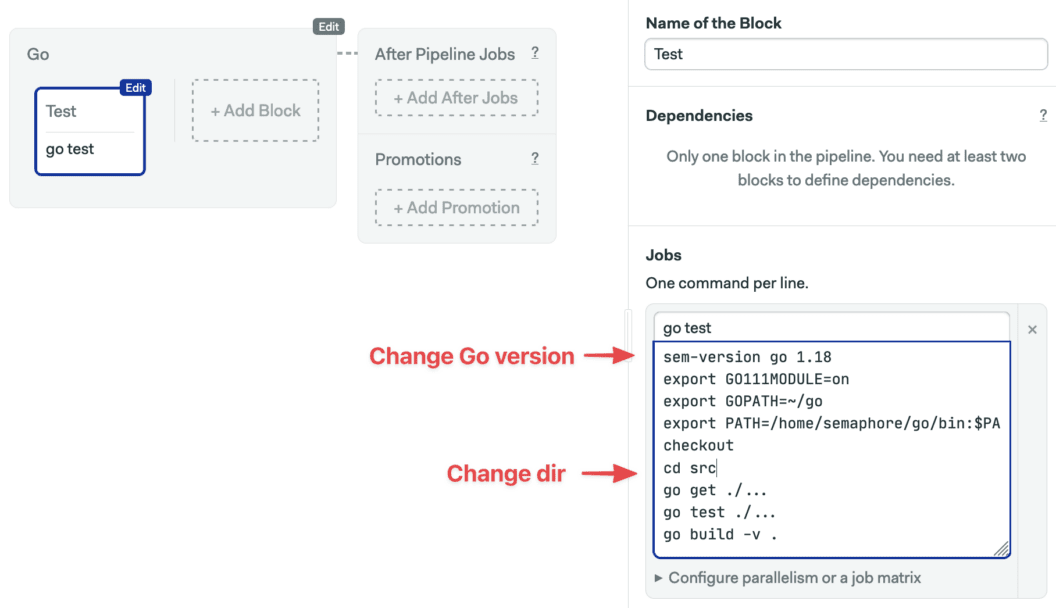
To get started, click on the Edit Workflow button, then:
- Click on the block. We’ll completely replace its contents.
- Change the name of the block and the job to “Install”.
- Type the following content in the Job command box:
sem-version go 1.18
export GO111MODULE=on
export GOPATH=~/go
export PATH=/home/semaphore/go/bin:$PATH
checkout
cd src
cache restore vendor-$SEMAPHORE_GIT_BRANCH-$(checksum go.mod),vendor-$SEMAPHORE_GIT_BRANCH,vendor-master
go mod vendor
cache store vendor-$SEMAPHORE_GIT_BRANCH-$(checksum go.mod),vendor-$SEMAPHORE_GIT_BRANCH,vendor-master vendor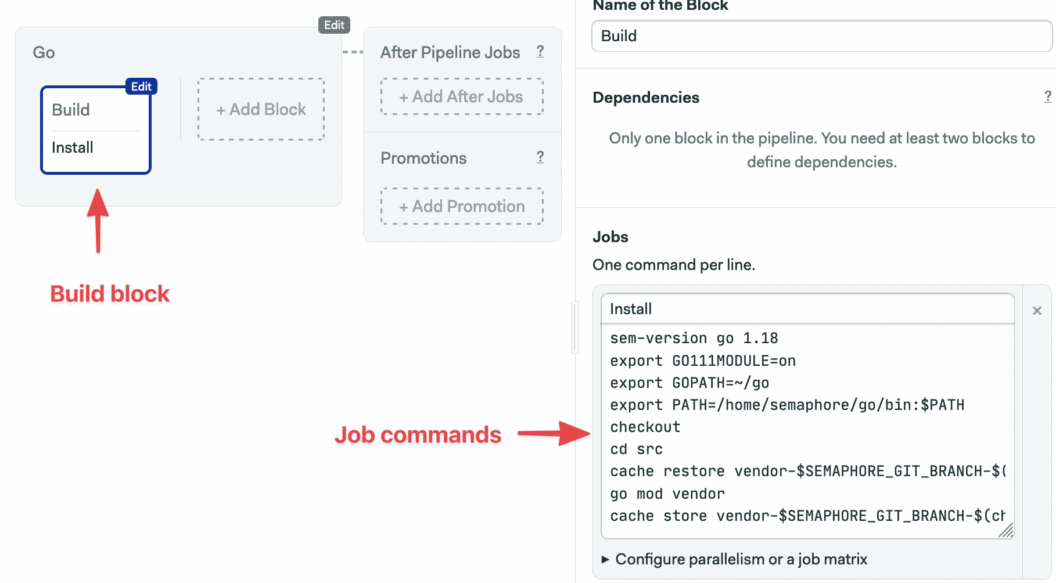
I think this is a good opportunity to learn about the Semaphore toolbox of built-in commands:
- checkout: the checkout commands clones the correct revision of the GitHub repository and changes the directory. It’s usually the first command in a job.
- sem-version: with sem-version, we can switch the active version of a language. Semaphore fully supports many languages, including Go.
- cache: the cache is a project file storage. We’ll use the cache to persist the
vendor/directory.
Let’s go back to our pipeline:
- Use the + Add Block dotted line button to create a new block.
- Call the block and the job “Test”.
- Open the Environment Variables section and create the
GO111MODULEandGOFLAGSvariables like we did on the previous block. - Open the Prologue section, which executed before each job in the block, and type the following commands:
sem-version go 1.18
export GO111MODULE=on
export GOPATH=~/go
export PATH=/home/semaphore/go/bin:$PATH
checkout
cd src
cache restore vendor-$SEMAPHORE_GIT_BRANCH-$(checksum go.mod),vendor-$SEMAPHORE_GIT_BRANCH,vendor-master- Type the following command in the job:
go test ./...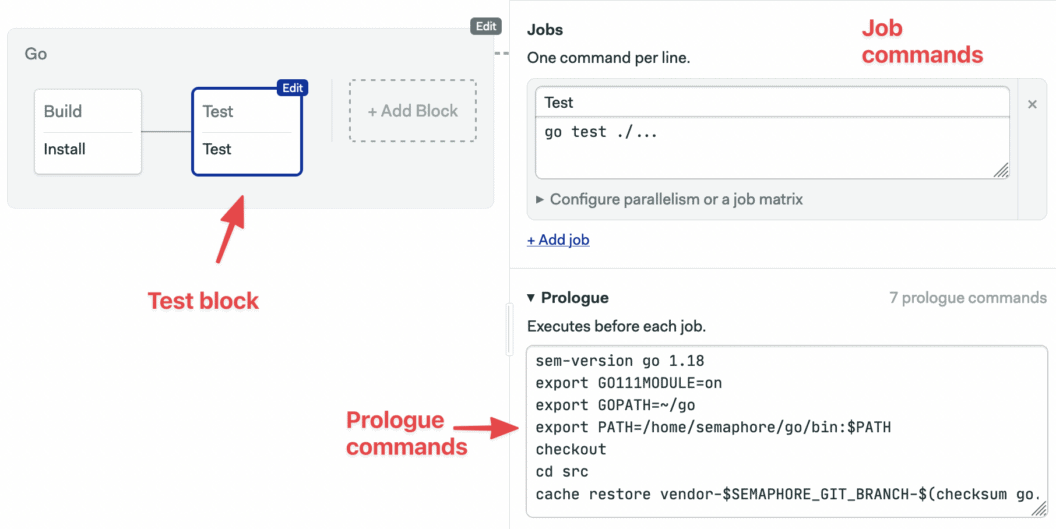
- Click on Run the Workflow and Start to try the updated pipeline.
Building the Docker Image
So far all we did enters in the Continuous Integration category, the natural next stage is to pack the application in a Docker container.
We’ll create a new delivery pipeline to:
- Build a Docker Image with our Go binary and HTML templates.
- Upload the image to Docker Hub so it’s ready for deployment.
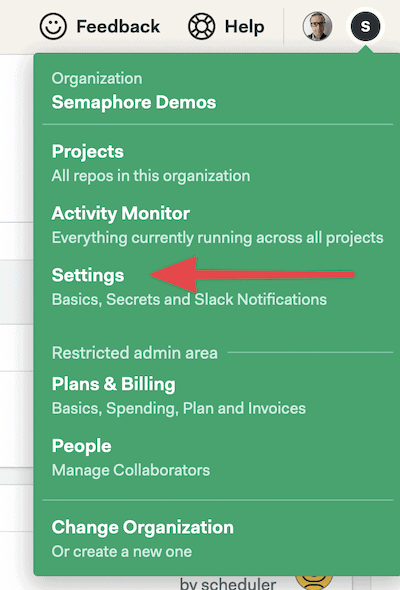
First, we have to tell Semaphore how to connect to Docker Hub:
- On the account menu, click on Settings:
- Click on Secrets and then Create New Secret.
- Create two variables for your Docker Hub username and password:
DOCKER_USENAME= YOUR DOCKER USERNAMEDOCKER_PASSWORD= YOU DOCKER PASSWORD
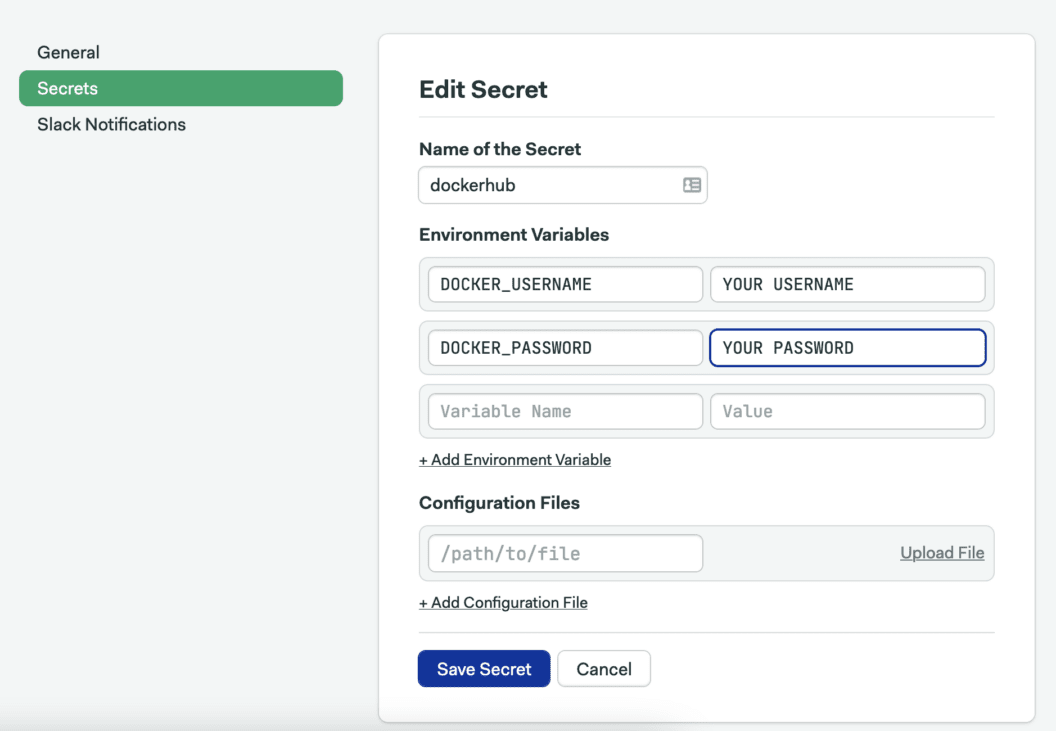
- Click on Save.
Going back to the pipeline:
- Click on Edit Workflow.
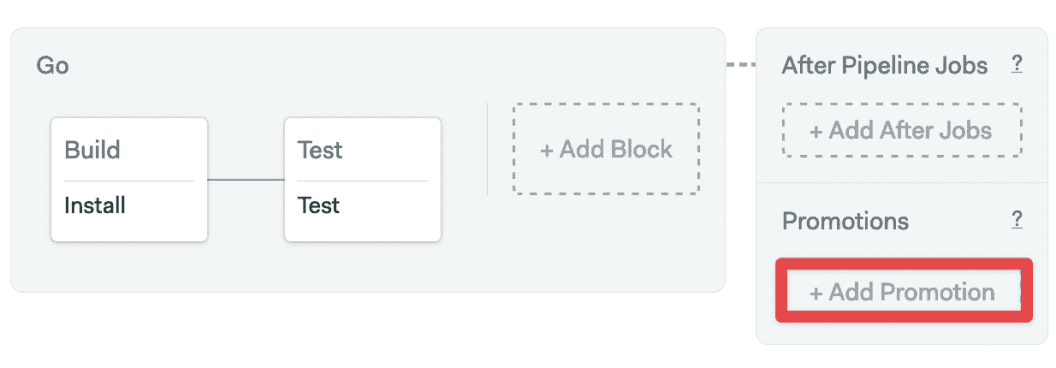
- Use the +Add First Promotion button to create a new linked pipeline:
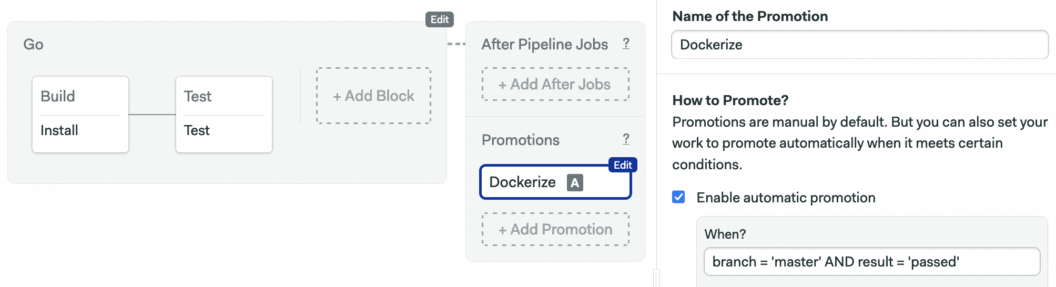
- Change the name of the pipeline to “Dockerize”
- Check Enable automatic promotion. You can set conditions to trigger the pipeline here:
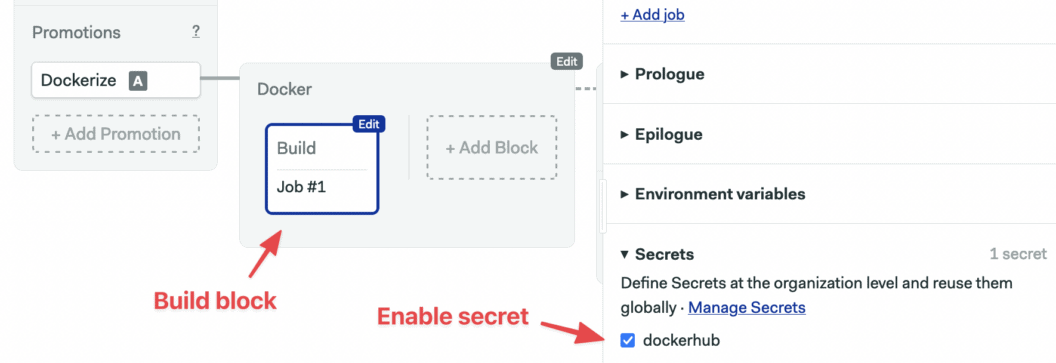
- Click +Add Block. We’ll call the new block “Build”
- Open the Secrets section and check the dockerhub box. This will import the variables we created earlier into the jobs in the block:
- Type the following commands in the job:
checkout
echo "$DOCKER_PASSWORD" | docker login --username "$DOCKER_USERNAME" --password-stdin
docker pull $DOCKER_USERNAME/mathapp-production:latest
docker build -f Dockerfile.production --cache-from <span class="katex"><span class="katex-mathml"><math xmlns="http://www.w3.org/1998/Math/MathML"><semantics><mrow><mi>D</mi><mi>O</mi><mi>C</mi><mi>K</mi><mi>E</mi><msub><mi>R</mi><mi>U</mi></msub><mi>S</mi><mi>E</mi><mi>R</mi><mi>N</mi><mi>A</mi><mi>M</mi><mi>E</mi><mi mathvariant="normal">/</mi><mi>m</mi><mi>a</mi><mi>t</mi><mi>h</mi><mi>a</mi><mi>p</mi><mi>p</mi><mo>−</mo><mi>p</mi><mi>r</mi><mi>o</mi><mi>d</mi><mi>u</mi><mi>c</mi><mi>t</mi><mi>i</mi><mi>o</mi><mi>n</mi><mo>:</mo><mi>l</mi><mi>a</mi><mi>t</mi><mi>e</mi><mi>s</mi><mi>t</mi><mo>−</mo><mi>t</mi></mrow><annotation encoding="application/x-tex">DOCKER_USERNAME/mathapp-production:latest -t </annotation></semantics></math></span><span class="katex-html" aria-hidden="true"><span class="base"><span class="strut" style="height:1em;vertical-align:-0.25em;"></span><span class="mord mathnormal" style="margin-right:0.02778em;">D</span><span class="mord mathnormal" style="margin-right:0.07153em;">OC</span><span class="mord mathnormal" style="margin-right:0.07153em;">K</span><span class="mord mathnormal" style="margin-right:0.05764em;">E</span><span class="mord"><span class="mord mathnormal" style="margin-right:0.00773em;">R</span><span class="msupsub"><span class="vlist-t vlist-t2"><span class="vlist-r"><span class="vlist" style="height:0.3283em;"><span style="top:-2.55em;margin-left:-0.0077em;margin-right:0.05em;"><span class="pstrut" style="height:2.7em;"></span><span class="sizing reset-size6 size3 mtight"><span class="mord mathnormal mtight" style="margin-right:0.10903em;">U</span></span></span></span><span class="vlist-s"></span></span><span class="vlist-r"><span class="vlist" style="height:0.15em;"><span></span></span></span></span></span></span><span class="mord mathnormal" style="margin-right:0.10903em;">SERN</span><span class="mord mathnormal">A</span><span class="mord mathnormal" style="margin-right:0.05764em;">ME</span><span class="mord">/</span><span class="mord mathnormal">ma</span><span class="mord mathnormal">t</span><span class="mord mathnormal">ha</span><span class="mord mathnormal">pp</span><span class="mspace" style="margin-right:0.2222em;"></span><span class="mbin">−</span><span class="mspace" style="margin-right:0.2222em;"></span></span><span class="base"><span class="strut" style="height:0.8889em;vertical-align:-0.1944em;"></span><span class="mord mathnormal">p</span><span class="mord mathnormal">ro</span><span class="mord mathnormal">d</span><span class="mord mathnormal">u</span><span class="mord mathnormal">c</span><span class="mord mathnormal">t</span><span class="mord mathnormal">i</span><span class="mord mathnormal">o</span><span class="mord mathnormal">n</span><span class="mspace" style="margin-right:0.2778em;"></span><span class="mrel">:</span><span class="mspace" style="margin-right:0.2778em;"></span></span><span class="base"><span class="strut" style="height:0.7778em;vertical-align:-0.0833em;"></span><span class="mord mathnormal" style="margin-right:0.01968em;">l</span><span class="mord mathnormal">a</span><span class="mord mathnormal">t</span><span class="mord mathnormal">es</span><span class="mord mathnormal">t</span><span class="mspace" style="margin-right:0.2222em;"></span><span class="mbin">−</span><span class="mspace" style="margin-right:0.2222em;"></span></span><span class="base"><span class="strut" style="height:0.6151em;"></span><span class="mord mathnormal">t</span></span></span></span>DOCKER_USERNAME/mathapp-production:latest .
docker push $DOCKER_USERNAME/mathapp-production:latest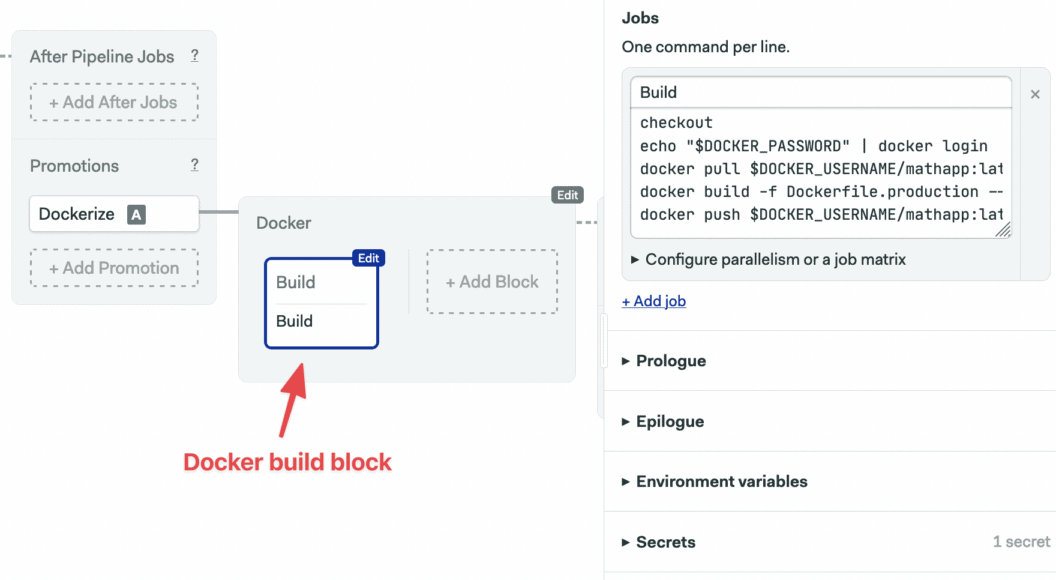
- Click on Run the Workflow and Start.
- Once the first two blocks are done, click on the Promote button:

Wait a few seconds until the Dockerize pipeline is done:
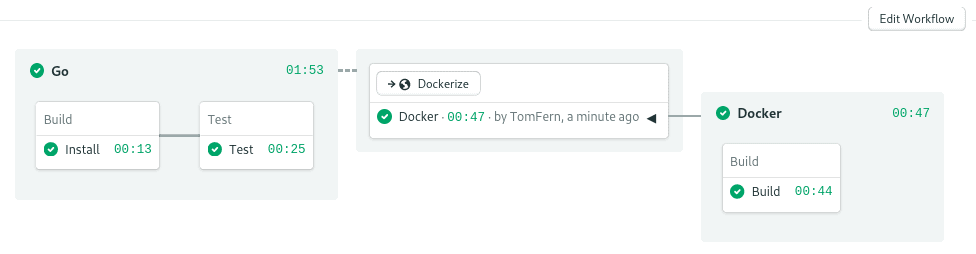
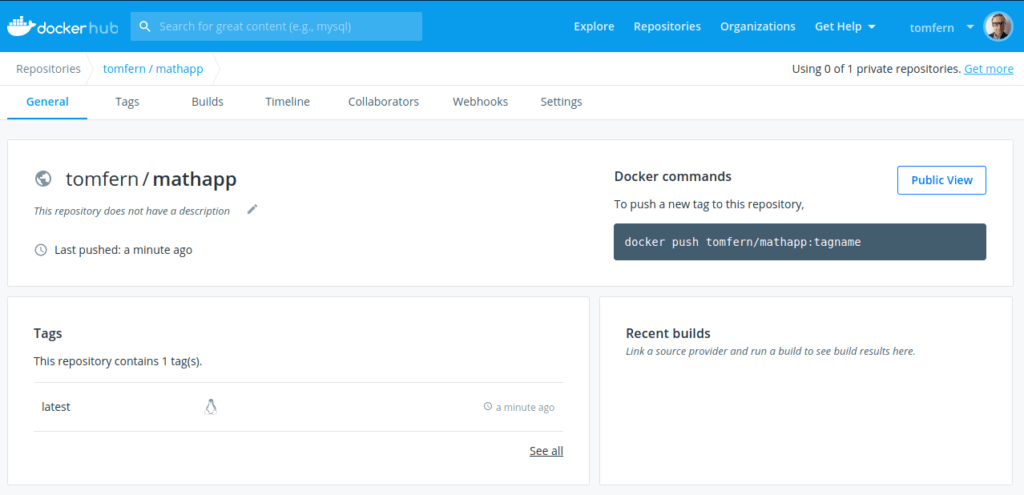
Check your Docker Hub repositories, you should find the new image, ready to use:
Finally, pull and test the new image in your machine:
$ docker pull YOUR_DOCKERHUB_USERNAME/mathapp-production
$ docker run -it -p 8010:8010 YOUR_DOCKERHUB_USERNAME/mathapp-production
What’s Next
Docker opens up the possibilities for deployments:
- Self-hosted: run the image directly on a VM. With some scripting, we can integrate automatic deployment to your CI/CD setup.
- PaaS: many Platforms-as-a-Service offerings such as Heroku can directly run Docker containers. For more details, check the links below.
- Kubernetes: with Kubernetes, we can run the application at scale. Kubernetes brings a lot of features and is supported by almost every cloud provider. Checks the links below for related tutorials.
Heroku:
- Continuous Deployment of a Python Flask Application with Docker and Semaphore
- Dockerizing a PHP Application
Kubernetes:
- Download our ebook for free: CI/CD with Docker and Kubernetes
- CI/CD for Microservices on DigitalOcean Kubernetes
- A Step-by-Step Guide to Continuous Deployment on Kubernetes
- Continuous Integration and Delivery to AWS Kubernetes
Conclusion
In this tutorial, we learned how to create a Docker container for a Go application and prepare a Docker container using Semaphore.
You should now be ready to use Docker to simplify the deployment of your next Go application. If you have any questions, feel free to post them in the comments below.
P.S. Want to continuously deliver your applications made with Docker? Check out Semaphore’s Docker support.
Read next:
- Dockerizing a Python Django Web Application
- Building Go Web Applications and Microservices Using Gin
- Lightweight Docker Images in 5 Steps
📥 This article is long. Download a PDF to read it later.