そばちゃ (original) (raw)
- instance types
- strange instance recommendation??
- alerting for recommendations → probably not possible
- Active Assist: view recommendations in one place
- DB Connections (Cloud SQL, postgres)
- of max connections can be configured via the DB flag max_connections
instance types
Cloud SQL machine types have a "legacy machine type" name, which is legacy w.r.t the new instance type notation db-custom-<CPU>-<RAM>
For example, db-n1-standard-1 which has 1 vCPU and 3840MB (3.75GiB) is db-custom-1-3840 in the new format. AFAIK terraform accepts both formats.

strange instance recommendation??
Cloud SQL docs say this about memory usage best practices:
Avoid memory exhaustion When looking for signs of memory exhaustion, you should primarily use the usage metric. To avoid out-of-memory errors, we recommend that this metric remains below 90%.
Looking at this metric below, the usage was well below 90%, but I was still getting the recommendation to upgrade my instance memory from 0.6GB to 3.75GB. Not sure why, but my server did go down with exceeding the max connections which is determined by the memory size, so I had to scale up anyways.

alerting for recommendations → probably not possible
I wanted to get notified when there is a new recommendation on Cloud SQL, but AFAIK there's no way to do that. GKE does seem to have a recommendation metric for Autoscaler, but Cloud SQL doesn't seem to have one.

Active Assist: view recommendations in one place
As the title says, Active Assist console lists all the recommendations in one place, categorized by Security, Reliability, Performance, etc.

DB Connections (Cloud SQL, postgres)
ref: https://cloud.google.com/sql/docs/quotas#postgresql
of max connections can be configured via the DB flag
max_connections- the machine type determines the default # of max connections
- you can increase the # of max connections, but it has to fit the constraint below ↓
Note: To determine the maximum value that you can set for this flag, you must first calculate the number of backend connections that are already in use. This calculation is the sum of the values for max_connections (maximum number of client connections), autovacuum_max_workers (maximum number of autovacuum processes), and max_worker_processes. The sum cannot exceed 262142.
i.e. max_connections + autovacuum_max_workers + max_worker_processes <= 262142
- autovacuum_max_workers: the background worker that cleans up dead rows
- max_worker_processes: additional processes that help with parallel calculations
show max_connections; show autovacuum_max_workers; show max_worker_processes;
The default values for max_connections are describe here:Configure database flags | Cloud SQL for PostgreSQL | Google Cloud

For example, you have db-f1-micro, the memory size is 6GB, which means the default value would be 50.
This gives info on current connections ↓
SELECT datname, usename, state, query, application_name, backend_type FROM pg_stat_activity;
For backend_type, "client backend" is your typical application. So if you find rows where datname and usename match the application DB, and backend_type = 'client_backend', that should give the connections from your application.
notes on max connection error
the error message in Cloud SQL log:
db=ops-main,user=*** FATAL: remaining connection slots are reserved for non-replication superuser connections
there were 20 conns from this user + 2 conns from cloudsqladmin at this point, so given that the max_connections was either 25 or 50, this does explain the connection being exhausted
idk how google doesn't have docs for this and I keep googling so..
code
export SERVICE_ACCOUNT_EMAIL=xxx
gcloud auth application-default login --scopes=https://www.googleapis.com/auth/cloud-platform,https://www.googleapis.com/auth/drive.readonly,https://www.googleapis.com/auth/spreadsheets.readonly
gcloud config set auth/impersonate_service_account $SERVICE_ACCOUNT_EMAIL
pip install pandas google-api-python-client google-auth
import pandas as pd from googleapiclient.discovery import build import google.auth
def read_spreadsheet( project_id: str, spreadsheet_id: str, sheet_title: str, sheet_range: str ) -> pd.DataFrame: print( f"reading spreadsheet: https://docs.google.com/spreadsheets/d/{spreadsheet_id}" ) credentials, _project_id = google.auth.default( quota_project_id=project_id scopes=[ "https://www.googleapis.com/auth/cloud-platform", "https://www.googleapis.com/auth/drive.readonly", "https://www.googleapis.com/auth/spreadsheets.readonly", ], )
service = build("sheets", "v4", credentials=credentials)
sheet = service.spreadsheets()
result = (
    sheet.values()
    .get(spreadsheetId=spreadsheet_id, range=f"'{sheet_title}'!{sheet_range}")
    .execute()
)
values = result.get("values", [])
service account roles
Service Usage Consumer is required for this service account. Probably because it consumes the quota for Sheets API...?
overview
- tailwind will be installed to the project
- during development, tailwind will compile the CSS into a single output CSS file
- this output file will be included in
theme.liquid - no need for a separate build step
NOTE: I use pnpm for my stuff but you can use yarn/npm/whatever
steps
1. install tailwind
pnpm add -D tailwind
2. create tailwind config file
pnpm tailwindcss init
NOTE: since we have the package installed, we use pnpm = pnpm exec
This command will create a tailwind.config.js. We want to make tailwind watch liquid files, so we update the content field:
/** @type {import('tailwindcss').Config} / module.exports = { content: ["./**/.liquid"], theme: { extend: {}, }, plugins: [], }
3. create the input css file at the root of the theme
cd my-theme touch tw-input.css vi tw-input.css
@tailwind base; @tailwind components; @tailwind utilities;
4. add scripts to package.json
during development, we compile styles to a single CSS file like this:
pnpm exec tailwindcss -i ./tw-input.css -o ./assets/tw-compiled.css --watch
tw-input.cssis the file we created in step 3./assets/tw-compiled.cssis the compiled file that tailwind creates for us (we don't touch this file)--watchtells tailwind to watch for changes in the project i.e. whenever we hit "Save",tw-compiled.csswill be updated
to run this as a script with pnpm, update package.json's scripts like this:
"scripts": { "dev": "npm-run-all -p dev:*", // -p to run command in parallel "dev:tailwind": "pnpm exec tailwindcss -i ./tw-input.css -o ./assets/tw-compiled.css --watch", "dev:shopify": "shopify theme dev // ... your other commands },
since we use npm-run-all to run dev:tailwind and dev:shopify, install the package:
pnpm add -D npm-run-all
5. include the compiled CSS file in the <head> tag at theme.liquid
cd my-theme mkdir layouts vi theme.liquid
sample code:
  {% comment %} load custom styles {% endcomment %}
  {{ 'tw-compiled.css' | asset_url | stylesheet_tag }}

  {{ content_for_header }}
</body>
6. configure .shopifyignore
mainly to not upload node_modules
vi .shopifyignore
npm
package.json node_modules
tailwind
tw-input.css # the input file tailwind.config.js # config file
prettier (only if you install prettier in the following optional step)
.prettierrc
7. (optional) install Prettier & prettier tailwind plugin
I like to use the prettier plugin so the tw classes are automatically sorted. However, since Shopify theme files are liquid files, we need a separate plugin to handle that.
``sh pnpm add -D prettier prettier-plugin-tailwindcss @shopify/prettier-plugin-liquid
then, in .prettierrc specify the plugins:
{ "semi": false, "plugins": ["@shopify/prettier-plugin-liquid", "prettier-plugin-tailwindcss"] }
NOTE: make sure prettier-plugin-tailwindcss comes AFTER the liquid plugin as stated here: [https://github.com/tailwindlabs/prettier-plugin-tailwindcss?tab=readme-ov-file#compatibility-with-other-prettier-plugins]
to quote,
This plugin uses Prettier APIs that can only be used by one plugin at a time, making it incompatible with other Prettier plugins implemented the same way. To solve this we've added explicit per-plugin workarounds that enable compatibility with the following Prettier plugins ... One limitation with this approach is that prettier-plugin-tailwindcss must be loaded last.
reference
tip
IAP service identity の設定
IAP x Cloud Run で使う場合、次の2つの設定が必要
- アクセスする人 (e.g.
tarou@example.com) にroles/iap.httpsResourceAccessorをつける - IAP の "service identity" に
roles/run.invokerをつける
イメージとしては
- ユーザは IAP にアクセスして (だから IAP の権限が必要)
- IAP は IAP の service identity として Cloud Run にアクセスする (だから Cloud Run Invoker) が必要
て感じ。
で、 IAP の service identity を API を有効化しただけだと作成されないケースがあって、その場合はこのコマンドを叩く
gcloud beta services identity create --service=iap.googleapis.com --project=[PROJECT_ID]
docs: Enabling IAP for Cloud Run | Identity-Aware Proxy | Google Cloud
Cloud Build と格闘した記録。
tips
use secrets
ref: Use secrets from Secret Manager | Cloud Build Documentation | Google Cloud
ポイント - steps のあとに、 availableSecrets の中でアクセスしたい secret の ID を指定する - step の中で使いたい secret を指定する - "Note: You can refer to secrets only in the args field of a build step." とあるので、 args 以外の script とかだと使えない模様。 -c も必須。
steps:
- name: 'gcr.io/cloud-builders/docker'
entrypoint: 'bash'
args: ['-c', 'docker login --username=$$USERNAME --password=$$PASSWORD']
secretEnv: ['USERNAME', 'PASSWORD']
availableSecrets:
secretManager:
- versionName: projects/PROJECT_ID/secrets/DOCKER_PASSWORD_SECRET_NAME/versions/DOCKER_PASSWORD_SECRET_VERSION env: 'PASSWORD'
- versionName: projects/PROJECT_ID/secrets/DOCKER_USERNAME_SECRET_NAME/versions/DOCKER_USERNAME_SECRET_VERSION env: 'USERNAME'
build が queued にいるのはなんで?
why do cloud build private pools have a long queue time - Stack Overflow
ここによると、private pool の場合 VM を毎回起動しているかららしい
run migration: private pool build, private IP Cloud SQL
Private IP なので、 Cloud SQL Auth Proxy を通す必要がない
Connect from Cloud Build | Cloud SQL for PostgreSQL | Google Cloud
ポイント - name に _IMAGE_NAME を指定することでその image を実行できる
steps:
id: "docker-build" name: "gcr.io/cloud-builders/docker" args: ["build", "-t", "${_IMAGE_NAME}", "sql-private-pool/."]
id: "docker-push" name: "gcr.io/cloud-builders/docker" args: ["push", "${_IMAGE_NAME}"]
id: "migration" name: "${_IMAGE_NAME}" dir: sql-private-pool env:
- "DATABASE_NAME=mydatabase"
- "DATABASE_USER=myuser"
- "DATABASE_HOST=${_DATABASE_HOST}"
- "DATABASE_TYPE=${_DATABASE_TYPE}" secretEnv:
- DATABASE_PASS
entrypoint: python
args: ["migrate.py"]
options: pool: name: projects/$PROJECT_ID/locations/us-central1/workerPools/private-pool dynamic_substitutions: true
substitutions: _DATABASE_PASSWORD_KEY: database_password _DATABASE_TYPE: postgres _IMAGE_NAME: gcr.io/${PROJECT_ID}/sample-private-pool
availableSecrets: secretManager: - versionName: projects/$PROJECT_ID/secrets/${_DATABASE_PASSWORD_KEY}/versions/latest env: DATABASE_PASS
my code
前提: repository の web/ 以下に Next.js x Prisma application, cloudbuild.yaml, Dockerfile を置いてる
cloudbuild.yaml
steps:
id: 'build-image' name: 'gcr.io/kaniko-project/executor:latest' args:
- --destination=${_IMAGE_URL}:${REVISION_ID}
- --destination=${_IMAGE_URL}:latest
- --cache=true
- --cache-ttl=168h
- --context=dir://web
id: 'migrate' name: '${_IMAGE_URL}' entrypoint: 'pnpx' args:
- 'prisma'
- 'migrate'
- 'deploy' secretEnv:
- 'DATABASE_URL' dir: 'web'
name: 'gcr.io/google.com/cloudsdktool/cloud-sdk' entrypoint: gcloud args:
'run'
'deploy'
'${_CLOUDRUN_SERVICE_NAME}'
'--image'
'${_IMAGE_URL}:latest'
'--ingress'
'internal-and-cloud-load-balancing'
'--region'
'${_CLOUDRUN_SERVICE_REGION}'
'--service-account'
'${_CLOUDRUN_SERVICE_ACCOUNT}'
'--no-allow-unauthenticated'
'--set-env-vars'
'AUTH0_BASE_URL=${_AUTH0_BASE_URL}'
'--set-env-vars'
'AUTH0_CLIENT_ID=${_AUTH0_CLIENT_ID}'
'--set-env-vars'
'AUTH0_ISSUER_BASE_URL=${_AUTH0_ISSUER_BASE_URL}'
'--set-secrets'
'AUTH0_CLIENT_SECRET=auth0-client-secret:latest'
'--set-secrets'
'AUTH0_SECRET=auth0-secret:latest'
'--set-secrets'
'DATABASE_URL=database-url:latest'
availableSecrets: secretManager:
- versionName: 'projects/${PROJECT_ID}/secrets/database-url/versions/latest' env: 'DATABASE_URL'
substitutions: _AUTH0_BASE_URL: 'xxx' _AUTH0_CLIENT_ID: xxx _AUTH0_ISSUER_BASE_URL: 'https://xxx.jp.auth0.com' _CLOUDRUN_SERVICE_NAME: 'web' _CLOUDRUN_SERVICE_REGION: 'asia-northeast1' _CLOUDRUN_SERVICE_ACCOUNT: 'web-worker@${PROJECT_ID}.iam.gserviceaccount.com' _IMAGE_URL: 'asia-northeast1-docker.pkg.dev/${PROJECT_ID}/${_REPOSITORY}/web' _REPOSITORY: 'xxx'
options: dynamicSubstitutions: true logging: CLOUD_LOGGING_ONLY pool: name: 'projects/${PROJECT_ID}/locations/${LOCATION}/workerPools/main-pool'
substitutionOption: 'ALLOW_LOOSE'
Dockerfile
USER を真面目に権限設定しようと思ったがうまくいかなかったので、もろもろ汚い。
ポイントとして、 pnpm と NextUI を使っているとき最初の COPY package.json の行に .npmrc を追加しないと、NextUI のスタイルが消える (i.e. グレーのボタンになる)。この issue で原因が判明した、ありがとう。
see: https://github.com/vercel/next.js/blob/canary/examples/with-docker/Dockerfile
FROM node:22.5.1-alpine AS base
Install dependencies only when needed
FROM base AS deps
Check https://github.com/nodejs/docker-node/tree/b4117f9333da4138b03a546ec926ef50a31506c3#nodealpine to understand why libc6-compat might be needed.
RUN apk add --no-cache libc6-compat WORKDIR /app
Install dependencies based on the preferred package manager
COPY package.json yarn.lock* package-lock.json* pnpm-lock.yaml* .npmrc ./
RUN
if [ -f yarn.lock ]; then yarn --frozen-lockfile;
elif [ -f package-lock.json ]; then npm ci;
elif [ -f pnpm-lock.yaml ]; then corepack enable pnpm && pnpm i --frozen-lockfile;
else echo "Lockfile not found." && exit 1;
fi
Rebuild the source code only when needed
FROM base AS builder WORKDIR /app COPY --from=deps /app/node_modules ./node_modules COPY . .
Next.js collects completely anonymous telemetry data about general usage.
Learn more here: https://nextjs.org/telemetry
Uncomment the following line in case you want to disable telemetry during the build.
ENV NEXT_TELEMETRY_DISABLED=1
RUN
if [ -f yarn.lock ]; then yarn run build;
elif [ -f package-lock.json ]; then npm run build;
elif [ -f pnpm-lock.yaml ]; then corepack enable pnpm && pnpm run build;
else echo "Lockfile not found." && exit 1;
fi
Production image, copy all the files and run next
FROM base AS runner WORKDIR /app
ENV NODE_ENV=production
Uncomment the following line in case you want to disable telemetry during runtime.
ENV NEXT_TELEMETRY_DISABLED=1
NOTE: managing user is too much work to debug permissions issues (around pnpm stuff)
RUN addgroup --system --gid 1001 nodejs
RUN adduser --system --uid 1001 nextjs
COPY --from=builder /app/public ./public
copy files to run prisma migrations
COPY --from=builder /app/prisma ./prisma
Set the correct permission for prerender cache
RUN mkdir .next
RUN chown nextjs:nodejs .next
Automatically leverage output traces to reduce image size
https://nextjs.org/docs/advanced-features/output-file-tracing
COPY --from=builder --chown=nextjs:nodejs /app/.next/standalone ./
COPY --from=builder --chown=nextjs:nodejs /app/.next/static ./.next/static
COPY --from=builder /app/.next/standalone ./ COPY --from=builder /app/.next/static ./.next/static
USER nextjs
install pnpm
ENV PNPM_HOME="/pnpm" ENV PATH="$PNPM_HOME:$PATH" RUN corepack enable
use Cloud Run default port
EXPOSE 8080
ENV PORT=8080
server.js is created by next build from the standalone output
https://nextjs.org/docs/pages/api-reference/next-config-js/output
ENV HOSTNAME="0.0.0.0"
CMD ["node", "server.js"]
のちほど追記していく予定
topics
Cloud SQL への接続
egress setting で、 private IP への接続のみを VPC に向けるというオプションがあるので、それに設定する。

コマンド的にはこうなると思う↓
gcloud run deploy SERVICE_NAME
--image=IMAGE_URL
--network=NETWORK
--subnet=SUBNET
--network-tags=NETWORK_TAG_NAMES \
--vpc-egress=private-ranges-only \
--region=REGION
Serverless VPC Access Connector との比較
G-gen さんの記事によると、
Direct VPC Egress は、従来はサーバーレス VPC アクセスコネクタを使用していた以下のようなケースで使用することができます。
先述のコストメリットとパフォーマンスを考慮すると、制限事項 により使用できない場合を除き、基本的にはコネクタよりも Direct VPC Egress を使用すると良いでしょう。
とあるので、Direct VPC Egress の方がよさそう。Google の記事としても "Migrate to Direct VPC Egress" というのもある。
Migrate standard VPC connector to Direct VPC egress | Cloud Run Documentation | Google Cloud
IP Address
安定稼働してるときのインスタンス数 x4 の IP Address 数がいる
If the subnet's total number of instances across all Cloud Run services and jobs grows beyond 100, we recommend having at least 4 times (4X) the total number available. If Cloud Run cannot allocate more IP addresses, it cannot start any more service instances or job tasks until more IP addresses become available.
Direct VPC egress with a VPC network | Cloud Run Documentation | Google Cloud
また、範囲はここに指定してある分から選ぶ: Direct VPC egress with a VPC network | Cloud Run Documentation | Google Cloud
複数の service がある場合
...は、1 subnet で ok
For IP allocation efficiency and ease of management, place multiple services or jobs on the same subnet.
Direct VPC egress with a VPC network | Cloud Run Documentation | Google Cloud
Cloud Run Jobs
...は、まだ GA してないので本番はやめたほうがよさそう。
毎回しらべていてしんどいので。
参考資料 ここが一番わかりやすいhttps://codelabs.developers.google.com/connecting-to-private-cloudsql-from-cloud-run
用語の整理
"Private service access" を設定する一貫で、 "private service connection" をつくる。Google の docs だと "private connection" といってることもあるけど、こっちは「パブリックでない接続」という意味の一般用語ぽい。
つくるもの
注: ここでは default の VPC を使うよ。要件的に微妙な場合は別途 google_compute_network と google_compute_subnetwork を作ってね。
注: CLI のコマンドは Code Labs からコピペ、 terraform はわたしが書いたコード
つくるものはこういうイメージ↓

services
これらのサービスが有効になっている必要がある
gcloud services enable
sqladmin.googleapis.com
run.googleapis.com
vpcaccess.googleapis.com
servicenetworking.googleapis.com
VPC peering 用の IP address
gcloud compute addresses create google-managed-services-default
--global
--purpose=VPC_PEERING
--prefix-length=20
--network=projects/$PROJECT_ID/global/networks/default
resource "google_compute_global_address" "google_managed_services_default" { name = "google-managed-services-default" purpose = "VPC_PEERING" address_type = "INTERNAL" prefix_length = 20 network = data.google_compute_network.default.id }
private connection
gcloud services vpc-peerings connect - connect to a service via VPC peering for a project network
ref: https://cloud.google.com/sdk/gcloud/reference/services/vpc-peerings/connect
gcloud services vpc-peerings connect
--service=servicenetworking.googleapis.com
--ranges=google-managed-services-default
--network=default
--project=$PROJECT_ID
resource "google_service_networking_connection" "private_service_access_connector_default" { network = data.google_compute_network.default.id service = "servicenetworking.googleapis.com" reserved_peering_ranges = [google_compute_global_address.google_managed_services_default.name] }
Cloud SQL instance, db, user
gcloud sql instances create $DB_INSTANCE_NAME
--project=$PROJECT_ID
--network=projects/$PROJECT_ID/global/networks/default
--no-assign-ip
--database-version=POSTGRES_12
--cpu=2
--memory=4GB
--region=$REGION
--root-password=${DB_INSTANCE_PASSWORD}
db
gcloud sql databases create DBDATABASE−−instance=DB_DATABASE --instance=DBDATABASE−−instance=DB_INSTANCE_NAME
user
gcloud sql users create ${DB_USER}
--password=$DB_PASSWORD
--instance=$DB_INSTANCE_NAME
resource "google_sql_database_instance" "main" { name = "main" region = var.region database_version = "POSTGRES_16"
settings { tier = "db-f1-micro" edition = "ENTERPRISE" availability_type = "ZONAL" ip_configuration { ipv4_enabled = false private_network = var.network_default_id enable_private_path_for_google_cloud_services = true } backup_configuration { enabled = true point_in_time_recovery_enabled = true } }
depends_on = [var.private_service_access_connector_default_id] }
resource "google_sql_database" "main_db" { name = var.db_database_name instance = google_sql_database_instance.main.name }
resource "google_sql_user" "main_user" { name = var.db_username instance = google_sql_database_instance.main.name password = var.db_password }
Serverless VPC Access connector
紛らわしいのが、 private service connection とは別に Cloud Run にもコネクターが必要になる。というのも、 Cloud Run はサーバレスなやつなので、 VPC の概念がない。
gcloud compute networks vpc-access connectors - manage Serverless VPC Access Service connectors
https://cloud.google.com/sdk/gcloud/reference/compute/networks/vpc-access/connectors
gcloud compute networks vpc-access connectors create ${SERVERLESS_VPC_CONNECTOR}
--region=${REGION}
--range=10.8.0.0/28
resource "google_vpc_access_connector" "serverless_default" { name = "serverless-conn-default"
network = data.google_compute_network.default.id ip_cidr_range = "10.8.0.0/28" region = var.region }
Cloud Run
直前でつくった serverless VPC access service connector を割り当てて Cloud Run を deploy する
gcloud run deploy $MENU_SERVICE_NAME
--image=gcr.io/$PROJECT_NAME/menu-service:latest
--region $REGION
--allow-unauthenticated
--set-env-vars DB_USER=$DB_USER
--set-env-vars DB_PASS=$DB_PASSWORD
--set-env-vars DB_DATABASE=$DB_DATABASE
--set-env-vars DB_HOST=$DB_INSTANCE_IP
--vpc-connector $SERVERLESS_VPC_CONNECTOR
--project=$PROJECT_ID
--quiet
(自分は gcloud コマンドでデプロイするので Terraform は省略)
tips
IP アドレスの数の考慮
IP アドレスの数が足りなくなったら、
- CIDR block を expand するか、
- 新しい IP address range を allocate
のどちらかができる。ただし、 allocation の数には quota があるので、 expand したほうがよさそう。
Select a CIDR block that is large enough to meet your current and future needs. If you later find that the range isn't sufficient in size, expand the range if possible. Although you can assign multiple allocations to a single service producer, Google enforces a quota on the number of IP address ranges that you can allocate but not the size (netmask) of each range.
https://cloud.google.com/vpc/docs/configure-private-services-access#considerations
allocation (= IP address range) の名前
自分で private service connection を作るとき (i.e. terraform とか CLI とか) google-managed-services-[your network name] という形式にしておくとよい。この名前は Google が自動で作る名前なのにで、新しい接続をコンソールからつくるときとかに、Google 側に「もう接続があるよ」とつたえられて新しいリソースが作られるのを防ぐ。IP アドレスって結構高いからやった方が良いと思う。
If you create the allocation yourself instead of having Google do it (such as through Cloud SQL), you can use the same naming convention to signal to other users or Google services that an allocation for Google already exists. When a Google service allocates a range on your behalf, the service uses the following format to name the allocation: google-managed-services-[your network name]. If this allocation exists, Google services use the existing one instead of creating another one.
https://cloud.google.com/vpc/docs/configure-private-services-access#considerations
Cloud SQL の private IP address を変えるとき
... は、なんか考慮が必要っぽい。詳しくはここ: https://cloud.google.com/sql/docs/mysql/configure-private-services-access#change-private-ip
Private service access で複数のリソースがある場合
たとえば、同じ VPC に複数の Cloud SQL があってそれらに Private service access を設定する必要があるとき、 Private service access は1つでよい...というのが明示的に書いてある。
If a single service producer offers multiple services, you only need one private connection for all of the producer's services.
https://cloud.google.com/vpc/docs/configure-private-services-access#creating-connection
もしどの Cloud SQL がどの connection を使うかを指定したいときは、VPC network を複数立ててね、とも書いてある。
If a single service producer offers multiple services and you want to control which allocated ranges are used for different service resources, you can use multiple VPC networks each with their own private connections.
google-managed-services-[network name] となっているもの上記の説明で納得できる。
解説的な
そもそもなんで private service access を設定する必要があるかというと、Cloud SQL を VPC 内に置くためには、「自分の VPC」と、「Google 側の VPC」をつなげる必要がある。結局「自分の VPC」も Google 側のリソースだからわざわざ分ける必要は何? って思ったけど、Cloud SQL がマネージドサービスなのとか責任範囲とかが関わってくるっぽい。
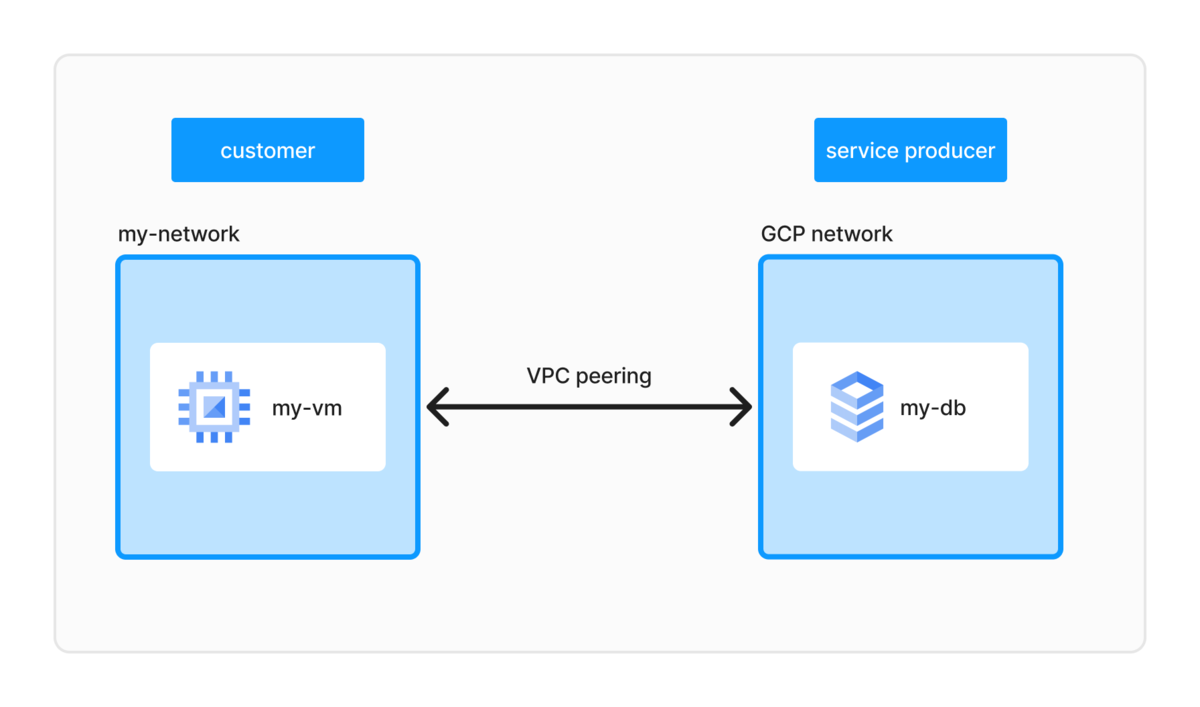
ちなみに、説明としてはこうあったので
The private connection enables VM instances in your VPC network and the services that you access to communicate exclusively by using internal IP addresses.
自分のプロジェクトだと VM 使わないからいらないか〜と思って、private connection を作らずに private IP つきの Cloud SQL を作ったらふつうにエラーになった。