API を本番のデータにつなぎながら確認できるステージング環境を作成しました (original) (raw)
はじめに
こんにちは!トモニテにて開発を行っている吉田です。
今回は API を本番のデータにつなぎながら確認できるようステージング環境を作成したのでそのことについて書いていきます!
目的
本番環境へのリリース前には、さまざまなケースを考慮したテストを行うことが不可欠です。しかし、開発環境で考えられる限りのケースを網羅しても、どうしても考慮漏れが発生することがあります。このようなリスクを軽減するために本番環境を利用したステージング環境を構築しました。
これにより、実際のデータを使用しながら運用時を想定したテストを行うことが可能になりリリース前に潜在的な問題を早期に発見し、サービスの品質を向上が期待できます。
ステージング環境の作成
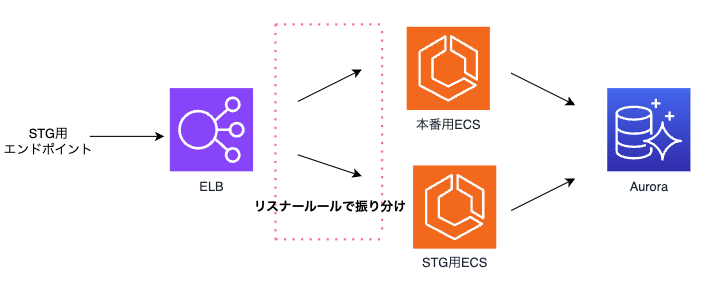
現在のトモニテのインフラ構成は簡単に図に起こすと下記のようになっています。

今回は ECS を新たに作成しリスナールールを追加することでステージング環境の構築を実現をします。 図だと赤枠で囲っているところが新たな構成になるイメージ(下図)です。
ステージング環境の作成でのゴールは以下のように設定しました。
- エンドポイントを叩いて動作確認ができる
- 開発ブランチへのマージをトリガーにステージング環境のサーバーにもデプロイ
エンドポイントを叩いて ステージング できるようにする
弊社ではインフラの管理に terraform を利用しています。以下は、AWS インフラを terraform を用いて構築するためのリソース定義のサンプルです。
(各リソースについて一部省略しています)
1.タスク定義
resource "aws_ecs_task_definition" "stg_server" { family = "stg-server" requires_compatibilities = ["FARGATE"] network_mode = "awsvpc" cpu = 256 memory = 512 execution_role_arn = <タスク実行のARN> task_role_arn = <IAMロールのARN> container_definitions = jsonencode( [ { command = [...] cpu = 0 environment = [...] essential = true image = <ecrのイメージを指定> logConfiguration = { logDriver = "awslogs" options = { awslogs-create-group = "true" awslogs-group = "stg-server" awslogs-region = <region指定> awslogs-stream-prefix = "ecs" } } mountPoints = [] name = "stg-server" portMappings = [ { containerPort = 1323 hostPort = 1323 protocol = "tcp" }, ] secrets = [...] volumesFrom = [] }, ]) runtime_platform { cpu_architecture = "X86_64" operating_system_family = "LINUX" } }
2.ターゲットグループ
resource "aws_lb_target_group" "stg_server_target" { name = "stg_server_target" port = 1323 target_type = "ip" protocol = "HTTP" vpc_id = <VPCのID> deregistration_delay = <ドレインするまでに待機する時間>
health_check { path = "/healthcheck" interval = 30 timeout = 5 healthy_threshold = 5 unhealthy_threshold = 2 } }
3.クラスター
resource "aws_ecs_cluster" "stg_ecs_cluster" { name = "stg_ecs_cluster" }
4.サービス
resource "aws_ecs_service" "stg_server" { name = "stg-server" cluster = aws_ecs_cluster.stg_ecs_cluster.arn task_definition = "stg-server" desired_count = 1 deployment_maximum_percent = 200 deployment_minimum_healthy_percent = 100 launch_type = "FARGATE" enable_execute_command = true
load_balancer { target_group_arn = aws_lb_target_group.stg_server_target.arn container_name = "stg-server" container_port = 1323 }
network_configuration { subnets = <subnet指定> security_groups = <セキュリティグループ指定> assign_public_ip = true }
lifecycle { ignore_changes = [task_definition] } }
5.ロードバランサー
resource "aws_alb_listener_rule" "stg_server_rule" { listener_arn = <登録するリスナーリソース>.arn priority = <優先度>
action { type = "forward" target_group_arn = aws_lb_target_group.stg_server_target.arn }
condition { host_header { values = [<マッチするホストヘッダーパターン>] } } }
6.Route53 レコード
resource "aws_route53_record" "stg_server" { name = <レコード名> records = <ELBのDNS名> ttl = "300" type = "CNAME" zone_id = <ホストゾーンのID>
weighted_routing_policy { weight = 100 } }
7.ECR のライフサイクルポリシー
resource "aws_ecr_lifecycle_policy" "stg-server-lifecycle_policy" { repository = <stg環境用のECRリポジトリ>.name
policy = <<EOF { "rules": [ { "rulePriority": 1, "description": "最新の1イメージを残す", "selection": { // 今回はタグによる指定 "tagStatus": "tagged", "tagPrefixList": ["stg"], "countType": "imageCountMoreThan", "countNumber": 1 }, "action": { "type": "expire" } } ] } EOF }
上記の構成を既存リソースに加えることで新規に作成した API についてエンドポイントを叩いて動作確認することができるようになりました。
※今回は認証について言及していませんが別途認証の設定等も必要になります。
注意点
- ALB やホストゾーンなど既存のリソースを利用しているものについては記述を省略しています。
- <...>で囲まれた部分は、実際の値に置き換えてください。
- 各リソースの設定は、具体的な要件や環境に応じて調整が必要です。
- Terraform のバージョンや AWS プロバイダーのバージョンによって、リソースの属性や構文が異なる場合がありますので、公式ドキュメントを参照してください。
開発環境へのデプロイをフックにステージング環境のサーバーにもデプロイ
トモニテでは、開発プロセスの効率化と品質向上を目指し、ビルドに AWS CodeBuild を利用しています。ステージング環境のサーバーへのデプロイは、開発ブランチへのマージをトリガーとして自動的に行う仕組みを構築しました。 これにより、開発者はコードをマージするだけで、ステージング環境に最新のビルドをデプロイすることができます。
以下は、AWS CodeBuild で使用する buildspec.yml の設定です。このファイルは、ビルドプロセスの各フェーズで実行されるコマンドを定義しています。
version: 0.2
env: variables: REPOSITORY_URI_BASE: DOCKER_BUILDKIT: "1"
phases:
install:
commands:
- GO_VERSION=$(cat .go-version)
- REPOSITORY_URI=${AWS_ACCOUNT_ID}${REPOSITORY_URI_BASE}stg-server
- TAG=stg
- |
echo "Setup ecs-deploy"
curl -sL https://github.com/silinternational/ecs-deploy/archive/3.10.7.tar.gz | tar zxvf -
mv ecs-deploy-3.10.7 ecs-deploy
chmod +x ecs-deploy/ecs-deploy
pre_build:
commands:
- docker login -u -p ${DOCKER_HUB_PASS}
- DATE=date +%s
build:
commands:
- echo Building the Docker image...
- docker build -f ./Dockerfile --build-arg GO_VERSION=$GO_VERSION -t REPOSITORYURI:REPOSITORY_URI:REPOSITORYURI:TAG .
- docker tag REPOSITORYURI:REPOSITORY_URI:REPOSITORYURI:{TAG} "${REPOSITORY_URI}:${TAG}.${DATE}"
post_build:
commands:
- echo Logging in to Amazon ECR ...
- aws ecr get-login-password --region ap-northeast-1 | docker login --username AWS --password-stdin AWSACCOUNTID{AWS_ACCOUNT_ID}AWSACCOUNTID{REPOSITORY_URI_BASE
- echo Pushing the Docker images...
- docker push REPOSITORYURI:REPOSITORY_URI:REPOSITORYURI:TAG
- docker push "${REPOSITORY_URI}:${TAG}.${DATE}"
- |
echo "deploy start"
ecs-deploy/ecs-deploy --cluster
--task-definition-file <タスク定義>.json
--service-name
--region <region指定>
--timeout 600
--image AWSACCOUNTID.{AWS_ACCOUNT_ID}.AWSACCOUNTID.{REPOSITORY_URI_BASE}/:${TAG}
cache: paths: - $GOPATH
まとめ
今回の記事では、ステージング環境の構築について説明しました。本番データに接続し実際の運用を想定したテストを行うことで、リリース前に潜在的な問題を早期に発見し、サービスの品質を向上させることを目的としています。 ステージング環境の作成により考慮漏れによるリスクを軽減できたと考えています。 一方、この環境は比較的ライトに構築したため、さらなる改良の余地があると考えています。今回作成したものをゴールとせず、より良い構成になるよう今後も改善を重ねていきたいと思います!