Product Experiments: What Are They And 6 Experiments To Try (original) (raw)
Summary of product experiments and SaaS onboarding
- Product experimentation involves testing product ideas before their full implementation to minimize resource and time waste.
- Product experiments provide insights into user preferences, help identify and resolve issues in user experience, and enhance user satisfaction and retention.
- A/B testing is a comparative approach used to identify the better-performing option between two variants.
- Multivariate testing is like A/B testing but involves multiple variables simultaneously.
- Fake door testing is a low-cost, low-risk strategy to gauge user interest in potential new features.
- Funnel testing is a technique to optimize the user journey by removing friction.
- Session replays involve recording and analyzing user interactions to pinpoint usability issues.
Steps for Effective Experimentation:
- Identifying problems involves gathering both quantitative and qualitative data and is the first step in the process.
- Based on the data, you need to formulate hypotheses about potential solutions.
- Next, choose the right experimental method for the problem.
- After that, set the experiment parameters. This could be determining the appropriate sample size and experiment duration.
- Finally, carry out the test to gather the necessary data and analyze it to prove or refute the hypothesis.
- For best results, involve all team members when ideating solutions and see how your competitors address the problem.
- Using a structured experimentation framework can improve the experimentation consistency and effectiveness.
- To gather relevant insights, adapt experiments for different user segments.
- Quantitative data tells you what happens while qualitative data why, so collect both types.
- Uses past experiment outcomes to refine future experimentation strategies.
- Userpilot is a comprehensive product growth platform with tools for conducting and analyzing product experiments, including the upcoming feature of session replays. Book the demo to find out more!
What is product experimentation?
Product experimentation is a process of testing product ideas before fully implementing them in real life.
Let’s imagine you’ve got an idea for a new feature.
The problem is that it will take a fair bit of time and money to develop. To make sure you’re not going to waste valuable resources, you can run experiments, like fake door tests, to validate this idea.
Experimentation also allows you to verify if the product or feature works as it should and is bug-free.
Why conduct product experiments?
Product experimentation has several benefits. Let’s check out a few of the key ones.
Collect data regarding user preferences
The main reason for running experiments is to assess user needs and preferences.
For instance, an A/B test can help you identify which microcopy version converts best while a fake door test can reveal if there’s a demand for a particular feature.
Such insights enable you to allocate your resources adequately and avoid costly or time-consuming mistakes.
Identify friction and take steps to remove it
Experiments can also help teams identify friction in the user journey and identify solutions.
For example, a usability test involving session recordings can reveal that users don’t scroll down far enough to access key information or discover an important feature.
Once you know this, you can run a further round of experiments to identify the best location on the page to maximize engagement or conversions.
Increase user satisfaction and retention
The improvements that you manage to implement as a result of experiments help users realize their goals more effectively and ensure that the user experience is positive.
This translates into higher user satisfaction, retention, and loyalty. If you look after their needs and take their opinions and preferences into consideration, there’s no reason to leave.
Types of product experiments product teams should conduct
I’ve already mentioned a few types of product experiments in the previous sections. Why don’t we have a closer look at what each of them involves?
1. A/B testing
A/B tests are probably one of the most popular experiment types in the product space.
This kind of test is used to choose a better-performing option from 2 alternatives. For example, you can use it to choose a landing page design or an onboarding flow with a higher conversion rate.
To do so, you create the two versions and select a user segment that you want to test it with. Next, you randomly assign users to two groups – A and B and enable each version to one of the groups.
The final stage is tracking the performance of the tested versions. You can do it indirectly, for example, by analyzing conversion or completion rates, or let your analytics tool do the job for you.
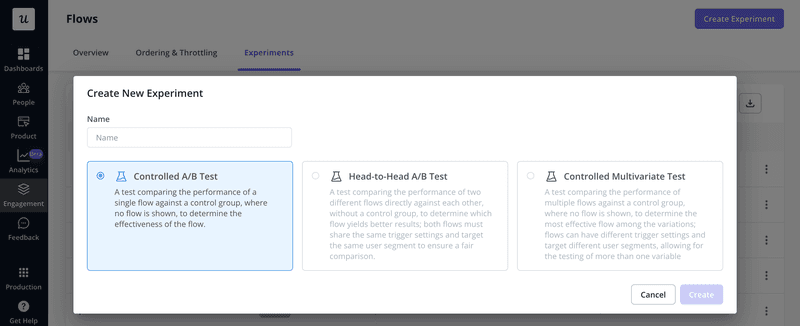
There are two types of A/B tests:
- Controlled – when you compare a new feature to an existing one to see if it moves the needle in the desired direction.
- Head-to-head – when you compare two new variations to choose the better one.
A/B testing is most suitable for later stages of the experimentation process when you’ve already narrowed down the options. Otherwise, running multiple tests can be very time-consuming.

Product experiments: A/B testing.
2. Multivariate testing
If you have multiple components to test, multivariate testing is more suitable than A/B testing.
The principle behind these tests is very similar: you enable the different versions to different groups simultaneously and track their performance. The difference is that here, multiple variables are changing.
For example, you may use it to test the effectiveness of different CTA buttons or their different positions on the screen. Or both in the same test.
Product experiments: multivariate testing.
3. Fake door testing
Fake door testing is yet another all-time favorite.
What makes it so popular?
You can test new features or product ideas with a minimal investment of time and money.
This kind of test is quite mischievous because it involves cheating your users, but if you play it right, they will forgive you.
Here’s a hypothetical example to show you how it works:
Imagine you’re a product manager at Asana and want to build the goals feature. The idea sounds brilliant, but how do you make sure that enough users want it to justify the investment?
You add the feature to the menu as if it were ready and trigger a tooltip to drive user engagement. Then you sit back and watch how many users click on it.
If enough, it means your instinct was right and you go on to build the feature. If not, you scrap it without wasting pretty much any money or developer time.
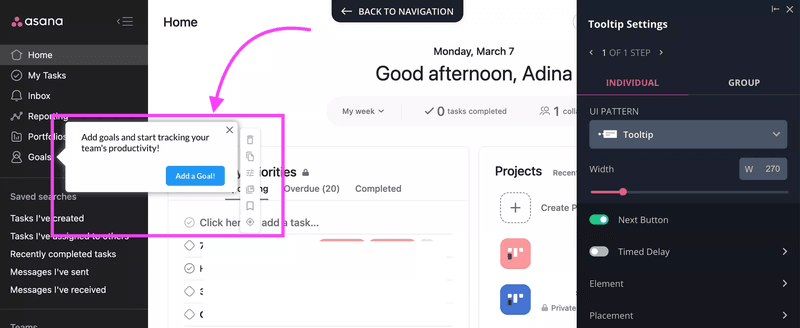
Product experiments: a hypothetical fake door test.
Of course, when users click on the feature, they will quickly realize it’s not there and you’ve taken them for a ride.
Fear not! All you have to do is explain why you did it. Just trigger a modal with an explanation and the job is done. Better yet, use it to sign the user up for beta tests so that you have them all lined up when the feature is ready.
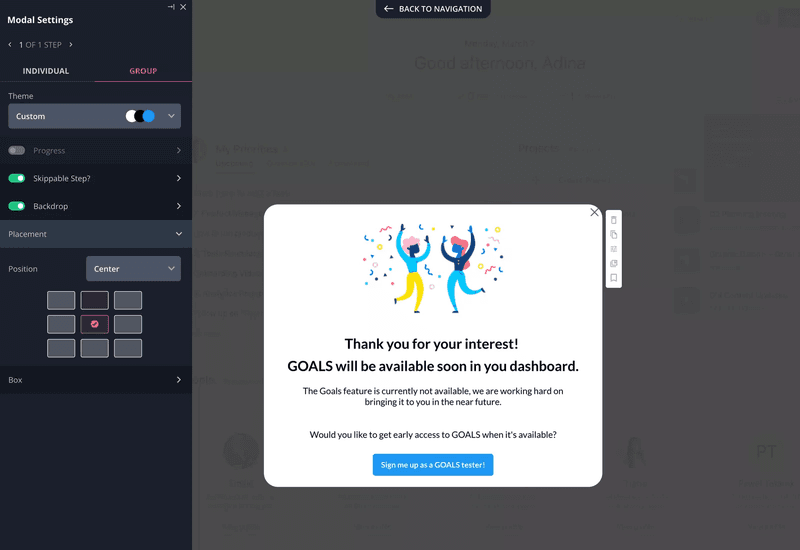
Fake door test.
What if you’re only starting to build a new product?
You can run similar experiments by creating a landing page and driving traffic with paid ads.
4. Funnel testing
Product teams use funnel testing to optimize the user journey through the product.
For example, you can use it to tweak your onboarding flows to boost user activation and product adoption.
In this context, the funnel would consist of all the steps in the onboarding process, from the moment they sign up till they complete the user activation event or events. In the chart, each bar would represent one of these steps.
While it’s natural for users to drop out, a dramatic drop between one stage and another can indicate that users are experiencing excessive friction that hinders their progress.
If you look at the chart below, there are two areas of concern. The first one is just after sign-up as only 50% of users send a message. The next one is step 5 because no users upload media.
That’s where you have to make changes. If the changes are effective, this be visible in the funnel chart right away as the difference between the steps will be less prominent.
Of course, for the results to be reliable, you need to carry out the test on 2 cohorts – those that signed up before the changes and those after.
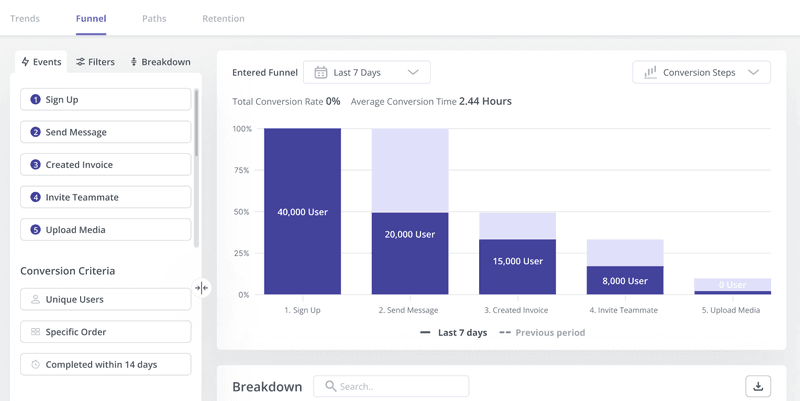
Product experiments: Funnel analysis.
5. Session replays
Funnel analysis can reveal only the general area where users are experiencing friction. If you need more granular insights, session replays can help.
Session replays, aka session recordings, are just what the name says – recordings of what users do on a page or inside the product. That’s every click, scroll, hover, or text input.
Such recordings are priceless when it comes to usability testing. By analyzing user actions inside the product, you can pinpoint the exact friction points.
Armed with such insights, you can tweak the UI to improve the user experience and follow up with more recordings to assess the impact of changes.
Product experiments: session recording in Hotjar.
Components of successful experiments
To successfully conduct experiments, you need a few things in place.
The problem
The process starts by defining the problem.
This often requires collecting quantitative and qualitative data about user interactions with the product and conducting root cause analysis.
The proposed solution
Once you understand the problem, you will be able to develop potential solutions.
Testing their effectiveness will be the focus of your experiment.
The target audience
The choice of the target audience for your experiment is essential to its success. For starters, you need to choose a relevant user segment.
There’s no point in choosing a group that has no use for the feature you’re just testing or is not experiencing the problem you’re trying to solve.
Data from the experiment
There are no experiments without data. This normally means specific metrics that you want to influence.
How to run experiments to understand user behavior
Now that we know the different types of experiments and what you need to carry them out, let’s look at how to do it!
1. Use data analysis to perform user research
The first step in the experimentation process is user research to identify issues to solve.
The odds are that you’re already tracking your product performance. For example, you could be tracking new user activation or feature usage, which is how you first notice there’s an issue.
User feedback may also indicate that there’s a problem.
Once you identify the general problem area, you need to drill down to find the root cause.
This normally means following up on the users via surveys and interviews and analyzing their behavior in more depth.
Useful analytics tools include:
- Trend analysis – For changes in user behavior over time.
- Funnel reports – To identify friction in the user journey.
- Path analysis – Analyze actions leading up to or following conversions.
- Feature usage reports – To analyze how users interact with particular features.
- Session recordings – To monitor how users interact with your app.
This stage is also essential to set the baseline so that you can track progress effectively.
2. Define a clear hypothesis based on your observation
In step 2, we have to formulate hypotheses on how to solve it.
For example, ‘removing the question about income from the welcome survey will increase the completion rate’ or ‘adding a task to the onboarding checklist will increase user activation.’
Naturally, hypotheses are just speculations at this stage. You may suspect what could work, but you can’t be certain.
3. Choose your experimentation type
For the experiment to provide actionable insights, you need to choose the right method.
For instance, A/B and multivariate tests are great if you have one or more solutions to the problem and are not sure if they will work or which one to choose. However, they aren’t much use if you want to validate a new feature idea.
Choosing product experiment type.
4. Set the product experiment parameters
Setting the parameters is probably the most challenging part of the process because it can affect the reliability of the results.
Here’s why?
- If your sample size is too small, the results won’t be valid. To calculate the sample size, use a calculator. If you’re not sure how to set the confidence level, margin of error, and population proportion, talk to a data scientist or data product manager on your team.
- If the experiment length is too short, you won’t get enough data. However, if it’s too long, the results may be outdated by the time it’s over.
Fortunately, analytics tools can help you through the choices. For example, in Userpilot, you can set the experiment to last only as long as it’s necessary to determine the result.
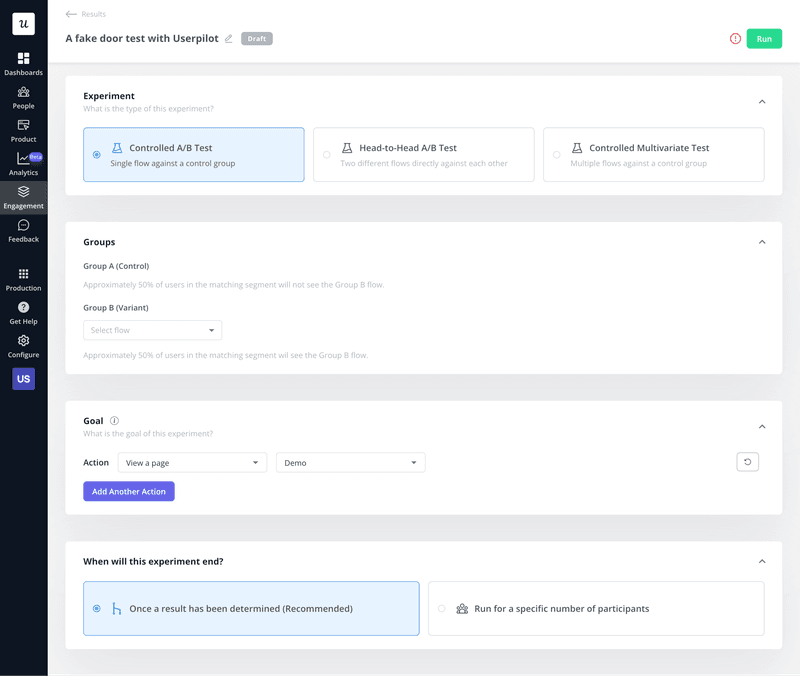
Setting parameters for experiments.
5. Conduct the experiment
This step involves collecting the data needed to prove or refute your hypothesis.
What it involves depends on the test. If it’s a fake door test, you enable the feature you’re testing and track user engagement. For the A/B test, just launch it from your platform.
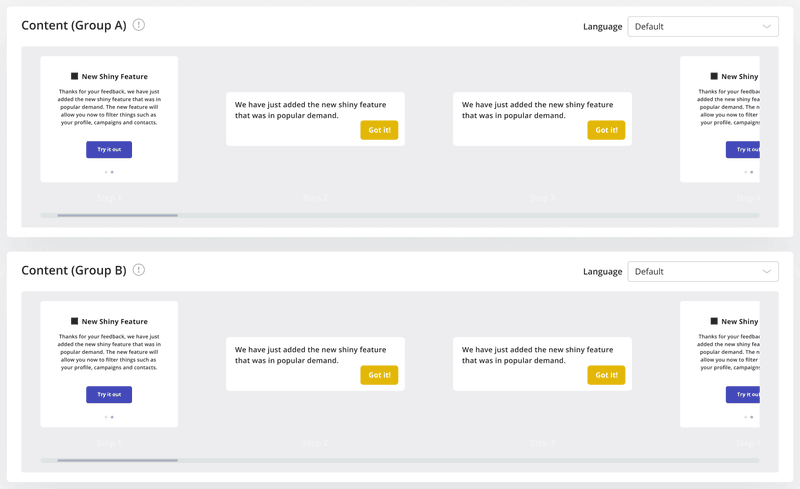
Conducting A/B experiments in Userpilot.
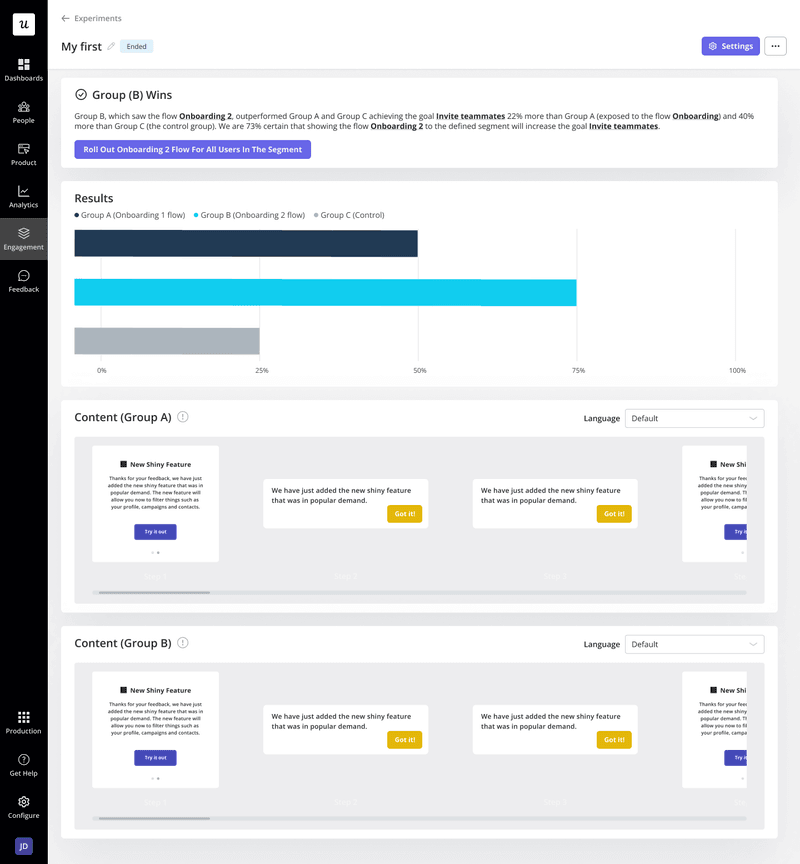
6. Analyze experiment results
Once you have the data points, it’s time to analyze them.
Again, how complex this is depends on the test. If you’re lucky, your analytics tool will do a lot of the work for you automatically.
If you have to do the analysis manually, however, things can get pretty technical. Unless you have some background in analytics, it’s best to leave it to data scientists. They have the skills necessary to deal with issues like statistical significance and help you ensure the results are conclusive.

A/B test results in Userpilot.
Best product experiment practices to extract valuable insights
Let’s wrap up with a few best practices on how to get the best out of your experiments.
- Brainstorm testing ideas with your team – the more of you and the more diverse perspective you bring to the table, the more innovative the solution.
- Run a competitor analysis to find variables to test – your competitors may already have a solution to your problem.
- Use a product experimentation framework – to give the structure of your experiment and ensure consistency.
- Customize your product experiments for different user segments – as they all use the product differently.
- Pair your experiment with qualitative data for deeper insights – it’s not only about what happens but also why.
- Use completed experiments to inform future experiments – if you run a successful experiment, replicate the protocol in the future; if it fails, learn from your mistakes.
How to run successful product experiments with Userpilot
Userpilot is a digital adoption platform with advanced analytics, feedback, and user engagement features that you can use for product experimentation:
- With funnel and path analysis, you can identify the areas where users experience friction.
- Trend analysis can help you assess the impact of experiments on key metrics.
- Feedback analysis is essential to understanding the true nature of user problems and forming hypotheses.
- UI patterns (tooltips, modals, etc.) to conduct fake door tests and recruit experiment participants.
- A/B and multivariate testing.
And let’s not forget about session replays that are coming to Userpilot in 2Q2024!
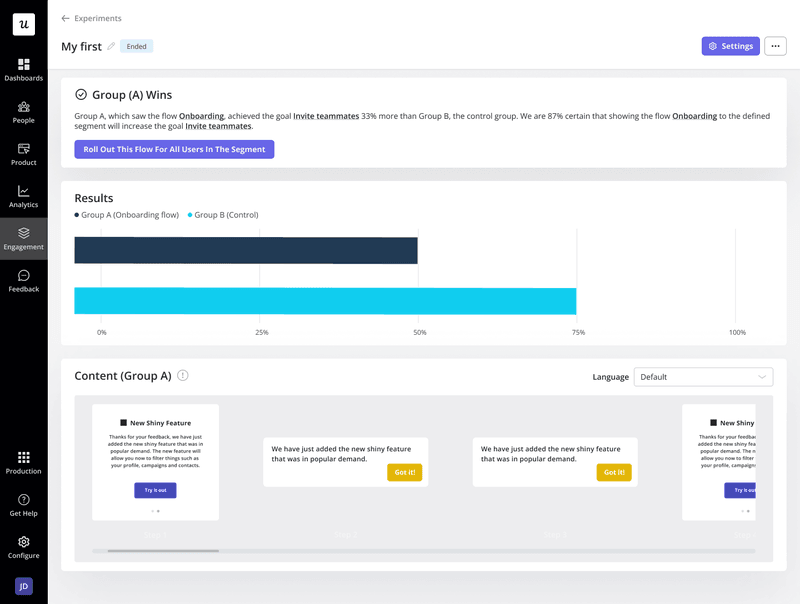
A/B test results in Userpilot.
Conclusion
Developing products and improving the user experience without product experiments is like finding your way in the dark. You may be lucky to discover what you’re after, but you also risk walking into the wall or stubbing your toe.
If you want to see how Userpilot can help you conduct experiments and shed light on what works and what doesn’t, book the demo!