NanoPi R6S - FriendlyELEC WiKi (original) (raw)
Contents
- 1 Introduction
- 2 Hardware Spec
- 3 Diagram, Layout and Dimension
- 4 Get Started
- 4.1 Essentials You Need
- 4.2 TF Cards We Tested
- 4.3 PD Power Adapters We Tested
- 4.4 Configure parameters for serial port
- 4.5 Install OS
* 4.5.1 Downloads
* 4.5.1.1 Official image
* 4.5.1.2 Tools (optional)
* 4.5.2 Flashing the OS to the microSD card
* 4.5.3 Install OS to eMMC
* 4.5.3.1 Option 1: Install OS via TF Card
* 4.5.3.1.1 Flash Official OS to eMMC
* 4.5.3.1.2 Flash third party OS (Image file) to eMMC
* 4.5.3.2 Option 2: Install OS on Web Page
* 4.5.3.3 Option 3: Install OS via USB
* 4.5.3.3.1 Step 1: Download the required files and install the USB driver
* 4.5.3.3.2 Step 2: Connect NanoPi-R6S to PC and Enter Installation Mode
* 4.5.3.3.3 Step 3: Launch RKDevTool
* 4.5.3.3.4 Step 4: Erase eMMC
* 4.5.3.3.5 Step 5: Begin Flashing
* 4.5.4 Installing the System to M.2 or USB Drive
- 5 Work with FriendlyWrt
- 5.1 Introduction to FriendlyWrt
- 5.2 First boot
- 5.3 Account & Password
- 5.4 Login FriendlyWrt
- 5.5 Recommended security settings
- 5.6 Change LAN IP in LuCI
- 5.7 Safe shutdown operation
- 5.8 Soft Factory Reset
- 5.9 Install Software Packages
* 5.9.1 Set up openwrt official opkg source
* 5.9.2 Update Package List
* 5.9.3 List Available Packages
* 5.9.4 List Installed Packages
* 5.9.5 Install Packages
* 5.9.6 Remove Packages - 5.10 Disable IPv6
- 5.11 Configure the function of the user button
- 5.12 Some common issues of FriendlyWrt
- 5.13 Use USB2LCD to view IP and temperature
- 5.14 How to use USB WiFi
* 5.14.1 Check USB WiFi Device with Command Line Utility
* 5.14.2 Configure a USB WiFi Device as AP
* 5.14.3 Common USB WiFi issues
* 5.14.4 Change the default WiFi hotspot configuration - 5.15 Work with Docker Applications
* 5.15.1 Work with Docker: Install JellyFin
* 5.15.2 Work with Docker: Install Personal Nextcloud
* 5.15.3 Docker FAQ and solutions
* 5.15.3.1 Unable to access the network services provided by the Docker container - 5.16 Mount smbfs
- 5.17 Use sdk to compile the package
* 5.17.1 Install the compilation environment
* 5.17.2 Download and decompress sdk from the network disk
* 5.17.3 Compile the package
* 5.17.4 Install the ipk to NanoPi - 5.18 Build FriendlyWrt using GitHub Actions
- 6 Work with Ubuntu 24.04 Desktop
- 6.1 Introduction to Ubuntu 24.04 Desktop
- 6.2 Account & Password
- 6.3 Install Ubuntu software center
- 6.4 Install the kernel-header package
- 6.5 Install the kernel-image package
- 6.6 Change time zone
* 6.6.1 Check the current time zone
* 6.6.2 List all available time zones
* 6.6.3 Set the time zone (e.g. Shanghai) - 6.7 Change startup LOGO and Wallpaper
* 6.7.1 Change startup LOGO - 6.8 Soft Factory Reset
- 6.9 Start the program automatically at startup(For example Firefox)
- 6.10 Disable auto-mounting
- 6.11 Setup Chinese language and Input method
* 6.11.1 Setup Chinese language - 6.12 Video playback with hardware decoding
* 6.12.1 GUI
* 6.12.2 Command line - 6.13 Using USB Camera
- 6.14 Install Docker Engine
* 6.14.1 Install Docker Engine
* 6.14.2 Run Docker as a non-root user
* 6.14.3 Testing Docker: Installing Nextcloud with docker - 6.15 Disable Automatic Login
- 6.16 WiFi Connection
* 6.16.1 Gui
* 6.16.2 Console - 6.17 Test OpenGL ES
- 6.18 Chromium web browser
* 6.18.1 GPU
* 6.18.2 VPU
* 6.18.3 Check Supported Hardware Decoding Formats
- 7 Work with Android
- 7.1 WiFi models supported by Android
* 7.1.1 M.2 WiFi Module
* 7.1.1.1 Usb Dongle - 7.2 Bluetooch models supported by Android
* 7.2.1 Bluetooth Adapters
* 7.2.2 Bluetooth Remote - 7.3 How to use ADB
* 7.3.1 USB connection
* 7.3.2 For Android Tablet
* 7.3.3 For Android TV
* 7.3.4 Using ADB
* 7.3.5 Using ADB over the network - 7.4 How to Change Default Launcher in Android TV
- 7.5 Wired networks on Android
- 7.1 WiFi models supported by Android
- 8 Work with Debian11 Desktop
- 8.1 Introduction to Debian11 Desktop
- 8.2 Account & Password
- 8.3 View IP address
- 8.4 Connect to Debian via SSH
- 8.5 Update Software Packages
- 8.6 Install x11vnc Server on Debian for Remote Access
* 8.6.1 Install x11vnc server
* 8.6.2 Set your password
* 8.6.3 Setup x11vnc server with systemd auto start up
* 8.6.4 Testing remote access - 8.7 Install the kernel-header package
- 8.8 Change time zone
* 8.8.1 Check the current time zone
* 8.8.2 List all available time zones
* 8.8.3 Set the time zone (e.g. Shanghai) - 8.9 Change startup LOGO and Wallpaper
* 8.9.1 Change startup LOGO
* 8.9.2 Change Wallpaper - 8.10 Soft Factory Reset
- 8.11 Start the program automatically at startup(For example Kodi)
- 8.12 Disable auto-mounting
- 8.13 Setup Chinese language and Input method
* 8.13.1 Setup Chinese language
* 8.13.2 Installing Chinese input method - 8.14 Installing Plex Multimedia Server
- 8.15 Install Docker on Debian
- 8.16 How to test NPU
- 8.17 How to test VPU
- 8.18 WiFi Connection
* 8.18.1 Gui
* 8.18.2 Console - 8.19 Cancel auto-login
- 8.20 Test OpenGL ES
- 8.21 HDMI/DP LCD Resolution
- 8.22 HiDPI and display scaling
- 8.23 Adjust HDMI overscan
* 8.23.1 Query which resolutions the display supports
* 8.23.2 Set resolution
* 8.23.3 Adjust the HDMI overscan
* 8.23.4 Automatic adjustment at boot - 8.24 Chromium web browser
* 8.24.1 GPU
* 8.24.2 VPU - 8.25 Test hardware encoding
* 8.25.1 Check Supported Hardware Decoding Formats
- 9 Work with Debian10 Desktop
- 10 Work with FriendlyCore
- 10.1 FriendlyCore User Account
- 10.2 Update Software Packages
- 10.3 Setup Network Configurations
* 10.3.1 Set static IP address
* 10.3.2 Set a DNS
* 10.3.3 Set up to use another network interface - 10.4 Setup Wi-Fi
* 10.4.1 WiFi models supported
* 10.4.1.1 M.2 WiFi Module
* 10.4.1.2 Usb Dongle - 10.5 Install the kernel-header package
- 10.6 Config status LEDs
- 10.7 Delete Qt5 and related files
- 11 How to Compile
- 11.1 Setup Development Environment
* 11.1.1 Method 1: Using docker to cross-compile
* 11.1.2 Method 2: Setup build environment on the host machine
* 11.1.2.1 Install required packages
* 11.1.2.2 Setting the compiler path - 11.2 Build Openwrt/Friendlywrt
* 11.2.1 Download FriendlyWrt 25.12 source code
* 11.2.2 First compilation step
* 11.2.3 Secondary compilation steps
* 11.2.4 Build u-boot only
* 11.2.5 Build kernel only
* 11.2.6 Build friendlywrt only - 11.3 Build Buildroot
- 11.4 Build Other Linux
* 11.4.1 Kernel and u-boot versions
* 11.4.2 Build kernel linux-v6.1.y
* 11.4.3 Build u-boot v2017.09
* 11.4.4 Running the build
* 11.4.4.1 Install to target board
* 11.4.4.2 Packaging and creating an SD image
* 11.4.4.3 USB flashing
* 11.4.4.3.1 Linux - 11.5 Build the code using scripts
* 11.5.1 Download scripts and image files
* 11.5.2 Compile the kernel
* 11.5.3 Compile the kernel headers
* 11.5.4 Compile the uboot
* 11.5.5 Generate new image - 11.6 Building AOSP from source
* 11.6.1 Hardware and Software Requirements
* 11.6.2 Download source from the netdrive
* 11.6.3 Tablet profile build (First Build)
* 11.6.4 TV profile build (First Build)
* 11.6.5 Second build
* 11.6.6 Running your AOSP build
* 11.6.6.1 USB Flashing
* 11.6.6.2 SD-to-eMMC Flashing
* 11.6.7 Pack the new SD Image
- 11.1 Setup Development Environment
- 12 Using On-Board Hardware Resources
- 13 Backup rootfs and create custom SD image (to burn your application into other boards)
- 14 Common Linux-based operating system operations
- 14.1 Using ADB on Linux Systems
* 14.1.1 Enabling ADB in Buildroot System
* 14.1.2 Enabling ADB in Ubuntu and Debian Systems
* 14.1.3 How to Connect - 14.2 Install Kernel Headers
- 14.3 Update Kernel to Latest Version
- 14.4 Setting Kernel Boot Parameters
* 14.4.1 When the system needs to be installed on eMMC/UFS
* 14.4.2 Change kernel boot parameters by compiling the kernel - 14.5 View the current kernel configuration of the running Linux system
- 14.6 PWM Fan Control
- 14.7 Clear the Automatically Generated MAC Address
- 14.1 Using ADB on Linux Systems
- 15 Unbricking Method
- 16 Link to Rockchip Resources
- 17 Schematic, PCB CAD File
- 18 Update Logs
- 18.1 2026-06-03
* 18.1.1 eFlasher
* 18.1.2 FriendlyWrt - 18.2 2026-04-21
* 18.2.1 FriendlyWrt
* 18.2.2 Ramdisk
* 18.2.3 Debian 13(Trixie) GNOME Wayland Desktop - 18.3 2026-03-02
- 18.4 2026-01-12
* 18.4.1 OpenMediaVault
* 18.4.2 Debian Core - 18.5 2025-12-22
* 18.5.1 Android 14 / TV
* 18.5.2 Linux
* 18.5.3 FriendlyWrt - 18.6 2025-10-10
* 18.6.1 Android 14 / TV
* 18.6.2 Eflasher - 18.7 2025‑09‑02
* 18.7.1 Android 14/TV - 18.8 2025-08-26
- 18.9 2025-08-11
* 18.9.1 Ubuntu / Debian / FriendlyCore - 18.10 2025‑08‑07
* 18.10.1 Linux
* 18.10.2 Android 14 - 18.11 2025‑07‑08
* 18.11.1 FriendlyWrt - 18.12 2025‑06‑30
* 18.12.1 FriendlyWrt - 18.13 2025-06-13
* 18.13.1 Linux Kernel 6.1.y - 18.14 2025-06-03
* 18.14.1 OpenMediaVault - 18.15 2025-05-21
- 18.16 2025-04-30
* 18.16.1 FriendlyWrt - 18.17 2025-04-18
- 18.18 2025-03-24
* 18.18.1 FriendlyWrt - 18.19 2025-02-28
* 18.19.1 FriendlyWrt - 18.20 2025-01-23
- 18.21 2025-01-17
* 18.21.1 Linux Kernel
* 18.21.2 Debian/Ubuntu/OpenMediaVault/ProxmoxVE - 18.22 2024-11-12
- 18.23 2024-10-16
* 18.23.1 New System
* 18.23.2 Linux Kernel
* 18.23.3 Linux System
* 18.23.4 Others - 18.24 2024-06-13
* 18.24.1 Android - 18.25 2024-05-22
* 18.25.1 Linux Kernel - 18.26 2024-05-14
* 18.26.1 Debian/Ubuntu Desktop - 18.27 2024-05-11
* 18.27.1 Linux Kernel
* 18.27.2 Debian11 Desktop
* 18.27.3 Ubuntu Focal Desktop
* 18.27.4 OpenMediaVault
* 18.27.5 Other - 18.28 2024-04-21
* 18.28.1 OpenMediaVault - 18.29 2024-03-15
* 18.29.1 Ubuntu focal desktop
* 18.29.2 Debian/Ubuntu/FriendlyCore - 18.30 2024-01-31
* 18.30.1 Debian/Ubuntu/FriendlyCore/Buildroot
* 18.30.2 Android 12 & Android TV
* 18.30.3 FriendlyWrt - 18.31 2024-01-24
* 18.31.1 Buildroot - 18.32 2024-01-17
* 18.32.1 Linux
* 18.32.2 Android 12 - 18.33 2023-12-23
* 18.33.1 Android 12 & Android TV
* 18.33.2 FriendlyWrt - 18.34 2023-12-01
* 18.34.1 FriendlyWrt - 18.35 2023-11-13
* 18.35.1 Debian/Ubuntu/FriendlyCore
* 18.35.2 Android 12 - 18.36 2023-10-31
* 18.36.1 Add a new system
* 18.36.2 Debian/Ubuntu/FriendlyCore
* 18.36.3 FriendlyWrt - 18.37 2023-09-09
* 18.37.1 Android 12 - 18.38 2023-08-15
- 18.39 2023-07-19
* 18.39.1 Ubuntu Focal Desktop
* 18.39.2 Ubuntu Jammy Desktop
* 18.39.3 Debian/Ubuntu/Android
* 18.39.4 Ubuntu Jammy X11 Desktop - 18.40 2023-07-01
* 18.40.1 Debian11 - 18.41 2023-06-25
* 18.41.1 Debian11
* 18.41.2 Android TV & Android 12
* 18.41.3 FriendlyCore - 18.42 2023-06-16
* 18.42.1 Debian11 - 18.43 2023-06-09
* 18.43.1 FriendlyWrt
* 18.43.2 Ubuntu22 - 18.44 2023-06-06
* 18.44.1 Android TV & Android 12 - 18.45 2023-06-01
* 18.45.1 Android TV - 18.46 2023-05-27
* 18.46.1 Ubuntu22 - 18.47 2023-05-26
* 18.47.1 Ubuntu22
* 18.47.2 FriendlyWrt - 18.48 2023-05-21
* 18.48.1 Debian11 - 18.49 2023-05-15
* 18.49.1 FriendlyCore Focal - 18.50 2023-05-05
* 18.50.1 Android - 18.51 2023-04-26
* 18.51.1 FriendlyWrt: - 18.52 2023-02-10
* 18.52.1 Android update
* 18.52.2 Added Debian11 - 18.53 2023-01-09
* 18.53.1 New OS:
* 18.53.2 Android:
* 18.53.3 Ubuntu jammy: - 18.54 2022-12-13
* 18.54.1 Ubuntu jammy: - 18.55 2022-12-04
* 18.55.1 FriendlyWrt: - 18.56 2022-11-17
* 18.56.1 FriendlyWrt:
* 18.56.2 Ubuntu jammy desktop: - 18.57 2022-10-25
- 18.1 2026-06-03
1 Introduction


The NanoPi R6S (as “R6S”) is an open-sourced mini IoT gateway device with two 2.5G and one Gbps Ethernet ports, designed and developed by FriendlyElec.It is integrated with a Rockchip RK3588S CPU, 8GB LPDDR4x RAM and 32GB eMMC flash. It supports booting with TF cards and works with operating systems such as FriendlyWrt etc.
The NanoPi R6S has rich hardware resources with a compact size of 90 x 62 mm. FriendlyElec has released a carefully-designed custom CNC housing for it. It has one HDMI port. It works with Android, Debian Desktop and Ubuntu etc and works with headless systems as well. It supports decoding 8K60 H.265/VP9 formatted videos.
The NanoPi R6S has two USB ports, and supports USB type-C power delivery. It is an ideal portable drive for saving images and videos.
All in all, the NanoPi R6S is a board featured with multiple Ethernet ports, light NAS and video playing. It is a cannot-miss platform with infinite possibilities for geeks, fans and developers.
2 Hardware Spec
- SoC: Rockchip RK3588S
- CPU: Quad-core ARM Cortex-A76(up to 2.4GHz) and quad-core Cortex-A55 CPU (up to 1.8GHz)
- GPU: Mali-G610 MP4, compatible with OpenGLES 1.1, 2.0, and 3.2, OpenCL up to 2.2 and Vulkan1.2
- VPU: 8K@60fps H.265 and VP9 decoder, 8K@30fps H.264 decoder, 4K@60fps AV1 decoder, 8K@30fps H.264 and H.265 encoder
- NPU: 6TOPs, supports INT4/INT8/INT16/FP16
- RAM: 64-bit 8GB LPDDR4X at 2133MHz
- Flash: 32GB eMMC, at HS400 mode
- Ethernet: one Native Gigabit Ethernet, and two PCIe 2.5G Ethernet
- USB: one USB 3.0 Type-A and one USB 2.0 Type-A
- HDMI:
- compatible with HDMI2.1, HDMI2.0, and HDMI1.4 operation
- support up to 7680x4320@60Hz
- Support RGB/YUV(up to 10bit) format
- microSD: support up to SDR104 mode
- GPIO:
- 12-pin 0.5mm FPC connector
- with up to 1x SPI, up to 3x UARTs, up to 1x I2Cs, up to 2x SPDIF, up to 8x GPIOs
- Debug: one Debug UART, 3 Pin 2.54mm header, 3.3V level, 1500000bps
- LEDs: 4 x GPIO Controlled LED (SYS, WAN, LAN1, LAN2)
- others:
- 2 Pin 1.27/1.25mm RTC battery input connector for low power RTC IC HYM8563TS
- one IR receiver and the carrier frequency is 38Khz
- MASK button for eMMC update
- one user button
- Power supply: USB-C, support PD, 5V/9V/12V/20V input
- PCB: 8 Layer, 62x90x1.6mm
- Ambient Operating Temperature: 0℃ to 70℃
3 Diagram, Layout and Dimension
3.1 Layout

- 12-pin GPIO
| Pin# | GPIO | SPI | UART | I2C | SPDIF | POWER | Description |
|---|---|---|---|---|---|---|---|
| 1 | VCC3V3_SYS_S3 | 3.3V power output | |||||
| 2 | VCC3V3_SYS_S3 | 3.3V power output | |||||
| 3 | GPIO1_B3 | SPI0_CLK_M2 | UART4_TX_M2 | 3.3V level | |||
| 4 | GND | ||||||
| 5 | GPIO1_B1 | SPI0_MISO_M2 | 3.3V level | ||||
| 6 | GPIO1_B4 | SPI0_CS0_M2 | 3.3V level | ||||
| 7 | GPIO1_B2 | SPI0_MOSI_M2 | UART4_RX_M2 | 3.3V level | |||
| 8 | GND | ||||||
| 9 | GPIO1_B7 | UART1_RX_M1 | I2C5_SDA_M3 | SPDIF1_TX_M0 | 3.3V level | ||
| 10 | GPIO1_B6 | UART1_TX_M1 | I2C5_SCL_M3 | SPDIF0_TX_M0 | 3.3V level | ||
| 11 | GPIO3_C4 | UART5_TX_M1 | 3.3V level | ||||
| 12 | GPIO3_C5 | UART5_RX_M1 | 3.3V level |
- Debug UART Pin Spec
3.3V level signals, 1500000bps
| Pin# | Assignment | Description |
|---|---|---|
| 1 | GND | 0V |
| 2 | UART2_TX_M0_DEBUG | output |
| 3 | UART2_RX_M0_DEBUG | intput |
- USB Port
Each USB Type-A port has 1.4A overcurrent protection.
- RTC
RTC backup current is 0.25μA TYP (VDD =3.0V, TA =25℃).
Connector P/N: Molex 53398-0271
- IR receiver
Connected to PWM3_IR_M0
38Khz carrier frequency
compatible with NEC protocol, User code is 3B4C
Support power on via IR controller
Support FriendlyELEC RC100 IR controller
4 Get Started
4.1 Essentials You Need
Before starting to use your NanoPi-R6S get the following items ready
- NanoPi-R6S
- MicroSD Card/TF Card: Class 10 or Above, minimum 8GB SDHC
- USB C PD Charger (10W & above)
- If you need to develop and compile,you need a computer that can connect to the Internet. It is recommended to install Ubuntu 20.04 64-bit system and use the following script to initialize the development environment, or use docker container:
4.2 TF Cards We Tested
Refer to: TFCardsWeTested
4.3 PD Power Adapters We Tested
Refer to: PD Power Adapters We Tested
4.4 Configure parameters for serial port
Use the following serial parameters:
| Baud rate | 1500000 |
|---|---|
| Data bit | 8 |
| Parity check | None |
| Stop bit | 1 |
| Flow control | None |
4.5 Install OS
4.5.1 Downloads
4.5.1.1 Official image
Visit download link to download official image files (in the "01_Official images" directory).
The table below lists all official images, the word 'XYZ' in image filename meaning:
- sd: Use it when you need to boot the entire OS from the SD card
- eflasher: Use it when you need to flash the OS to eMMC via TF card
- usb: Use it when you need to flash the OS to eMMC via USB
| Icon | Image Filename | Version | Description | Kernel Version |
|---|---|---|---|---|
| rk3588-XYZ-debian-trixie-gnome-wayland-desktop-6.1-arm64-YYYYMMDD.img.gz | trixie | Debian 13 with GNOME and Wayland with recommended software | 6.1.y | |
| rk3588-XYZ-debian-trixie-gnome-wayland-minimal-6.1-arm64-YYYYMMDD.img.gz | trixie | Lightweight Debian 13 with GNOME and Wayland | 6.1.y | |
| rk3588-XYZ-debian-trixie-core-6.1-arm64-YYYYMMDD.img.gz | trixie | Debian 13 Core, command line only | 6.1.y | |
| rk3588-XYZ-debian-bullseye-xfce-minimal-6.1-arm64-YYYYMMDD.img.gz | bullseye | Debian 11 Desktop, Xfce desktop, no pre-installed recommended software, supports HW acceleration | 6.1.y | |
| rk3588-XYZ-debian-bullseye-xfce-desktop-6.1-arm64-YYYYMMDD.img.gz | bullseye | Debian 11 Desktop, Xfce desktop, pre-installed mpv, smplayer and chromium brower, supports HW acceleration | 6.1.y | |
| rk3588-XYZ-ubuntu-focal-lxqt-desktop-6.1-arm64-YYYYMMDD.img.gz | focal | Ubuntu 20.04 Desktop, LXQT desktop, pre-installed mpv, smplayer and chromium brower, supports HW acceleration | 6.1.y | |
| rk3588-XYZ-ubuntu-noble-gnome-desktop-6.1-arm64-YYYYMMDD.img.gz | noble | Ubuntu 24.04 with GNOME and Wayland with recommended software | 6.1.y | |
| rk3588-XYZ-ubuntu-noble-gnome-minimal-6.1-arm64-YYYYMMDD.img.gz | noble | Lightweight Ubuntu 24.04 with GNOME and Wayland | 6.1.y | |
| rk3588-XYZ-ubuntu-jammy-xfce-desktop-arm64-YYYYMMDD.img.gz | jammy | Ubuntu 22.04 with Xubuntu and X11, use Panfrost GPU driver | 6.1.y | |
| rk3588-XYZ-friendlycore-focal-qt5-6.1-arm64-YYYYMMDD.img.gz | focal | FriendlyCore,command line only, pre-installed Qt5, based on Ubuntu core 20.04 | 6.1.y | |
| rk3588-XYZ-android14-YYYYMMDD.img.gz | 14 | Android 14 Tablet | 6.1.y | |
| rk3588-XYZ-androidtv-YYYYMMDD.img.gz | 14 | Android 14 TV | 6.1.y | |
| rk3588-XYZ-android12-YYYYMMDD.img.gz | 12 | Android 12 Tablet | 5.10.y | |
 |
rk3588-XYZ-buildroot-6.1-arm64-YYYYMMDD.img.gz | -- | Buildroot OS, base on Rockchip Linux SDK | 6.1.y |
 |
rk3588-XYZ-openmediavault-6.1-YYYYMMDD.img.gz | Synchrony | OpenMediaVault NAS system, base on Debian 13 | 6.1.y |
 |
rk3588-XYZ-proxmox-6.1-YYYYMMDD.img.gz | 8.2.7 | Proxmox VE OS (Preview), base on Debian 12 | 6.1.y |
| rk3588-XYZ-friendlywrt-25.12-YYYYMMDD.img.gz | 25.12 | FriendlyWrt, based on OpenWrt 25.12 | 6.1.y | |
| rk3588-XYZ-friendlywrt-25.12-docker-YYYYMMDD.img.gz | 25.12 | FriendlyWrt with Docker, based on OpenWrt 25.12 | 6.1.y | |
| Third Party Images | ||||
 |
Armbian | - | Armbian for NanoPi M6Armbian for NanoPC T6Armbian for NanoPi R6S/R6CArmbian for CM3588 | - |
| Other Image | ||||
| FriendlyWrt (Github Actions) | 25.12,24.10 | FriendlyWrt | 6.1.y | |
 |
Alpine-Linux (Github Actions) | - | Alpine-Linux | 6.1.y |
|
rk3588-eflasher-multiple-os-YYYYMMDD-25g.img.gz | - | It contains multiple OS image files, making it convenient for testing different operating systems, this image disables automatic flashing at startup; you will need to manually select the OS to flash. |
4.5.1.2 Tools (optional)
Visit download link to download tools (in the "05_Tools" directory).
| Filename | Description |
|---|---|
| win32diskimager.rar | This program is designed to write a raw disk image to a removable device or backup a removable device to a raw image file |
| SD Card Formatter | A program (application) that allows easy and quick clear the SD card |
| RKDevTool_v3.37_for_window.zip | Rockchip flashing tool, for USB upgrade |
4.5.2 Flashing the OS to the microSD card
Follow the steps below:
- Get an 8G microSD card;
- Visit download linkto download image files (in the "01_Official images/01_SD card images" directory);
- Download the win32diskimager tool (in the "05_Tools" directory), or use your preferred tool;
- Extract the .gz format compressed file to get the .img format image file;
- Run the win32diskimager utility under Windows as administrator. On the utility's main window select your SD card's drive, the wanted image file and click on "write" to start flashing the SD card.
- Take out the SD and insert it to NanoPi-R6S's microSD card slot;
- Power on NanoPi-R6S and it will be booted from your TF card, some models may require pressing the Power button to start;
4.5.3 Install OS to eMMC
4.5.3.1 Option 1: Install OS via TF Card
This method firstly boots a mini Linux from a TF card and then automatically runs an EFlasher utility to install the OS to eMMC. You can connect your system to an HDMI monitor and watch its progress.
This is optional. You can watch its progress by observing its LEDs as well:
| Progress | SYS LED(Red) | LAN LED(Green) | WAN LED(Green) |
|---|---|---|---|
| Power On | Solid On | Off | Off |
| System Boot | Slow Flashing | Off | Off |
| Installation in Progress | Fast Flashing | Off | Off |
| Installation Done | Slow Flashing | Solid On | Solid On |
By default, flashing starts automatically upon power-up, so be sure to back up the data in eMMC. If you don't want it to start automatically, you can use image file with a filename containing the words 'multiple-os' and manually select the OS you want to flash on the interface.
4.5.3.1.1 Flash Official OS to eMMC
Follow the steps below:
- Get an SDHC card with a minimum capacity of 8G
- Visit download linkto download image files (in the "01_Official images/02_SD-to-eMMC images" directory) and win32diskimager tool (in the "05_Tools" directory);
- Extract the .gz format compressed file to get the .img format image file;
- Run the win32diskimager utility under Windows as administrator. On the utility's main window select your SD card's drive, the wanted image file and click on "write" to start flashing the SD card.
- Eject your SD card and insert it to NanoPi-R6S’s microSD card slot.
- Turn on NanoPi-R6S, it will boot from the SD card and automatically run EFlasher to install the OS to the board’s eMMC.
- After flashing is complete, eject the SD card from NanoPi-R6S, NanoPi-R6S will automatically reboot and boot from eMMC.
4.5.3.1.2 Flash third party OS (Image file) to eMMC
- Auto Install (Default Behavior)
- Download an “eflasher” firmware from network drive(in the "01_Official images/02_SD-to-eMMC images" directory), extract it and install it to a TF card ;
- Eject and insert the TF card to your PC, after a “FriendlyARM” device shows up(Under Linux, it is a “FriendlyARM” directory), copy the image file ending with .raw or .gz into the directory (Note: if your file is in .img format, please rename it to .raw format).
- Open the eflasher.conf file on the TF card, set “autoStart=” to the name of your image file, such as:
autoStart=openwrt-rockchip-armv8_nanopi-ext4-sysupgrade.img.gz
In addition to third-party image, official image files which with the '-sd-' word in the filename are also supported, for example: rk3NNN-sd-friendlywrt-24.10-YYYYMMDD.img.gz
4) Eject the TF card, insert the TF card to NanoPi-R6S, power it on it will automatically install your firmware. You can watch the installation progress by observing the LEDs’ status.
4.5.3.2 Option 2: Install OS on Web Page
Get a TF card which has been installed with FriendlyWrt, log in FriendlyWrt on the web page, click on “System” ->”eMMC Tools”. Click on “Select file” to select your wanted image file. The following file formats are supported: .img, .gz, .tgz, .zip. For official firmware, select a file with “-sd-” or “-usb-” in the filename, or upload a .tgz partition image archive from the “03_” directory on the official download server.
After a file is selected, click on “Upload and Write” to start installing an OS.
After installation is done, eject the SD card, the system will automatically reboot and load the OS from eMMC. After the OS begins to load, if the system LED is flashing and the network LED is on, it means the the OS has loaded successfully. If the OS is FriendlyWrt, you can click on “Go to Homepage” to enter the homepage.
For official OS, select a file with "-sd-" or "-usb-" in the filename, for example: rk3NNN-sd-friendlywrt-25.12-YYYYMMDD.img.gz. The supported file formats are .img, .gz, .tgz, and .zip. You can also upload a .tgz partition image archive from the "03_" directory on the official download server.
Flashing third-party firmware carries a risk of bricking the device. If the device gets bricked, or if you wish to restore the ability to boot from SD card, please refer to this link to recover the device.
4.5.3.3 Option 3: Install OS via USB
4.5.3.3.1 Step 1: Download the required files and install the USB driver
Download the Rockchip USB driver (DriverAssitant_v5.12.zip) from the netdrive/tools directory, extract it, and install it;
Download the required OS package from the netdrive (located in the "01_Official images/03_USB upgrade images" directory), extract it, and you will find that the firmware directory contains the Rockchip development tool and the preconfigured configuration files;
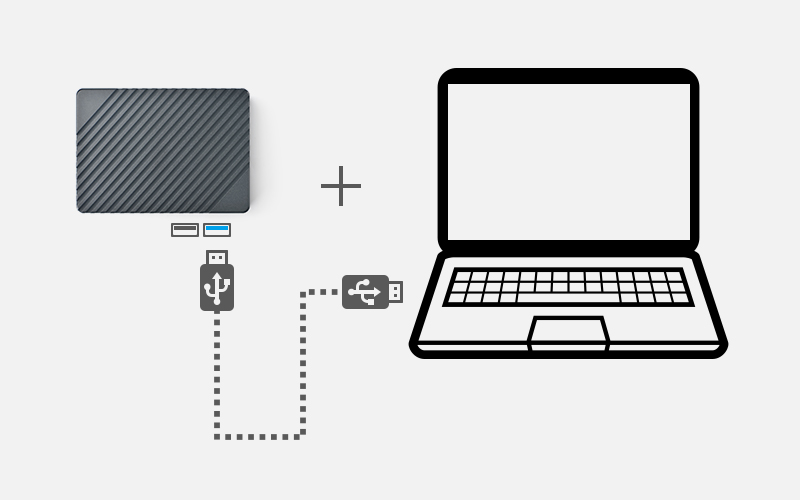
4.5.3.3.2 Step 2: Connect NanoPi-R6S to PC and Enter Installation Mode
- Press and hold the “Mask” key, power on the board. After the status LED has been on for at least 3 seconds, release the Mask key;
- Use a USB A-to-A cable, connect NanoPi-R6S to a PC as follows;
4.5.3.3.3 Step 3: Launch RKDevTool
Double-click "RKDevTool.exe" in the image directory to start the Rockchip development tool. If the development board is properly connected to your PC, the RKDevTool interface will display "Found One MASKROM Device".
4.5.3.3.4 Step 4: Erase eMMC
The erase operation is not mandatory—only required when the eMMC contains a different system. If the device fails to boot after flashing, you should erase the eMMC before reflashing.
Steps to erase the eMMC:
- In the RKDevTool interface, open the "Advanced Function" tab.
- In the "Boot" field, select "MiniLoaderAll.bin", then click the "Download" button.
- Click “EraseAll” to wipe the eMMC (Note: if the board includes SPI Flash, first check “EMMC” and click “Switch Storage” before proceeding).
4.5.3.3.5 Step 5: Begin Flashing
Firmware usually comes in one of two formats: a single image file (common for third-party firmware), or multiple partition images (used by FriendlyELEC). Instructions are provided below for both formats:
- Option 1: Flash firmware composed of multiple partition images
In the RKDevTool interface, click "Download Image", then click the "Run" button. The flashing process will complete shortly, and the device will reboot automatically and boot the newly installed system from eMMC;
- Option 2: Flash firmware packaged as a single image file
In the RKDevTool interface, click "Upgrade Firmware", then click the "Firmware" button. Select the image file you wish to flash, click "Upgrade", and wait for the process to complete. Upon completion, the device will reboot and boot the newly installed system from eMMC;
4.5.4 Installing the System to M.2 or USB Drive
You can use a TF card to boot the eFlasher system, allowing the boot and system to be installed on different storage devices. However, since the CPU doesn’t support booting directly from M.2 and USB devices, the system can be installed on M.2 and USB devices, but the boot must still be installed on eMMC or a TF card.
Steps are as follows:
- Prepare a TF card with a capacity of 32GB or larger.
- Visit [the download link here](http://download.friendlyelec.com/NanoPiR6S) to download the firmware file named XXXX-eflasher-multiple-os-YYYYMMDD-30g.img.gz (located in the “01_Official images/02_SD-to-eMMC images” directory).
- Flash the firmware to the TF card, connect the storage device you intend to use on NanoPi-R6S, insert the TF card and power on, we need to perform the operations in the eFlasher GUI. If your NanoPi-R6S does not have a display interface, you can use VNC; refer to Using VNC to Operate eFlasher.
- In the eFlasher GUI, select the OS to install, and in the OS settings interface, choose the destination for boot installation (typically eMMC), then choose the destination for system installation (options include eMMC, M.2 hard drive, USB storage, etc.), as shown below:

- If no eMMC is available, the TF card can serve as the boot by inserting another TF card into the USB port via a USB card reader and selecting it as the boot destination, enabling booting from the TF card with the system stored on the M.2 or USB drive.
- After flashing, eject the SD card from NanoPi-R6S. If booting from eMMC, NanoPi-R6S will automatically restart into the newly flashed system. If boot installation is on a TF card, power off, insert the boot TF card, and power on again.
- For a more detailed installation guide, please refer to this link.
5 Work with FriendlyWrt
5.1 Introduction to FriendlyWrt
FriendlyWrt is a customized system made by FriendlyElec based on an OpenWrt distribution. It is open source and well suitable for developing IoT applications, NAS applications etc.
5.2 First boot
For the first boot, the system needs to do the following initialization work:
1)Extended root file system
2)Initial setup(will execute /root/setup.sh)
So you need to wait for a while (about 2~3 minutes) to boot up for the first time, and then set FriendlyWrt, you can enter the ttyd terminal on the openwrt webpage, when the prompt is displayed as root@FriendlyWrt, it means the system has been initialized.
5.3 Account & Password
The default password is password (empty password in some versions). Please set or change a safer password for web login and ssh login. It is recommended to complete this setting before connecting NanoPi-R6S to the Internet.
5.4 Login FriendlyWrt
Connect the PC to the LAN port of NanoPi-R6S. If your PC without a built-in ethernet port, connect the LAN port of the wireless AP to the LAN port of NanoPi-R6S, and then connect your PC to the wireless AP via WiFi , Enter the following URL on your PC's browser to access the admin page:
- http://friendlywrt/
- http://192.168.2.1/
- http://[fd00🆎cd::1]
The above is the LAN port address of NanoPi-R6S. The IP address of the WAN port will be dynamically obtained from your main router through DHCP.
5.5 Recommended security settings
The following settings are highly recommended to complete before connecting NanoPi-R6S to the Internet。
- Set a secure password
- Only allow access to ssh from lan, change the port
- Check the firewall settings
Set up as you wish.
5.6 Change LAN IP in LuCI
- Click on Network → Interfaces, then click on the Edit button of the LAN Network;
- In General Setup tab, input new IP address (for example: 192.168.11.1), click "Save" and then click "Save & Apply";
- On the pop-up window with the title “Connectivity change“, click "Apply and revert on connectivity loss";
- Wait a moment, enter the new address in your computer's browser and login to FriendlyWrt;
5.7 Safe shutdown operation
Enter the "Services" -> "Terminal", enter the "poweroff" command and hit enter, wait until the led light is off, and then unplug the power supply.
5.8 Soft Factory Reset
Enter "System"->"Backup/Flash firmware",Click “Perform reset“ Button, Your device's settings will be reset to defaults like when FriendlyWrt was first installed.
You can also do this in the terminal:
5.9 Install Software Packages
5.9.1 Set up openwrt official opkg source
sed -i -e 's/mirrors.cloud.tencent.com/downloads.openwrt.org/g' /etc/opkg/distfeeds.conf opkg update
5.9.2 Update Package List
Before install software packages update the package list:
5.9.3 List Available Packages
5.9.4 List Installed Packages
5.9.5 Install Packages
$ opkg install
5.9.6 Remove Packages
$ opkg remove
5.10 Disable IPv6
. /root/setup.sh disable_ipv6 reboot
5.11 Configure the function of the user button
By default, the user button is configured to reboot the device, as shown below:
echo 'BTN_1 1 /sbin/reboot' >> /etc/triggerhappy/triggers.d/example.conf
You can change its behavior by changing the configuration file above.
5.12 Some common issues of FriendlyWrt
- Unable to dial up
- Go to "Network" -> "Firewall" and set "Inbound Data", "Outbound Data" and "Forwarding" in "WAN Zone" to "Accept";
- If you still cannot access the Internet, you can try to turn off IPV6;
- Dial-up successful, but no outgoing traffic
- Go to "Services" -> "Terminal" and type "fw4 reload" to try to reload the firewall settings again;
- Unable to power on
- Try to replace the power adapter and cable. It is recommended to use a power supply with specifications above 5V/2A;
- Note that some fast chargers with Type-C interface will have a delay, it may take a few seconds to start providing power;
- When doing secondary routing, the computer cannot connect to the Internet
- If your main network is IPv4, and NanoPi-R6S works in IPv6, the computer may not be able to connect to the Internet. It is recommended to turn off IPv6 (the method is described later in this WiKi), or switch the main route to IPv6;
- If you have questions or have better suggestions, please send an email to [email protected];
5.13 Use USB2LCD to view IP and temperature
Plug the USB2LCD module to the USB interface ofNanoPi-R6S and power on, the IP address and CPU temperature will be displayed on the LCD:
5.14 How to use USB WiFi
5.14.1 Check USB WiFi Device with Command Line Utility
(1) Click on "services>ttyd" to start the command line utility
(2) Make sure no USB devices are connected to your board and run the following command to check if any USB devices are connected or not
(3) Connect a USB WiFi device to the board and run the command again
You will see a new device is detected. In our test the device's ID was 0BDA:C811
(4) Type your device's ID (in our case it was "0BDA:C811" or "VID_0BDA&PID_C811") in a search engine and you may find a device that matches the ID. In our case the device we got was Realtek 8811CU.
5.14.2 Configure a USB WiFi Device as AP
(1) Connect a USB WiFi device to the NanoPi-R6S. We recommend you to use the following devices:
Note: devices that match these VID&PIDs would most likely work.
(2) Click on "System>Reboot" and reboot your NanoPi-R6S
(3) Click on "Network>Wireless" to enter the WiFi configuration page
(4) Click on "Edit" to edit the configuration
(5) On the "Interface Configuration" page you can set the WiFi mode and SSID, and then go to "Wireless Security" to change the password. By default the password is "password". After you make your changes click on "Save" to save
(6) After you change the settings you can use a smartphone or PC to search for WiFi
5.14.3 Common USB WiFi issues
- It is recommended to plug in the usb wifi in the off state, then power it on, FriendlyWrt will automatically generate the configuration file /etc/config/wireless, if not, see if there is wlan0 by ifconfig -a, if there is no wlan0, usually there is no driver.
- If ifconfig -a sees wlan0, but the hotspot is not working properly, try changing the channel and country code, an inappropriate country code can also cause the WiFi to not work.
- Some USB WiFis (e.g. MTK MT7662) work in CD-ROM mode by default and need to be switched by usb_modeswitch, you can try to add usb_modeswitch configuration to the following directory: /etc/usb_modeswitch.d.
5.14.4 Change the default WiFi hotspot configuration
FriendlyWrt sets the country, hotspot name and other parameters for USB WiFi by default, with the aim of being as plug-and-play as possible, but this does not guarantee that all modules will be compatible with this setting, you can change these behaviors by modifying the following file:
5.15 Work with Docker Applications
5.15.1 Work with Docker: Install JellyFin
mkdir -p /jellyfin/config mkdir -p /jellyfin/videos docker run --restart=always -d -p 8096:8096 -v /jellyfin/config:/config -v /jellyfin/videos:/videos jellyfin/jellyfin:10.1.0-arm64 -name myjellyfin
After installation, visit port 8096 and here is what you would find:
5.15.2 Work with Docker: Install Personal Nextcloud
mkdir /nextcloud -p docker run -d -p 8888:80 --name nextcloud -v /nextcloud/:/var/www/html/ --restart=always --privileged=true arm64v8/nextcloud
After installtion, visit port 8888.
5.15.3 Docker FAQ and solutions
5.15.3.1 Unable to access the network services provided by the Docker container
Solution:
- Go to the "Firewall" settings and set "Forwarding" to "Accept";
- Turn off "Software Offload";
5.16 Mount smbfs
mount -t cifs //192.168.1.10/shared /movie -o username=xxx,password=yyy,file_mode=0644
5.17 Use sdk to compile the package
5.17.1 Install the compilation environment
Download and run the following script on 64-bit Ubuntu (version 18.04+):How to setup the Compiling Environment on Ubuntu bionic
5.17.2 Download and decompress sdk from the network disk
The sdk is located in the toolchain directory of the network disk:
tar xvf openwrt-sdk-*-rockchip-armv8_gcc-11.2.0_musl.Linux-x86_64.tar.xz
If the path is too long, it will cause some package compilation errors, so change the directory name here
mv openwrt-sdk-*-rockchip-armv8_gcc-11.2.0_musl.Linux-x86_64 sdk cd sdk ./scripts/feeds update -a ./scripts/feeds install -a
5.17.3 Compile the package
download the source code of the example (a total of 3 examples are example1, example2, example3), and copy to the package directory:
git clone https://github.com/mwarning/openwrt-examples.git cp -rf openwrt-examples/example* package/ rm -rf openwrt-examples/
Then enter the configuration menu through the following command:
In the menu, select the following packages we want to compile (actually selected by default):
"Utilities" => "example1" "Utilities" => "example3" "Network" => "VPN" => "example2"
execute the following commands to compile the three software packages:
make package/example1/compile V=99 make package/example2/compile V=99 make package/example3/compile V=99
After the compilation is successful, you can find the ipk file in the bin directory, as shown below:
$ find ./bin -name example*.ipk ./bin/packages/aarch64_generic/base/example3_1.0.0-220420.38257_aarch64_generic.ipk ./bin/packages/aarch64_generic/base/example1_1.0.0-220420.38257_aarch64_generic.ipk ./bin/packages/aarch64_generic/base/example2_1.0.0-220420.38257_aarch64_generic.ipk
5.17.4 Install the ipk to NanoPi
You can use the scp command to upload the ipk file to NanoPi:
cd ./bin/packages/aarch64_generic/base/ scp example*.ipk root@192.168.2.1:/root/
Then use the opkg command to install them:
cd /root/ opkg install example3_1.0.0-220420.38257_aarch64_generic.ipk opkg install example1_1.0.0-220420.38257_aarch64_generic.ipk opkg install example2_1.0.0-220420.38257_aarch64_generic.ipk
5.18 Build FriendlyWrt using GitHub Actions
Please refre this link: https://github.com/friendlyarm/Actions-FriendlyWrt
6 Work with Ubuntu 24.04 Desktop
6.1 Introduction to Ubuntu 24.04 Desktop
Ubuntu 24.04 Desktop has the following features:
- Uses GNOME 46 as default desktop;
- Uses Wayland as default display server;
- Mali GPU-based OpenGL ES support;
- Support Rockhip MPP video hard coding and hard decoding;
- Pre-installed mpv and kodi, support video hardware decoding;
- Compatible with Docker and Plex server;

6.2 Account & Password
Regular Account:
User Name: pi
Password: pi
Root:
User Name: root
Password: fa
6.3 Install Ubuntu software center
$ sudo apt-get update $ sudo apt-get install snapd $ sudo snap install snap-store
sudo dpkg -i /opt/archives/linux-headers-*.deb
try to compile a kernel module:
sudo apt update sudo apt install git gcc make bc git clone https://github.com/carloscdias/hello-world-linux-module cd hello-world-linux-module make -j$(nproc) make test
6.5 Install the kernel-image package
You can visit http://112.124.9.243/archives/ to check if there is a new version of the kernel deb package (compare with the current version in the /opt/archives/ directory). If a new version is available, download it locally and install it using dpkg -i.
6.6 Change time zone
6.6.1 Check the current time zone
6.6.2 List all available time zones
timedatectl list-timezones
6.6.3 Set the time zone (e.g. Shanghai)
sudo timedatectl set-timezone Asia/Shanghai
6.7 Change startup LOGO and Wallpaper
6.7.1 Change startup LOGO
Replace the following two files in the kernel source code directory and recompile the kernel:
kernel/logo.bmp
kernel/logo_kernel.bmp
Or use the script to operate, as shown below:
- Download scripts:
git clone https://github.com/friendlyarm/sd-fuse_rk3588.git -b kernel-6.1.y cd sd-fuse_rk3588
- Compile kernel and repackage firmware
convert files/logo.jpg -type truecolor /tmp/logo.bmp convert files/logo.jpg -type truecolor /tmp/logo_kernel.bmp LOGO=/tmp/logo.bmp KERNEL_LOGO=/tmp/logo_kernel.bmp ./build-kernel.sh ubuntu-noble-desktop-arm64 ./mk-emmc-image.sh ubuntu-noble-desktop-arm64
6.8 Soft Factory Reset
Execute the following command in a terminal:
sudo firstboot && sudo reboot
6.9 Start the program automatically at startup(For example Firefox)
Put the desktop file in the ~/.config/autostart/ directory, for example:
mkdir ~/.config/autostart/ cp /usr/share/applications/firefox.desktop ~/.config/autostart/
6.10 Disable auto-mounting
sudo systemctl mask udisks2 sudo reboot
6.11 Setup Chinese language and Input method
6.11.1 Setup Chinese language
Enter the following command and select 'zh_CN.UTF-8':
sudo dpkg-reconfigure locales
Add environment variables to .bashrc:
echo "export LC_ALL=zh_CN.UTF-8" >> ~/.bashrc echo "export LANG=zh_CN.UTF-8" >> ~/.bashrc echo "export LANGUAGE=zh_CN.UTF-8" >> ~/.bashrc
Reboot device:
6.12 Video playback with hardware decoding
6.12.1 GUI
- Locate the video file in the file browser, right click and select "Play with mpv media player"
- Using Kodi player
- Using Chromium web browser, you can play videos on the web with hardware decoding (limited to the video formats supported by the CPU)
6.12.2 Command line
- Play local video file
export DISPLAY=:0.0 mpv --fs /home/pi/Videos/demo.mp4
- Play web-video
export DISPLAY=:0.0 mpv --fs https://www.youtube.com/watch?v=lK-nYDmC1Dk
6.13 Using USB Camera
(Note: The following test commands use the Logitech HD Pro Webcam C920.)
- List camera devices
$ v4l2-ctl --list-devices
- Display supported formats
$ v4l2-ctl -d /dev/video1 --list-formats-ext --all
- Preview
$ export XDG_RUNTIME_DIR=/run/user/0 $ gst-launch-1.0 v4l2src device=/dev/video1 ! image/jpeg,width=1280,height=720,framerate=30/1 ! jpegdec ! videoconvert ! glimagesink
- Record video
$ gst-launch-1.0 v4l2src device=/dev/video1 ! image/jpeg,width=1280,height=720,framerate=30/1 !
jpegdec ! videoconvert ! queue ! mpph265enc ! h265parse !
queue ! mux. alsasrc device=hw:CARD=realtekrt5616co ! audio/x-raw,channels=2
! audioconvert ! voaacenc ! queue ! mux. matroskamux name=mux ! filesink location="demo.mkv"
6.14 Install Docker Engine
6.14.1 Install Docker Engine
sudo apt install apt-transport-https ca-certificates curl software-properties-common gnupg lsb-release
curl -fsSL https://download.docker.com/linux/ubuntu/gpg | sudo gpg --dearmor -o /usr/share/keyrings/docker-archive-keyring.gpg
echo "deb [arch=$(dpkg --print-architecture) signed-by=/usr/share/keyrings/docker-archive-keyring.gpg]
https://download.docker.com/linux/ubuntu $(lsb_release -cs) stable" | sudo tee /etc/apt/sources.list.d/docker.list > /dev/null
sudo apt update
sudo apt install docker-ce docker-ce-cli containerd.io docker-compose-plugin
Let’s verify:
6.14.2 Run Docker as a non-root user
sudo groupadd docker sudo gpasswd -a ${USER} docker sudo systemctl restart docker sudo chmod a+rw /var/run/docker.sock
Let’s verify:
6.14.3 Testing Docker: Installing Nextcloud with docker
mkdir ~/nextcloud -p docker run -d -p 8888:80 --name nextcloud -v ~/nextcloud/:/var/www/html/ --restart=always --privileged=true arm64v8/nextcloud
After installation, visit: http://Device-IP-Address:8888 on your computer browser to view the nextcloud web page.
6.15 Disable Automatic Login
Edit the /etc/gdm3/custom.conf file, set AutomaticLoginEnable to false:
[daemon] AutomaticLoginEnable = false
6.16 WiFi Connection
6.16.1 Gui
Click on the icon on the top right in the FriendlyDesktop's main window, select your wanted WiFi hotspot and proceed with prompts
6.16.2 Console
Please visit: Use NetworkManager to configure network settings
6.17 Test OpenGL ES
First, change the CPU governor to performance:
sudo sh -c 'echo performance > /sys/devices/system/cpu/cpufreq/policy0/scaling_governor' sudo sh -c 'echo performance > /sys/devices/system/cpu/cpufreq/policy4/scaling_governor' sudo sh -c 'echo performance > /sys/devices/system/cpu/cpufreq/policy6/scaling_governor'
Start glmark2-es2-wayland:
6.18 Chromium web browser
6.18.1 GPU
Chromium web browser has enabled hardware acceleration by default, supports WebGL, and can view hardware acceleration details by entering the URL chrome://gpu, as shown below:
6.18.2 VPU
Play a video in the browser, then use fuser on the command line to view the mpp device node to confirm that the vpu interface is being called:
pi@FriendlyElec:~$ fuser /dev/mpp_service /dev/mpp_service: 3258
If there is no content output from the fuser command, it means software decoding.
6.18.3 Check Supported Hardware Decoding Formats
Enter about://gpu in your browser's address bar and scroll to the bottom of the page to view the "Video Acceleration Information" table.
After playing a video, enter about://media-internals in your browser's address bar to check if hardware decoding was enabled for the most recent playback.
7 Work with Android
Android include the following features:
- There are two versions, TV and Tablet;
- Support infrared remote control (only for models with Ir Receiver);
- Support Bluetooth remote control (requires USB or M.2 Bluetooth module);
- Support wired network;
- Support WiFi (requires external USB or M.2 WIFI module);
- Support video hard decoding;

7.1 WiFi models supported by Android
7.1.1 M.2 WiFi Module
- RTL8822CE
7.1.1.1 Usb Dongle
- RTL8821CU (Vid: 0BDA, Pid: C811) (Test sample:TP-Link TL-WDN5200H)
- RTL8812AU (Vid: 0BDA, Pid: 8812)
- MediaTek MT7662 (Vid: 0E8D, Pid: 7612) (Test sample:COMFAST CF-WU782AC V2)
7.2 Bluetooch models supported by Android
7.2.1 Bluetooth Adapters
- RTL8822CE
- RTL8761B
- CSR8510 A10 Bluetooth Dongle 0a12:0001
7.2.2 Bluetooth Remote
- Amazon Fire TV Remote
7.3 How to use ADB
7.3.1 USB connection
Please note: After turning on the ADB, the USB3 port will work in Device mode, if you need to connect a device such as a USB stick, you need to turn off the ADB and restart the board
In general, ADB is disabled by default, please follow the steps below to enable it:
- Connect your development board to your computer using a USB A-to-A data cable, referring to the figure below, be sure to connect it to the USB port closest to the edge:

7.3.2 For Android Tablet
- Go to Settings -> About tablet -> tap the "Build number" at the bottom of the screen 7 times in a row;
- Go to Settings -> System -> Advance -> Developer options, check USB-Debugging, and then reboot;
- To use ADB over the network, you need to connect to WiFi first, then enable Wireless debugging. In the prompt "Allow wireless debugging on the network", select "Always allow on this network", and then click "Allow".
7.3.3 For Android TV
- Click the Settings icon -> Device Preferences -> About -> tap the "Android TV OS build" at the bottom of the screen 7 times in a row;
- Click the Settings icon -> Device Preferences -> Developer options, check USB-Debugging, and then reboot;
- To use ADB over the network, on Android TV, which supports both WiFi and wired networks, enable network ADB by checking "Internet ADB" on the "Developer options" UI.
7.3.4 Using ADB
- Install ADB drivers and commands based on your operating system;
- Normally, the Android status bar will prompt "USB debugging connected", indicating that ADB has been enabled. Enter the following command on your computer to check the connection:
$ adb devices List of devices attached 27f7a63caa3faf16 device
- Enter adb shell:
7.3.5 Using ADB over the network
- On an Android Tablet, go to Settings -> System -> Advance -> Developer options, then click on Wireless debugging to view the IP address and port.
- The default network ADB port for Android TV is 5555.
Assuming the IP address and port displayed on the Wireless debugging interface are 192.168.1.167:45055, the ADB commands are as follows:
- To connect to the device:
$ adb connect 192.168.1.167:45055
connected to 192.168.1.167:45055
- To enter ADB shell:
If there are multiple devices, use the -s parameter to specify the device's IP and port, as shown below:
$ adb -s 192.168.1.167:45055 shell nanopi3:/ $
7.4 How to Change Default Launcher in Android TV
- Refer to the previous section to enable adb
- For example, install the third-party launcher Emotn UI via APK, visit the website https://app.emotn.com/ui/ to download the APK, and then install it using ADB:
$ adb install com.oversea.aslauncher_1.0.9.0_5094.apk Performing Streamed Install Success
- After the installation is complete, launch it, and then enter the following ADB command to obtain its package name:
$ adb shell dumpsys window | grep mCurrentFocus mCurrentFocus=Window{7a950fb u0 com.oversea.aslauncher/com.oversea.aslauncher.ui.main.MainActivity}
- As you can see, the package name of Emotn UI is com.oversea.aslauncher, set it as the default launcher:
$ adb shell pm set-home-activity com.oversea.aslauncher Success
- Then comes the critical step, you need to disable the native launcher using the following command:
$ adb shell pm disable-user --user 0 com.google.android.tvlauncher Package com.google.android.tvlauncher new state: disabled-user
- Finally, restart the device to see the effect, the device should boot directly into Emotn UI:
- From now on, if you want to install another launcher, you can switch between them through the GUI. for example, after installing FLauncher, you can enter the following settings interface to set FLauncher as the default launcher: Settings -> Device Preferences -> Advanced setting -> Default Launcher:

7.5 Wired networks on Android
- Any network port can connect to the network via DHCP
- If you want to configure a static IP, only eth0 interface is supported
- Some applications may have compatibility issues and report no network connection error, but the network is actually connected
8 Work with Debian11 Desktop
8.1 Introduction to Debian11 Desktop
Debian11 Desktop is a light-weighted debian desktop system,it has the following features:
- Uses Xfce as default desktop;
- Mali GPU-based OpenGL support;
- Support Rockhip MPP video hard coding and hard decoding;
- Pre-installed mpv and smplayer, both support 4K video hardware decoding;
- Pre-installed Chromium browser, support vpu/gpu hardware acceleration (video hard decoding limited to h264/mp4 format);
- Compatible with Plex Server and Docker;

8.2 Account & Password
Regular Account:
User Name: pi
Password: pi
Root:
the root user account is disabled by default, you may configure the root password through the 'sudo passwd root' command.
8.3 View IP address
Since the Debian Bullseye hostname is the hardware model by default, you can use the ping command to get the IP address:ping NanoPi-R6S
8.4 Connect to Debian via SSH
Run the following commandssh pi@NanoPi-R6S
The default password is: pi
8.5 Update Software Packages
8.6 Install x11vnc Server on Debian for Remote Access
8.6.1 Install x11vnc server
The following command to install x11vnc server:
sudo apt-get install x11vnc
8.6.2 Set your password
sudo x11vnc -storepasswd /etc/x11vnc.pwd
8.6.3 Setup x11vnc server with systemd auto start up
Create service configuration file:
sudo vi /lib/systemd/system/x11vnc.service
Let’s copy and paste the following configuration into our newly create service file:
[Unit] Description=Start x11vnc at startup. Requires=display-manager.service After=syslog.target network-online.target Wants=syslog.target network-online.target [Service] Type=simple ExecStart=/usr/bin/x11vnc -display :0 -forever -loop -noxdamage -repeat -rfbauth /etc/x11vnc.pwd -rfbport 5900 -shared -capslock -nomodtweak ExecStop=/usr/bin/x11vnc -R stop Restart=on-failure [Install] WantedBy=multi-user.target
The following commands to reload the systmd system and to enable and start the x11vnc service:
sudo systemctl daemon-reload sudo systemctl enable x11vnc.service sudo systemctl start x11vnc
8.6.4 Testing remote access
Start the VNC client software, input IP:5900 to connect:
sudo dpkg -i /opt/archives/linux-headers-*.deb
try to compile a kernel module:
sudo apt update sudo apt install git gcc make bc git clone https://github.com/carloscdias/hello-world-linux-module cd hello-world-linux-module make -j$(nproc) make test
8.8 Change time zone
8.8.1 Check the current time zone
8.8.2 List all available time zones
timedatectl list-timezones
8.8.3 Set the time zone (e.g. Shanghai)
sudo timedatectl set-timezone Asia/Shanghai
8.9 Change startup LOGO and Wallpaper
8.9.1 Change startup LOGO
Replace the following two files in the kernel source code directory and recompile the kernel:
kernel/logo.bmp
kernel/logo_kernel.bmp
Or use the script to operate, as shown below:
- Download scripts:
git clone https://github.com/friendlyarm/sd-fuse_rk3588.git -b kernel-6.1.y --single-branch cd sd-fuse_rk3588
- Compile kernel and repackage firmware
convert files/logo.jpg -type truecolor /tmp/logo.bmp convert files/logo.jpg -type truecolor /tmp/logo_kernel.bmp sudo LOGO=/tmp/logo.bmp KERNEL_LOGO=/tmp/logo_kernel.bmp ./build-kernel.sh debian-bullseye-desktop-arm64 sudo ./mk-sd-image.sh debian-bullseye-desktop-arm64 sudo ./mk-emmc-image.sh debian-bullseye-desktop-arm64
Note: If your system is not debian-bullseye-desktop-arm64, please specify according to the actual situation
8.9.2 Change Wallpaper
Modify the following configuration file:
/home/pi/.config/xfce4/xfconf/xfce-perchannel-xml/xfce4-desktop.xml
8.10 Soft Factory Reset
Execute the following command in a terminal:
sudo firstboot && sudo reboot
8.11 Start the program automatically at startup(For example Kodi)
Put the desktop file in the ~/.config/autostart/ directory, for example:
mkdir ~/.config/autostart/ cp /usr/share/applications/kodi.desktop ~/.config/autostart/
8.12 Disable auto-mounting
sudo systemctl mask udisks2 sudo reboot
8.13 Setup Chinese language and Input method
8.13.1 Setup Chinese language
Enter the following command and select 'zh_CN.UTF-8':
sudo dpkg-reconfigure locales
Add environment variables to .bashrc:
echo "export LC_ALL=zh_CN.UTF-8" >> ~/.bashrc echo "export LANG=zh_CN.UTF-8" >> ~/.bashrc echo "export LANGUAGE=zh_CN.UTF-8" >> ~/.bashrc
Reboot device:
8.13.2 Installing Chinese input method
Enter the following command to install fcitx and Pinyin input method:
sudo apt update sudo apt-get install fcitx fcitx-pinyin sudo apt-get install im-config sudo apt-get install fcitx-table* sudo apt-get install fcitx-ui-classic fcitx-ui-light sudo apt-get install fcitx-frontend-gtk2 fcitx-frontend-gtk3 fcitx-frontend-qt4 sudo apt-get remove --purge scim* ibus* sudo reboot
After reboot, press Ctrl+Space to switch between Chinese and English input methods, and the input method icon will appear in the upper right corner, right-click the input method icon in the upper right corner to switch input methods in the pop-up menu, as shown below:
8.14 Installing Plex Multimedia Server
Visit the Plex website: https://www.plex.tv/media-server-downloads/
On the download page, select the category "Plex Media Server", choose "Linux" for the platform and "Ubuntu(16.04+)/Debian(8+) - ARMv8" for the version,
After downloading the deb package, use the dpkg command to install the package:
sudo dpkg -i plexmediaserver_1.31.0.6654-02189b09f_arm64.deb
After installation, login to the Plex server by typing the following URL into your computer browser: http://IP地址:32400/web/
8.15 Install Docker on Debian
Please refer to: How to Install Docker on Debian
8.16 How to test NPU
Please refer to: NPU
8.17 How to test VPU
Please refer to: VPU
8.18 WiFi Connection
8.18.1 Gui
Click on the icon on the top right in the Debian's main window, select your wanted WiFi hotspot and proceed with prompts
8.18.2 Console
Please visit: Use NetworkManager to configure network settings
8.19 Cancel auto-login
Edit file:
sudo vim /etc/lightdm/lightdm.conf
Comment out the following two lines (insert # in front of them):
autologin-user=pi autologin-user-timeout=0
8.20 Test OpenGL ES
You can test it by clicking on the Terminator icon to start a commandline utility in the System Tools and run the following commands:
8.21 HDMI/DP LCD Resolution
Open the system's menu and go to Settings -> Display to customize your settings.
8.22 HiDPI and display scaling
Xfce supports HiDPI scaling which can be enabled using the settings manager: Go to Settings Manager > Appearance > Settings > Window Scaling and select 2 as the scaling factor.
Or Edit this file: ~/.config/xfce4/xfconf/xfce-perchannel-xml/xsettings.xml
8.23 Adjust HDMI overscan
Open the command line terminal and enter the command to operate, Note:
- You need to login to the desktop;
- If you are using ssh terminal, please use the same username as the desktop login. The default is pi. You cannot use the root user. you also need to assign the DISPLAY variable:
8.23.1 Query which resolutions the display supports
8.23.2 Set resolution
For example set to 1920X1080@60Hz:
xrandr --output HDMI-1 --mode 1920x1080 --refresh 60
8.23.3 Adjust the HDMI overscan
For example, the transformation scaling horizontal coordinates by 0.8, vertical coordinates by 1.04 and moving the screen by 35 pixels right and 19 pixels down:
xrandr --output HDMI-1 --transform 0.80,0,-35,0,1.04,-19,0,0,1
8.23.4 Automatic adjustment at boot
Edit ~/.config/autostart/lxrandr-autostart.desktop,Write the full xrandr command to the key at the beginning of "Exec= as shown below:
[Desktop Entry] Type=Application Name=LXRandR autostart Comment=Start xrandr with settings done in LXRandR Exec=sh -c 'xrandr --output HDMI-1 --mode 1920x1080 --refresh 50 --transform 1.04,0,-35,0,1.05,-30,0,0,1'
8.24 Chromium web browser
8.24.1 GPU
Chromium web browser has enabled hardware acceleration by default, supports WebGL, and can view hardware acceleration details by entering the URL chrome://gpu, as shown below:
8.24.2 VPU
Play a video in the browser, then use fuser on the command line to view the mpp device node to confirm that the vpu interface is being called:
pi@FriendlyElec:~$ fuser /dev/mpp_service /dev/mpp_service: 3258
If there is no content output from the fuser command, it means software decoding.
8.25 Test hardware encoding
mpi_enc_test -w 1920 -h 1080 -t 7 -f 0 -o test.h264 -n 300 export XDG_RUNTIME_DIR=/run/user/0 ffplay test.h264
8.25.1 Check Supported Hardware Decoding Formats
Enter about://gpu in your browser's address bar and scroll to the bottom of the page to view the "Video Acceleration Information" table.
After playing a video, enter about://media-internals in your browser's address bar to check if hardware decoding was enabled for the most recent playback.
9 Work with Debian10 Desktop
- Refer to:
10 Work with FriendlyCore
10.1 FriendlyCore User Account
Non-root User:
User Name: pi Password: pi
Root:
User Name: root Password: fa
10.2 Update Software Packages
10.3 Setup Network Configurations
10.3.1 Set static IP address
By default "eth0" is assigned an IP address obtained via dhcp. If you want to change the setting you need to change the following file:
vi /etc/network/interfaces.d/eth0
For example if you want to assign a static IP to it you can run the following commands:
auto eth0 iface eth0 inet static address 192.168.1.231 netmask 255.255.255.0 gateway 192.168.1.1
The other two ethernet ports are set up with static IP addresses, as follows:
eth1: 192.168.2.1
eth2: 192.168.3.1 (Note: if there are three network ports)
10.3.2 Set a DNS
You also need to modify the following file to add the DNS configuration:
vi /etc/systemd/resolved.conf
For example, set to 192.168.1.1:
[Resolve] DNS=192.168.1.1
Restart the systemd-resolved service with the following command:
sudo systemctl restart systemd-resolved.service sudo systemctl enable systemd-resolved.service
10.3.3 Set up to use another network interface
To change the setting of "eth1" you can add a new file similar to eth0's configuration file under the /etc/network/interfaces.d/ directory.
10.4 Setup Wi-Fi
First, use the following command to check if Network-Manager is installed on your system:
If you have installed it, refer to this link to connect to WiFi: Use NetworkManager to configure network settings, If you do not have Network-Manager installed on your system, please refer to the following method to configure WiFi,
By default the WiFi device is "wlan0". You need to create a configuration file under "/etc/network/interfaces.d/" for WiFi:
vi /etc/network/interfaces.d/wlan0
Here is a sample wlan0 file:
auto lo iface lo inet loopback auto wlan0 iface wlan0 inet dhcp wpa-driver wext wpa-ssid YourWiFiESSID wpa-ap-scan 1 wpa-proto RSN wpa-pairwise CCMP wpa-group CCMP wpa-key-mgmt WPA-PSK wpa-psk YourWiFiPassword
Please replace "YourWiFiESSID" and "YourWiFiPassword" with your WiFiESSID and password. After save and close the file you can connect to your WiFi source by running the following command:
sudo systemctl daemon-reload sudo systemctl restart networking
After you power on your board it will automatically connect to your WiFi source.
Please note that if you use one TF card to boot multiple boards the WiFi device name will likely be named to "wlan1", "wlan2" and etc. You can reset it to "wlan0" by deleting the contents of the following file and reboot your board: /etc/udev/rules.d/70-persistent-net.rules
10.4.1 WiFi models supported
10.4.1.1 M.2 WiFi Module
- RTL8822CE
10.4.1.2 Usb Dongle
- RTL8821CU (Vid: 0BDA, Pid: C811) (Test sample:TP-Link TL-WDN5200H)
- RTL8812AU (Vid: 0BDA, Pid: 8812)
- MediaTek MT7662 (Vid: 0E8D, Pid: 7612) (Test sample:COMFAST CF-WU782AC V2)
sudo dpkg -i /opt/archives/linux-headers-*.deb
10.6 Config status LEDs
First determine whether the system already exists the leds initialization service:
sudo systemctl status leds
If the leds service already exists, change the default behavior of the LEDs by editing the following file:
Since there is no leds service in the early firmware, you need to refer to the following guide to manually configure the LEDs. First, set the following kernel modules to be automatically loaded at boot:
modprobe ledtrig-netdev echo ledtrig-netdev > /etc/modules-load.d/ledtrig-netdev.conf
Put the following into the autorun script to associate the status leds with the ethernet interface, and you can configure it to behave in other ways by referring to these content:
echo netdev > /sys/class/leds/wan_led/trigger echo eth0 > /sys/class/leds/wan_led/device_name echo 1 > /sys/class/leds/wan_led/link echo netdev > /sys/class/leds/lan1_led/trigger echo eth1 > /sys/class/leds/lan1_led/device_name echo 1 > /sys/class/leds/lan1_led/link echo netdev > /sys/class/leds/lan2_led/trigger echo eth2 > /sys/class/leds/lan2_led/device_name echo 1 > /sys/class/leds/lan2_led/link
10.7 Delete Qt5 and related files
Execute the following commands:
su root cd / rm -rf usr/local/Trolltech/Qt-5.10.0-rk64one usr/local/Trolltech/Qt-5.10.0-rk64one-sdk usr/bin/setqt5env* usr/bin/qt5demo etc/qt5 rm -rf opt/{qt5-browser,Qt5_CinematicExperience,qt5-multi-screen-demo,qt5-nmapper,qt5-player,qt5-smarthome,QtE-Demo,qt5-qml-image-viewer,dual-camera}
11 How to Compile
11.1 Setup Development Environment
11.1.1 Method 1: Using docker to cross-compile
Please refre to docker-cross-compiler-novnc
11.1.2 Method 2: Setup build environment on the host machine
11.1.2.1 Install required packages
Install and run requirements ubuntu 20.04, install required packages using the following commands:
sudo apt-get -y update
sudo apt-get install -y sudo curl
sudo bash -c
"$(curl -fsSL https://raw.githubusercontent.com/friendlyarm/build-env-on-ubuntu-bionic/master/install.sh)"
The following cross-compilers will be installed:
| Version | Architecture | Compiler path | Purpose |
|---|---|---|---|
| 4.9.3 | armhf | /opt/FriendlyARM/toolchain/4.9.3 | Can be used to build 32-bit ARM applications |
| 6.4 | aarch64 | /opt/FriendlyARM/toolchain/6.4-aarch64 | Can be used to build kernel 4.4 |
| 11.3 | aarch64 | /opt/FriendlyARM/toolchain/11.3-aarch64 | Can be used to build kernel 4.19 or higher and U-Boot |
11.1.2.2 Setting the compiler path
Based on the table in the previous section, select the appropriate version of the compiler and add the compiler's path to PATH. For example, if you want to use the 11.3 cross-compiler, edit ~/.bashrc using vi and add the following content to the end:
export PATH=/opt/FriendlyARM/toolchain/11.3-aarch64/bin:$PATH export GCC_COLORS=auto
Run the ~/.bashrc script to make it effective in the current commandline. Note: there is a space after ".":
To verify if the installation was successful:
$ aarch64-linux-gcc -v Using built-in specs. COLLECT_GCC=aarch64-linux-gcc COLLECT_LTO_WRAPPER=/opt/FriendlyARM/toolchain/11.3-aarch64/libexec/gcc/aarch64-cortexa53-linux-gnu/11.3.0/lto-wrapper Target: aarch64-cortexa53-linux-gnu Configured with: /home/cross/arm64/src/gcc/configure --build=x86_64-build_pc-linux-gnu --host=x86_64-build_pc-linux-gnu --target=aarch64-cortexa53-linux-gnu --prefix=/opt/FriendlyARM/toolchain/11.3-aarch64 --exec_prefix=/opt/FriendlyARM/toolchain/11.3-aarch64 --with-sysroot=/opt/FriendlyARM/toolchain/11.3-aarch64/aarch64-cortexa53-linux-gnu/sysroot --enable-languages=c,c++ --enable-fix-cortex-a53-843419 --with-arch=armv8-a+crypto+crc --with-cpu=cortex-a53 --with-pkgversion=ctng-1.25.0-119g-FA --with-bugurl=http://www.friendlyelec.com/ --enable-objc-gc --enable-__cxa_atexit --disable-libmudflap --disable-libgomp --disable-libssp --disable-libquadmath --disable-libquadmath-support --disable-libsanitizer --disable-libmpx --with-gmp=/home/cross/arm64/buildtools --with-mpfr=/home/cross/arm64/buildtools --with-mpc=/home/cross/arm64/buildtools --with-isl=/home/cross/arm64/buildtools --enable-lto --enable-threads=posix --disable-libstdcxx-pch --enable-clocale=gnu --enable-libstdcxx-time=yes --with-default-libstdcxx-abi=new --enable-gnu-indirect-function --enable-gnu-unique-object --enable-default-pie --enable-linker-build-id --with-linker-hash-style=gnu --enable-plugin --enable-gold --with-libintl-prefix=/home/cross/arm64/buildtools --disable-multilib --with-local-prefix=/opt/FriendlyARM/toolchain/11.3-aarch64/aarch64-cortexa53-linux-gnu/sysroot --enable-long-long --enable-checking=release --enable-link-serialization=2 Thread model: posix Supported LTO compression algorithms: zlib gcc version 11.3.0 (ctng-1.25.0-119g-FA)
11.2 Build Openwrt/Friendlywrt
11.2.1 Download FriendlyWrt 25.12 source code
mkdir friendlywrt25-rk3588
cd friendlywrt25-rk3588
git clone https://github.com/friendlyarm/repo --depth 1 tools
tools/repo init -u https://github.com/friendlyarm/friendlywrt_manifests -b master-v25.12
-m rk3588.xml --repo-url=https://github.com/friendlyarm/repo --no-clone-bundle
tools/repo sync -c --no-clone-bundle
11.2.2 First compilation step
./build.sh rk3588.mk # or rk3588-docker.mk
If a compilation error occurs, try single-threaded compilation with the following command:
(cd friendlywrt && make -j1 V=s)
For the docker version, try clearing the go cache before single-threaded compilation:
(cd friendlywrt && rm -rf tmp/go-build && make -j1 V=s)
All the components (including u-boot, kernel, and friendlywrt) are compiled and the sd card image will be generated, then execute the following command to generate the image file for installing the system into the emmc:
After making changes to the project, the sd card image needs to be repackaged by running the following command:
11.2.3 Secondary compilation steps
cd friendlywrt make menuconfig rm -rf ./tmp make -j${nproc} cd ../ ./build.sh sd-img ./build.sh emmc-img
11.2.4 Build u-boot only
11.2.5 Build kernel only
11.2.6 Build friendlywrt only
Or go to the friendlywrt directory and follow the standard openwrt commands. If you get an error with the above command, try using the following command to compile in a single thread:
cd friendlywrt make -j1 V=s
11.3 Build Buildroot
please refer to: Buildroot
11.4 Build Other Linux
11.4.1 Kernel and u-boot versions
| Operating System | Kernel Version | U-boot version | Cross-compiler | Partition type | Packaging Tool | Kernel branch | Kernel configuration | U-boot branch | U-boot configuration |
|---|---|---|---|---|---|---|---|---|---|
| buildroot | linux v5.10.y | u-boot v2017.09 | 11.3-aarch64 | GPT | sd-fuse | nanopi5-v5.10.y_opt | nanopi6_linux_defconfig | nanopi6-v2017.09 | nanopi6_defconfig |
| openmediavault-arm64 | linux v6.1.y | GPT | sd-fuse | nanopi6-v6.1.y | |||||
| ubuntu-noble-desktop-arm64 | GPT | ||||||||
| ubuntu-noble-minimal-arm64 | |||||||||
| ubuntu-jammy-x11-desktop-arm64 | |||||||||
| ubuntu-focal-desktop-arm64 | |||||||||
| friendlycore-focal-arm64 | |||||||||
| debian-trixie-core-arm64 | |||||||||
| debian-bullseye-desktop-arm64 | |||||||||
| debian-bullseye-minimal-arm64 | |||||||||
| friendlywrt21 | nanopi6_linux_defconfigfriendlywrt.config | ||||||||
| friendlywrt21-docker | |||||||||
| friendlywrt23 | |||||||||
| friendlywrt23-docker |
- Kernel git repo:https://github.com/friendlyarm/kernel-rockchip
- U-boot git repo:https://github.com/friendlyarm/uboot-rockchip
- The cross-compile toolchain is located in the path: /opt/FriendlyARM/toolchain/
- The sd-fuse is a helper script to make bootable SD card image.
11.4.2 Build kernel linux-v6.1.y
Clone the repository to your local drive then build:
git clone https://github.com/friendlyarm/kernel-rockchip --single-branch --depth 1 -b nanopi6-v6.1.y kernel-rockchip cd kernel-rockchip export PATH=/opt/FriendlyARM/toolchain/11.3-aarch64/bin/:$PATH touch .scmversion
Configuring the Kernel
Option1: Load linux configuration
make CROSS_COMPILE=aarch64-linux-gnu- ARCH=arm64 nanopi6_linux_defconfig
Option2: Load linux configuration with kvm support
make CROSS_COMPILE=aarch64-linux-gnu- ARCH=arm64 nanopi6_linux_defconfig kvm.config
Option3, Load configuration for FriendlyWrt
make CROSS_COMPILE=aarch64-linux-gnu- ARCH=arm64 nanopi6_linux_defconfig friendlywrt.config
Optionally, if you want to change the default kernel config
make CROSS_COMPILE=aarch64-linux-gnu- ARCH=arm64 menuconfig
Start building kernel
make CROSS_COMPILE=aarch64-linux-gnu- ARCH=arm64 nanopi6-images -j$(nproc)
Start building kernel modules
mkdir -p out-modules && rm -rf out-modules/* make CROSS_COMPILE=aarch64-linux-gnu- ARCH=arm64 INSTALL_MOD_PATH="$PWD/out-modules" modules -j$(nproc) make CROSS_COMPILE=aarch64-linux-gnu- ARCH=arm64 INSTALL_MOD_PATH="$PWD/out-modules" modules_install INSTALL_MOD_STRIP=1
Get kernel version
KERNEL_VER=$(make CROSS_COMPILE=aarch64-linux-gnu- ARCH=arm64 kernelrelease)
Building r8125 module
export ETHTOOL_LEGACY_2500baseX=y [ -d r8125 ] || git clone https://github.com/friendlyarm/r8125 -b main r8125 cd r8125 make CROSS_COMPILE=aarch64-linux-gnu- ARCH=arm64 KSRC=../ CONFIG_VENDOR_FRIENDLYARM=y CONFIG_WERROR=n -j$(nproc) aarch64-linux-gnu-strip --strip-unneeded r8125.ko mkdir -p ../out-modules/lib/modules/${KERNEL_VER}/extra/ cp r8125.ko ../out-modules/lib/modules/${KERNEL_VER}/extra/ -afv cd .. unset ETHTOOL_LEGACY_2500baseX
Generate modules.dep
[ ! -f "$PWD/out-modules/lib/modules/${KERNEL_VER}/modules.dep" ] && depmod -b PWD/out−modules−EModule.symvers−FSystem.map−wPWD/out-modules -E Module.symvers -F System.map -w PWD/out−modules−EModule.symvers−FSystem.map−w{KERNEL_VER}
The generated files:
| kernel.img | resource.img | The kernel modules are located in the out-modules directory |
|---|
Run your build:
Please refre to #Running the build
11.4.3 Build u-boot v2017.09
Clone the repository to your local drive then build:
git clone https://github.com/friendlyarm/rkbin --single-branch --depth 1 -b nanopi6 git clone https://github.com/friendlyarm/uboot-rockchip --single-branch --depth 1 -b nanopi6-v2017.09 export PATH=/opt/FriendlyARM/toolchain/11.3-aarch64/bin/:$PATH cd uboot-rockchip/ ./make.sh nanopi6
After the compilation, the following files will be generated:
| uboot.img | rk3588_spl_loader_xx.yy.zzz.bin (aka MiniLoaderAll.bin) |
|---|
Run your build:
Please refre to #Running the build
11.4.4 Running the build
11.4.4.1 Install to target board
RK3588 uses GPT partitions by default, you can use the dd command, but be careful to choose the right output device:
- The SD/TF Card device node: /dev/mmcblk0
- The eMMC device node: /dev/mmcblk2
Use the 'parted' command to view the partition layout:
parted /dev/mmcblk2 print
Sample outputs:
Model: MMC A3A551 (sd/mmc) Disk /dev/mmcblk2: 31.0GB Sector size (logical/physical): 512B/512B Partition Table: gpt Disk Flags: Number Start End Size File system Name Flags 1 8389kB 12.6MB 4194kB uboot 2 12.6MB 16.8MB 4194kB misc 3 16.8MB 21.0MB 4194kB dtbo 4 21.0MB 37.7MB 16.8MB resource 5 37.7MB 79.7MB 41.9MB kernel 6 79.7MB 113MB 33.6MB boot 7 113MB 147MB 33.6MB recovery 8 147MB 31.0GB 30.9GB ext4 rootfs
as shown above, the resource partition is located at 4 and the kernel partition is located at 5. Use the dd command to write the resource.img and kernel.img files to these partitions, the commands are as follows:
dd if=resource.img of=/dev/mmcblk2p4 bs=1M dd if=kernel.img of=/dev/mmcblk2p5 bs=1M
If you want to update u-boot:
dd if=uboot.img of=/dev/mmcblk2p1 bs=1M
To update new driver modules, copy the newly compiled driver modules to the appropriate directory under /lib/modules.
11.4.4.2 Packaging and creating an SD image
To create a new OS image file, you need to use the "sd-fuse" packaging tool.
"sd-fuse" is a collection of scripts that can be used to create bootable SD card images for FriendlyElec boards. Its main features include:
- Creation of root filesystem images from a directory
- Building of bootable SD card images
- Simple compilation of kernel, U-Boot, and third-party drivers
Please click on the following link to find out more:
| Kernel version | Packaging Tool |
|---|---|
| linux v6.1.y | sd-fuse_rk3588 |
11.4.4.3 USB flashing
11.4.4.3.1 Linux
Reboot the board and enter loader mode with the following command:
To flash U-Boot and kernel using the "upgrade_tool_v2.17_for_linux" tool, please use the following command:
sudo upgrade_tool di -k kernel.img sudo upgrade_tool di -re resource.img sudo upgrade_tool di -u uboot.img sudo upgrade_tool RD
Note: "upgrade_tool" is a command-line tool provided by Rockchip for Linux operating systems (Linux_Upgrade_Tool).
11.5 Build the code using scripts
11.5.1 Download scripts and image files
git clone https://github.com/friendlyarm/sd-fuse_rk3588.git --single-branch -b kernel-6.1.y cd sd-fuse_rk3588 tar xvzf /path/to/netdrive/03_Partition\ image\ files/friendlycore-focal-arm64-images.tgz
11.5.2 Compile the kernel
Download the kernel source code and compile it. the relevant image files in the friendlycore-focal-arm64 directory will be automatically updated, including the kernel modules in the file system:
git clone https://github.com/friendlyarm/kernel-rockchip --depth 1 -b nanopi6-v6.1.y kernel-rk3588 KERNEL_SRC=$PWD/kernel-rk3588 ./build-kernel.sh friendlycore-focal-arm64
git clone https://github.com/friendlyarm/kernel-rockchip --depth 1 -b nanopi6-v6.1.y kernel-rk3588 MK_HEADERS_DEB=1 BUILD_THIRD_PARTY_DRIVER=0 KERNEL_SRC=$PWD/kernel-rk3588 ./build-kernel.sh friendlycore-focal-arm64
11.5.4 Compile the uboot
Download the uboot source code and compile it. the relevant image files in the friendlycore-focal-arm64 directory will be automatically updated:
git clone https://github.com/friendlyarm/uboot-rockchip --depth 1 -b nanopi6-v2017.09 UBOOT_SRC=$PWD/uboot-rockchip ./build-uboot.sh friendlycore-focal-arm64
11.5.5 Generate new image
Repackage the image file in the friendlycore-focal-arm64 directory into sd card image:
./mk-sd-image.sh friendlycore-focal-arm64
After the command is completed, the image is in the out directory, you can use the dd command to make the SD boot card, for example:
dd if=out/rk3588-sd-friendlycore-focal-5.10-arm64-YYYYMMDD.img of=/dev/sdX bs=1M
11.6 Building AOSP from source
11.6.1 Hardware and Software Requirements
- Your computer should have at least 32GB of RAM and 300GB of disk space. We recommend using a machine with 64GB of RAM and a large-capacity, high-speed SSD, and we do not recommend using virtual machines.
- If you encounter compilation errors, they may be caused by problems with the compilation environment. We recommend using the following Docker container for compilation: docker-cross-compiler-novnc.
11.6.2 Download source from the netdrive
Netdisk URL: Click here
File location on netdisk:"07_Source codes/rk35xx-android14-xxxxxxx-YYYYMMDD.tgz" (YYYYMMDD represents the date of the package, and xxxxxxx represents the final commit-id)
Unzip and fetch updates:
tar xzf '/path/to/netdisk/07_Source codes/rk35xx-android14-xxxxxxx-YYYYMMDD.tgz' cd rk35xx-android14 [ -d .git ] && git pull
11.6.3 Tablet profile build (First Build)
echo "ROCKCHIP_DEVICE_DIR := device/rockchip/rk3588/nanopi6" > .rockchip_device.mk
If you need to build WiFi Display, please uncomment and run the following command:
echo "ROCKCHIP_WIFI_DISPLAY := yes" >> .rockchip_device.mk
If you need to build a version with pre-installed Google apps, please uncomment and run the following command:
echo "INSTALL_GAPPS_FOR_TESTING := yes" >> .rockchip_device.mk
If you need to add support for the Quectel EM05/EC20 4G module, please uncomment and run the following command:
echo "BUILD_WITH_EC20 := yes" >> .rockchip_device.mk
Initialize the environment and start building:
export BUILD_NUMBER=$(date +"6%y%m%d")1 . setenv.sh ./build.sh -FMu
If you want to generate an OTA update package, please add the `-O` option when running the build.sh command:
If a build error occurs, try the following commands:
Continue building with a single thread
make -j1
If no errors occur, run build.sh again to package the images
./build.sh -FMu
11.6.4 TV profile build (First Build)
echo "ROCKCHIP_DEVICE_DIR := device/rockchip/rk3588/nanopi6_box" > .rockchip_device.mk
If you need to build a version with pre-installed Google apps, please uncomment and run the following command:
echo "INSTALL_GAPPS_FOR_TESTING := yes" >> .rockchip_device.mk
Initialize the environment and start building:
export BUILD_NUMBER=$(date +"6%y%m%d")1 . setenv.sh ./build.sh -FMu
If a build error occurs, try the following commands:
Continue building with a single thread
make -j1
If no errors occur, run build.sh again to package the images
./build.sh -FMu
11.6.5 Second build
. setenv.sh ./build.sh -FMu
If you need to clean before building:
. setenv.sh make installclean rm -rf out/dists out/target/product/nanopi3/* ./build.sh -FMu
11.6.6 Running your AOSP build
After the Android compilation is completed, the image file will be stored in the rockdev/Image-aosp_nanopi3 subdirectory of the Android source code directory.
11.6.6.1 USB Flashing
Use the rockchip tool to flash the following file: rockdev/Image-aosp_nanopi3/update.img
11.6.6.2 SD-to-eMMC Flashing
Refer to the following steps:
- Insert the SD card of the eflasher system into the host;
- Copy the files in the rockdev/Image-aosp_nanopi3 directory to the android14 or androidtv directory in the FRIENDLYARM partition of the SD card:
sudo cp -af parameter.txt config.cfg MiniLoaderAll.bin uboot.img
dtbo.img vbmeta.img boot.img
misc.img pcba_small_misc.img pcba_whole_misc.img
baseparameter.img super.img /media/$USER/FriendlyARM/android14
- The Image-aosp_nanopi3 directory does not contain **idbloader.img**. You can download it from here:
cd /media/$USER/FriendlyARM/android14 [ -f idbloader.img ]
- Insert the SD card into NanoPi R6S and re-flash;
11.6.7 Pack the new SD Image
git clone https://github.com/friendlyarm/sd-fuse_rk3588.git
SDFUSE=$PWD/sd-fuse_rk3588
mkdir $SDFUSE/android14
cd /path/to/rk35xx-android14/rockdev/Image-aosp_nanopi3
cp -af parameter.txt config.cfg MiniLoaderAll.bin uboot.img
dtbo.img vbmeta.img boot.img
misc.img pcba_small_misc.img pcba_whole_misc.img
baseparameter.img super.img $SDFUSE/android14
wget http://112.124.9.243/dvdfiles/rk3588/tools/idbloader.img -O $SDFUSE/android14/idbloader.img
cd $SDFUSE/
./mk-sd-image.sh android14
Extract the eFlasher system image from the downloaded archive
tar xvzf /path/to/netdrive/03_Partition\ image\ files/emmc-flasher-images.tgz ./mk-emmc-image.sh android14
For more information, please refer to #Packaging and creating an SD image
12 Using On-Board Hardware Resources
12.1 VPU
Please refer to NPU
12.2 NPU
Please refer to NPU
12.3 DTS files
Please refer to DTS files
12.4 GPIO
Please refer to GPIO Programming: Using the libgpiod Library
12.5 Serial Port
The kernel has enabled the following serial ports for testing by default (should be based on kernel dts configuration), to use more serial ports you can configure the kernel dts yourself:
| CPU | Model | Port | Device Node |
|---|---|---|---|
| RK3588 | NanoPC-T6 / NanoPC-T6-LTS / NanoPC-T6-Plus / NanoPi-M6 / NanoPi-M6V2 / CM3588 | UART6 | /dev/ttyS6 |
| RK3588S | NanoPi-R6S / NanoPi-R6C | UART5 | /dev/ttyS5 |
12.6 ADC
The file node corresponding to channel2 is shown below, this ADC can be used to query the input voltage of USB-C:
| Channel | Node |
|---|---|
| Channel 2 | /sys/devices/platform/fec10000.saradc/iio:device0/in_voltage2_raw |
12.7 PWM
12.7.1 NanoPC-T6
Pin32 is configured as PWM by default
12.7.2 NanoPi-R6C
Pin29 is configured as PWM by default
12.8 RTC
You can access RTC by calling APIs under the "/sys/class/rtc/rtc0/" directory. For instance you can check the current RTC time by running the following commands:
cat /sys/class/rtc/rtc0/date
2018-10-20
cat /sys/class/rtc/rtc0/time
08:20:14
12.9 Watch dog
Operating the watchdog is simple: open the device /dev/watchdog and write a character to it periodically. If the system fails to write, the device will automatically reboot after a timeout:
int fd = open("/dev/watchdog", O_WRONLY); write(fd, "a", 1);
13 Backup rootfs and create custom SD image (to burn your application into other boards)
13.1 Backup rootfs
Run the following commands on your target board. These commands will back up the entire root partition:
sudo passwd root
su root
cd /
tar --warning=no-file-changed -cvpzf /rootfs.tar.gz
--exclude=/rootfs.tar.gz --exclude=/var/lib/docker/runtimes
--exclude=/etc/firstuser --exclude=/etc/friendlyelec-release
--exclude=/usr/local/first_boot_flag --one-file-system /
Note: if there is a mounted directory on the system, an error message will appear at the end, which can be ignored.
13.2 Making a bootable SD card from a root filesystem
Run the following script on your Linux PC host, we'll only mention "debian-bullseye-desktop-arm64 os" for brevity, but you can apply the same process for every linux OS.
su root git clone https://github.com/friendlyarm/sd-fuse_rk3588 --single-branch -b kernel-6.1.y cd sd-fuse_rk3588 tar xvzf /path/to/netdrive/03_Partition\ image\ files/debian-bullseye-desktop-arm64-images.tgz tar xvzf /path/to/netdrive/03_Partition\ image\ files/emmc-eflasher-images.tgz scp pi@BOARDIP:/rootfs.tar.gz /rootfs.tar.gz mkdir rootfs tar xvzfp rootfs.tar.gz -C rootfs --numeric-owner --same-owner ./build-rootfs-img.sh rootfs debian-bullseye-desktop-arm64 ./mk-sd-image.sh debian-bullseye-desktop-arm64 ./mk-emmc-image.sh debian-bullseye-desktop-arm64 autostart=yes
14 Common Linux-based operating system operations
14.1 Using ADB on Linux Systems
14.1.1 Enabling ADB in Buildroot System
Enable on Startup
mv /etc/init.d/K50usbdevice.sh /etc/init.d/S50usbdevice.sh reboot
Enable Temporarily
14.1.2 Enabling ADB in Ubuntu and Debian Systems
Enable on Startup
sudo systemctl enable usbdevice sudo reboot
Enable Temporarily
14.1.3 How to Connect
When using ADB, the port connected to the computer is the same as the USB flashing port.
To install the .deb file located in the /opt/archives directory:
sudo dpkg -i /opt/archives/linux-headers-*.deb
To download and update the kernel header files online:
wget http://112.124.9.243/archives/rk3588/linux-headers-$(uname -r)-latest.deb
sudo dpkg -i ./linux-headers-latest.deb
You can visit http://112.124.9.243/archives/rk3588 to see which kernel deb packages are available.
14.3 Update Kernel to Latest Version
This will update the kernel to the latest version and update the kernel and resource partitions, as well as the kernel modules:
wget http://112.124.9.243/archives/rk3588/linux-image-$(uname -r)-latest.deb
sudo dpkg -i ./linux-image-latest.deb
sudo reboot
14.4 Setting Kernel Boot Parameters
14.4.1 When the system needs to be installed on eMMC/UFS
Flash the firmware file XXXX-eflasher-multiple-os-YYYYMMDD-30g.img.gz to a TF card, then insert the TF card into your computer. Windows will usually recognize the TF card partition automatically (formatted as exFAT). For Linux or Mac users, manually mount the first partition of the TF card. Assuming the TF card’s device name is /dev/sdX, mount /dev/sdX1.
Edit the info.conf configuration file in the OS directory on the TF card, adding the bootargs-ext parameter. For example:
bootargs-ext=rockchipdrm.fb_max_sz=2048
To remove a specified parameter, set it to empty. For example, to remove the userdata parameter:
14.4.2 Change kernel boot parameters by compiling the kernel
Search for the bootargs field in the kernel source directory and modify the DTS file of the target development board (click DTS files to view the corresponding DTS file for the board):
grep -R "bootargs" arch/arm64/boot/dts/rockchip
Then recompile the kernel and update resource.img.
14.5 View the current kernel configuration of the running Linux system
sudo modprobe configs sudo zcat /proc/config.gz > kernel.config cat kernel.config
14.6 PWM Fan Control
The following script temporarily runs the fan at maximum speed for a short period (2 seconds). After the temperature drops, it will automatically return to the normal speed:
#!/bin/bash STATE=$1 true ${STATE:=1} find_pwm_fan() { for d in /sys/class/thermal/cooling_device*; do if grep pwm-fan $d/type >/dev/null; then PWM_FAN=$d break fi done } find_pwm_fan if [ -n "${PWM_FAN}" ]; then MAX_STATE=$(cat ${PWM_FAN}/max_state) if [ STATE−gt{STATE} -gt STATE−gt{MAX_STATE} ]; then STATE=${MAX_STATE} fi echo STATE>STATE > STATE>{PWM_FAN}/cur_state echo "Current pwm-fan state: (cat(cat (cat{PWM_FAN}/cur_state)" fi
14.7 Clear the Automatically Generated MAC Address
- Note: The following method only applies to Linux systems that use GPT partition tables. Since it performs raw writes to the storage device, please back up your data before proceeding.
- Background: When you clone a TF card using the dd command and run it on another development board, you may find that both boards end up using the same MAC address. To resolve this issue, you can use the following command to clear the stored MAC address, allowing the system to generate a new MAC address during the next boot, thereby avoiding duplicate MAC addresses:
dd if=/dev/zero of=/dev/mmcblk0 bs=512 seek=7168 count=1
In the command above, mmcblk0 refers to the TF card device name.
If the storage device is eMMC, it should be changed to mmcblk2.
If the storage device is UFS, it should be changed to sda.
15 Unbricking Method
If the ROM is not installed correctly, causing the development board to become bricked, and you might not have the opportunity to reinstall the ROM via an SD card, you need to enter Maskrom mode to unbrick it by erasing the storage device.
15.1 Windows Users
15.1.1 Download Required Files
- Get the necessary tools: Visit here, find RKDevTool_v3.37_for_window.zip and DriverAssitant_v5.12.zip in the 05_Tools directory, and download them to your local machine.
- Install Rockchip USB driver and RKDevTool: Extract DriverAssitant_v5.12.zip to install the Rockchip USB driver, and extract RKDevTool_v3.37_for_window.zip to obtain the Rockchip flashing tool RKDevTool.
- Get the loader: Visit here, enter the tools directory corresponding to your CPU model, and download MiniLoaderAll.bin.
15.1.2 Enter Maskrom Mode to Erase the Storage Device
- Remove the SD card, USB device, and other peripherals from the development board
- Start RKDevTool on your computer.
- Press and hold the “Mask” key, power on the board. After the status LED has been on for at least 3 seconds, release the Mask key
- Use a USB A-to-A cable, connect NanoPi-R6S to a PC as follows
- You will see Found One MASKROM Device displayed at the bottom of the RKDevTool interface, as shown below:

- Click the Advanced Function tab in the RKDevTool interface.
- In the Boot text box, select MiniLoaderAll.bin, then click the Download button.
- Then click the EraseAll button to erase the eMMC.

- At this point, NanoPi-R6S is restored to its initial state and can be normally booted via SD card or eMMC.
15.2 Linux Users
15.2.1 Download the Required Files
- Get the necessary tools: Visit here and find upgrade_tool_v2.30_for_linux.tgz in the 05_Tools directory and download it locally.
- Get the loader: Visit here, enter the tools directory corresponding to your CPU model, and download MiniLoaderAll.bin.
15.2.2 Installation for upgrade_tool
Using the following commands:
tar xzf upgrade_tool_v2.30_for_linux.tgz cd upgrade_tool_v2.30_for_linux sudo cp upgrade_tool /usr/local/sbin/ sudo chmod 755 /usr/local/sbin/upgrade_tool
15.2.3 Enter Maskrom Mode to Erase the Storage Device
- Connect NanoPi-R6S to the computer using a USB data cable.
- Disconnect the power from NanoPi-R6S, hold down the MASK button, connect the power, and release the button after 4 seconds.
- Check the connection with the following command:
A result similar to "DevNo=1 Vid=0x2207,Pid=0x350b,LocationID=13 Mode=Maskrom SerialNo=" indicates that the device has been detected.
- Erase the eMMC with the following command:
upgrade_tool EF MiniLoaderAll.bin
- At this point, NanoPi-R6S has been restored to its initial state and can boot the system normally via SD card or eMMC.
15.3 Mac Users
Our tests found that upgrade_tool_v2.25 does not work properly on macOS. Therefore, we recommend using Windows or Linux unless an updated version of upgrade_tool becomes available.
16 Link to Rockchip Resources
17 Schematic, PCB CAD File
- Schematic: NanoPi_R6S_2208_SCH.PDF
- PCB CAD File:NanoPi_R6S_2208_2D_DXF.zip
18 Update Logs
18.1 2026-06-03
18.1.1 eFlasher
- improved the backup and restore functionality
- Added boot logo generation and customization
- Added kernel command-line parameter editing
18.1.2 FriendlyWrt
- Updated FriendlyWrt to OpenWrt 25.12.4
18.2 2026-04-21
18.2.1 FriendlyWrt
- Updated FriendlyWrt to OpenWrt 25.12
- Updated eMMC-Tools web-based flashing tool under FriendlyWrt, improved stability and support for more formats
- Enabled built-in fq_codel queue scheduler in kernel to improve network latency
18.2.2 Ramdisk
- Fixed the issue of factory reset not working on UFS devices
- Optimized the disk repair process
18.2.3 Debian 13(Trixie) GNOME Wayland Desktop
- Fixed duplicate kernel log output on serial port
- Updated Chromium web browser to new version 144.0.7559.133-1
18.3 2026-03-02
- Added desktop system: Debian 13 (Trixie) GNOME Wayland Desktop
- Fix the issue of CAM415 camera 3A not working on Debian 11 and Ubuntu 20
18.4 2026-01-12
18.4.1 OpenMediaVault
- Update to 8.0.6-1
- Update to Debian13
18.4.2 Debian Core
- Update to Debian13
18.5 2025-12-22
18.5.1 Android 14 / TV
- Sync the factory SDK update to **rkr8**
- Fix an issue where one RK 3A ISP stream did not work when two MIPI cameras were connected
18.5.2 Linux
- Update the vendor kernel to version 6.1.141
- Fix an issue where one RK 3A ISP stream did not work when two MIPI cameras were connected
- Update the Chromium web browser to version 143.0.7499.40 (Debian/Ubuntu only)
18.5.3 FriendlyWrt
- Update FriendlyWrt to version 24.10.4
18.6 2025-10-10
18.6.1 Android 14 / TV
- Sync the factory SDK update to **rkr7.2**
- Fix failure to auto-expand partitions
18.6.2 Eflasher
- Allow GUI info to be set in config file
18.7 2025‑09‑02
18.7.1 Android 14/TV
- Updated SDK to RKR7.1 and kernel to 6.1.141
- Fixed black screen at left side in Settings
- For AndroidTV,improved DSI panel support and fixed no-boot issue in portrait mode
18.8 2025-08-26
- Resolved camera access issue on the ubuntu-jammy-x11-desktop-arm64 system
18.9 2025-08-11
18.9.1 Ubuntu / Debian / FriendlyCore
- Updated and pre-installed the camera support package camera_engine_rkaiq to the new version 6.30.4
- Added support for the CAM415 camera (How to test)
- Updated the ramdisk to fix known issues
- Optimized the configuration of mpv
18.10 2025‑08‑07
18.10.1 Linux
- Synchronized upstream kernel update to version 6.1.118
- Add support for the HD702M LCD screen (LCD-HD702M)
- Add GPIO pin labels in the DTS so that the application layer can conveniently access GPIOs via libgpiod (GPIO Programming: Using the libgpiod Library)
18.10.2 Android 14
- Sync with the upstream kernel update to version 6.1.118
- Add support for the HD702M LCD screen (LCD-HD702M)
- Add support for the MIPI camera sensor IMX415
- Enable wireless ADB functionality once Ethernet is connected
- Update the boot logo to match the Android boot animation
- Fix the issue of high-frequency logging that occurs during camera preview
18.11 2025‑07‑08
18.11.1 FriendlyWrt
- Fixed PWM fan control issue (using the pwm‑fan driver module)
18.12 2025‑06‑30
18.12.1 FriendlyWrt
- Updated FriendlyWrt to version 24.10.2
- Updated network-related kernel configuration
18.13 2025-06-13
18.13.1 Linux Kernel 6.1.y
- Improved sleep/wake support
- Fixed network unavailability after sleep/wake with rtl8211f
- Enhanced USB Bluetooth sleep/wake support
- Optimized Bluetooth support
- Added Bluetooth support for rtl8851bu
- Re-enabled MediaTek module Bluetooth support, except for the mt7921u 0e8d:7961 module (CF‑953AX), which has been disabled due to malfunction during testing
18.14 2025-06-03
18.14.1 OpenMediaVault
- Turn off the planned task of BTRFS scrub by default (BTRFS scrub)
18.15 2025-05-21
- Added Android 14 TV
18.16 2025-04-30
18.16.1 FriendlyWrt
- Added configuration to load the NPU driver module
- Added support for the RTL8851bu wireless adapter
18.17 2025-04-18
- Added Android 14 Tablet
18.18 2025-03-24
18.18.1 FriendlyWrt
- Fix insufficient inodes in the opt partition
- Re-enable the eMMC-Tools for devices with over 1G memory when booting from eMMC
18.19 2025-02-28
18.19.1 FriendlyWrt
- Updated to openwrt-24.10.0
- Partition adjustment: Fixed the root partition size and added an independent partition to improve Docker storage performance. Data on this partition will be retained after a factory reset.
18.20 2025-01-23
- Update Chromium to the new stable version (130) for Debian 11 and Ubuntu 20 systems
- Add the gstreamer1.0-rockchip package for video hardware encoding and decoding on Ubuntu Noble Desktop (Example: USB_Camera)
- Add udev rules on Ubuntu 24 Core and Debian 12 Core systems to fix permissions for VPU/GPU device nodes
18.21 2025-01-17
18.21.1 Linux Kernel
- Synchronized upstream kernel update to version 6.1.99
- Updated rknpu driver to version v0.9.8 (Document: NPU)
18.21.2 Debian/Ubuntu/OpenMediaVault/ProxmoxVE
- Updated Debian Bullseye system to linux-5.10-gen-rkr9 (including updates mpp, xserver, rkaiq, gstreamer-rockchip, rga2, libv4l-rkmpp, libmali, and related packages)
- Updated Rockchip hardware-related packages for Ubuntu Focal Desktop system (same as Debian Bullseye)
- Integrated hardware acceleration packages such as mpp, gstreamer, rknn, and libmali into the Core system without a desktop environment
18.22 2024-11-12
- Improved ramdisk and eflasher for more flexibility and reliability when installing the system on external storage
18.23 2024-10-16
18.23.1 New System
- Added Ubuntu 24.04 Desktop system, using Wayland, supporting VPU/GPU acceleration, and integrated with the new version of Chromium.
- Added Proxmox VE system
18.23.2 Linux Kernel
- KVM is enabled by default in the kernel
18.23.3 Linux System
- Updated Buildroot system to linux-5.10-gen-rkr8
- Updated Debian Bullseye system to linux-5.10-gen-rkr8 (updated packages such as mpp/xserver/rkaiq/gstreamer-rockchip/rga2/libv4l-rkmpp, etc.)
- Updated Rockchip-related software packages in Ubuntu Focal Desktop system (same as Debian Bullseye)
- Upgraded Chromium to the new version (stable version 129), improving performance by 50% compared to the previous version, with support for GPU acceleration and hardware video decoding, as well as HiDPI resolution
- Updated FriendlyWrt to version openwrt-23.05.05
18.23.4 Others
- Eflasher firmware flashing now supports selecting the target storage device, allowing the Linux system root partition to be installed on M.2 SSD or USB drive (but still requires eMMC/TF card for boot)
- Eflasher can customize kernel boot parameters via configuration file
- Updated ramdisk to support btrfs filesystem (can use sd-fuse_rk3568 to package btrfs firmware)
- Updated ramdisk to improve compatibility for filesystem repair
18.24 2024-06-13
18.24.1 Android
- Added support for PWM fan
- Improved HDMI output compatibility
- Added support for Intel RealSense Depth Camera, enable it by setting the CONFIG_USB_VIDEO_CLASS_REALSENSE option in the kernel
- Updated support for Android video decoding
18.25 2024-05-22
18.25.1 Linux Kernel
- Fixed the issue where HDMI output at 4K 120p was displaying incorrectly.
- Fixed the issue where only one display might be working when using dual HDMI outputs.
- Fixed the RGA3 issue.
- Modified kernel LSM to add apparmor,selinux.
18.26 2024-05-14
18.26.1 Debian/Ubuntu Desktop
- Fix alsa issue
18.27 2024-05-11
18.27.1 Linux Kernel
- Synchronize upstream kernel updates to 6.1.57.
- Add support for NVMe hardware monitoring, temperature of NVMe devices can be viewed through the /sys/class/hwmon node.
- Introduce support for PWM fans, it can be disabled by unloading the pwm_fan module.
- Refactor rknpu (v0.9.3) as a module for easier updates or version changes.
- Enhance compatibility for HDMI output.
- Introduce a simple driver for querying input power voltage (node: /sys/class/power_supply/simple-vin/voltage_now).
- Add support for Intel RealSense Depth Camera, enable it by configuring the kernel option CONFIG_USB_VIDEO_CLASS_REALSENSE.
18.27.2 Debian11 Desktop
- Synchronize upstream Debian version to linux-5.10-gen-rkr7.1.
- Update core libraries such as libmali, mpp, rga2, npu, gstreamer, etc., to newer versions.
- Update web browser Chromium to a new version.
18.27.3 Ubuntu Focal Desktop
- Add support for multiple languages (including Chinese).
- Fix potential issue of no display when connecting a screen after boot.
- Update core libraries such as libmali, mpp, rga2, npu, gstreamer, etc., to newer versions.
18.27.4 OpenMediaVault
- Improve the compatibility of hard drive, allowing hard drives with the same ID
18.27.5 Other
- sd-fuse_rk3588 Support packaged image on arm64 platform
18.28 2024-04-21
18.28.1 OpenMediaVault
- Update to 7.0.5-1
- Update to Debian12
18.29 2024-03-15
18.29.1 Ubuntu focal desktop
- Fix the bluetooth issue
18.29.2 Debian/Ubuntu/FriendlyCore
- Updated uboot: Fixed the problem that DVI mode may not be displayed.
- Updated 6.1 kernel: fixed rknpu not being able to tune and specify different cores
18.30 2024-01-31
18.30.1 Debian/Ubuntu/FriendlyCore/Buildroot
- Add adb support
18.30.2 Android 12 & Android TV
- Add wifidisplay (no hdcp) support
- Add Wi-Fi direct support for rtl8822ce and rtl8812au
18.30.3 FriendlyWrt
- Add wireless repeater mode support for rtl8822ce
18.31 2024-01-24
18.31.1 Buildroot
- Fix "no sound from headphone jack" issue on nanopc-t6
18.32 2024-01-17
18.32.1 Linux
- Fix NPU interrupt exception
- Fix Buildroot default audio output setting
- Fix mpp decoding issue on Buildroot
18.32.2 Android 12
- Fix the issue that headphone audio not working if hdmi-in connected
18.33 2023-12-23
18.33.1 Android 12 & Android TV
- Fix the UsbCamera preview abnormal issue
- Fix connection for ps5/dualshock controller
- Improve support for non-16:9 resolutions in HDMI output
- Update SDK to Rockchip Android 12.1 rkr14.2
18.33.2 FriendlyWrt
- Fix an issue that unable to use eMMC tools for large-capacity eMMC
18.34 2023-12-01
18.34.1 FriendlyWrt
- Update to openwrt-23.05.2
18.35 2023-11-13
18.35.1 Debian/Ubuntu/FriendlyCore
- Updated npu driver to 0.9.2, fixed known issues
18.35.2 Android 12
- Built-in EC20 support, no system updates required (<#EC20%5F4G%5FLTE%5Fmodule%5Fon%5FAndroid>)
18.36 2023-10-31
18.36.1 Add a new system
- Add NAS system OpenMediaVault, base on Debian 11 with kernel 6.1
18.36.2 Debian/Ubuntu/FriendlyCore
- Update to kernel 6.1
18.36.3 FriendlyWrt
- Update to kernel 6.1
- Update to openwrt-23.05
18.37 2023-09-09
18.37.1 Android 12
- Add hardware library support (Click to view details)
- Add support for OTA and virtual A/B partitions
- Add EC20 support for NanoPC-T6 (<#EC20%5F4G%5FLTE%5Fmodule%5Fon%5FAndroid>)
18.38 2023-08-15
- Add support for Buildroot
18.39 2023-07-19
18.39.1 Ubuntu Focal Desktop
- Add Ubuntu 20.04 desktop, with LXQT lightweight desktop
18.39.2 Ubuntu Jammy Desktop
- Update chromium to a freshly compiled version 114.0.5735.198
- Update the libmali driver to the new version g13p0-6
18.39.3 Debian/Ubuntu/Android
- Fix RTL9210 enclosures slowdown issue
18.39.4 Ubuntu Jammy X11 Desktop
- Add Ubuntu X11 desktop, based on Xubuntu, using panfrost driver for UI acceleration, rkmpp/mpv etc for video acceleration
18.40 2023-07-01
18.40.1 Debian11
- Update to rockchip bsp linux-5.10-gen-rkr5, improve xserver and video playback performance
- Update kernel to 5.10.160
- Fix some known issues
18.41 2023-06-25
18.41.1 Debian11
- Update mpp/ffmpeg/gsteamer-rockchip/libv4l-rkmpp/libdrm-cursor packages
- Fix mouse cursor disappearing issue
- Fix headphone jack no sound issue
18.41.2 Android TV & Android 12
- Update to rockchip android-12.1-mid-rkr14
- Upgrade kernel to 5.10.160
- Add support for MediaTek MT7921 wireless card (WiFi only)
18.41.3 FriendlyCore
- Fix headphone jack no sound issue
18.42 2023-06-16
18.42.1 Debian11
- Merge changes from upsteam version rockchip linux-5.10-gen-rkr4.1
- Improved UI performance and video playback performance
- Switch desktop to XFCE
- Add support for MediaTek MT7921 wireless card
- Fix some known issues
- WiKi add HDMI-IN video capture instructions
18.43 2023-06-09
18.43.1 FriendlyWrt
- Add support for MediaTek MT7921 wireless card
18.43.2 Ubuntu22
- Add support for MediaTek MT7921 wireless card
- Add panfrost GPU driver (located in /opt/panfrost)
18.44 2023-06-06
18.44.1 Android TV & Android 12
- Auto expand storage space for SD boot
18.45 2023-06-01
18.45.1 Android TV
- Fix home button issue
18.46 2023-05-27
18.46.1 Ubuntu22
- Fix multi-screen display issue (4K+4K+4K or 8K+4K)
18.47 2023-05-26
18.47.1 Ubuntu22
- Fixed audio issues with DP
- Fixed 8K display (HDMI TX0 port)
- Optimized r8125 performance and stability
18.47.2 FriendlyWrt
- Updated v22.03 to openwrt-22.03.5
- Updated v21.02 to openwrt-21.02.7
- Optimized r8125 performance and stability
18.48 2023-05-21
18.48.1 Debian11
- Update to Rockchip sdk version linux-5.10-gen-rkr4
- Switch desktop to LXDE
18.49 2023-05-15
18.49.1 FriendlyCore Focal
- Add Qt 5.10 support
18.50 2023-05-05
18.50.1 Android
- Add USB bluetooth dongle support (rtl8761bu)
- Add M.2 RTL8822CE bluetooth support
18.51 2023-04-26
18.51.1 FriendlyWrt:
- Upgrade v22.03 to openwrt-22.03.4
- Upgrade v21.02 to openwrt-21.02.6
18.52 2023-02-10
18.52.1 Android update
- android support direct boot from sd card
- Fix the problem that in some cases hdmi has no signal output and needs to be plugged in once to recover
- Support enable adb function through android interface
18.52.2 Added Debian11
There are three versions:
- Debian11 Core: Command-line only
- Debian11 Minimal: With Xfce desktop, lite version
- Debian11 Desktop: With Xfce desktop, full version
18.53 2023-01-09
18.53.1 New OS:
- Android12: Android 12 Tablet
- FrienclyCore: Lightweight version of Linux, based on Ubuntu Core 20.04, no desktop system
18.53.2 Android:
- Add support for USB WiFi module (Model: RTL8822CE/RTL8812AU/MediaTek MT7662)
- Update SDK to Rockchip android-12.1-mid-rkr12
18.53.3 Ubuntu jammy:
- optimized the systemd service
18.54 2022-12-13
18.54.1 Ubuntu jammy:
- Fix WiFi issue
18.55 2022-12-04
18.55.1 FriendlyWrt:
- Fix the issue that the storage space cannot be expanded
- Improve stability of the eMMC Tools
18.56 2022-11-17
18.56.1 FriendlyWrt:
- Fix 1G LAN port not working issue
18.56.2 Ubuntu jammy desktop:
- Add chromium video hardware decoding support
- Add hardware cursor support
18.57 2022-10-25
Initial Release