Starting Seeds Indoors: How and When to Start Seeds (original) (raw)
For daily wit & wisdom, get the Almanac newsletter.

Body
When do you start your seeds indoors? Sow too early, and the plants may be ready to leave their pots before it’s warm enough outside. Sow seeds too late, and they won’t have enough time to reach maturity. We’ll provide some tips, as well as a chart on how many weeks to sow indoors before the last spring frost.
The Hindi word for seed is bija, meaning containment of life. This is an apt description of these tiny miracles that contain everything needed to make a new plant. This time of year, we are up to our elbows in dirt, starting more seeds indoors each week!
Why Start Seeds Indoors
There are many benefits to sowing seeds indoors:
- You get a head start on the growing season, which can lead to more fruitful harvests.
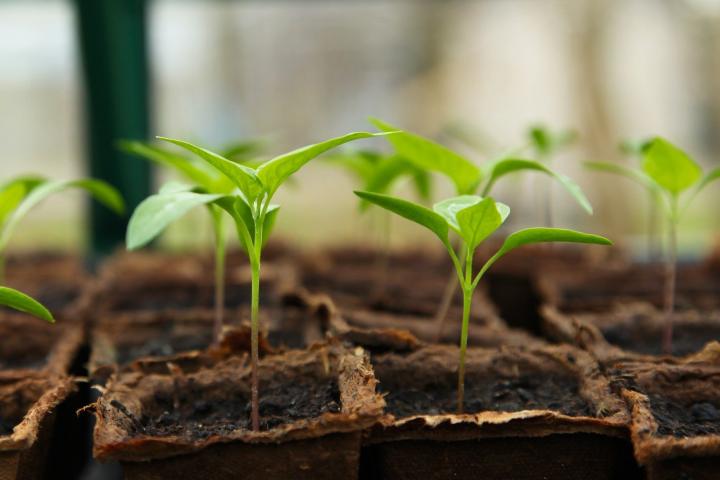
- It’s truly necessary for a number of plants. Warm-season vegetables—such as tomatoes, peppers, and eggplant—can’t be planted too early in the spring, as the soil is too cool. In many regions (including New England and the Midwest), there are not enough growing days for those plants to get to harvest if they’re started outside. Starting seeds indoors allows you to gain a few precious weeks of growing time, which can make a difference. In warmer regions, starting seeds indoors can allow you to get in an extra round of crops (especially cool-season crops) before summer heat stifles growth.
- If you don’t start seeds indoors, you will need to buy young plants called “transplants” or “starts” at the garden store or nursery. While some nursery starter plants are grown well, others may be of poor quality and don’t thrive once they’re home. When you plant your own seeds, you tend to have healthier starts since you can care for them from day one.
- A much wider range of varieties is available as seeds—things you would never find in a six-pack at the local garden center!
- You will know how they have been raised—organically instead of bathed in a wash of chemicals. You can time the plants to be ready when you want to plant them.
- Finally, seeds are much less expensive than buying plants at the garden store.
When to Start Seeds Based on Frost Date
As a general rule, seeds are started indoors about 6 weeks prior to your last frost date.
During a cold spring, it’s better to delay sowing to ensure the soil temperature is warm enough than to be hasty and get disappointing results.
Here are three tools to determine the best date to start your seeds where you live.
- Read your seed packet. Most will list when the seeds should be started indoors (or outdoors). For example, it may say, “Start indoors 8 to 10 weeks before the last expected frost date in your area.” You can simply count back from your frost-free date by checking the _Almanac_’s Frost Date Calculator.
- If you don’t have your seed packets yet, the _Almanac_’s Planting Calendar calculates ideal dates to start seeds for common vegetables and herbs based on your frost date and location.
- Finally, if you plant your garden with the Almanac online Garden Planner, it has all the planting dates and aligns with your entire garden plan for the season. The Garden Plannerlooks up climate data from your nearest weather station and uses that to calculate the best range of planting dates for each crop in your plan. It’s color-coded to show you dates for sowing indoors and outdoors, as well as growing and even the harvest period!
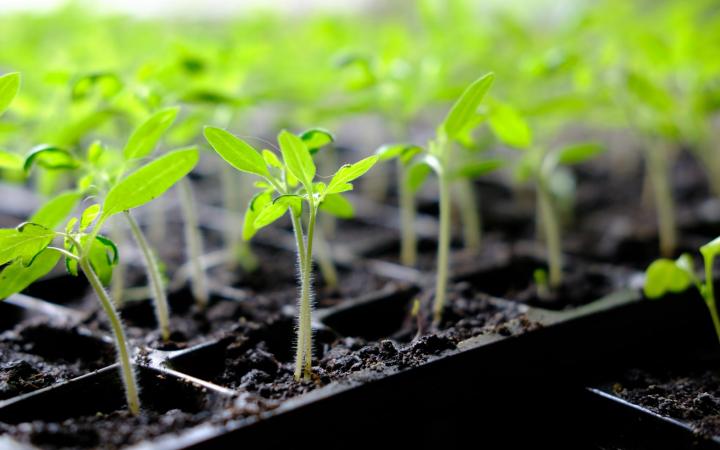
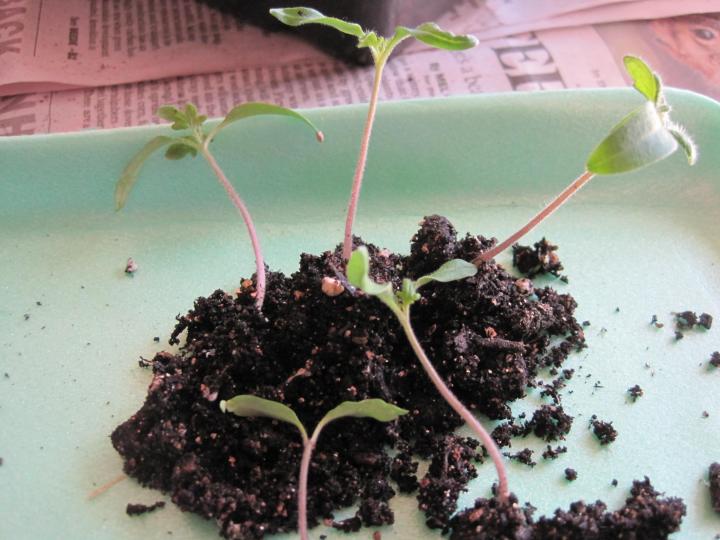
Photo by Sergii Kononenko/Shutterstock
Which Seeds Should Be Started Indoors
Not all seeds should be started indoors. Most vegetables grow perfectly well when started outdoors and even prefer not to be transplanted. Ultimately, it’s important to consider how each type of vegetable grows in addition to where it will be growing.
Consult the table below to see which crops are typically started indoors and which are typically started outdoors. Remember that there isn’t a hard-and-fast rule about what you can start indoors and outdoors; it varies by your experience, personal preference, location, and the plant itself. In general, we find that:
- Crops best started indoors include broccoli, brussels sprouts, cabbage, and tomatoes.
- Those with slower root development, like cauliflower, celery, eggplant, and peppers, should also be started indoors.
- Tender vegetables like tomatoes, eggplant, and peppers are very susceptible to the cold temperatures of spring, so it’s best to start them indoors and keep them safe from unpredictable weather.
- Plants that do not transplant well and are best started in the garden (or in outdoor containers) include cucumbers, melons, pumpkins, and squashes. These are all tender, however, so refrain from sowing them outdoors while frost is still a threat.
- Some plants truly resist transplanting. Root vegetables, like carrots, turnips, and beets, don’t like having their roots disturbed, so it’s safer to start their seeds outdoors in the ground rather than transplant them later on. Plants with long taproots also dislike being transplanted; examples include dill and parsley.
- Finally, plants like radishes and peas are fast-growing and cold-tolerant, so putting them right in the ground makes sense!
Seed-Starting Chart by Plant
Soil Temperature and Germination
Most seed‑starting guides use frost dates to help you count back the right number of weeks—and that’s a good place to start. But seeds sprout based on soil temperature, not the calendar. If your soil is still cold, even indoor‑started seedlings may stall. For the soil‑temperature ranges each crop needs to sprout, see our Soil Temperature Chart for Planting.
How to Start Seeds Indoors (Step-by-Step)
For starting seeds, you only need a seed-starting mix, containers, and a strong light source (but more on that later).
1. Choosing a Potting Mix
Let’s start with the potting mix. Generally, you will have no trouble using an all-purpose potting mix. Drainage is good, but if your potting mix has a lot of large chunks of wood or rocks, we recommend sifting it through a screen before using it for seed starting. Seedlings’ roots will struggle in a medium that’s not fine enough.
For very small or delicate seeds, we recommend using a seed-starting mix, which is a potting mix designed especially for starting seeds. We also like seed-starting mixes because they’re low in nutrients; the seeds themselves are already full of nutrients. Avoid peat-based mixes, if possible. Use more sustainable alternatives, such as coconut coir.
Do NOT use soil from outdoors. It’s often too heavy or compacted for seedlings’ roots and may contain pests or diseases!
2. Choosing a Container
You can sow into pots, plug trays, or recycled containers. Each has its advantages:
- Sowing many seeds into a large pot is space-efficient, as the young seedlings take up less space initially. It’s a more efficient use of seeds, too, because you can germinate many seeds in a pot and then transfer every seedling into its own pot or plug. Sowing into a single container can also be useful for sowing very tiny seeds, such as basil or easy-to-transplant flower seeds. For easy, cool-season crops—everything from onions to celery to cabbage—you can sow multiple seeds in the same container.
- Plug trays, on the other hand, are flatter containers with individual pockets (or “cells”) for each seed. They remove the need to transfer seedlings as often, minimizing root disturbance. Simply sow seeds into the plugs, then grow them until it’s time to plant, though they may need to be transplanted into larger plugs or pots if the roots fill their plugs before it’s time to plant outside. Two or more seeds are usually sown per plug, and then the germinated seedlings are either left to grow as a cluster or thinned out to leave the strongest seedling in each plug. Trays with smaller plugs suit most leafy greens and radishes, especially if they will be transplanted promptly (within 3 or 4 weeks of sowing). We also like this method for cluster-grown crops such as beets, beetroot, and salad onions.
- Recycled containers: We often repurpose food containers such as yogurt cups, sour cream containers, or plastic muffin trays as seed-starting containers. Clean them out and poke a few drainage holes in the undersides. They are generally large enough to house one or two small seedlings for a few weeks. Eventually, seedlings will need to be transplanted into their own pots.
Well-made rigid plastic containers and trays can last for many years, but if you want to avoid plastic, look for alternatives made of biodegradable fiber.
Use wide, shallow, flat containers to start rows of seedlings, which will eventually be potted up into individual containers.
3. Sowing in the Pot
Sowing in a pot or a plug tray is really easy to do!
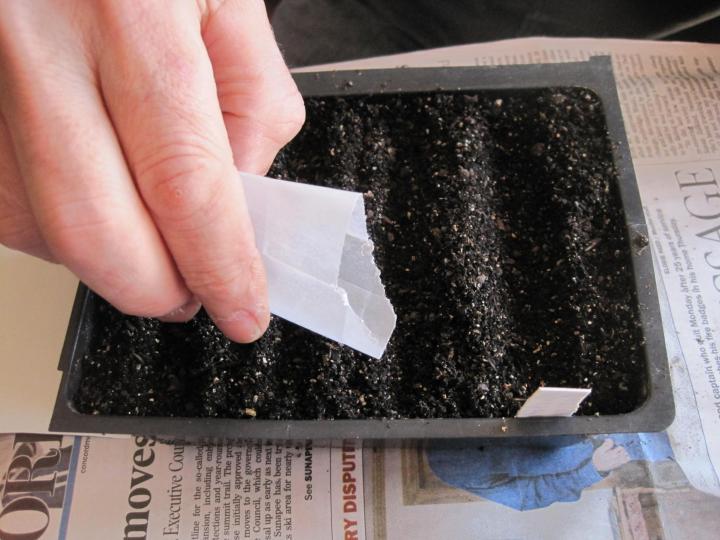
- If sowing in a pot, fill it to the brim with potting mix, then tamp it down to a firm level. It’s hard to over-firm, and seedlings prefer plenty of potting mix to sustain them. If you are using plug trays, fill them to the top, then tamp them down to settle. Top with a little more of the mix, then brush off the excess.
- Use your finger or the eraser-end of a pencil to poke planting holes in the mix. Be sure to sow the seeds at the depth listed on the seed packet. Many seeds can be gently pressed into the medium with your fingers, too. When choosing which seeds to plant, choose the largest, healthiest-looking seeds in the packet for the best chance at germination. Many vegetables, including common crops such as salad greens, onions, beets, peas, and radishes, may be sown in pinches of three to five seeds per plug for planting as a cluster of seedlings (to be later thinned as they grow). Larger seeds, like beans, are sown individually into deeper holes made with a finger, pencil, or dibber (a special seed-sowing tool).
- Once sowing is done, cover the seeds with potting mix, so they’re at the correct depth (as listed on the seed packet).
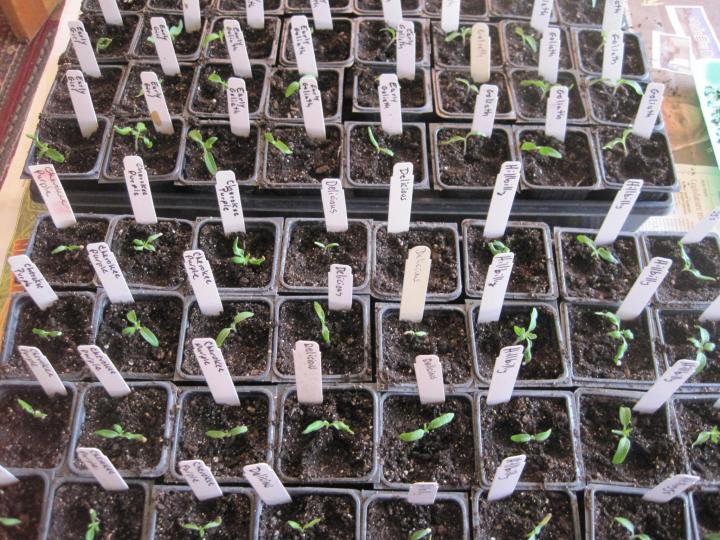
- Label your sowings, especially different varieties of the same plant type. This is important! You might think you’ll remember, but it’s easy to get confused, particularly if you’ve got seedlings with similar leaves (such as multiple varieties of tomatoes). Note the date of sowing and the variety.
- Water the pots or trays carefully using a watering can fitted with a fine sprinkling rose or a clean turkey baster. A pitcher may let the water out too forcefully, dislodging the seeds. A mist sprayer is gentle but can take a long time to fully saturate the potting mix. After watering, leave the medium to drain from the surface, then repeat. You really want to wet the mix at the start so the seeds wake up from their slumber! Don’t worry; if it’s a good mix, it’s hard to overwater; any excess will just drain out of the bottom.
Watch this video to see the seed-starting advice in this article come to life. Ben will show you how it’s done so that you can sow like a pro!
Tips to Speed Up Germination
We all want to see those seedlings push through quickly! The best way to achieve that is to give your seeds as close to ideal conditions as possible, which usually means a little warmth.
- The seed packet should indicate the ideal germination temperature. In most instances, a tucked-away corner of a warm room should work just fine.
- To further speed up germination, you could use a heating pad to warm the medium under your seedlings. Just leave enough space between it and your seedlings so you don’t bake them!
- Keep the potting mix from drying out and conditions warm by loosely covering the plug tray or pot with plastic wrap; poke a few holes in the plastic with a toothpick for ventilation; mold growth can occur if containers are not allowed to “breathe.”
- After about half the seedlings have sprouted, remove them from the humidity dome or remove the plastic covering, then move them to a spot with good, strong light.
See our article on “How to Improve Germination.”
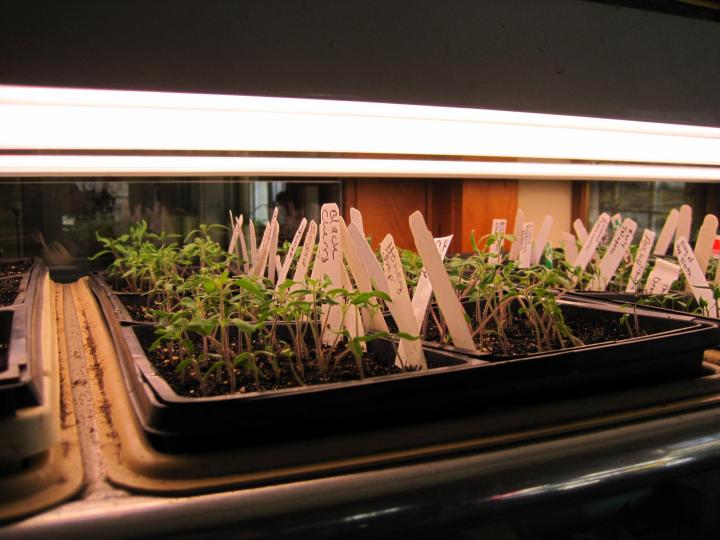
Hang the lights so they can be adjusted to keep them 4 inches above the plants as they grow.
Add Grow Lights
Poor light levels are often the killer in wintertime, rather than cold, at least for cool-season crops. So, if it’s early in the season and you don’t have a suitable outdoor protected structure, such as a greenhouse or cold frame, it might be worth investing in full-spectrum grow lights.
Placing seedlings on a windowsill rarely gives the same light as outdoors. You can try turning seedlings daily to help them grow more upright, but more often than not, the result is leggy seedlings bent in all directions that will struggle to recover.
- Grow lights don’t need to be anything fancy. An LED or fluorescent light fixture that’s “full-spectrum” (i.e., produces light in the full range of the visible spectrum—like the Sun) can usually be found for under $40 at a local hardware or department store.
- The lamp unit can be raised up and down with inexpensive grow lights. Ideally, you want the lights about 4 to 6 inches above the seedlings’ canopy. That’s far enough above not to be too warm but to give a good, strong light. Move the lamp unit up as the plants grow and need more space.
- Up to 16 hours of light a day is fine. In fact, in most cases, the longer you leave them on, the quicker seedlings will grow, so this is a good way to catch up on growth early in the season. (Note that plants do need a period of darkness, too, so don’t leave your lights on 24/7!) Many gardeners switch on the lights when getting up in the morning and then switch them off when heading to bed, which means they’re on for around 15 to 16 hours. Or, you could put your grow lights on a timer.
- Plants can move from grow lights to outdoors or to protected outdoor areas when it’s warm enough or, for cool-season crops, once outdoor light levels have improved slightly.
See our articles on using grow lights and the best grow lights for growing vegetables indoors.
Next Step: Transfer Seedlings
After you start your seedlings, and they have two pairs of leaves, you’ll often need to transplant them into their own pots. Don’t delay transplanting your seedlings, as overcrowding can cause issues such as legginess or disease.
- To transplant seedlings, fill new pots with potting mix; at this stage, an all-purpose or multipurpose potting mix is ideal. Make your planting holes, then carefully remove the seedlings from their nursery pots. If you aren’t transferring all the seedlings, lift out only what you need.
- Separate the seedlings, then transfer them to their planting holes. Only ever handle seedlings by their leaves; if you damage or crush the fragile stems or roots, the seedlings are done for!
- Try to avoid damaging the roots as much as possible, too. One way to do this is to bring along as much of the potting mix that’s around the roots as you can. This is one reason, in fact, why working with really young, small seedlings is often better: They are really quick-growing, and their roots are nowhere near as extensive as more established seedlings, so there’s less root to damage.
- You can set seedlings deeper than they had been growing, especially if they are slightly leggy. This helps support their stems and get them back on track.
- Firm in around the seedlings. Once you’re done, gently water the seedlings with a watering can. Don’t worry if the seedlings get a little flattened; they’ll soon recover.
- Check your seedlings and plants regularly for moisture. Push a thumb into the potting mix, or simply lift the pot to gauge its weight. You’ll get a feel for this with more experience, but the heavier it is, the more water it will contain and the less likely it is to need watering.
See our video below on how to transplant seeds.
Ready for Outdoors? Harden Off!
Seedlings of tender crops must be gradually introduced to outdoor conditions before planting in the garden, a process known as “hardening off.” Suddenly moving plants from a stable indoor environment to one with wide variations in temperature, light, and wind can seriously weaken—or kill—plants!
For most plants, start hardening off about 7 to 10 days before the final frost date for your area. Check our Planting Calendar for safe dates to plant outside and work back from there. Withhold fertilizer and water them a little less often during this period.
Here’s how to harden off your seedlings:
- About 7 to 10 days before transplanting, set the seedlings outdoors in dappled shade for a short time each day. Make sure the spot is sheltered from the wind.
- Start with an hour a day, then gradually extend the time plants spend outside until they’re staying out all day.
- Keep the growing medium moist at all times during this period. Dry air and spring breezes can result in rapid transpiration. If possible, transplant on overcast days or in the early morning when the Sun won’t be too harsh.
- Cool-season crops don’t really need as much hardening. Crops such as lettuce, onions, beets, or peas can go straight outside as soon as the ground is ready, meaning that the soil is no longer cold and wet and has reached around 50ºF (10ºC). But warm-season crops such as tomatoes and peppers will need to acclimate.
- A great way to toughen up plants—whether indoors or under cover in a greenhouse or cold frame—is to run your fingers lightly over the foliage. This mimics wind to create sturdier plants. Indoors, you could also use a fan.
- If outdoor conditions allow, plant seedlings while they are still quite young—sometimes as soon as 3 to 4 weeks after first sowing. Younger seedlings tend to establish quicker than those that have become root-bound in their containers.
See our video on How to Harden Off Plants.
If you’re not able to be around to bring your seedlings back and forth from the outdoors, another option is to place them in a cold frame and gradually increase ventilation by opening vents progressively wider each day. Make sure to shut them down completely before dark. (See how to make a cold frame for cold-weather protection.)
Final Thoughts and Tips
- Be seed-savvy. Obtain seed catalogs from several companies and compare their offerings and prices. Some regional companies may carry varieties better suited to your area.
- Make a list of what you’d like to grow. A good rule of thumb is to imagine your garden is one-quarter its actual size. This allows for good spacing practices! See Vegetable Gardening for Beginners for popular beginner vegetables.
- Experienced gardeners are always prepared for some losses. Successful gardening depends on so many factors. Is the season unusually warm or cold this year? Are your first seedlings going to be eaten by pests like slugs, birds, or rabbits? That’s why it’s a good idea to sow seeds in small batches a few weeks apart.
- If you’re starting out, it’s worth beginning a little early because losing those seedlings doesn’t matter so much; you can always sow more!
- The Garden Planner shows you exactly how many plants you’ll need based on your layout. But sow a few more than you’ll need as spares, just in case, or so you can select the very biggest, healthiest seedlings to plant.
- If you have extra seeds to pour back into the packet, do so over the pot you’ve just sown. That way, if you drop any, they’ll end up sown with the right batch of seeds rather than being wasted or mixed up in the spare potting mix!
- Put in place pest-prevention techniques, such as row covers like netting or fleece for bird protection and slug traps.
- Many quick-growing crops are harvested throughout the growing season. Take lettuce or radishes, for example. Sow a new plug tray every couple of weeks throughout the growing season, and that way, you can look forward to a succession of harvests rather than them all coming at once. That’s smart garden planning!
More Reference Material
Consult the _Almanac_’s library of Vegetable Growing Guides, which provides planting, care, and harvesting information for each of the common vegetables, fruits, and herbs.
What seeds are you starting this season?
About The Author

Catherine Boeckmann
Executive Digital Editor and Master Gardener
Catherine Boeckmann is the Executive Digital Editor of Almanac.com, the website companion of The Old Farmer's Almanac. She covers gardening, plants, pest control, soil composition, seasonal and moon c...
More Like This
📣The Gardening Club Just Got Better! 3 Deliveries, 10% Store Discount, and more!
![]()