Making a DIY Laser Engraver (original) (raw)
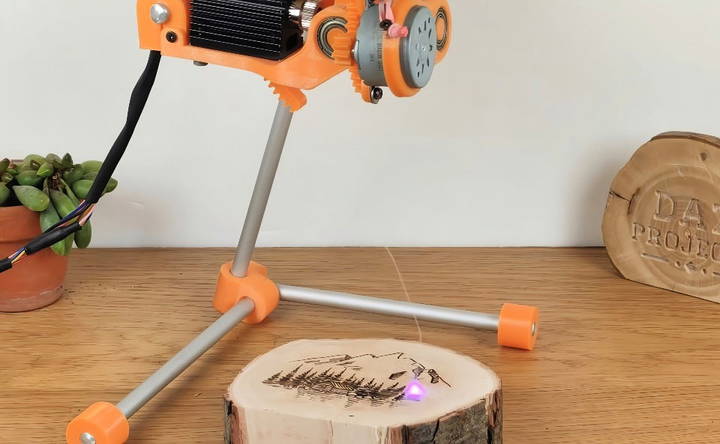
In this article, I'm going to share my personal journey of building a DIY laser engraver. This was my first time undertaking such a project, and it involved reinventing the way these machines usually work. Instead of using linear axes like standard laser engravers, I implemented rotational axes to make a smaller and more budget-friendly machine.
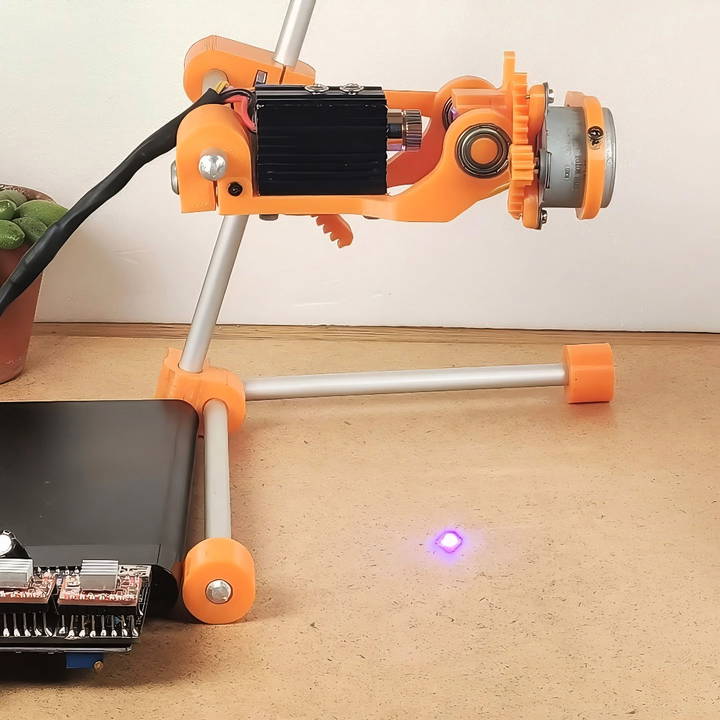
This guide will walk you through the step-by-step process to build your own laser engraver, with helpful insights and tips based on my experience.
Why Build A Portable Laser Engraver?
Learn the benefits of building a portable laser engraver. Learn about the project's motivation and how its design offers unparalleled convenience and versatility.
The Motivation Behind The Project
The inspiration to make a portable laser engraver came from my fascination with the technology and the convenience of having a compact tool that could be easily transported. Traditional laser engravers tend to be large and expensive, making them inaccessible for hobbyists and DIY enthusiasts. I wanted a machine that was easy to build, affordable, and could perform precise engravings without taking up too much space.
The Benefits of a Portable Design
Portability offers several advantages, including the ability to move and use the engraver in different locations, whether at home, a friend's workshop, or a shared maker's space. It also makes opportunities for personalizing everyday items and allows for creativity on the go.
Before jumping into the assembling process, let's talk about the materials and tools you'll need. Each component serves a crucial role in making a functional engraver, and understanding these will help you work more efficiently.
Materials
- 500mW Laser Module: This is the core of the engraver. It's powerful enough to handle most engraving tasks on various materials like wood and plastic.
- 28BYJ-48 Stepper Motors (Two Units): These motors are responsible for controlling the X and Y movements. They are readily available and cost-effective.
- Arduino Uno: This microcontroller is essential for operating the stepper motors and the laser.
- GRBL CNC Shield: This adds the interface needed for controlling the stepper motors via the Arduino.
- Relay (for laser control): This is crucial in enabling on/off control of the laser, enhancing safety and precision.
- 3D Printed Parts: Used for custom mounting various parts and constructing the axes. The flexibility of design is crucial here.
- Aluminum Rods and Tripod Assembly: Provides a steady and adjustable platform for the engraver.
- Bluetooth Module: Allows for wireless operation via a smartphone.
- Power Bank (5V): Provides portability by powering the entire setup.
- Miscellaneous: Bolts, Bearings, USB Connectors, Heat Shrink Tubing, etc.: All needed to ensure everything is securely in place and functioning correctly.
Tools
- 3D Printer: For making custom parts.
- Soldering Iron: Needed for assembling the electronic components.
- Screwdrivers: For assembling various parts.
- Wire Cutters and Strippers: Essential for managing wires.
- Computer: Required for uploading code and controlling the engraver.
Step by Step Guide Instructions
Learn how to build a DIY laser engraver with our step-by-step guide. From assembling the laser head to adding Bluetooth control, follow every detail.
Step 1: Assemble the Laser Head
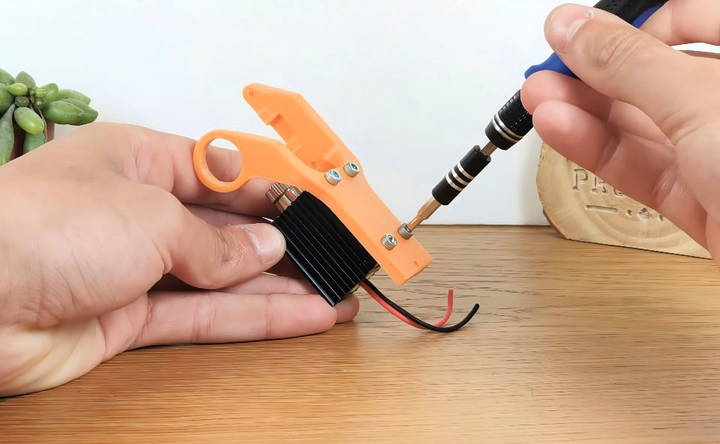
First, you'll need to securely attach the 500mW laser module to the main body using four screws. This step is crucial as it forms the core of your engraver. Use precision to ensure that the laser is aligned properly to avoid any disturbances in engraving accuracy.
Step 2: Set up the Y-Axis
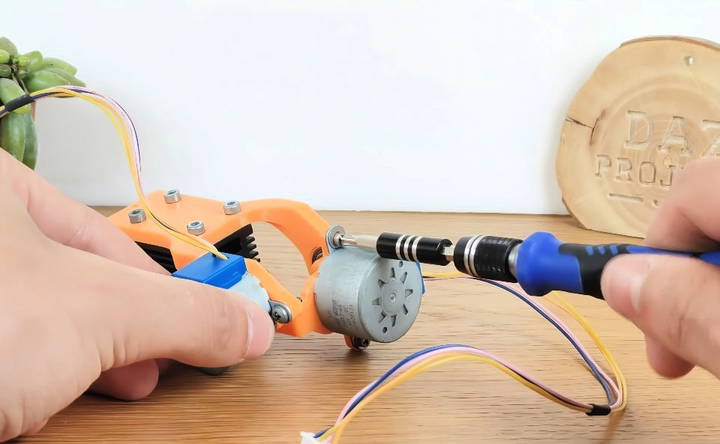
Insert a bearing into the designated hole. This will allow rotational motion for the laser without friction, making your engravings precise. Once the bearing is in place, attach a 28BYJ-48 stepper motor to the opposite side of this assembly. This motor will control the motion along the Y-axis, which is pivotal for making designs accurately.
Step 3: Construct the X-Axis
Much like the Y-axis, you will need another stepper motor for the X-axis. Secure it using self-tapping screws. Once attached, fit a 3D-printed gear onto its shaft, and attach a mirror onto it with some glue. The role of this mirror is to redirect the laser light, which is essential for focusing the laser exactly where it needs to go.
Step 4: Make the Support Structure
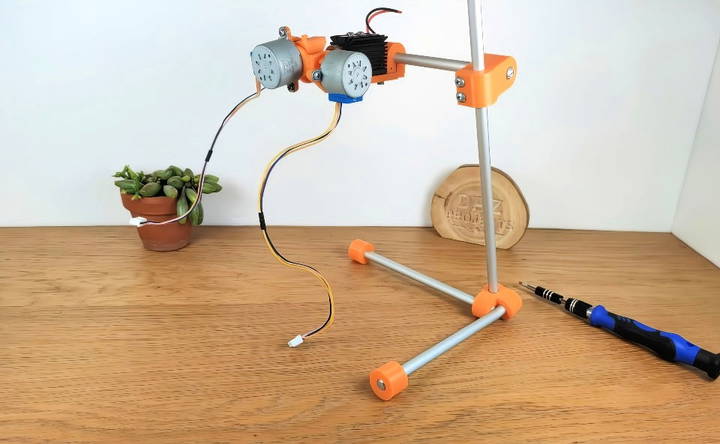
The engraver requires a stable support structure. Cut aluminum rods to length and use additional 3D-printed parts to assemble a small tripod. Mount the engraver to this tripod, ensuring that it can be easily aligned above the workpiece. This support is essential for maintaining stability during operation.
Troubleshooting Common Issues
When I first tested my machine, I noticed that the resolution wasn't as refined as I wanted. This was because the stepper motors, initially set to a low step-per-millimeter rate, struggled to make smooth lines.
Step 5: Enhance Motor Resolution
Initially, I experimented with pulleys, which did not provide the reliability needed. I found using 3D printed gears greatly improved the axle drive, resulting in precise engravings comparable to those from professional machines. Adjusting and refining these mechanical aspects made a significant difference in engraving quality.
Step 6: Testing and Calibrations
Once the mechanical components are assembled, it's time to test the movements. Power up your Arduino and GRBL shield and upload the necessary GRBL firmware. Connect to a computer or smartphone and run a few test engravings on a scrap material to calibrate and perfect the engraver's precision.
Integrating Advanced Features
Discover how to integrate advanced features by adding bluetooth control and designing a custom pcb in your final assembly project.
Step 7: Adding Bluetooth Control
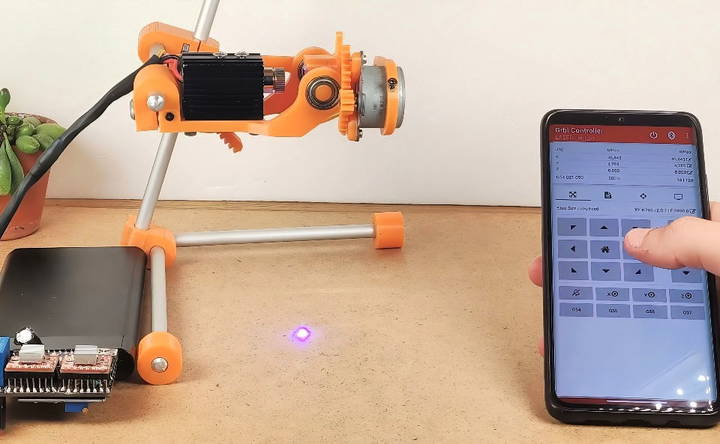
For added convenience and modern functionality, I integrated a Bluetooth module. This allowed me to control the machine wirelessly from my smartphone, transforming how I interact with my engraver. It's a game changer in terms of usability and operational flexibility.
Step 8: Custom PCB and Final Assembly
Designing a custom PCB can streamline your entire setup, though you may start with a breadboard if you're looking for simplicity. When my PCB arrived, soldering the components was straightforward, following the layout to connect the Bluetooth module, Arduino Nano, and motor drivers. This turned my project into one that was compact and organized, minimizing wiring mess and potential connection issues. Additionally, this step up in voltage converter to ensure the 12V motor was run via a 5V power supply comfortably rounded off the electrical part of the project perfectly.
Advanced Projects and Ideas
Discover advanced project ideas, engraving tips, customization techniques, and resources for creative and professional craftsmanship.
Creative Project Ideas
Laser engraving opens up a world of creative possibilities. Here are some advanced project ideas to inspire you:
- Custom Jewelry: Make unique pieces like engraved pendants, bracelets, and rings. Use materials such as wood, acrylic, or metal. Personalize them with names, dates, or intricate designs.
- Personalized Gifts: Design custom gifts for special occasions. Engrave messages or images on items like photo frames, keychains, or coasters. These make thoughtful and memorable presents.
- Home Décor: Enhance your living space with laser-engraved decorations. Make wall art, decorative signs, or custom mirrors. Use different materials to match your home's style.
- Business Products: Make professional items like engraved business cards, nameplates, or promotional products. These can help your business stand out and leave a lasting impression.
- Educational Tools: Design educational aids such as puzzles, flashcards, or models. These can be used for teaching various subjects in a fun and interactive way.
Engraving on Different Materials
Experimenting with different materials can yield stunning results. Here are some materials you can use and tips for engraving them:
- Wood: Ideal for making warm, rustic designs. Ensure the wood is smooth and free of knots for the best results.
- Acrylic: Perfect for modern, sleek designs. Use a lower power setting to avoid melting the material.
- Metal: Great for durable, high-quality engravings. Use a fiber laser for the best results on metals like stainless steel or aluminum.
- Glass: Makes elegant, frosted designs. Use a rotary attachment for cylindrical objects like glasses or bottles.
- Leather: Adds a sophisticated touch to items like wallets, belts, or journals. Test on a small piece first to find the right settings.
Customization Tips
Personalizing your projects can make them more special. Here are some tips for customization:
- Use High-Quality Images: Ensure your designs are high-resolution for the best engraving quality.
- Experiment with Fonts: Different fonts can change the look and feel of your project. Choose fonts that match the style of your design.
- Combine Techniques: Mix engraving with cutting to make intricate designs. For example, cut out shapes and then engrave details on them.
- Test Settings: Always test your settings on a scrap piece of material. This helps you avoid mistakes and achieve the best results.
Advanced Techniques
For those looking to push their skills further, here are some advanced techniques:
- 3D Engraving: Make depth in your designs by adjusting the laser's power and speed. This technique is great for making lifelike images or detailed textures.
- Inlay Work: Combine different materials by engraving a design and then filling it with another material. This can make striking contrasts and unique effects.
- Rotary Engraving: Use a rotary attachment to engrave cylindrical objects. This is perfect for items like glasses, bottles, or pens.
Inspiration and Resources
Looking for more ideas? Here are some resources to help you get inspired:
- Online Communities: Join forums and social media groups dedicated to laser engraving. Share your projects and get feedback from other enthusiasts.
- Tutorials and Courses: Take online courses or watch tutorials to learn new techniques and improve your skills.
- Design Libraries: Explore design libraries for templates and inspiration. Many websites offer free or paid designs that you can use or modify.
By exploring these advanced projects and ideas, you can take your laser engraving skills to the next level.
Common Issues and Troubleshooting
Find solutions to common laser engraving issues like uneven engraving, burn marks, alignment problems, excessive noise, overheating, etc.
Uneven Engraving
- Problem: Your engraving appears uneven, with some areas deeper than others.
- Solution: Check material surface: ensure the material is smooth and flat. Any bumps or dents can cause uneven engraving. Secure the material: make sure the material is firmly fixed on the engraving bed to prevent movement. Adjust focus: verify that the laser is properly focused. An out-of-focus laser can lead to uneven results.
Burn Marks
- Problem: The engraved area has unsightly burn marks.
- Solution: Adjust power and speed: lower the laser power or increase the engraving speed to reduce burn marks. Use masking tape: apply masking tape over the material before engraving. This can help prevent burn marks and is especially useful for wood. Clean the lens: ensure the laser lens is clean. A dirty lens can cause the laser to overheat the material.
Incomplete Engravings
- Problem: Parts of the design are missing or not fully engraved.
- Solution: Increase laser power: gradually increase the laser power until the engraving is complete. Check optics: clean the laser lens and mirrors. Dust and grime can interfere with the laser beam. Inspect connections: ensure all cables and connections are secure. Loose connections can cause power fluctuations.
Alignment Issues
- Problem: The engraving is misaligned or skewed.
- Solution: Check the frame: ensure the frame of the laser engraver is square and stable. Tighten belts: make sure the belts are tight and not slipping. Loose belts can cause misalignment. Calibrate the machine: run a calibration test to ensure the laser head moves accurately along the x and y axes.
Excessive Noise
- Problem: The laser engraver is making unusual or excessive noise.
- Solution: Lubricate moving parts: apply lubricant to the moving parts of the engraver to reduce friction and noise. Check for loose parts: tighten any loose screws or bolts that might be causing vibrations. Inspect motors: ensure the stepper motors are functioning correctly and not overloading.
Laser Not Emitting Light
- Problem: The laser does not turn on or emit light.
- Solution: Check the power supply: ensure the power supply is connected and functioning properly. Inspect wiring: look for any loose or disconnected wires. Test the laser module: use the control panel to test the laser module. If it still doesn't work, the module might need replacing.
Engraving Different Depths
- Problem: The engraving depth varies across the material.
- Solution: Check focus: ensure the laser is correctly focused on the material. Inspect the material: make sure the material thickness is consistent. Adjust settings: fine-tune the laser power and speed settings to achieve a uniform depth.
Overheating
- Problem: The laser engraver overheats during operation.
- Solution: Improve ventilation: ensure the engraver is in a well-ventilated area to prevent overheating. Check the cooling system: Verify that it is working properly. Clean or replace any clogged filters. Reduce workload: allow the machine to cool down between long engraving sessions.
By addressing these common issues and following the troubleshooting tips, you can ensure your DIY laser engraver operates smoothly and produces high-quality results.
FAQs About DIY Laser Engravers
Discover essential FAQs about DIY laser engravers! Get insights, tips, and solutions to common questions for your laser engraving projects.
**1. What is a DIY laser engraver and what can I do with it?
A DIY laser engraver is a machine that uses a focused laser beam to engrave or cut designs onto various materials. You can use it to personalize items, make custom gifts, or even start a small business. Popular materials for laser engraving include wood, acrylic, leather, and even some metals.
**2. What are the different types of DIY laser engravers available?
There are two main types of DIY laser engravers: diode laser engravers and CO2 laser engravers. Diode lasers are generally less expensive and easier to set up, but they have lower power and are suitable for engraving and cutting thinner materials. CO2 lasers are more powerful and can handle thicker materials, but they are also more expensive and require additional safety precautions.
**3. What safety precautions should I take when using a DIY laser engraver?
Laser safety is paramount. Always wear laser safety glasses designed for the specific wavelength of your laser. Ensure proper ventilation to remove any fumes produced during engraving. Never leave the laser engraver unattended while it's operating.
**4. How do I choose the right DIY laser engraver for my needs?
Consider the following factors when choosing a laser engraver:
Budget: Determine how much you are willing to spend.
Materials: Decide what materials you want to engrave or cut.
Workspace: Make sure you have enough space for the machine.
Power: Choose a laser with enough power for your intended projects.
Features: Look for features like adjustable focus, air assist, and rotary attachments.
**5. Where can I find resources and support for my DIY laser engraver?
There are many online communities, forums, and tutorials dedicated to DIY laser engraving. You can find project ideas, troubleshooting tips, and connect with other enthusiasts. Additionally, many manufacturers offer support and resources for their machines.
Conclusions and Personal Insights
Building a DIY portable laser engraver was an incredibly rewarding experience, blending creativity with technical skill. It pushed my boundaries, enhancing my understanding of electronics, programming, and design.
Tips and Best Practices
- Patience is Key: Building from scratch means trial and error. There will be setbacks, so tackle each challenge calmly and learn from them.
- Leverage Open Resources: Use online guides and communities to seek help and exchange ideas. They can be incredibly helpful if you encounter obstacles.
- Safety First: Always use protective eyewear when testing the laser and ensure that you are in a controlled environment to prevent any accidents.
This journey not only provided me a deep sense of satisfaction but also resulted in a practical tool that I often rely on for creative projects. Whether you're a seasoned DIY enthusiast or a beginner, this project could be a wonderful challenge to undertake, fostering innovation and hands-on learning.