A simple Git guide and cheat sheet for open source contributors (original) (raw)
A go-to git cheat sheet for your open source contributions.
If you’re reading this article, you already know that the benefit of open source contribution abounds. You can skip the article and navigate to the end if you’re here for the cheat sheet.
The common problem faced by aspiring open source contributors is how to take the first step from fork to pull request. After reading this article, you should be well equipped with all you need to make your first open source pull request.
Apart from making the process easier for you, the git workflow defined in this piece also makes your contributions look professional. This is especially useful in case you want to add your open source contributions to your portfolio.
Prerequisites
 _Photo by [Unsplash](Randy" title="undefined" rel="noopener noreferrer">https://unsplash.com/@randyfath?utm\_source=ghost&utm\_medium=referral&utm\_campaign=api-credit">Randy Fath / <a href="https://unsplash.com/?utm\_source=ghost&utm\_medium=referral&utm_campaign=api-credit)_
This article assumes you already know the steps to take to contribute to open source. If you don’t know, you may want to read this article written by Maryna. This piece also assumes that you’ve already setup Git on your PC. If you haven’t, you may want to check the setting up Git section of this article and do that first.
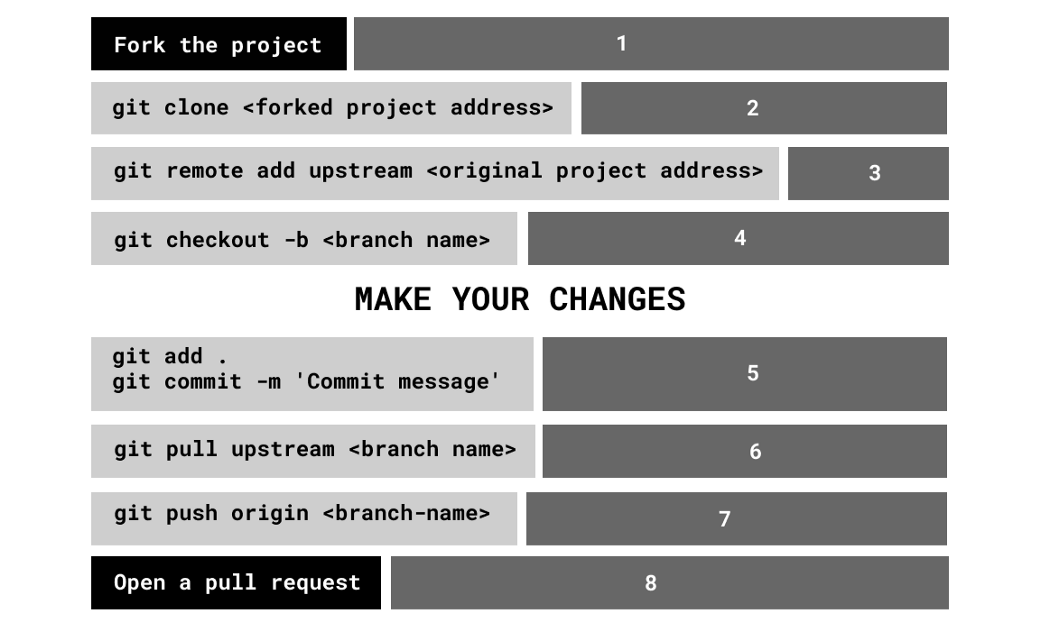
Step 1: Fork the project
This is as simple as clicking a button on GitHub. Navigate to the repository of the project you want to contribute to, then click the fork button at the top right corner as illustrated in the picture below.
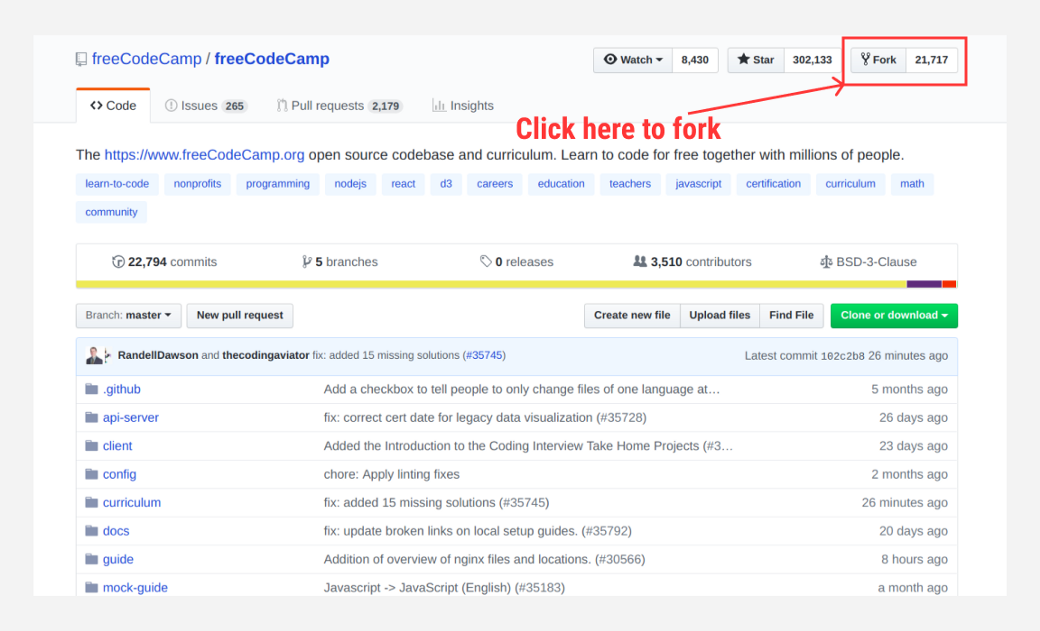
After using the fork button, you’d now have the repository on your GitHub account.
Step 2: Clone the project to your local machine
This is the simplest part of Git. Navigate to your forked repository (the repository is now one of your GitHub repositories). Follow steps 1 and 2 as shown in the image below to copy the clone address. This address should look like this: https:[github.com/suretrust.com/freeCodeCamp.git](http://github.com/suretrust.com/freeCodeCamp.git)
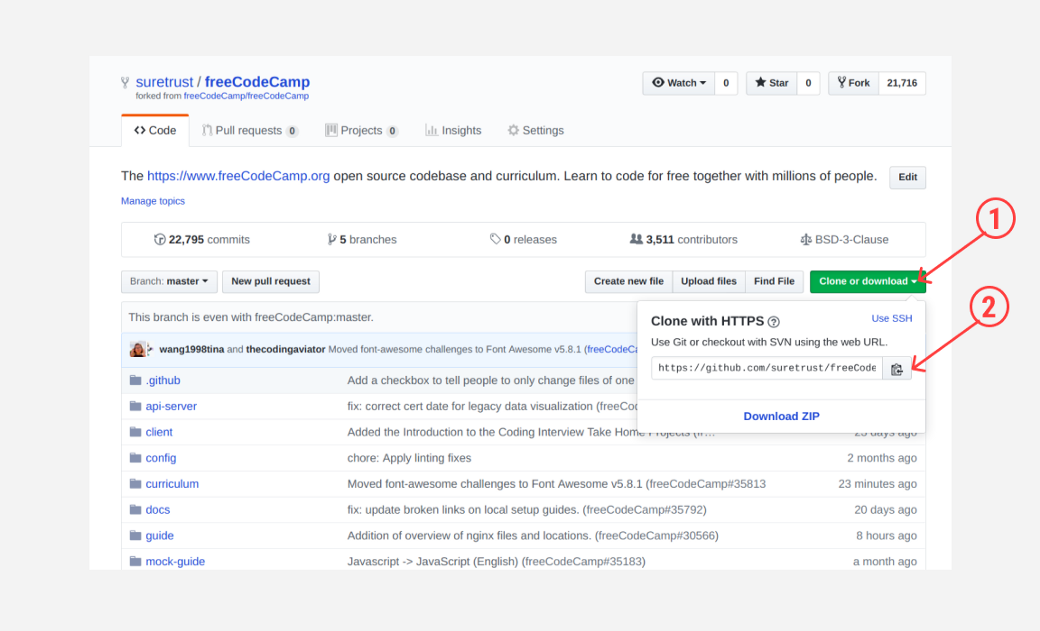
Then, clone the project by typing git clone <the copied address> into your command terminal as shown below:
git clone [https://github.com/suretrust/freeCodeCamp.git](https://github.com/suretrust/freeCodeCamp.git)
Step 3: Create upstream
The upstream is necessary to keep track of the difference between the forked repository that is on your Git account and the original repository. This is most useful if you want to contribute to a popular repository.
Some repositories merge pull requests hourly or less, so be safe and assume that the forked repository you have will be behind the original repository.
Note that the upstream is in the freeCodeCamp repository and not your forked repository. Follow steps 1 and 2 as shown below to copy the upstream address:
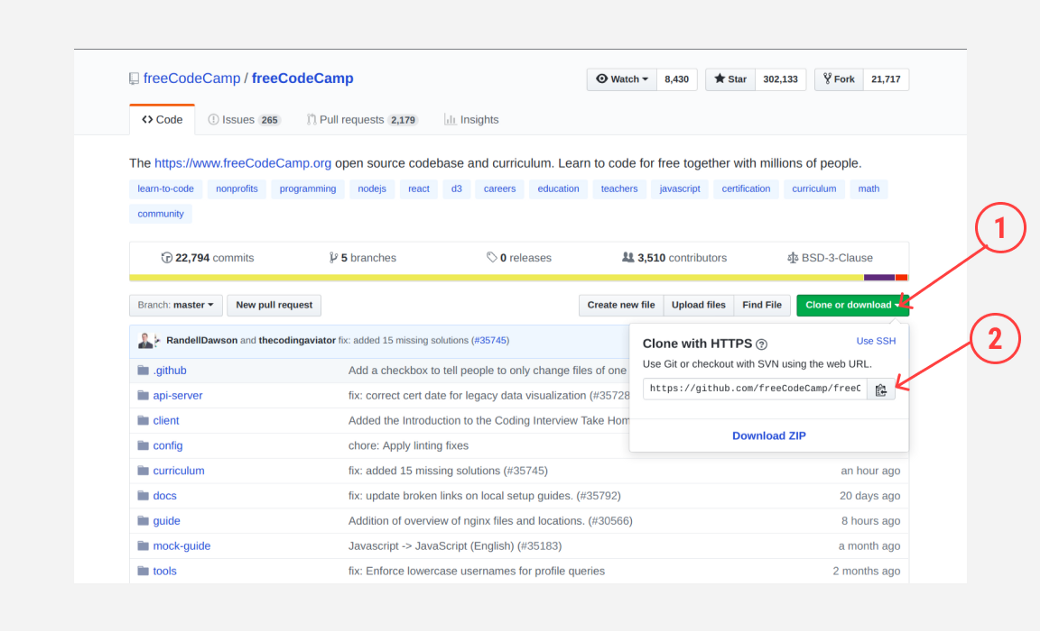
To create a link to the original repository, copy and paste the following command into your terminal:
git remote add upstream <upstream address>
You can use git pull upstream master to confirm if there has been any change at the moment (from when you forked the repository to now).
Step 4: Create the branch you want to work on
 _Photo by [Unsplash](Zach" title="undefined" rel="noopener noreferrer">https://unsplash.com/@_zachreiner_?utm\_source=ghost&utm\_medium=referral&utm\_campaign=api-credit">Zach Reiner / <a href="https://unsplash.com/?utm\_source=ghost&utm\_medium=referral&utm_campaign=api-credit)_
It is nice to create a new branch whenever you want to contribute. This illustrates that the branch is only for that contribution you are about to make. It could be as small as fixing a typo or as large as implementing a new feature. Either way, it’s good practice to create a branch.
Another important part of the branch creation is naming. It is pleasing to use a name that a stranger who knows nothing about the repository can easily understand. If you want to add a login feature, for example, you could create a branch called add-login-feature or login-feature.
To create a branch type the following command into your terminal:
git checkout -b <your branch name>
This command will create the branch and navigate into it. If your branch name is login-feature, then you can use the following command:
git checkout -b login-feature
Then add your contributions. After adding your contribution, move on to Step 5.
Step 5: Git add and commit your contributions
This is quite simple as well. Stage and commit your changes by typing the following into your terminal.
git add .
git commit -m 'Commit message'
Now, you have the changes staged and committed. What next?
Step 6: Pull from upstream to the branch
As I explained in step 4, this step is to merge any difference in the upstream into the branch so as to prevent conflicts.
git pull upstream <branch name>
This merges the upstream changes into your current branch.
Step 7: Push to the branch you’re working on
Now, you are almost there. Push your changes to the branch you are working on as shown below:
git push origin <branch-name>
Step 8: Open a pull request
This is the final step for any open source contribution, you are simply saying ‘I have made some changes, would you mind adding it to the project?’.
You open a pull request and if the repository owner or members like what they see, they’ll merge it. Otherwise, they could make changes then merge or request for changes.
To open a pull request, navigate to the forked repository as shown below. You’ll see your last push branch ‘login-feature’, then click on ‘compare and pull request’.
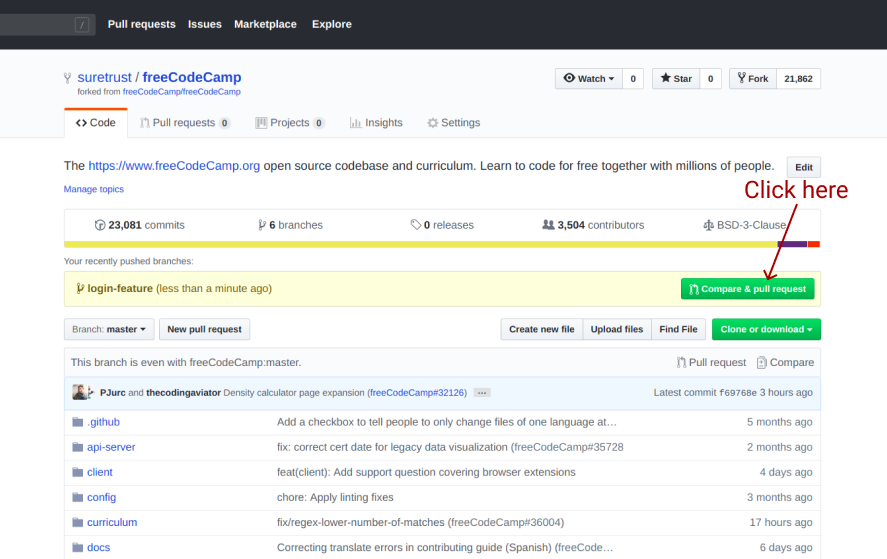
Explain clearly, the changes you made, then open a pull request as shown below:

And that’s it. :) You can now go ahead and contribute like a PRO!
Peace out and happy contributing!
Learn to code for free. freeCodeCamp's open source curriculum has helped more than 40,000 people get jobs as developers. Get started