Authentication and Authorization in Spring Boot 3.0 with Spring Security (original) (raw)
Last Updated : 4 May, 2026
Authentication and Authorization are the core pillars of security in Spring Boot 3.0 applications using Spring Security. They ensure that users are properly verified and granted access only to permitted resources, maintaining application integrity and data protection.
- Authentication validates user identity using credentials like username and password.
- Authorization determines access levels based on roles or permissions.
- Spring Security integrates these mechanisms seamlessly with Spring Boot for robust protection.
Authentication
Authentication is the process of verifying the identity of a user when they log in using credentials like username and password. In Spring Security, the provided credentials are validated against a configured data source.
- Verifies that the user is who they claim to be.
- Common methods include Username/Password, Token-based authentication, and OAuth2.
- After successful authentication, user details are stored in the SecurityContext for further authorization.
Authorization is the process of determining what actions or resources an authenticated user is allowed to access. In Spring Security, access is controlled based on roles or permissions assigned to the user.
- Determines user permissions after successful authentication.
- Based on roles (e.g., ROLE_ADMIN, ROLE_USER) or authorities.
- Can be configured at method-level (e.g., @PreAuthorize) or URL-level security.
Step-by-Step Implementation of Project
Follow the steps below to create and secure a Spring Boot application using Spring Security.
Step 1: Create a New Spring Boot Project
Go to Spring Initializr and create a new project with the following options:
- **Project: Maven
- **Language: Java
- **Packaging: Jar
- **Java: 17
**Dependency:
- Spring Web
- Spring Security XML `
4.0.0
<parent>
    <groupId>org.springframework.boot</groupId>
    <artifactId>spring-boot-starter-parent</artifactId>
    <version>3.0.6</version>
    <relativePath/> <!-- lookup parent from repository -->
</parent>

<groupId>com.example</groupId>
<artifactId>demo</artifactId>
<version>0.0.1-SNAPSHOT</version>
<name>demo</name>
<description>Demo project for Spring Boot</description>

<properties>
    <java.version>17</java.version>
</properties>

<dependencies>
    <!-- Spring Boot Starter Web -->
    <dependency>
        <groupId>org.springframework.boot</groupId>
        <artifactId>spring-boot-starter-web</artifactId>
    </dependency>

    <!-- Spring Boot Starter Security -->
    <dependency>
        <groupId>org.springframework.boot</groupId>
        <artifactId>spring-boot-starter-security</artifactId>
    </dependency>

    <!-- Spring Boot Starter Test -->
    <dependency>
        <groupId>org.springframework.boot</groupId>
        <artifactId>spring-boot-starter-test</artifactId>
        <scope>test</scope>
    </dependency>

    <!-- Spring Security Test for Testing Security Configurations -->
    <dependency>
        <groupId>org.springframework.security</groupId>
        <artifactId>spring-security-test</artifactId>
        <scope>test</scope>
    </dependency>
</dependencies>

<build>
    <plugins>
        <!-- Spring Boot Maven Plugin -->
        <plugin>
            <groupId>org.springframework.boot</groupId>
            <artifactId>spring-boot-maven-plugin</artifactId>
        </plugin>
    </plugins>
</build>
`
Step 2: Create the Controller
Create a REST controller to define public and secured endpoints using role-based access control.
Java `
@RestController @RequestMapping("/auth") public class UserController {
@GetMapping("/welcome") public String welcome()
{
    return "Welcome, this endpoint is not secure";
}

@GetMapping("/user/userProfile")
@PreAuthorize("hasRole('USER')")
public String userProfile()
{
    return "Welcome to User Profile";
}

@GetMapping("/admin/adminProfile")
@PreAuthorize("hasRole('ADMIN')")
public String adminProfile()
{
    return "Welcome to Admin Profile";
}
}
`
Step 3: Configure Security
Configure authentication, authorization, and user roles using Spring Security.
Java `
@Configuration @EnableMethodSecurity public class SecurityConfig {
@Bean public PasswordEncoder passwordEncoder()
{
    return new BCryptPasswordEncoder();
}

@Bean
public UserDetailsService
userDetailsService(PasswordEncoder encoder)
{

    UserDetails admin
        = User.withUsername("Amiya")
              .password(encoder.encode("123"))
              .roles("ADMIN", "USER")
              .build();

    UserDetails user
        = User.withUsername("Ejaz")
              .password(encoder.encode("123"))
              .roles("USER")
              .build();

    return new InMemoryUserDetailsManager(admin, user);
}

@Bean
public SecurityFilterChain
securityFilterChain(HttpSecurity http) throws Exception
{
    http.csrf(csrf -> csrf.disable())
        .authorizeHttpRequests(
            auth
            -> auth.requestMatchers("/auth/welcome")
                   .permitAll()
                   .requestMatchers("/auth/user/**")
                   .hasRole("USER")
                   .requestMatchers("/auth/admin/**")
                   .hasRole("ADMIN")
                   .anyRequest()
                   .authenticated())
        .formLogin(form
                   -> form.defaultSuccessUrl(
                       "/auth/welcome", true))
        .httpBasic();

    return http.build();
}
}
`
Step 4: Run and Test the Application
Run the application and test endpoints using browser or Postman.
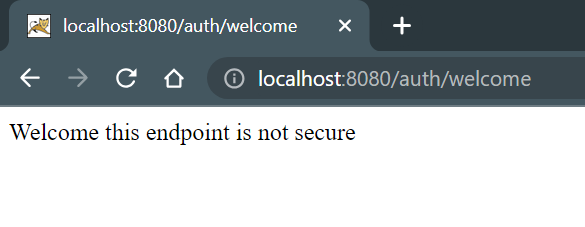
**Test 1: Public Endpoint
Open in browser and test following URL
You can access this endpoint without any authentication as it is not secured.
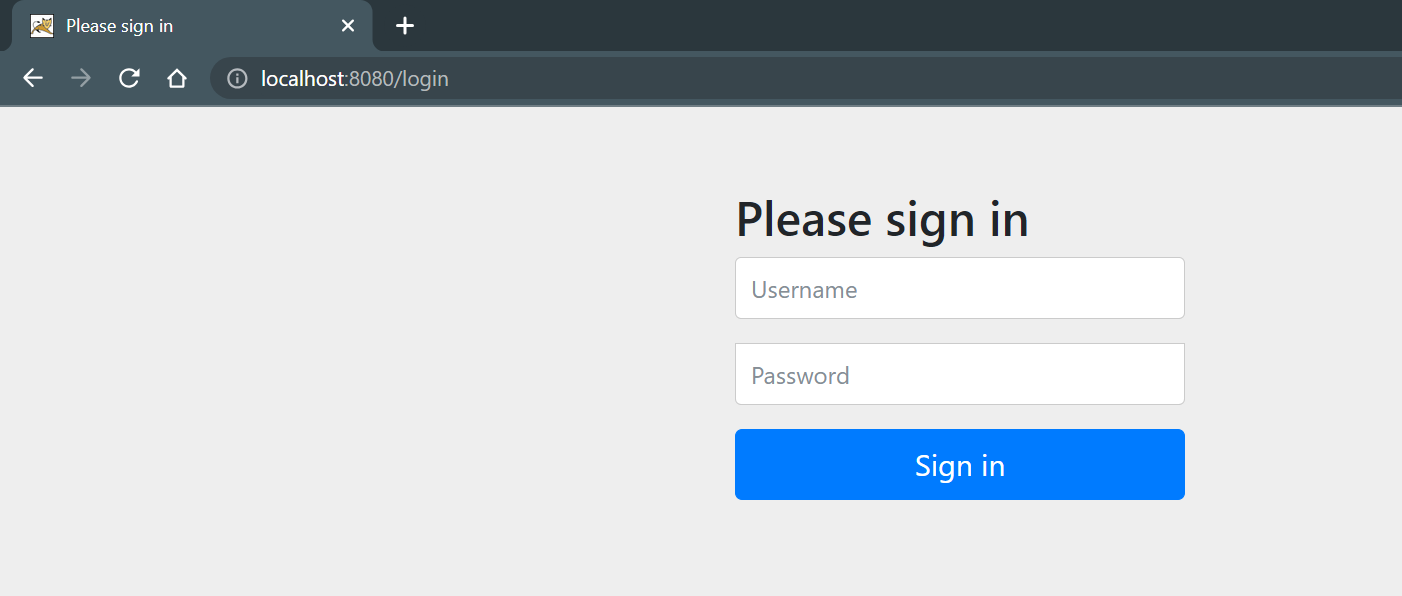
**Test 2: User Profile (Authentication Required)
Now, hit the following URL:
**If Not Logged In: You will be redirected to the below URL:
**Output:
After putting the correct Username and Password you can access your endpoint. Put this Username and Password
- **Username: Ejaz
- **Password: 123
And you will get the output screen like this,
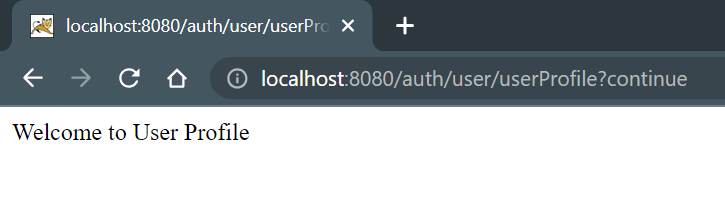
After logging in with the correct credentials, you will be able to access this endpoint if your role includes USER.