JPA Creating an Entity (original) (raw)
Last Updated : 9 Apr, 2026
JPA is defined as Java Persistence API (JPA) that can simplify the process of the persisting Java objects to the relational databases. Creating the entity in the JPA involves defining the java class that can represent the database table and it can be annotated with the JPA annotations to specify its mapping to the database schema.
- Entity class must be annotated with @Entity
- It should have a primary key (@Id)
- Each field maps to a column in the database
| Annotation | Uses |
|---|---|
| @Entity | Marks the class as a JPA entity (represents a database table) |
| @Table(name = "table_name") | Maps the entity to a specific table in the database |
| @Id | Defines the primary key of the entity |
| @GeneratedValue | Specifies how the primary key value is generated automatically |
| @Column(name = "column_name") | Maps a field to a specific column in the table |
| @Basic(fetch = FetchType.LAZY) | Defines the fetch strategy (lazy or eager loading) |
| @Transient | Excludes the field from being persisted in the database |
| @OneToOne | Defines a one-to-one relationship between entities |
| @OneToMany | Defines a one-to-many relationship |
| @ManyToOne | Defines a many-to-one relationship |
| @JoinColumn | Specifies the foreign key column in a relationship |
| @JoinTable | Defines a join table for many-to-many relationships |
Step by Step Process to Creating a JPA Entity
Follow the below steps to set up and configure a Hibernate application in IntelliJ IDEA, including project creation, dependency setup, configuration, and execution.
Step 1: Create new Project
Follow these steps to create a project in IntelliJ IDE. Enter project details:
1. Open IntelliJ IDEA
2. Click on New Project (or File -> New ->Project if already opened)
3. Select Maven from the left panel
4. Choose JDK (Java version) and click Next
5. Enter project details:
- **Group Id: com.example
- **Artifact Id: HibernateDemo
6. Click Finish
Step 2: Open project from project Directory
The project we have created visible with the provided name as- create-entity-demo and the Structure of project looks like:
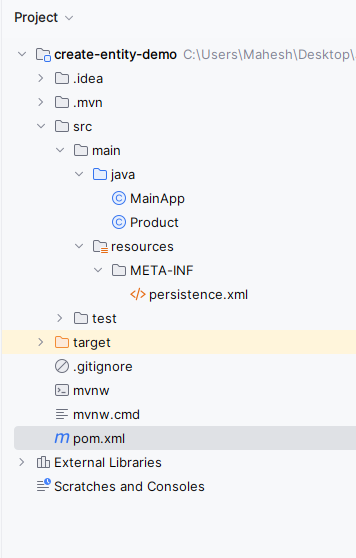
file structure
Step 3: Add Dependencies (pom.xml)
These dependencies enable Hibernate ORM and MySQL connectivity.
XML `
org.hibernate.orm hibernate-core 6.0.2.Final<dependency>
<groupId>com.mysql</groupId>
<artifactId>mysql-connector-j</artifactId>
<version>8.0.33</version>
</dependency>`
Step 4: Configure persistence.xml
This file configures database connection and JPA settings.
XML `
Product
</persistence-unit>`
Step 5: Create Entity Class (Product.java)
The Entity class maps Java object to a database table.
Java `
import jakarta.persistence.*;
@Entity @Table(name = "products") public class Product { @Id @GeneratedValue(strategy = GenerationType.IDENTITY) private Long id;
private String name;
private double price;

public Long getId() { return id; }

public void setId(Long id) { this.id = id; }

public String getName() { return name; }

public void setName(String name) { this.name = name; }

public double getPrice() { return price; }

public void setPrice(double price)
{
    this.price = price;
}
}
`
Step 6: Create Main Class
The main class performs database operations like insert and fetch.
Java `
import jakarta.persistence.EntityManager; import jakarta.persistence.EntityManagerFactory; import jakarta.persistence.Persistence; import java.util.List;
public class MainApp { public static void main(String[] args) { // Initialize EntityManagerFactory EntityManagerFactory entityManagerFactory = Persistence.createEntityManagerFactory( "example-unit");
    // Create EntityManager
    EntityManager entityManager
        = entityManagerFactory.createEntityManager();

    // Persist sample data
    persistSampleData(entityManager);

    // Display sample data
    displaySampleData(entityManager);

    // Close EntityManager
    entityManager.close();

    // Close EntityManagerFactory
    entityManagerFactory.close();
}

private static void
persistSampleData(EntityManager entityManager)
{
    // Begin transaction
    entityManager.getTransaction().begin();

    // Create sample products
    Product product1 = new Product();
    product1.setName("Product 1");
    product1.setPrice(10.99);

    Product product2 = new Product();
    product2.setName("Product 2");
    product2.setPrice(20.99);

    // Persist products
    entityManager.persist(product1);
    entityManager.persist(product2);

    // Commit transaction
    entityManager.getTransaction().commit();
}

private static void
displaySampleData(EntityManager entityManager)
{
    // Query all products
    List<Product> products
        = entityManager
              .createQuery("SELECT p FROM Product p",
                           Product.class)
              .getResultList();

    // Print product details
    System.out.println("Products:");
    for (Product product : products) {
        System.out.println(
            "ID: " + product.getId()
            + ", Name: " + product.getName()
            + ", Price: " + product.getPrice());
    }
}
}
`
Step 7: Run Your Application
Now we can run the application and show the ID, name, product and prices of the products as output.
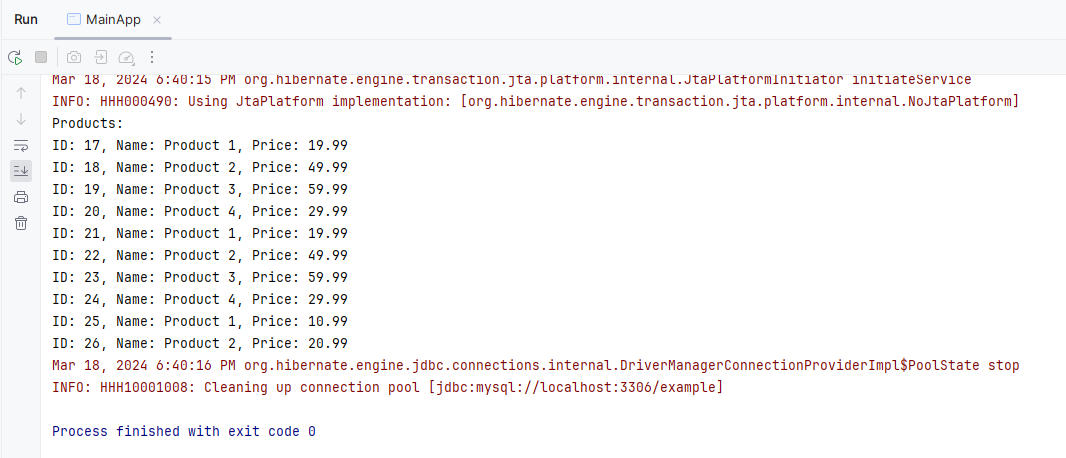
output