What is Spring Data REST? (original) (raw)
Last Updated : 23 Apr, 2026
Spring Data REST automatically exposes Spring Data repositories as REST APIs, eliminating the need for controller code. By defining repositories (like CrudRepository), endpoints are generated automatically, with options for customization using annotations and configuration.
- Supports pagination, sorting, and filtering for efficient data access
- Provides flexible customization using annotations and configuration
**Real-world example: In an e-commerce application, product and customer repositories can be directly exposed as REST APIs using Spring Data REST, allowing frontend applications to perform operations like viewing products, adding items, or updating customer details without needing custom controller logic.
Architecture of Spring Data REST
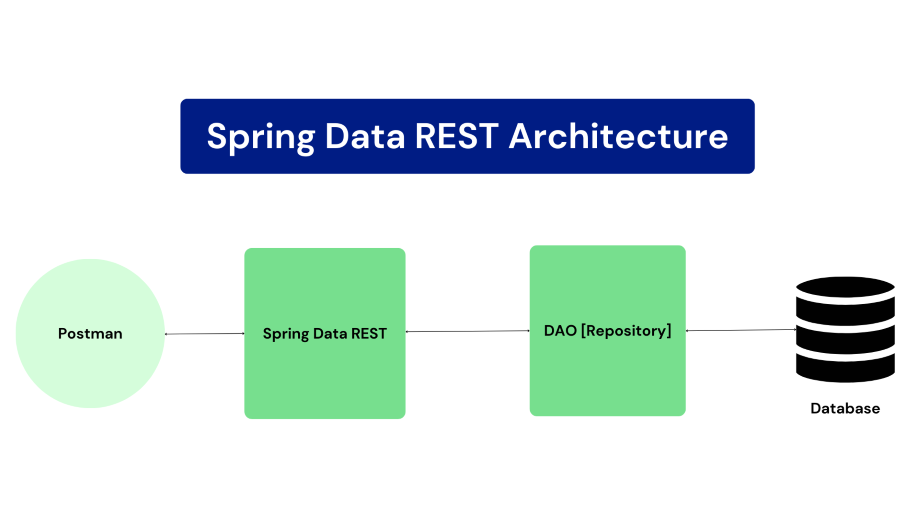
Spring Data REST follows a layered architecture where repositories act as the data access layer, and it automatically exposes them as RESTful endpoints using Spring MVC.
Architecture of Spring Data REST
The Spring Data REST architecture diagram you sent shows the following components:
- **Spring Data REST: Spring Data REST is a framework that makes it easy to build hypermedia-driven REST web services on top of Spring Data repositories.
- **DAO [Repository]: The DAO layer is responsible for interacting with the underlying data store. It is implemented using Spring Data repositories.
- **Database: The database is the underlying data store that Spring Data REST uses to store and retrieve data.
- **Postman: Postman is a tool that can be used to send and receive HTTP requests. It is used in the diagram to show how to interact with the Spring Data REST API.
Spring Data REST architecture works as follows:
- A client sends an HTTP request to the Spring Data REST server.
- The Spring Data REST server receives the HTTP request and routes it to the appropriate repository.
- The repository interacts with the underlying data store to perform the requested operation.
- The repository returns the results of the operation to the Spring Data REST server.
- The Spring Data REST server returns the results of the operation to the client.
- **HATEOAS (Hypermedia as the Engine of Application State) is a fundamental aspect of RESTful web services. It describes how relationships and links to related resources are represented in REST APIs.
- Spring HATEOAS library is used under the hood to generate links. Resources implement the Resource interface.
- HATEOAS support makes the APIs intuitive to use and enables building discoverable, stateless clients.
How Spring Data REST follows HATEOAS
- **Automatic resource exposure: Spring Data REST automatically exposes your domain model entities as REST resources and includes hypermedia links in the resource representations.
- **Flexible configuration: Spring Data REST allows you to customize the hypermedia links that are included in the resource representations.
- **Support for hypermedia formats: Spring Data REST supports HAL, a popular hypermedia format.
- The **_links object in the response contains the hypermedia links. The self link points to the resource itself, the profile link points to the user's profile, and the orders link points to the user's orders.
{
"_links": {
"self": { "href": "https://api.example.com/users/1" },
"profile": { "href": "https://api.example.com/users/1/profile" },
"orders": { "href": "https://api.example.com/users/1/orders" }
}
}
Getting Started with Spring Data REST
Follow these steps to set up and start using Spring Data REST to expose repositories as RESTful APIs with minimal configuration.
Step 1: Setting up a Spring Boot project
Create a Spring Boot project and add typical Spring Boot dependencies like Spring Web, Spring Data JPA etc.
Step 2: Adding dependencies
Add the spring-boot-starter-data-rest dependency and other required dependencies.
Step 3: Creating data models (JPA entities)
- Define your domain model model model classes annotated with @Entity
- Add fields, getters/setters, IDs etc.
Step 4: Creating JPA repositories
- Create interfaces extending JpaRepository or PagingAndSortingRepository.
- These will manage CRUD for your entities
Step 5: Running the Spring Boot application
- Add @SpringBootApplication to your app class
- Run the main method as a Spring Boot app
Step 6: Accessing the generated API endpoints
- API will be exposed at /entityname by default.
- Send GET, POST, PUT, and DELETE requests to endpoints.
- Entities returned will contain HATEOAS links.
Example Project of Student Management System
Step 1: Create Spring Boot Project
- Go to Spring Initializr and generate a project.
- Project: Maven
- Language: Java
- Spring Boot Version: 3.x
- Add basic project details (Group, Artifact, Name).
Step 2: Add required dependencies
- Spring Web
- Spring Data JPA
- Spring Data REST
- Mysql Database (or any other database of your choice)
Below is the code for pom.xml file
XML `
4.0.0 org.springframework.boot spring-boot-starter-parent 3.1.4 com.spring Spring_Data_Rest 0.0.1-SNAPSHOT Spring_Data_Rest Demo project for Spring_Data_Rest <java.version>17</java.version> org.springframework.boot spring-boot-starter-data-jpa org.springframework.boot spring-boot-starter-data-rest org.springframework.boot spring-boot-starter-web
    <dependency>
        <groupId>com.mysql</groupId>
        <artifactId>mysql-connector-j</artifactId>
        <scope>runtime</scope>
    </dependency>
    <dependency>
        <groupId>org.springframework.boot</groupId>
        <artifactId>spring-boot-starter-test</artifactId>
        <scope>test</scope>
    </dependency>
</dependencies>

<build>
    <plugins>
        <plugin>
            <groupId>org.springframework.boot</groupId>
            <artifactId>spring-boot-maven-plugin</artifactId>
        </plugin>
    </plugins>
</build>
`
Step 3: Create JPA Entity
Create a package entities and define Student class. Use JPA annotations:
- @Entity ->marks class as database entity
- @Table -> defines table name
- @Id ->primary key
- @GeneratedValue -> auto ID generation Java `
package com.spring.entities;
import jakarta.persistence.Entity; import jakarta.persistence.GeneratedValue; import jakarta.persistence.GenerationType; import jakarta.persistence.Id; import jakarta.persistence.Table;
@Entity @Table(name = "students") public class Student { @Id @GeneratedValue(strategy = GenerationType.AUTO) private int id;
private String first_name;
private String last_name;
private String marks;

public Student()
{
    super();
    // TODO Auto-generated constructor stub
}

public Student(int id, String first_name,
               String last_name, String marks)
{
    super();
    this.id = id;
    this.first_name = first_name;
    this.last_name = last_name;
    this.marks = marks;
}

public int getId() { return id; }

public void setId(int id) { this.id = id; }

public String getFirst_name() { return first_name; }

public void setFirst_name(String first_name)
{
    this.first_name = first_name;
}

public String getLast_name() { return last_name; }

public void setLast_name(String last_name)
{
    this.last_name = last_name;
}

public String getMarks() { return marks; }

public void setMarks(String marks)
{
    this.marks = marks;
}
}
Java
package com.spring;
import com.spring.entities.Student; import com.spring.repositories.StudentRepository; import org.springframework.beans.factory.annotation.Autowired; import org.springframework.boot.CommandLineRunner; import org.springframework.boot.SpringApplication; import org.springframework.boot.autoconfigure.SpringBootApplication;
@SpringBootApplication public class SpringDataRestApplication implements CommandLineRunner { @Autowired private StudentRepository studentRepository;
public static void main(String[] args)
{
    SpringApplication.run(
        SpringDataRestApplication.class, args);
}

@Override
public void run(String... args) throws Exception
{
    // TODO Auto-generated method stub

    Student student = new Student();
    student.setFirst_name("John");
    student.setLast_name("Mark");
    student.setMarks("89");
    this.studentRepository.save(student);

    Student student1 = new Student();
    student1.setFirst_name("SPR");
    student1.setLast_name("XYZ");
    student1.setMarks("88");
    this.studentRepository.save(student1);
}
}
`
Step 4: Create Spring Data JPA Repository
- Create package repositories.
- Define interface extending JpaRepository. Java `
package com.spring.repositories;
import com.spring.entities.Student; import org.springframework.data.jpa.repository.JpaRepository; import org.springframework.data.rest.core.annotation.RepositoryRestResource;
@RepositoryRestResource(path = "students", collectionResourceRel = "stu") public interface StudentRepository extends JpaRepository<Student, Integer> { }
`
Step 5: Configure Database Connection
In your application.properties or application.yml file, configure the database connection details.
spring.jpa.hibernate.ddl-auto=update
spring.datasource.url=jdbc:mysql://localhost:3306/student_management
spring.datasource.username=root
spring.datasource.password=admin
spring.datasource.dbcp2.driver-class-name=com.mysql.cj.jdbc.Driver
spring.data.rest.base-path=api/
Step 6: Run Your Application
We can run your Spring Boot application from your IDE or by using the command-line tool provided by Spring Boot.
mvn spring-boot:run
Step 7: Access Your RESTful Endpoints
Your Spring Data REST API is now available. You can access it via HTTP, using tools like cURL, Postman, or your web browser.
To a Post specific student, you can use: http://localhost:8080/api/students
**To get all students, you can use: http://localhost:8080/api/students