RecyclerView in Android with Example (original) (raw)
Last Updated : 29 Jan, 2025
RecyclerView is a ViewGroup added to the android studio as a successor of the GridView and ListView. It is an improvement on both of them and can be found in the latest v-7 support packages. It has been created to make possible construction of any lists with **XML layouts as an item which can be customized vastly while _improving on the efficiency of ListViews and GridViews. This improvement is achieved by recycling the views which are out of the visibility of the user.
**For example, if a user scrolled down to a position where items 4 and 5 are visible; items 1, 2, and 3 would be cleared from the memory to reduce memory consumption.
Let us check, Android RecyclerView with a simple example.
**Example: An Android Application showing the Exam Schedule

To implement a basic RecyclerView three sub-parts are needed to be constructed which offer the users the degree of control they require in making varying designs of their choice.
- **The Card Layout: The card layout is an XML layout which will be treated as an item for the list created by the RecyclerView.
- **The ViewHolder: The ViewHolder is a java class that stores the reference to the card layout views that have to be dynamically modified during the execution of the program by a list of data obtained either by online databases or added in some other way.
- **The Data Class: The Data class is a custom java class that acts as a structure for holding the information for every item of the RecyclerView.
Step by Step to Create RecyclerView
**Step 1: Create new project
- Click on File, then New => New Project.
- Choose “Empty Activity” for the project template.
- Select language as Kotlin.
- Select the minimum SDK(According to the application needs).
Step 2: Creating Layout for the Application
Layouts are important part of the Android Applications. This Application will need two main layouts as mentioned below:
- activity_main.xml
- exam_card.xml
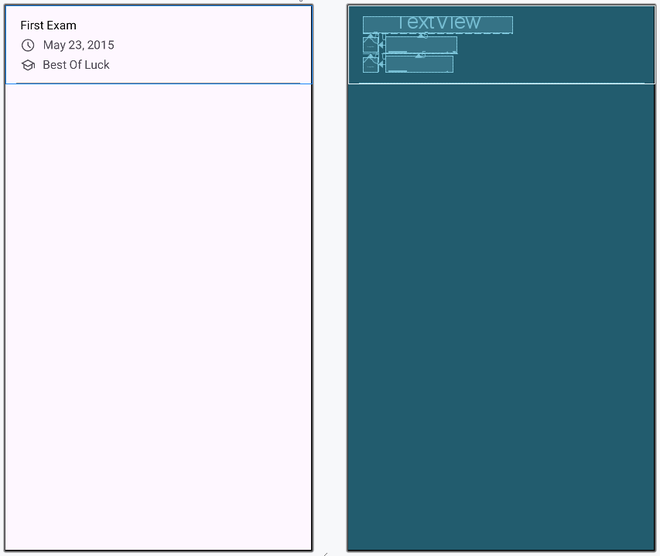
exam_card.xml: (This is the Layout of the element to be inserted in RecyclerView)
XML `
<TextView
    android:layout_width="200dp"
    android:id="@+id/examName"
    android:textSize="16sp"
    android:layout_marginStart="20dp"
    android:text="First Exam"
    android:textColor="@color/black"
    android:layout_marginEnd="20dp"
    android:maxLines="1"
    android:layout_marginTop="15dp"
    android:layout_height="wrap_content"/>

<ImageView
    android:id="@+id/examPic"
    android:layout_width="20dp"
    android:layout_height="20dp"
    android:layout_below="@+id/examName"
    android:layout_marginStart="20dp"
    android:layout_marginTop="7dp"
    app:srcCompat="@drawable/schedule"/>

<TextView
    android:id="@+id/examDate"
    android:layout_toEndOf="@+id/examPic"
    android:layout_width="wrap_content"
    android:layout_height="wrap_content"
    android:layout_below="@+id/examName"
    android:layout_marginTop="5dp"
    android:layout_marginEnd="20dp"
    android:layout_marginStart="10dp"
    android:gravity="center"
    android:text="May 23, 2015"
    android:textSize="16sp"/>

<ImageView
    android:id="@+id/examPic2"
    android:layout_width="20dp"
    android:layout_height="20dp"
    android:layout_below="@+id/examDate"
    android:layout_marginStart="20dp"
    android:layout_marginTop="7dp"
    app:srcCompat="@drawable/school"/>

<TextView
    android:id="@+id/examMessage"
    android:layout_toEndOf="@+id/examPic2"
    android:layout_width="wrap_content"
    android:layout_height="wrap_content"
    android:layout_below="@+id/examDate"
    android:layout_marginEnd="20dp"
    android:layout_marginTop="5dp"
    android:layout_marginStart="10dp"
    android:gravity="center"
    android:text="Best Of Luck"
    android:textSize="16sp"/>

<TextView
    android:id="@+id/border2"
    android:layout_width="match_parent"
    android:layout_height="1dp"
    android:layout_marginStart="15dp"
    android:layout_marginEnd="15dp"
    android:layout_alignParentBottom="true"
    android:background="#808080"/>
`
Layout:
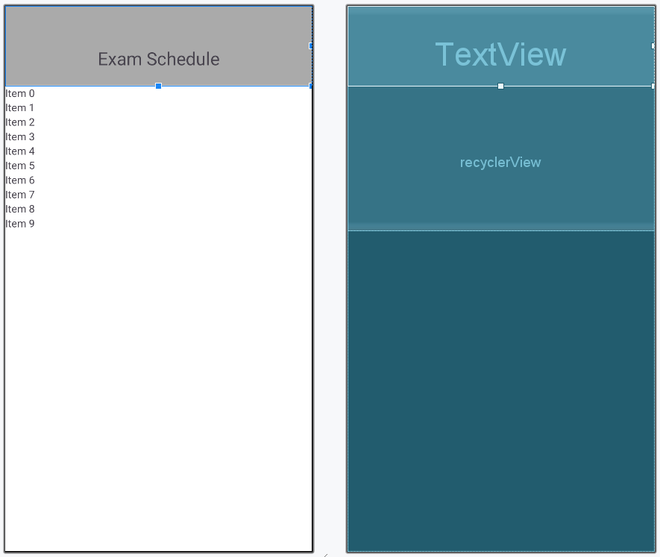
activity_main.xml:
XML `
<LinearLayout
    android:layout_width="match_parent"
    android:layout_height="wrap_content"
    android:orientation="vertical" >

    <TextView
        android:layout_width="match_parent"
        android:layout_height="wrap_content"
        android:text="Exam Schedule"
        android:textAlignment="center"
        android:background="@android:color/darker_gray"
        android:paddingTop="54sp"
        android:paddingBottom="20sp"
        android:textSize="24sp"/>

    <androidx.recyclerview.widget.RecyclerView
        android:nestedScrollingEnabled="false"
        android:id="@+id/recyclerView"
        android:layout_width="match_parent"
        android:overScrollMode="never"
        android:layout_height="wrap_content"/>

</LinearLayout>
`
Layout:
Step 2: Defining the Elements to be Inserted in Card
We have two layouts now, but the elements to be placed in the **exam_card.xml needs to be defined. So, create a new file named **ExamItem file. Properties like name, date, message, image1 and image2.
ExamItem File:
Java `
package com.gfg.example_recyclerview;
public class ExamItem { private String name; private String date; private String message; private int image1; private int image2;
public ExamItem(String name, String date, String message, int image1, int image2) {
    this.name = name;
    this.date = date;
    this.message = message;
    this.image1 = image1;
    this.image2 = image2;
}

public String getName() {
    return name;
}

public String getDate() {
    return date;
}

public String getMessage() {
    return message;
}

public int getImage1() {
    return image1;
}

public int getImage2() {
    return image2;
}
}
Kotlin
package com.gfg.recyclerview_kotlin
class ExamItem { var examName: String? = null var examDate: String? = null var examMessage: String? = null var examPic: Int? = null var examPic2: Int? = null
constructor(examName:String, examDate:String, examMessage:String, examPic:Int, examPic2:Int){
    this.examName = examName
    this.examDate = examDate
    this.examMessage = examMessage
    this.examPic = examPic
    this.examPic2 = examPic2
}
}
`
Step 3: Define a Adapter File
**The Adapter: The adapter is the main code responsible for RecyclerView. It holds all the important methods dealing with the implementation of RecylcerView. The basic methods for a successful implementation are:
- **onCreateViewHolder****:** which deals with the inflation of the card layout as an item for the RecyclerView.
- **onBindViewHolder****:** which deals with the setting of different data and methods related to clicks on particular items of the RecyclerView.
- **getItemCount****:** which Returns the length of the RecyclerView.
- **onAttachedToRecyclerView****:** which attaches the adapter to the RecyclerView.
MyAdapter File:
Java `
package com.gfg.example_recyclerview;
import android.view.LayoutInflater; import android.view.View; import android.view.ViewGroup; import android.widget.ImageView; import android.widget.TextView; import androidx.annotation.NonNull; import androidx.recyclerview.widget.RecyclerView; import java.util.List;
public class MyAdapter extends RecyclerView.Adapter<MyAdapter.MyViewHolder> {
private List<ExamItem> examList;

// Constructor
public MyAdapter(List<ExamItem> examList) {
    this.examList = examList;
}

@NonNull
@Override
public MyViewHolder onCreateViewHolder(@NonNull ViewGroup parent, int viewType) {
    View view = LayoutInflater.from(parent.getContext())
            .inflate(R.layout.exam_card, parent, false);
    return new MyViewHolder(view);
}

@Override
public void onBindViewHolder(@NonNull MyViewHolder holder, int position) {
    ExamItem examItem = examList.get(position);

    holder.examName.setText(examItem.getName());
    holder.examDate.setText(examItem.getDate());
    holder.examMessage.setText(examItem.getMessage());
    holder.examPic.setImageResource(examItem.getImage1());
    holder.examPic2.setImageResource(examItem.getImage2());
}

@Override
public int getItemCount() {
    return examList.size();
}

// ViewHolder class
static class MyViewHolder extends RecyclerView.ViewHolder {
    TextView examName, examDate, examMessage;
    ImageView examPic, examPic2;

    public MyViewHolder(@NonNull View itemView) {

          super(itemView);

        examName = itemView.findViewById(R.id.examName);
        examDate = itemView.findViewById(R.id.examDate);
        examMessage = itemView.findViewById(R.id.examMessage);
        examPic = itemView.findViewById(R.id.examPic);
        examPic2 = itemView.findViewById(R.id.examPic2);
    }
}
}
Kotlin
package com.gfg.example_recyclerview
import android.view.LayoutInflater import android.view.View import android.view.ViewGroup import android.widget.ImageView import android.widget.TextView import androidx.recyclerview.widget.RecyclerView import com.gfg.recyclerview_kotlin.ExamItem import com.gfg.recyclerview_kotlin.R
class MyAdapter(private val examList: List) : RecyclerView.Adapter<MyAdapter.MyViewHolder>() {
override fun onCreateViewHolder(parent: ViewGroup, viewType: Int): MyViewHolder {
    val view = LayoutInflater.from(parent.context).inflate(R.layout.exam_card, parent, false)
    return MyViewHolder(view)
}

override fun onBindViewHolder(holder: MyViewHolder, position: Int) {
    val examItem = examList[position]

    holder.examName.text = examItem.examName
    holder.examDate.text = examItem.examDate
    holder.examMessage.text = examItem.examMessage

    if(examItem.examPic != null)
        holder.examPic.setImageResource(examItem.examPic!!)

    if(examItem.examPic2 != null)
        holder.examPic2.setImageResource(examItem.examPic2!!)
}

override fun getItemCount(): Int {
    return examList.size
}

// ViewHolder class
class MyViewHolder(itemView: View) : RecyclerView.ViewHolder(itemView) {
    val examName: TextView = itemView.findViewById(R.id.examName)
    val examDate: TextView = itemView.findViewById(R.id.examDate)
    val examMessage: TextView = itemView.findViewById(R.id.examMessage)
    val examPic: ImageView = itemView.findViewById(R.id.examPic)
    val examPic2: ImageView = itemView.findViewById(R.id.examPic2)
}
}
`
Step 4: **Working with the **MainActivity.java file
After, defining the whole application properties and providing the functionality to the layouts, we will wrap all of them into **MainActivity file. OnCreate Method is defined in this file.
MyActivity File:
Java `
package com.gfg.example_recyclerview;
import com.gfg.example_recyclerview.Adapter.MyAdapter; import android.os.Bundle; import androidx.appcompat.app.AppCompatActivity; import androidx.recyclerview.widget.LinearLayoutManager; import androidx.recyclerview.widget.RecyclerView; import java.util.ArrayList; import java.util.List;
public class MainActivity extends AppCompatActivity {
@Override
protected void onCreate(Bundle savedInstanceState) {
    super.onCreate(savedInstanceState);
    setContentView(R.layout.activity_main);

    RecyclerView recyclerView = findViewById(R.id.recyclerView);

    // Sample data
    List<ExamItem> examList = new ArrayList<>();

    examList.add(new ExamItem("Math Exam", "May 23, 2015",
                              "Best of Luck", R.drawable.schedule,
                              R.drawable.school));

    examList.add(new ExamItem("Science Exam", "June 10, 2015",
                              "Do Well", R.drawable.schedule,
                              R.drawable.school));

     examList.add(new ExamItem("History Exam", "July 15, 2015",
                              "All the Best", R.drawable.schedule,
                              R.drawable.school));

      examList.add(new ExamItem("English Exam", "August 1, 2015",
                              "Stay Confident", R.drawable.schedule,
                              R.drawable.school));

    // Set LayoutManager
    recyclerView.setLayoutManager(new LinearLayoutManager(this));

    // Set Adapter
    MyAdapter adapter = new MyAdapter(examList);
    recyclerView.setAdapter(adapter);
}
}
Kotlin
package com.gfg.recyclerview_kotlin
import android.os.Bundle import androidx.appcompat.app.AppCompatActivity import androidx.recyclerview.widget.LinearLayoutManager import androidx.recyclerview.widget.RecyclerView import com.gfg.example_recyclerview.MyAdapter
class MainActivity : AppCompatActivity() { override fun onCreate(savedInstanceState: Bundle?) { super.onCreate(savedInstanceState) setContentView(R.layout.activity_main)
    val recyclerView = findViewById<RecyclerView>(R.id.recyclerView)

    // Sample data
    val examList: MutableList<ExamItem> = ArrayList()
    examList.add(
        ExamItem(
            "Math Exam",
            "May 23, 2015",
            "Best of Luck",
            R.drawable.schedule,
            R.drawable.school
        )
    )
    examList.add(
        ExamItem(
            "Science Exam",
            "June 10, 2015",
            "Do Well",
            R.drawable.schedule,
            R.drawable.school
        )
    )
    examList.add(
        ExamItem(
            "History Exam",
            "July 15, 2015",
            "All the Best",
            R.drawable.schedule,
            R.drawable.school
        )
    )
    examList.add(
        ExamItem(
            "English Exam",
            "August 1, 2015",
            "Stay Confident",
            R.drawable.schedule,
            R.drawable.school
        )
    )

    // Set LayoutManager
    recyclerView.layoutManager = LinearLayoutManager(this)

    // Set Adapter
    val adapter = MyAdapter(examList)
    recyclerView.adapter = adapter
}
}
`
Output:
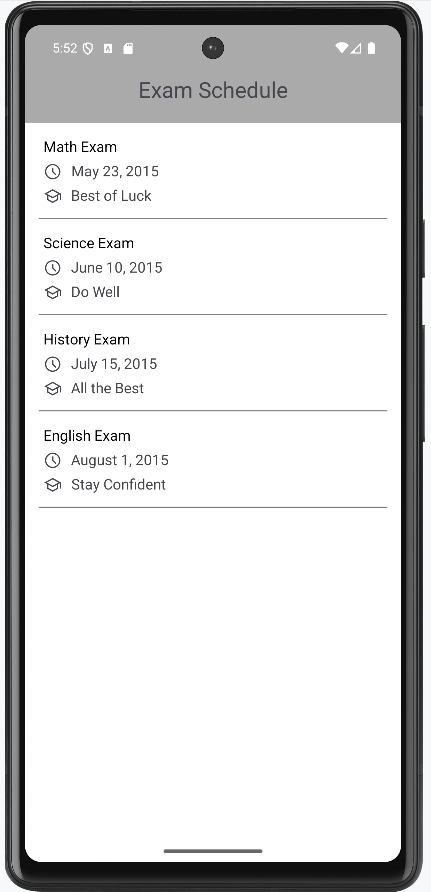
Keep in mind, that the drawable mentioned in the XML layouts have to be added to the drawable folder under res of the Android Studio Project and support package v7 should be added as an implementation in the Gradle file of the project for the code to run. The above code uses ScrollView as a parent to RecyclerView and disables the scrolling of the RecyclerView hence making the whole page scroll instead of just the RecyclerView contents.