How to Create a Dynamic Widget of an Android App? (original) (raw)
Last Updated : 15 Jul, 2025
Widgets are the UI elements provided by an application for accessing some of its features remotely either from Home Screens or Lock Screens. Widgets can be **Static or **Dynamic meaning that the display elements don't change (Static) or change (Dynamic) with time. Through this article, let's demonstrate the implementation of a **Dynamic widget. In our case, we shall change the display with respect to time using a **Thread.
Step 1: Create a New Project
To create a new project in Android Studio please refer to **How to Create/Start a New Project in Android Studio.
**Note: that Select Kotlin as the Programming Language.
**Step 2: Add the App Widget to the Project
- Right-Click on the **app, move the cursor to **new, find the "**Widget" option at the end, select it.
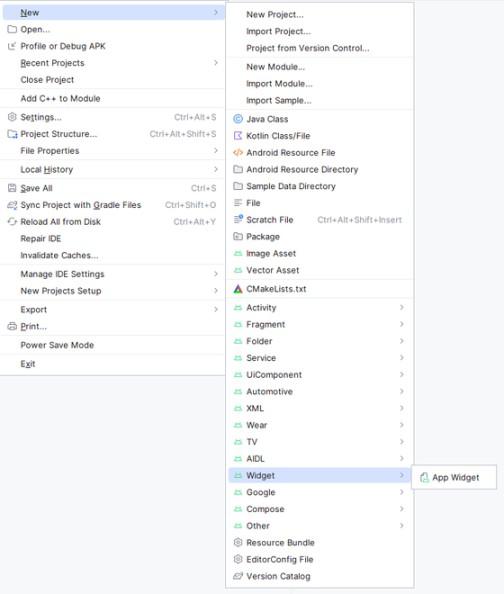
Creating Widget
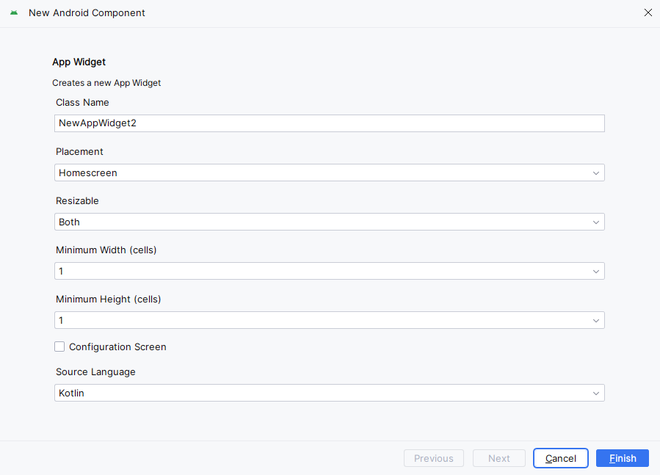
- Specify the required properties for the widget such as min.width and **height, config file and preferred language, etc, and proceed. Files are automatically generated.
Step 3: What to program? Where to program?
In our application, since we wish to display two messages "**Just do it" & "**You are awesome" (the users may choose their own messages) one after the other simultaneously, we would be implementing a thread for generating a pause (of 1 second) in between.
The entire programming (back-end) is done in the newly created **NewAppWidget.kt, Kotlin Class File in the Main Source Folder.
**NewAppWidget.kt:
NewAppWidget.kt `
package org.geeksforgeeks.demo
import android.appwidget.AppWidgetManager import android.appwidget.AppWidgetProvider import android.content.Context import android.widget.RemoteViews
class NewAppWidget : AppWidgetProvider() { override fun onUpdate( context: Context, appWidgetManager: AppWidgetManager, appWidgetIds: IntArray ) {
    // There may be multiple widgets active, so update all of them
    for (appWidgetId in appWidgetIds) {
        updateAppWidget(context, appWidgetManager, appWidgetId)
    }
}

override fun onEnabled(context: Context) {
    // functionality for when the first widget is created
}

override fun onDisabled(context: Context) {
    // functionality for when the last widget is disabled
}
}
internal fun updateAppWidget( context: Context, appWidgetManager: AppWidgetManager, appWidgetId: Int ) { Thread { while (true) {
        // Construct the RemoteViews object
        val views = RemoteViews(context.packageName, R.layout.new_app_widget)
        views.setTextViewText(R.id.appwidget_text, "Just do it")

        // Instruct the widget manager to update the widget
        appWidgetManager.updateAppWidget(appWidgetId, views)
        Thread.sleep(1000)

        // Construct the RemoteViews object
        views.setTextViewText(R.id.appwidget_text, "You are awesome")

        // Instruct the widget manager to update the widget
        appWidgetManager.updateAppWidget(appWidgetId, views)
        Thread.sleep(1000)
    }
}.start()
}
`
Step 4: Design the Widget
Navigate to **app > res > layout > new_app_widget.xml and customise the widget as below
**new_app_widget.xml:
XML `
<TextView
    android:id="@+id/appwidget_text"
    style="@style/Widget.Demo.AppWidget.InnerView"
    android:layout_width="wrap_content"
    android:layout_height="wrap_content"
    android:layout_centerHorizontal="true"
    android:layout_centerVertical="true"
    android:backgroundTint="@android:color/transparent"
    android:layout_margin="8dp"
    android:contentDescription="@string/appwidget_text"
    android:text="@string/appwidget_text"
    android:textSize="24sp"
    android:textStyle="bold|italic" />
`
Output: